Board & Batten Accent Wall

For $40 in material, you can update any room with a simple accent wall.

The motivation behind our master bedroom refresh was my vision to lighten up the space completely. Some of my favorite rooms have been spaces we stayed at on vacations. The retreat-like ambiance always relaxes us the most so having that in our room where we sleep every night & wake up every morning became my goal.

First, I started by refinishing our dark, black furniture with this chalk paint recipe and by updating the black leather headboard insert with a beautiful gray twill fabric.

You can watch my step by step for recovering the headboard insert in highlights here.

Refinishing the furniture alone was a major update to the room. We’ve never been a big fan of the tan walls, partly because our first home had so much of that color before we made the change over to agreeable gray.

The accent wall was going to be behind our bed, on the main wall. This wall also happens to be the only one in the room with windows. A couple of years ago, we updated the windows with plantation shutters which we absolutely LOVE but something about them looked unfinished on that wall. I wanted the shutters and new accent wall to blend and look like one big statement.

Adding floor to ceiling board & batten and painting it the same color as the shutters and trim became the vision for the space.

We agreed on using 1×2 primed MDF.

The first thing I had to do was add trim to the crown and baseboard on this wall that allowed for the MDF to bump up flush to the edge.

I used this product, cove moulding, from Home Depot.

Once it was painted to match the existing trim, it made the crown and baseboard look like a chunkier piece of trim.

See the before and after:

Notice how the after picture shows the MDF boards are flush to the added cove moulding?

After measuring the length of the wall, we determined an approximate number of 1×2 boards needed, 10 (4 of which were not full length due to the two windows) and approximately 15.5-16 inches apart.

The spacing had to be adjusted slightly because the wall length wasn’t 100% exact on either side of the windows. Thankfully, my mom was at the house when I was struggling to make these adjustments. Simple math sounded like the logical solution but then the boards weren’t centered evenly over the windows. Long story short, we finally worked out the spacing solution, adjusted when needed and overall, you don’t notice there are any differences in spacing between any of the MDF strips.

The BEST part about this project was getting to use my father-in-laws nail gun.

It’s not just any nail gun. It’s cordless, doesn’t require an air compressor and uses CO2 cartridges. (I’m going to need one for myself.) Most air compressors are loud so it was nice using this nail gun as I was DIYing this project during toddler naptime. The nail gun was fairly quiet, quiet enough to not wake said sleeping toddler.

If you’re in the market for a finish nailer. I encourage you consider this one as an option and compare as you won’t also have to buy an air compressor.

Simple Steps for adding board & batten when you have existing crown and baseboards that you don’t want to remove.

  1. Add cove moulding with a finish nailer to the length of the existing crown and baseboards.
  2. Caulk seams, putty nail holes with wood putty, let it dry then sand lightly with 220 grit block
  3. Now you can paint this newly updated trim and the wall the intended color of your accent wall. (I recommend doing this before adding the board & batten strips as it will make painting easier when they are added.)
  4. Add the first board and batten strip flush to the edge of the wall. Don’t worry about any gaps that may exist due to wall inconsistencies, you will be caulking this prior to painting once the strips are up.
  5. Measure out spacing for each strip of your board and batten.
  6. Add liquid nails to the back of the strips, then nail to the wall using your finish nailer. Liquid nails are recommended as you likely won’t be adding each strip where the studs are located.
  7. After adding each board, fill holes with wood putty, caulk all seams at the added boards and wall (you want to do this to fill any gaps that may exist), wait to dry, sand puttied holes then vacuum up all debris.
  8. Now you’re ready for paint! If you painted the wall the accent color prior to adding the B&B strips, you’ll just have to paint the seams and newly added trim.

In full transparency, it’s been a lot of work updating this room soley because of my project to repaint ALL of our bedroom furniture. It’s an easy process, just time consuming due to the coats of paint and polycrylic finish.

In the end, all of the labor is worth it. You eventually forget about how much it hurts during the process, then you do it all over again for the next project.

I want to hear if you are planning to add an accent wall. Share in comments if you’re adding a pattern or keeping it classic with a floor to ceiling board and batten addition.

Shiplap + Bathroom Redesign

If you’re looking to add shiplap to a wall or room in your home on a budget, this post is for you.  I’m sharing how you can update a standard builder grade bathroom into a modern farmhouse design.

We transformed this space:

IMG_6402

Into this newly designed space for a total of $315.  The shiplap wall only cost a little over $15.

Start by measuring your walls.  In this case, we were only doing the mirrored wall which made for simple math when deciding how much 1/4 inch plywood we needed.

For ease, we had Home Depot rip down 2 sheets of 1/4 inch plywood into 6 inch planks.  (we did have some scrap that we measured out to smaller planks that we knew we could use where some boards needed to be ripped down to less than 6 inches.) We also knew we wanted to continue the shiplap in the shower/toilet room and would use the extra planks in there.

Simple steps to hang the planks:

  1. Sand down all edges of the planks with an electric sander as there will be rough areas. This goes quickly.  *Wear a ventilation mask, it’s not healthy to breath in the dust from the wood.
  2. Remove old light fixtures
  3. Measure the length of your wall and trim the board accordingly.  Our wall was mostly to scale so we went ahead and trimmed all needed boards to the length of wall.  Where there were slight discrepancies, I was able to use an electric sander to take off a small amount for a perfect fit.
  4. Using a stud finder, mark out the studs in the wall drawing a line all the way down.  This is where you will nail your planks.
    1. In this case, we started adding our planks at the ceiling because we wanted a full 6 inch board at the top.  When planking a full wall, it’s sometimes easier to start from the bottom and work you way up.
  5. Ensure the board is level & using a nail gun (with 1 1/4 nails), nail one end of the board.  It’s easier when you have an extra set of hands to hold the board in place but if you are doing the job solo, double check that your board stayed level and nail the opposite end to the wall.  Then nail along the board where you marked the stud locations.
  6. Use nickels for your spacers and put up the next board in place.
  7. Continue step 5 until you have to make cuts for outlets or light boxes.
  8. In this case, we had to trim the bottom of one board and the top of the next to accomodate for the lighting.  We put the boards in place and traced out where we needed to cut.
  9. Use a jigsaw to make these cuts.  You can always trim off more if your first cut isn’t perfect. (Continue nailing boards after these cuts are made).IMG_6515
  10. I recommend painting the edges of each board and the wall as you put up each one.  This makes the painting process much easier as you don’t have to squeeze a brush into the cracks.  We had to get this job done quickly with two toddlers running around so we opted to just get the boards up and I’d paint later.
  11. Paint the sides and cracks of the boards first.
  12. Roll the boards second.  I needed 3 coats total when rolling because it went on much thinner compared to the brush.
  13. Caulk the seam where the boards meet the wall and the top of the vanity.
  14.  Hang new light fixtures and mirrors and you can call it a completed project!

Our new lights against the freshly painted white shiplap.

IMG_6535

I wanted to further update the space and bought these handles for our existing cabinet doors and drawers.

I also really like these handles but admittedly, I didn’t price around for hardware for the best deal like I normally do and just made a decision at Home Depot.

I also spray painted our existing towel rings to match. (This cost nothing as I already had flat black spray paint for metal.)

When deciding on mirrors, you do need to measure out what range in size you can shop for.  I knew what my maximum height and width could be above each sink and searched online first.

Hobby Lobby frequently has a 50% off sale on their mirrors.  Luckily for me, the sale was going on when I was shopping so I made a quick run to the store and snagged the last two. These mirrors had the perfect amount of coastal farmhouse vibe we were going for.

Here is a little video highlight featuring a trick for hanging hardware on cabinet doors and drawers. Click Here

A quick trip to Marshalls for accessories – rug, vanity decor, and fresh linens, I snagged YOU LOOK GOOD sign from the inventory of The Homestead Haven (my side gig with my bestie), and then shopped our home for the rest to complete this room design.

You can shop this sign and others in our Etsy shop, here.  By the way, this sign is interchangeable.  The wooden insert comes out of the base and can be changed seasonally or with other design offerings in our shop.  I’m forever changing decor in our home and love this creation of ours making it easy to do so inexpensively.

The best part about the room design, our two boys (ages 5 and almost 3) complimenting each individual new detail in the room.  They seemed to really appreciate the hard work and love that went into freshening up this space.  Mission accomplished.

Please comment with any questions you may have and follow along via Instagram for our next project.

DIY “Shiplap” Deck Skirt


Seeing potential in our home has always been a fun challenge for my husband and I.  We prefer to start with a clean slate and add finishing touches that fit our style.  One main thing our home lacked on the exterior when we moved was curb appeal.  We made plans early on to add a patio and landscaping to the back so that we could enjoy the views, pond, and entertain friends and family.

If you are looking for a way to add a deck skirt but don’t necessarily want the look of lattice, this tutorial might be for you.  We loved that there was great storage under our screened in porch but really disliked that everything was visible.

We sketched out the look we had in mind to send in to our HOA for approval and began measuring how much wood we would need.

Deck Skirt Process

Basic Materials List:

1x6x8 pressure treated boards

2×2 pressure treated boards

Galvanized screws

Lag Bolts

The first step for us was to add new support boards to the interior of the posts that would allow the horizontal boards to be flush with the posts.  You can see from the pictures above what this process looked like.  New boards were added first, then the old exterior boards were removed from the sides.

Step two, we ran 2×2 posts along the deck posts leaving space for the horizontal boards to be attached to them and remain flush with the deck posts.

Each horizontal board had to be measured individually because the deck posts had natural inconsistencies that happened over time.

Use a piece of scrap wood from you cuts to make a spacer the width you want your boards to be spaced apart.  Ours are space just under an inch apart.

It’s easiest to work from the top down when adding each horizontal board as your deck is already level.

The most challenging thing for our project was making a door for us to easily access everything we were storing.  We originally planned to make two swinging doors that carried over the deck skirt design but we determined that the weight of the wood would eventually cause the doors to sag.  We didn’t want that.

With some insight from my brother, he suggested making a removable panel that would match the deck skirt.  The trick was determining a way to hang it so that it would be removed easily.  We decided to add lag bolts, two on each side of the opening, from Home Depot.

We notched out the sides of the door panel, at an angel, to allow for the homemade door to easily drop on and lift off when we needed to access things.

We opted to wait for the treated boards to dry out in the summer sun and then prime & paint them to match our trim.  After having the natural look of the wood for so long, we began to also love that look but ultimately went with a cleaner look with the white.  It has brightened the space so much and now lets our landscaping colors pop.

It’s hard to believe we started with a small concrete slab at the base of the deck stairs and now have an outdoor living area that allows us to enjoy the outdoors so much more.

Please see this post for an easy DIY trash can hideaway.

IMG_4324

As I’m typing, 4 yards of mulch is being dumped on the driveway so I guess I need to wrap it up and start filling the wheelbarrow to freshen up our natural areas.  Don’t worry, the hubby is almost finished with work so we’re going to work together while the kids play outside on this beautiful Spring day.

Let us know if you have any questions.  Tag us if you tackle this DIY deck skirt, @4havenssake on Instagram & Facebook, we’d love to see.

DIY Wood & Metal Hooks

DIY Wall Hooks

This simple DIY project is perfect for a rainy day.  You can plan ahead and snag these hooks for 1/2 off when they are in the sale rotation at Hobby Lobby.

Materials:

1- 1×6 Pine Board (1 board allowed for the 3 different wall hooks you see pictured)

Wall Hooks – sourced from Hobby Lobby (they are frequently 50% off)

1 inch black screws (quantity dependent on how many hooks you plan to make)

Stain color of choice (we used Special Walnut by Minwax)

1/4 inch drill bit (attachment for your drill to make a hole in the metal wall hook)

2 inch black screws (quantity dependent on number of wall hooks you make)

This budget friendly DIY can cost as little as $40 for all 3 wall hooks.  Hobby Lobby frequently offers their drawer pulls and metal wall hooks at 50% off.  You can find each hook at these links – Single Retro Iron Hook, Triple Retro Iron Hook, single iron hook (not available online).  If you don’t want to wait for the hooks to go on sale, you can use a 40% off mobile coupon for one item.

Steps:

  • Stain the board and allow to dry.  Do not discard the towel used for staining as you will  need it again to stain edges after you cut your board
  • While your board is drying, you will drill the holes in the metal hooks to allow for ease of attaching them to the wood board.  Attach the drill bit to your power drill, mark where you want the holes for the screws, leverage the metal hook on an sturdy surface to allow for some overhang for your drill, securely hold the hook with one hand on the surface while you drill a hole, discard metal shards and repeat until you have 2 holes in each of the larger metal hooks.  No drilling is required for the individual hooks.
  • Measure out the size you want for each wall hook.  To utilize one board as we did, measurements are as follows: 1 Single Hook – 7 inches, 3 hook – approx. 23 1/4 inches & 5 hook – approx 41.5 inches.
  • Stain raw edges after you cut each piece
  • Center metal hooks on board and attach them using the 1 inch black screws
  • Once boards have completely dried, you can attach them to your wall using the 2 inch screws.  We recommend finding the stud in the wall to ensure they are secure and withstand holding the weight of your goods over time.

IMG_5861

Our 5 hook set was added above a shoe bench in our garage to create a simple hall tree and catch all for jackets & book bags.

If you love the look and just don’t have the time or tools to make these, you can send us a message at The Homestead Haven as we have them in our shop inventory ready to ship.  (They’re currently not online in our Etsy shop and solely made for our vendor markets.)

Chalk Paint DIY

DIY Chalk Painted Desk

I recently inherited a few items from my grandparents as the family prepared the home for an estate sale.  One item, a solid wooden desk, I wanted for my boy’s bedroom and loved the idea that they would ledger on the same desk that my father and his brother used as kids.

The desk had stains from drinks, small divots and scratches in the wood but overall, was in great condition.

I knew I wanted to incorporate olive green into the bedroom because it matched an army trunk that was my Grandfathers’.   I first checked out Magnolia’s line of chalk paint at Target, Magnolia Paint , but I didn’t like the $32 price tag.  If you are one who likes convenience of a pre-made-ready-to-use chalk paint, they have a great selection of paint colors for your project.

If you’re like me and like to decorate on a budget, this Chalk Paint recipe is for you.

I ventured to Sherwin Williams to collect a few samples of olive green paints.  Like any color, there are so many variations & shades I thought I’d like best but I ended up eliminated them from my final selection first.

Final paint selection, SW Oakmoss

This shade of olive green matched the army trunk perfectly and looked great with a black and white gingham pillow that I had already sewn for a desk chair.

Steps to refinish your furniture:

  •  Lightly sand the surface of the piece and apply more pressure to areas that may have damage to smooth out the surface
  • Remove all debris
  • Remove any drawers and hardware
  • Prepare your chalk paint
    • 1 cup of paint
    • 1 tbsp plaster of paris
    • 1/4 of hot water
      • Add paint into a glass bowl, add plaster of paris and hot water and mix until there are no remaining clumps of plaster and you have a smooth mixture.
    • Begin painting your piece, smooth and even strokes, let it dry then add a second coat once it’s completely dry.
    • If you intend to distress your piece after the paint has dried, keep that in mind as you’re painting.  You  may not want to have complete coverage if you’re looking for a more distressed look.
    • Once your piece has dried completely, distress if you want.
    • I recommend adding a wax finish to protect the surface.  I used Minwax Paste Finishing Wax in clear.

For an alternative chalk paint recipe, you can try out Natalie’s (of The Vintage Porch), here.  She provides great tips on finishes, brush selection, and amazing before & after pictures of projects she has tackled.

Check out the before and after of the desk:

IMG_0104
Finished Product

I found this sleek little chair at Marshalls & love how it brings out the original color of the desk and also ties in the wood of the boys bunk beds.

This refinish gives me all #thefeels #meaningfulspaces #meaningfulpieces.

The Magnolia Venture

There came a day when visiting Waco, Texas was added to my bucket list.  Like many, Fixer Upper became my favorite reality show.  Joanna’s effortless style was right in line with mine and spoke to my heart.  Did anyone else feel like they were living their dreams vicariously through Joanna when the show aired?  I think what drew me into the show most was the comedic personality of Chip.  He immediately reminded me of my husband, the random jokes, constant laughter, and inability to be serious at times you need to be, I WAS HOOKED.

When we found out we were pregnant with our second child, we jumped at the opportunity to have an early baby-moon adventure.  Believe it or not, it was my husband’s idea to book a trip to Texas and visit all things Magnolia.  That is love my friends.  You can imagine, there was zero hesitation in planning this adventure.

I quickly realized there weren’t too many places to find information on self-guided tours.  While much has changed since we visited on this particular getaway, there’s a tour company, Waco Tours, I wanted to provide an option for those of you who are like us and love to venture out exploring new cities on your own.

If you’re here because you are planning your future Waco trip, I have one piece of advice – don’t hold yourself bound completely to a schedule.  Allow yourself the opportunity to speak with locals and stop when a place catches your attention whether it’s a cute shop, a restaurant or a park that is drawing in crowds of people.  It’s in those moments that you’ll find local treasures, tangible and memories made, and meet some pretty amazing people.

Having been to Austin, TX before, I looked into flying into Dallas, TX and compared flights into each city.  Both are equal distance to Waco and offer cheaper flights compared to flying directly into Waco.  Southwest Airlines is our go-to and makes it easy to book one-way tickets to and from different airports.  (Plus it didn’t hurt that we had points for free flights.)  We ultimately traveled round trip in and out of Dallas.

Consider Priceline for booking a rental car.  Enterprise is generally our go-to but you’ll see all options at discounted rates on Priceline and can easily do a price comparison.  Enterprise doesn’t charge extra for multiple drivers if you’re married.

After the flights and car were booked, the hotel was next.  At the time of our trip, there weren’t any Fixer Upper airbnb or VRBO rental options but you can now find so many!  I’ve since been back to Waco after my first trip and stayed at this adorable studio, Dutch Door House.  The hosts were amazing and even helped my mother and I get into the rental after hours when the key code wasn’t working for us.  They also provided a pack-n-play for my 1 year old, sheets, snacks, coffee & tea, and all essentials needed for a comfortable stay.  Although it was small, it was perfect for us & super budget friendly so we could have more fun shopping without any guilt.

If you do want to stay at one of the iconic Fixer Uppers, here are a few options you can check out and also search for additional rentals.

Rock Star Reno, Barndominium, German Schmear House, Shotgun House

Now let’s get into the fun stuff.  I’ve listed out a suggestion for a single day in Waco and one for up to 3 days.

If you’re planning well in advance, go ahead and make reservations at Magnolia Table if they will accept them.  Hours are 6AM-3PM Monday-Saturday.  Wait time is generally 1-2 hours otherwise for breakfast/lunch only.  If you’re traveling on limited time, this may not be feasible for your schedule.

Day 1 in Waco, TX

Stop 1:  Common Grounds – 1123 S 8th St, Waco, TX 76706, 8AM

As featured on Fixer Upper, get a great cup of coffee from the locals.  Located next to the beautiful campus of Baylor University.  They are known for the Cowboy Special and their “secret sauce” that’s in multiple menu items.  Get ready to have a jolt to fuel your day of exploring.

Stop 2: Magnolia at The Silos – 601 Webster Ave, Waco, TX, Opens at 9AM
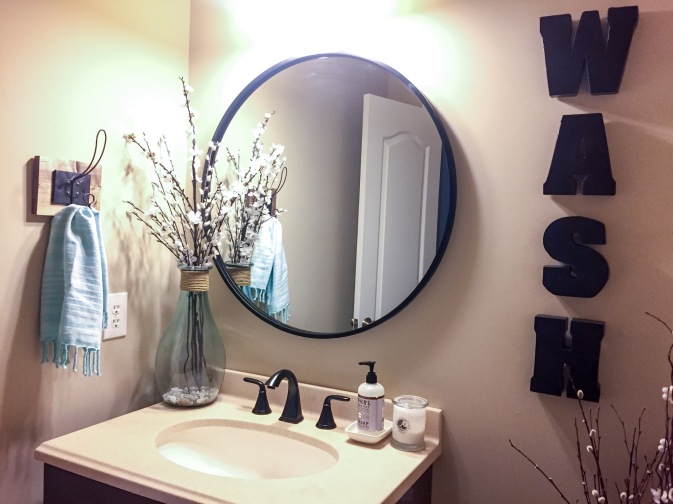
Try to arrive when/before they open as parking is usually plentiful and the lines are sparse. (Weekdays particularly)

I recommend walking through Magnolia to get a good look at everything, it can be overwhelming.  Then go out on the gorgeous lawn space, grab a bite to eat at one of the food trucks on site or the Silos Bakery.  Sit and enjoy the community, music & have conversations with others sitting nearby.  It’s interesting to hear where people are traveling from.  Offer to take pictures.  People will return the favor without you having to ask.  Explore the grounds, step into the Magnolia Seed & Supply garden shop, enjoy the music & activities for kids on the lawn then head back inside to make your purchases.

*Tip* Magnolia will package and ship your purchase of $75 or more for FREE.

Had I known that on my first trip, I would have been in trouble.

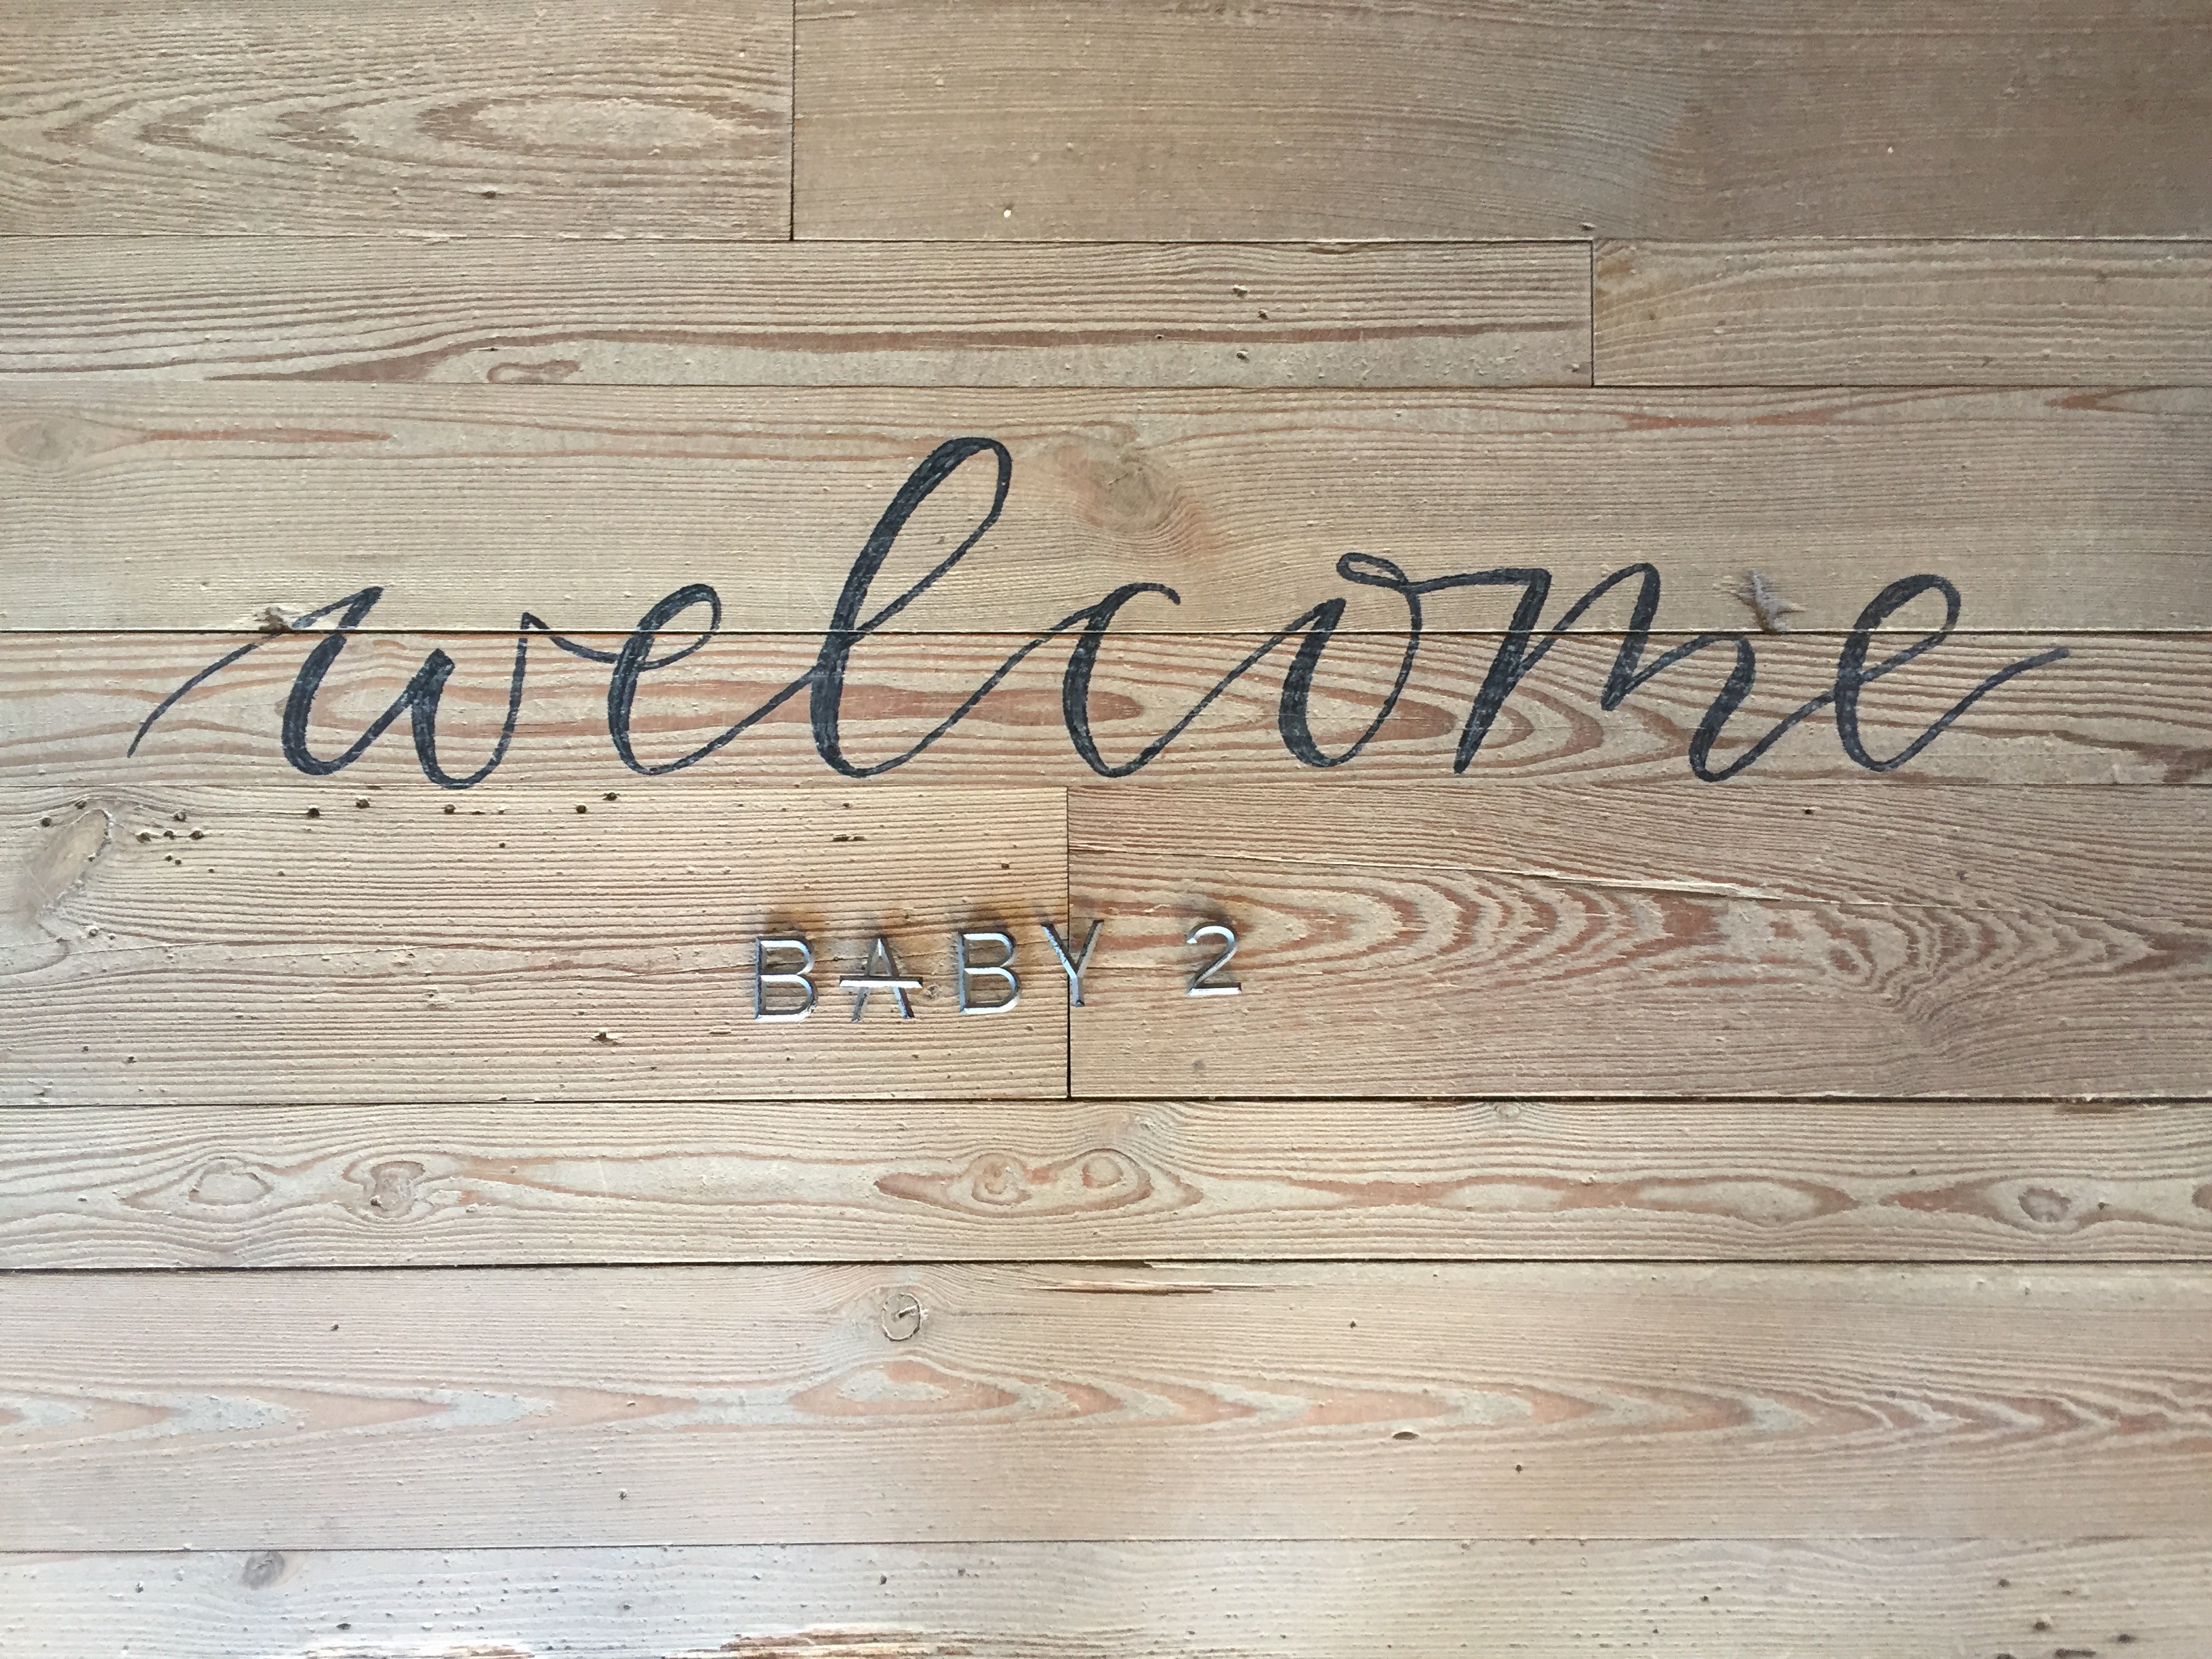
Magnolia at The Silos was still pretty new when we first went.  The lines were long but moved quickly.  Upon entering, they had WELCOME lettered on the entrance floor.  As my husband and I shopped, I noticed individual miniature metal letters for sale that sparked an idea for a baby announcement.  I found letters B A B Y 2, walked back to the front of the store and we took this picture that we’d soon share with friends and family.
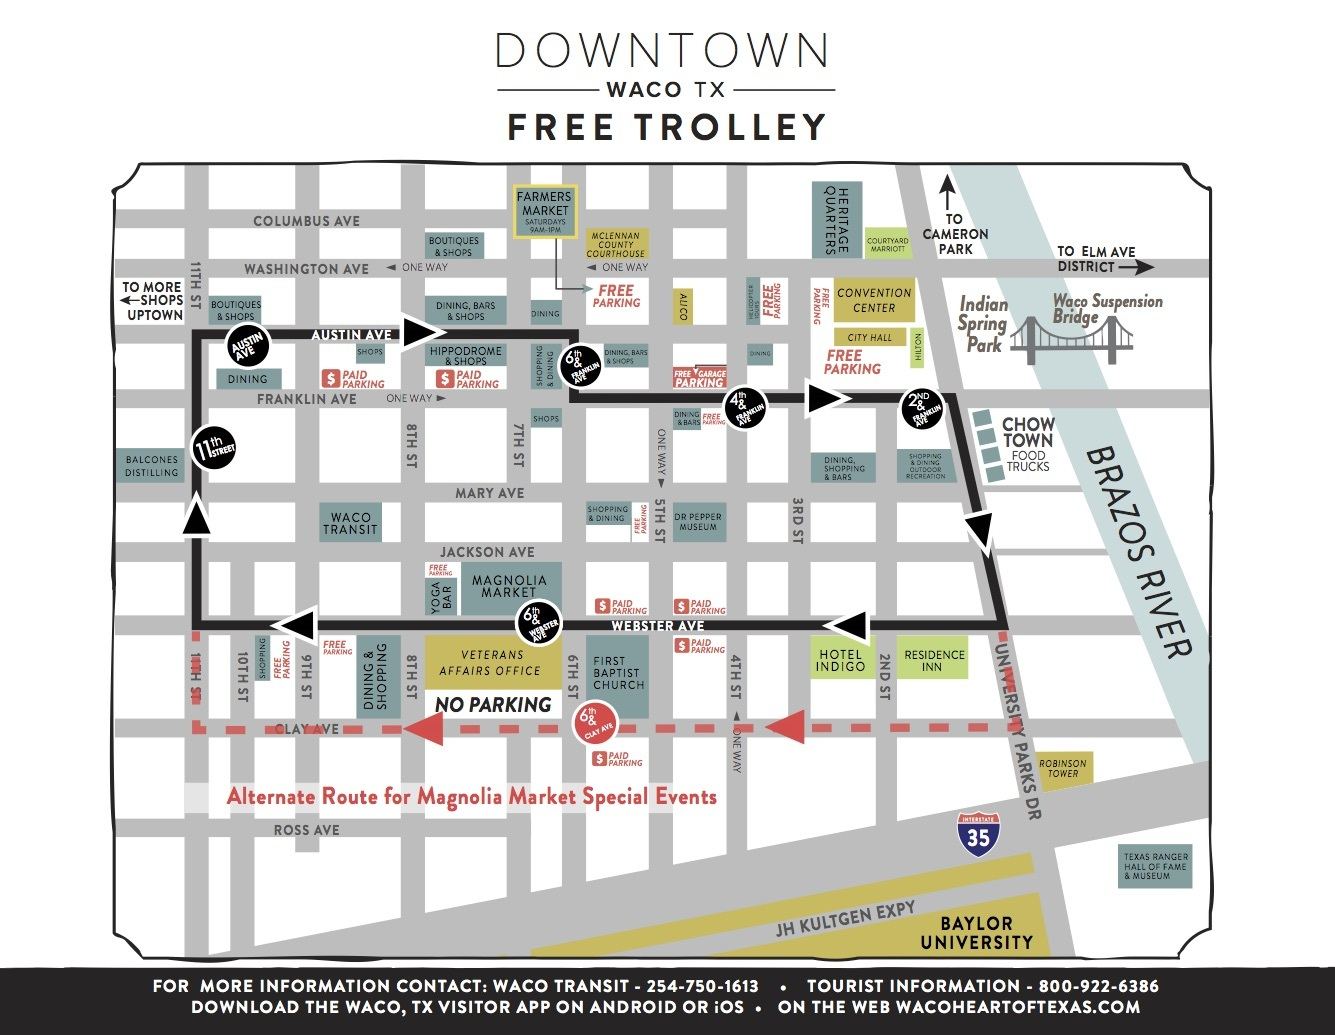
IMG_0840

Stop 3: Trolley

Hop on the trolley that picks up in front of the Magnolia entrance.  They return back to the Silos with multiple stops along the route making it easy for you to see downtown with a FREE tour guide.  They provide a map of the stops and information along the ride.

The trolley runs every 15-20 minutes, Monday-Saturday from 9AM-6:30PM.

Trolley-Route

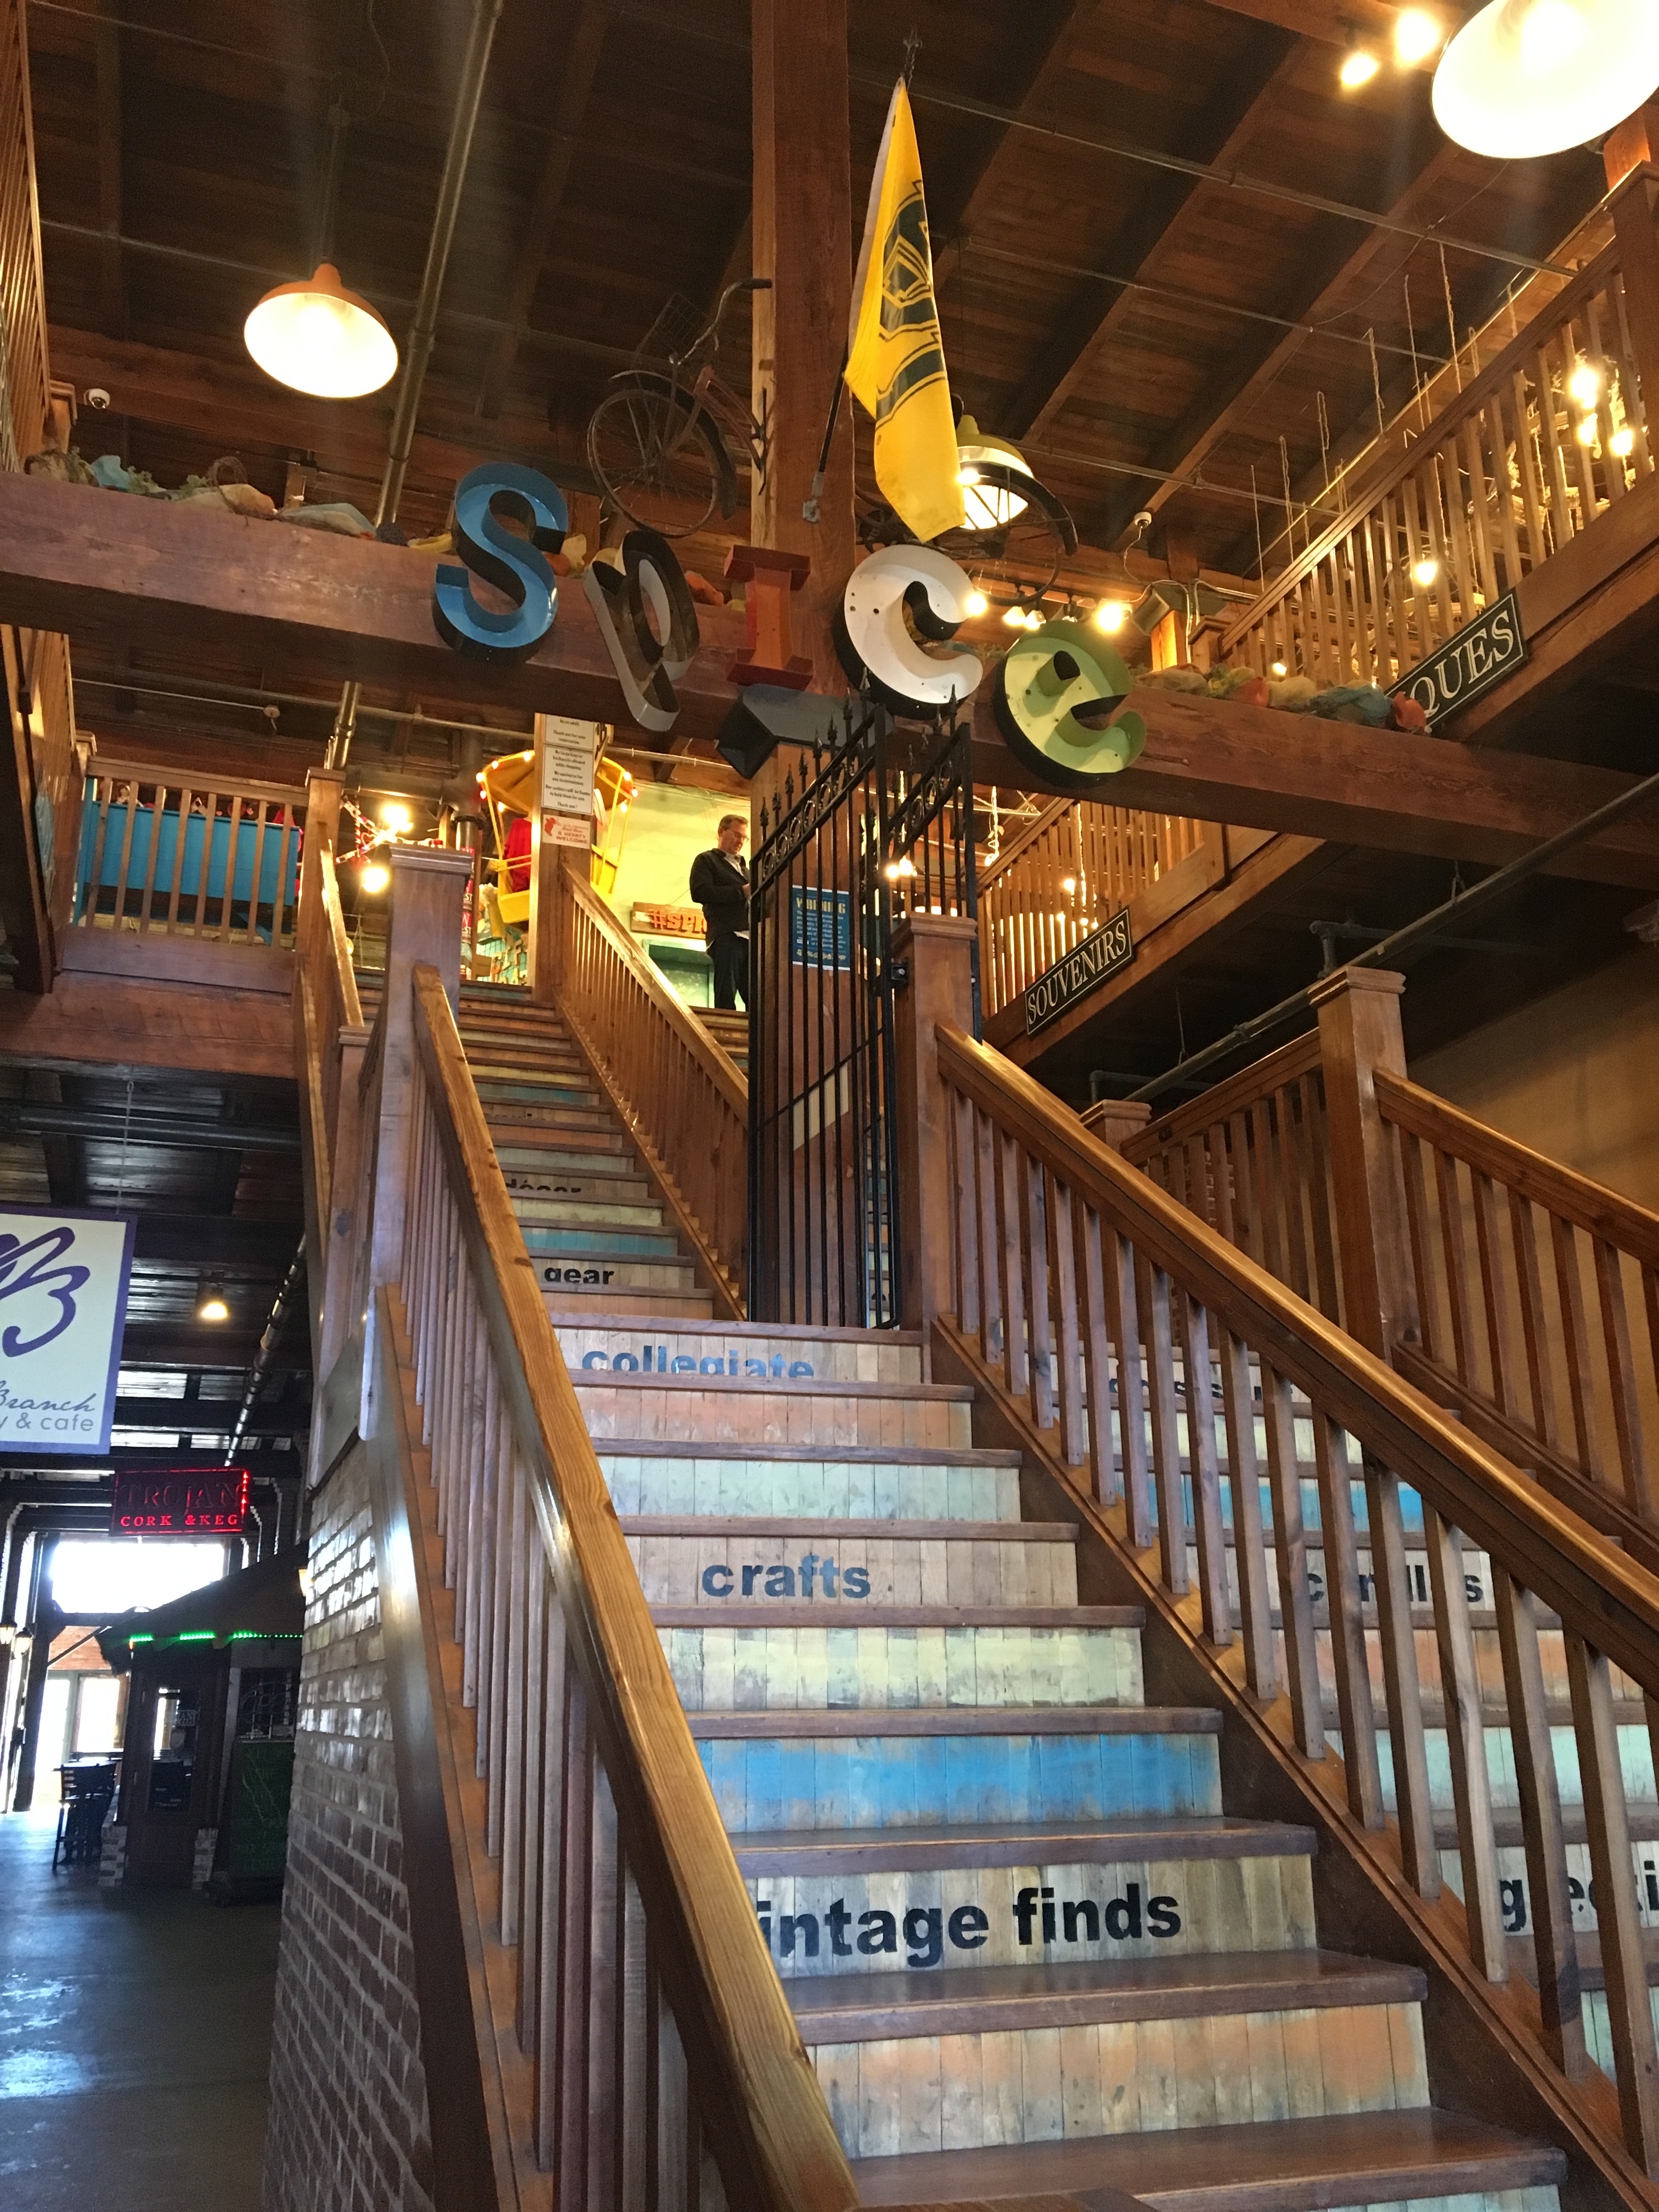
Stop 4: Spice Village – 213 Mary Ave, Waco, TX 76701

IMG_3862

Get off the trolley at this stop.  If you don’t have lunch reservations at Magnolia Table, you can eat at Olive Branch Bakery & Cafe for tasty local fare, located on the first floor of Spice Village.  *If you do have reservations at Magnolia Table, you will want to map out the drive time from where you parked so plan accordingly.

After lunch, head upstairs and shop among the vendor booths where you’ll find a mix of antiques, vintage finds, screen printed shirts, etc.

Keep an eye on the time & remember the trolley runs every 15-20 minutes.  Head back to Magnolia after you finish shopping.

Stop 5: The Findery – 501 S 8th St, Waco, TX 76706

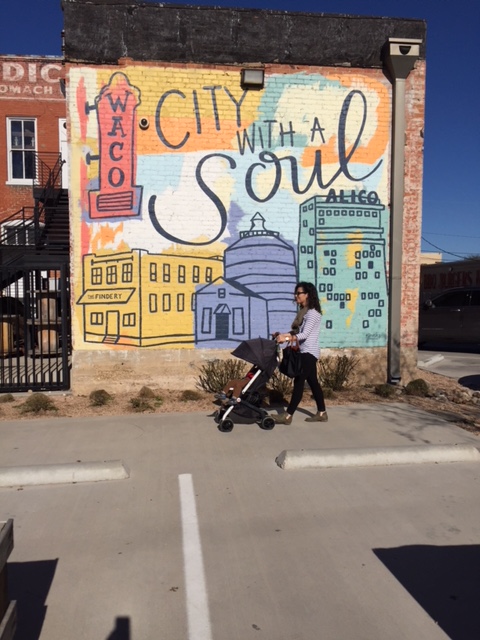
After you get off the trolley, drop off your purchases in your car and head to The Findery, walking distance from Magnolia and on the same street.  Two stories of vintage and new inventory for your home.  One more block away from the main storefront is The Findery’s warehouse with even more goodies.  Vintage and reclaimed overload! Ask an associate for directions if you want guidance on getting to the warehouse.  As you leave The Findery from the back door, turn around and look at the mural wall.  It makes for a great photo opp.

IMG_3840

Stop 6: Head back to your car but be sure to snag a cupcake & afternoon pick-me-up of coffee from the Silos Bakery if you haven’t already.  If the weather is nice, I highly recommend getting it to go and heading to the next suggested stop.

Stop 7: Jacob’s Ladder at Cameron Park

IMG_0761

After climbing nearly 100 steps to the top, you’ll have beautiful panoramic view of the Bosque River.  If you have little ones with you, there is a park and open space for them to run around and burn some energy without fear of them breaking inventory in the shops.  Enjoy that baker cupcake and coffee with the views if you haven’t already.

If you want to save Jacob’s Ladder for the morning of your second day, you can also enjoy the miles of trails along the river and wooded trails throughout the park.  I think my husband and I ended up hiking around 5 miles and saw beautiful scenery along the way.

If time allows before sunset and dinner, head to The Waco Suspension Bridge, 101 N University Parks Dr, Waco, TX 76701, for views of all bridges down the river.  There’s also a walking trail if you’re not already worn out.

Stop 8: Dinner

We ate at Ninfa’s Mexican restaurant as it was recommended by a local.  A quick google search will give you additional options for dinner.


DAY 2 – Antiquing & Fixer Upper drive-bys

Stop 1: Shop on Bosque – 3801 Bosque Blvd, Waco, TX 76710.

If you’re an early riser, plan to do a drive-by of the original Magnolia store, aka The Little Shop on Bosque, to gain perspective on where Joanna started and where she is now with her business venture.

Stop 2: Harp Design Co. – 808 N 15th St, Waco, TX 76707 – Opens at 10AM

If you’re on a ladies trip, snag a t-shirt for your man/kid(s) from here.  The shirts are SUPER soft.  It’s fun to see Clint Harp’s homemade goods in person.

Stop 3:  Milo Biscuit company, located at 1020 Franklin Ave, Waco TX.  We enjoyed their fresh breakfast when their food truck was parked in the Silos common area.  Now, they have a storefront serving up Lunch, Brunch, Happy Hour & Dinner fare.

Stop 4: Austin Avenue Antique Shops

Cameron Trading Co. , Moon Rein by Christi, Papillon Antiques, and La Grange are a few that I visited on my second trip back on a mother-daughter trip.

Stop 5: Laverty’s Antiques & Furnishings – as featured on Fixer Upper, 600 N 18th Street, Waco, TX *Check to see if they are open first as they have limited hours due to their travels for vintage pickin’

Stop 6: The Junkey Money – 2223 La Salle Ave Waco, TX 76706

You’ll find additional shops on La Salle, hours vary if the owners are traveling to vintage pick for their shops.

If you want to drive by some of the Fixer Upper houses from season 2, you’ll pass through Woodway, TX and can view a few on the way to the next stop.

Season Two Flips

Stop 7: Cedar Chest, 31707 West Highway 84 McGregor, TX

Stop 7: Magnolia House – 323 S Madison Ave, McGregor, TX 76657

IMG_3958

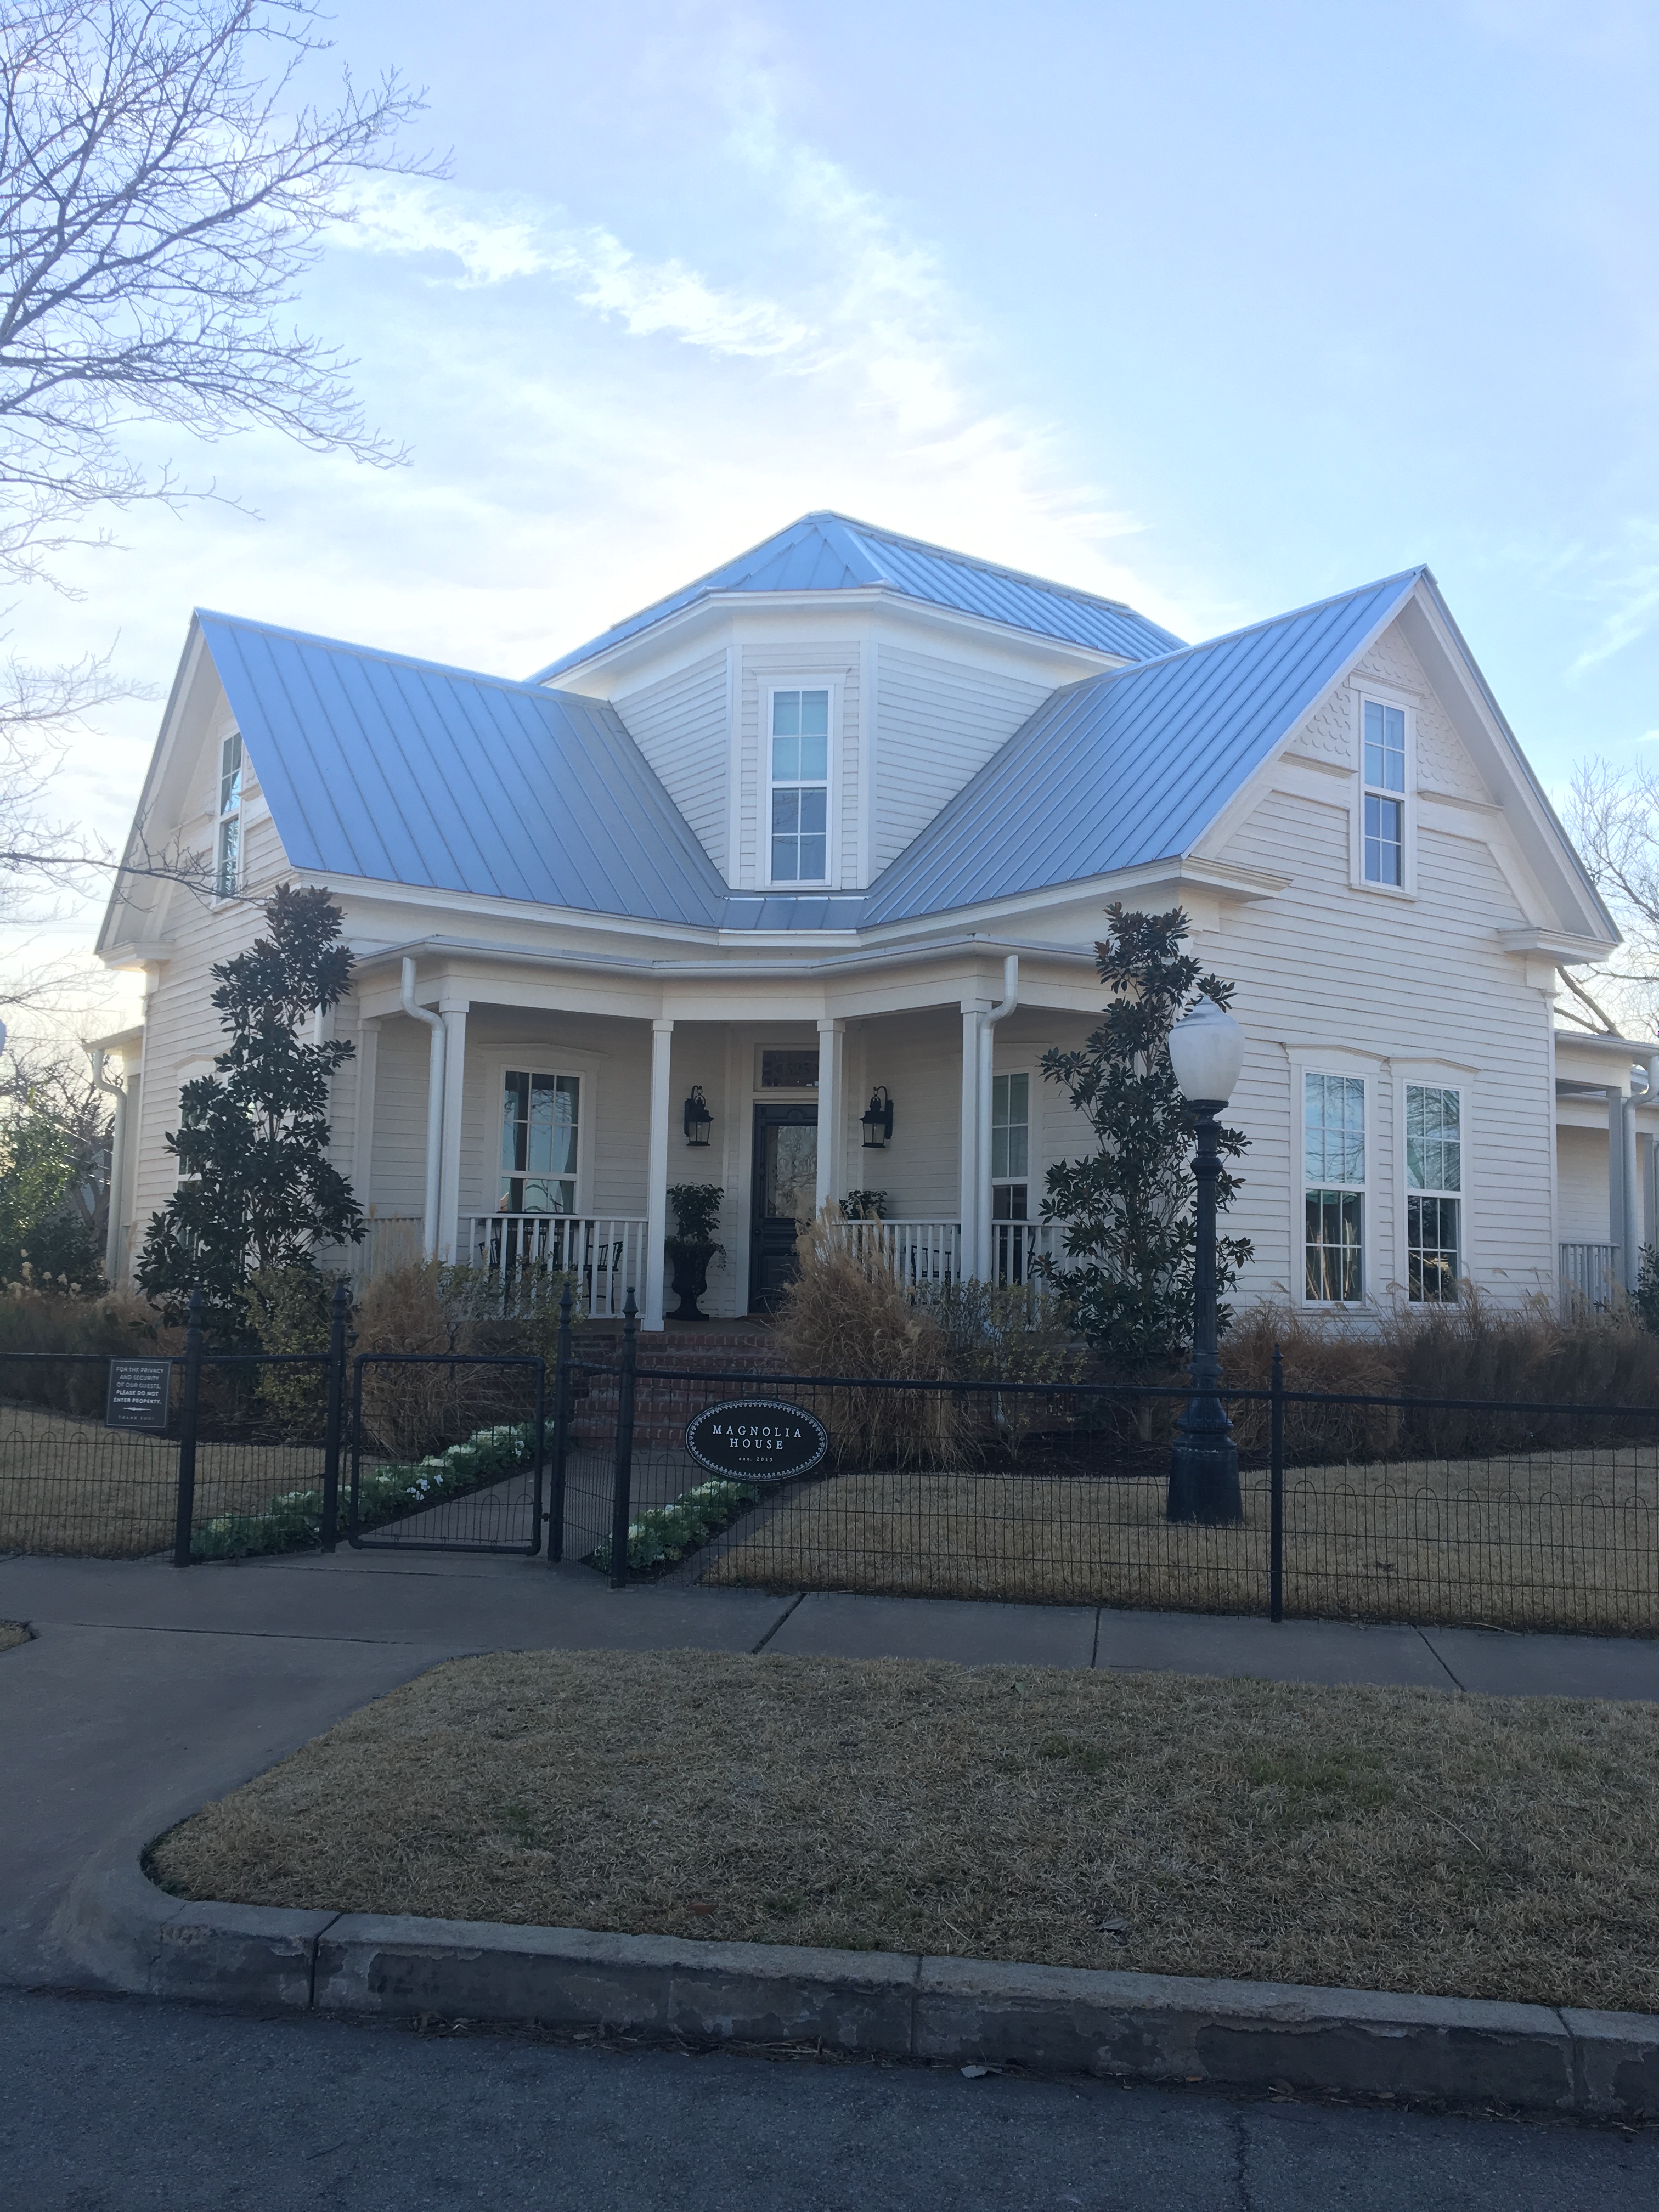
Chip & Joanna’s first Bed & Breakfast

Finish up the day driving by some of the other Fixer Upper homes if time allows as you head back to Waco.

Day 3: Homestead Heritage & Cafe Homestead to eat, 608 Dry Creek Rd Waco, Texas 76705

If you happen to be leaving out of Dallas, TX, plan to leave out late and allow time to stop by Homestead Heritage on your way.  It’s in northern Waco, TX and on the way to Dallas.

Thanks to my mom’s research, she found this amazing treasure in Waco.  Cafe Homestead is one of the Gaines’ favorite places to visit.  It’s also the location of the Blacksmith Joanna commissioned to make a dinner bell for one of her families on Fixer Upper.

Explore the grounds of Homestead Heritage to understand what is involved in true Homesteading.  You’ll appreciate locally grown, locally sourced, and locally made food and homegoods like never before.

It’s my hope that these suggestions help you with your trip planning for your Magnolia Venture.  I’d love to hear from you after your trip!

Safe travels.

xo, Amanda