
Sweet gestures and gifts that are simple can be just as meaningful. When planning out this year’s teacher gifts, I ended up paring it down from my original thought and I think it’s cute and… More

Sweet gestures and gifts that are simple can be just as meaningful. When planning out this year’s teacher gifts, I ended up paring it down from my original thought and I think it’s cute and… More

From a cluttered corner to a cozy clean zone, our small laundry room glow-up is complete after I finished my first successful wallpapering project in our home. Let’s talk about one of the most-used, least-loved… More

Keeping the spooky spirit alive with a little adult twist — single-serve gin & tonics, all dressed up for a Halloween surprise. Want to boo-ze your own boos? I’m sharing the printable tag so you… More
We spent more time in Valley of Fire State Park exploring than we anticipated but ultimately, we made our own schedule and didn’t rush through seeing all that we wanted to on our way from LAS to Zion National Park.


Day 1: Afternoon/Evening in Zion after arrival
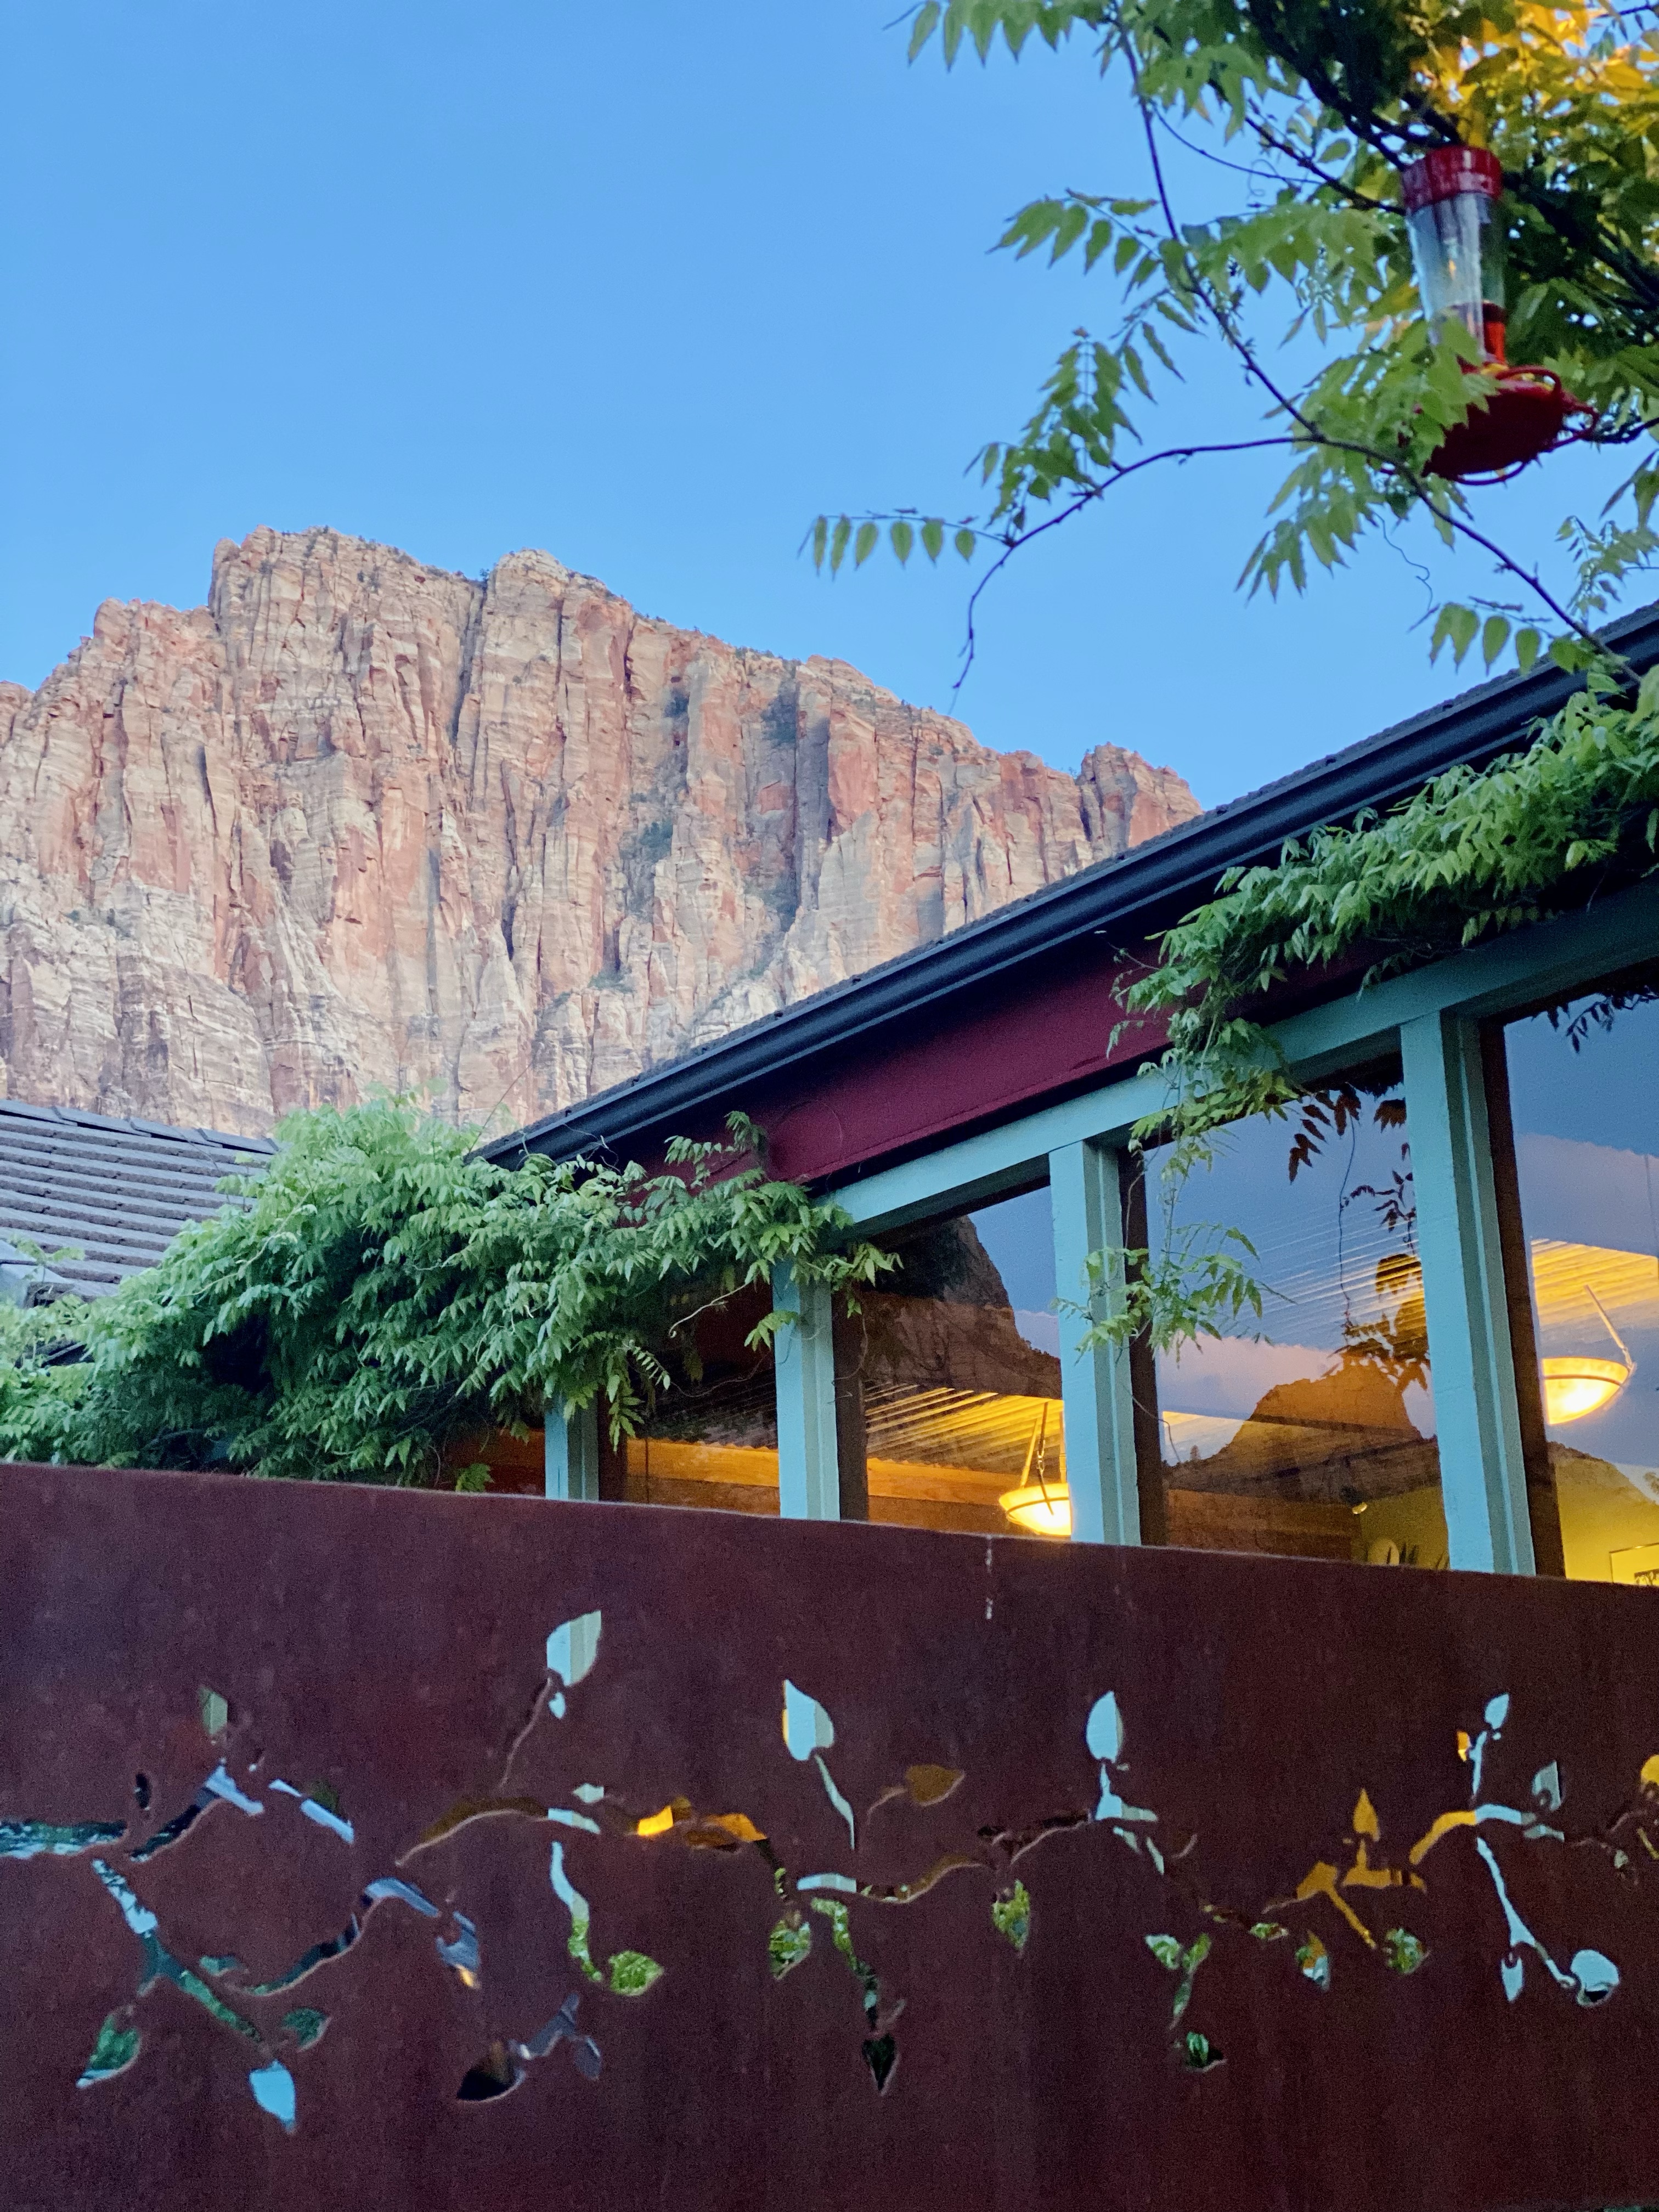
After leaving Valley of Fire State Park, we drove to Springdale, UT which is a quaint town near the South entrance of Zion National Park.
It was around 4PM when we arrived to our hotel, Holiday Inn Express, which included a free (and healthy) continental breakfast every morning. For example, egg white and veggie omelets, fresh fruit choices, greek yogurts, oatmeal, DIY Waffles and pancakes, turkey sausage, freshly brewed coffee and a filtered water station to fill up your camelbaks and water bottles for a day full of hiking.
Springdale has a lot to offer including a complimentary shuttle service, shopping, restaurants, coffee shops, a brewery on the Virgin River and a greenway to walk/run or ride e-bikes.


After settling in to our hotel room, quickly walking the property grounds outside and resting for a little while, we were anxious to head out and hike one of the shorter trails that had promising views overlooking the town of Springdale.
A quick 5 minute drive to the South Entrance of Zion National Park, we handed over our National Park pass to be scanned, the ranger offered us a map (you will want this as it includes all of the trails, discriptions/difficulties and what stop you’ll need to get off for the shuttles to access each), and parked at the Visitor Center.
Watchman Trail – 3.4 Miles roundtrip. My watch calculated it was a bit further than that at 3.75 Miles which may have been because we did a smaller scenic route once we were at the top (definately do this…you will have better views) and we walked part of the Pa’rus Trail along the Virgin River which connects you to Watchman Trail.
We started this hike around 6:15PM and knew we needed to hustle before we lost daylight as the sun dropped behind the mountains. It probably only took about 45 minutes to get to the top and left us with plenty of time to take in the beautiful views.


We only passed a handful of people on the trail which was so peaceful. Having 3 boys at home that are all talkative from sun up to sun down, one of the first things we noticed while hiking either late evening or early mornings was the noticeable quiet all around.
We decided on a dinner spot, The Spotted Dog, and ended up having one of the best meals of our entire trip. Please go and ask for Freddy if he’s working. He was our amazing server and lead us to our dinner choices but more importantly, we had a wonderful time talking to him about his life and what lead him there, how much growth that has happened in the area in just a few years, and how it’s impacting locals.
Refueled with good food & a delicious cocktail, we were more than ready for a solid nights rest.


Day 2: Up and at ’em – Breakfast eaten by 6:30 and in the car to snag a parking spot at the visitor center to catch the first shuttle in Zion departing at 7AM. Our day’s objective was to see Angels Landing before the crowds.
Take the Zion Shuttle – Zion Canyon Line to Stop 6, The Grotto
Begin hike toward Angel’s Landing taking The Grotto Trail (1 Mile) to the West Rim trail which leads to Scout Lookout (4.2 Miles roundtrip) and Angel’s Landing (another .5 miles).


*Note* A permit is required to hike past Scout Landing and continue to Angels Landing. (Apply Here) Also keep in mind the difficulty and nature of the remaining .5 mile hike to Angels Landing. The most difficult part of the hike (for those afraid of heights) is the half mile out onto the ridge and back. Sheer drop-offs extend downward on both sides of the path in places. Some rock scrambling is also necessary. You will also have to hold onto the chain railing.
As you wind up the West Rim trail toward Scout Landing, the pathway will have many switchbacks leading up. The views continue to get better as you climb. This is one of our favorite viewpoints along the way.


Walter’s Wiggles is also another popular area on the trail.


After reaching Scouts Landing, there are restrooms and views that will take your breath away. You can continue right on the trail toward Angel’s Landing if you have a permit or left on the trail to continue on the West Rim trail as far as you want to hike. Keep in mind it’s an out and back trail so you have to hike back the way you came.


We continued on the West Rim trail and were quickly stopped by the rare sighting of two California Condors. We stood and watched them in complete awe.


While hiking the West Rim trail, I met a local couple who said “Angels Landing is so overrated. The West Rim trail is so much better and doesn’t have all of the traffic.” Hearing her say that made me feel better about our decision to not apply for the permit to hike Angels Landing. Pre-kids I wouldn’t have hesitated but something happened after kids and I have become too anxious when it comes to certain risks.
We had a picnic lunch/snack from this area on the rim trail and I have to say, the views didn’t disappoint. We were also alone until we packed up and began hiking again.


We probably hiked 2 miles on the rim trail before deciding we were ready to make the trek back down to our starting point and head to our next destination. The Condors were still on the trail and showing off.
It’s fun to hike the trail back down to see the views from a different vantage point.
Back at The Grotto stop for a bathroom break, we hiked the Kayenta Trail (2 Miles) leading us to the Emerald Pools trails. After taking the advice from a couple we met, we only did the lower and middle trails as they said the upper didn’t offer different views and there are no visible falls from that point.
Lower Emerald Pool Trail – 1.2 Miles
Middle Emerald Pool Trail – 2.2
Upper Emerald Pool Trail – 1 Mile


The Middle Pool Trail leads you back to The Zion Lodge which is another shuttle stop. Here you will find a restaurant that is a part of the Lodge, a gift shop and restrooms.
Next, we took the Zion Lodge shuttle from Stop 5 to the final Stop, 9, Temple of Sinawava.
Riverside Walk (2.2 Miles) – Takes you to The Narrows. Unfortunately, we couldn’t hike The Narrows as the water flow in the Virgin River was around 1400 CFS (cubic feet per second) and they require the flow to be 150 CFS or less for 24 hours before hiking is permitted. The extreme snow fall this winter caused the water flow to be at such a high volume.


This just means we will have to go back to Zion, right?!
Get back on the shuttle and stop at Big Bend, Stop 8, which is only available on the down-canyon shuttle. Take pictures and get back on to stop at the next stop, Weeping Rock. This .3 mile out and back trail is an easy and accessible trail for most anyone.
The shuttle service is an enjoyable scenic ride that also plays tour guide audio along the journey. We learned a lot about the sights we were seeing along the way that we had not already read in our research.
At this point we had hiked around 12-13 miles and it was only the early afternoon. We took the shuttle back to our hotel, had a much needed rest, then got ready for an afternoon/evening exploring Springdale.
Dinner at Bit and Spur Saloon – Walking distance from our hotel, we took the leisure stroll over to the restaurant. We had no trouble being seated right away but also discovered you can walk to their back property to seat yourself at one of their outdoor tables and order food from their taco truck and drinks from the outdoor bar. We requested to be outdoors and were able to enjoy the outdoor space on such a beautiful Spring day. It was kid friendly with open space, corn hole, a stage for live music performances and room to roam around. The views weren’t too bad either.
I ordered their seasonal margarita, Prickly Pear Margarita, which used locally harvested fruit. It was so delicious, we got a second after dinner.


Day 3: Observation Point (8 Mile loop) or Drive toward Bryce National Park. Unfortunately, access to this hike was closed as the trail was obstructed by a fallen boulder so we pivoted and began our drive. I read the views are worth the hike so try to incorporate it in your itinerary if you can.
Zion-Mt Carmel Highway – Arguably the most scenic drive in the entire national park system, this 26 Mile route winds around and through colorful rock formations, sweeping views, seasonal waterfalls and switchbacks. There are several scenic pull offs along the way. It’s hard to not stop at each one as remarkable beauty is all around and will leave you nearly speechless.


You will come to the Zion-Mt Carmel Tunnel along the way. Once we passed through, we immediately noticed a slightly different change in the landscape.
If you hope to see The Wave in Coyote Buttes, you’ll have to apply for either the advance lottery 4 months prior or the daily lottery. You can apply for the daily lottery when you’re in range of the GEO mapped area only. You need to apply 2 days prior to when you hope to visit.
For us, it worked out perfectly to apply when we were in route from Zion to Bryce as our itinerary had us in Bryce for 2 nights. Should we be accepted, we would stop in Coyote Buttes on our way to our next overnight destination in Page, AZ.
Mt. Carmel Junction on the way and is where we applied online, here. Our hope was that we would be accepted giving us entry to Coyote Buttes after our 2 days in Bryce National Park. Our lottery entry wasn’t selected so I was even more thankful we had visited Valley of Fire State park and saw the Firewave as it had a very similar (albeit smaller) landscape as The Wave. (All about Valley of Fire State Park, here)
Our time in Zion National Park was only a small piece of the magic we experienced on our trip.
Next stop, Bryce National Park. (Click here to read all about our two days in Bryce.)
What was once an item listed on our project list, the powder room, it quickly became an active project when my husband walked into the garage and returned inside with a hammer and crowbar. He took to a corner in the bathroom and began an attempt at removing 1/4 round and baseboards. All I needed to get going on this particular project was him taking that first step and saying “let’s start checking off these projects.”
DIYs are fun but now with 3 kids, we have to be strategic in planning when we can tackle projects -between his work travel and kid schedules.
Goals for this project:
Project Mood Board

You can find links to the lights, hardware, and faucet here, Product Links. The final faucet we went with can be found here. We have been very pleased with it. In fact, I installed it apart from connecting the drain to the p trap. I’m thankful for my dad who came over to connect them and teach me how they work.
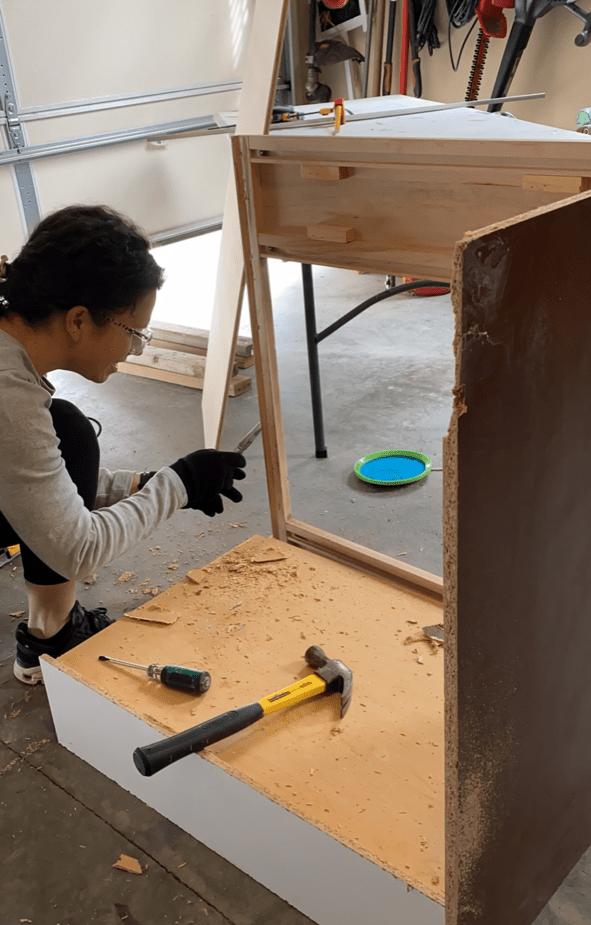
First we demoed by taking out all 1/4 round, baseboards, disconnecting the water supply and removing the vanity.
We ended up having to purchase this set to help in removing the 1/4 round and baseboards. Even still, it proved to be challenging because the installers used 3 inch nails which is excessive in my opinion.


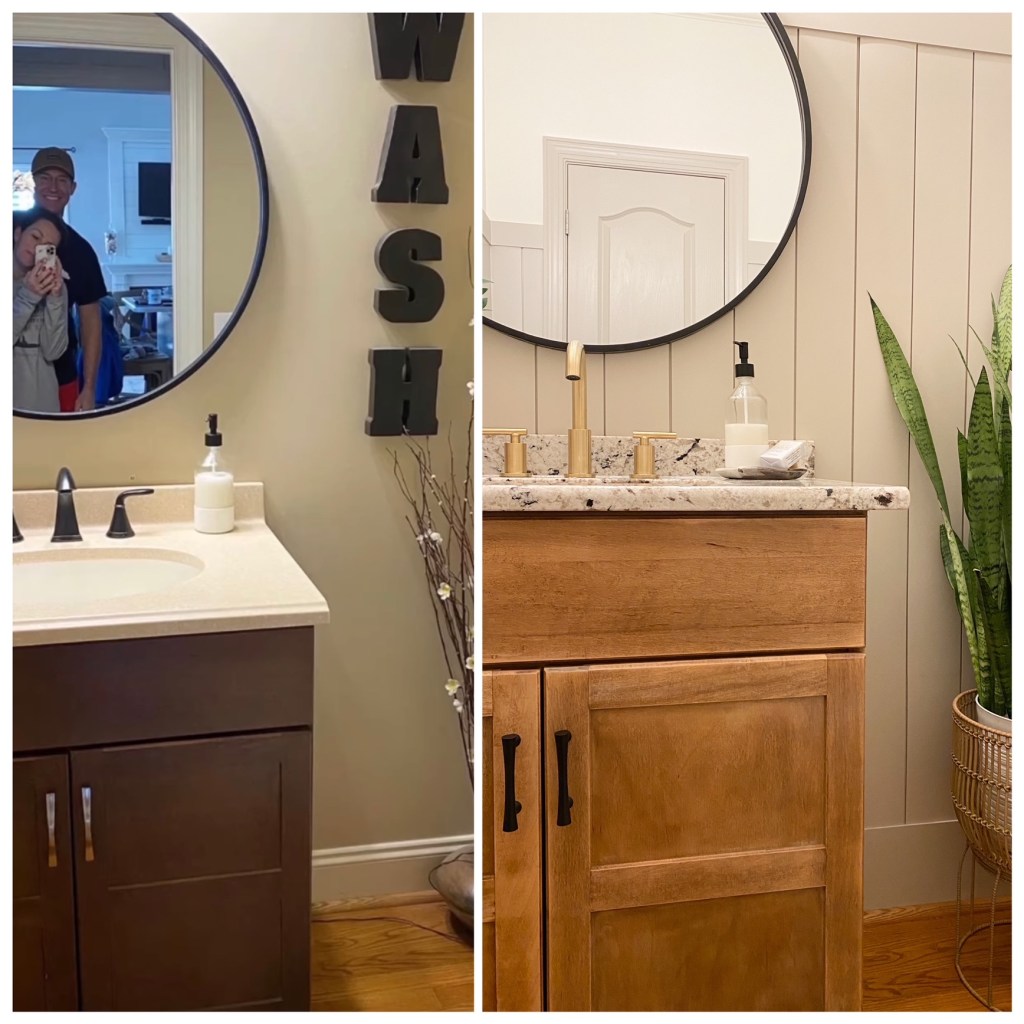
As you can see, the before was just “blah” and didn’t fit our style at all. As for the layout of the bathroom, we would have never designed it this way but we had to work with it.
After the space was cleared out, I painted the top 1/4 section of the walls White Dove and the crown molding, and ceiling. Then we added in new baseboards, 1×8 primed pine as the MDF was limited for us.
After baseboards and paint, we added a 1×4 piece of trim that was our finishing cap and would act as the point where we measured for each vertical shiplap board.

Once we both cut down our shiplap to size for our first wall, I painted the edges of each piece prior to nailing them to the wall. As I did this, my husband marked the studs on the walls.


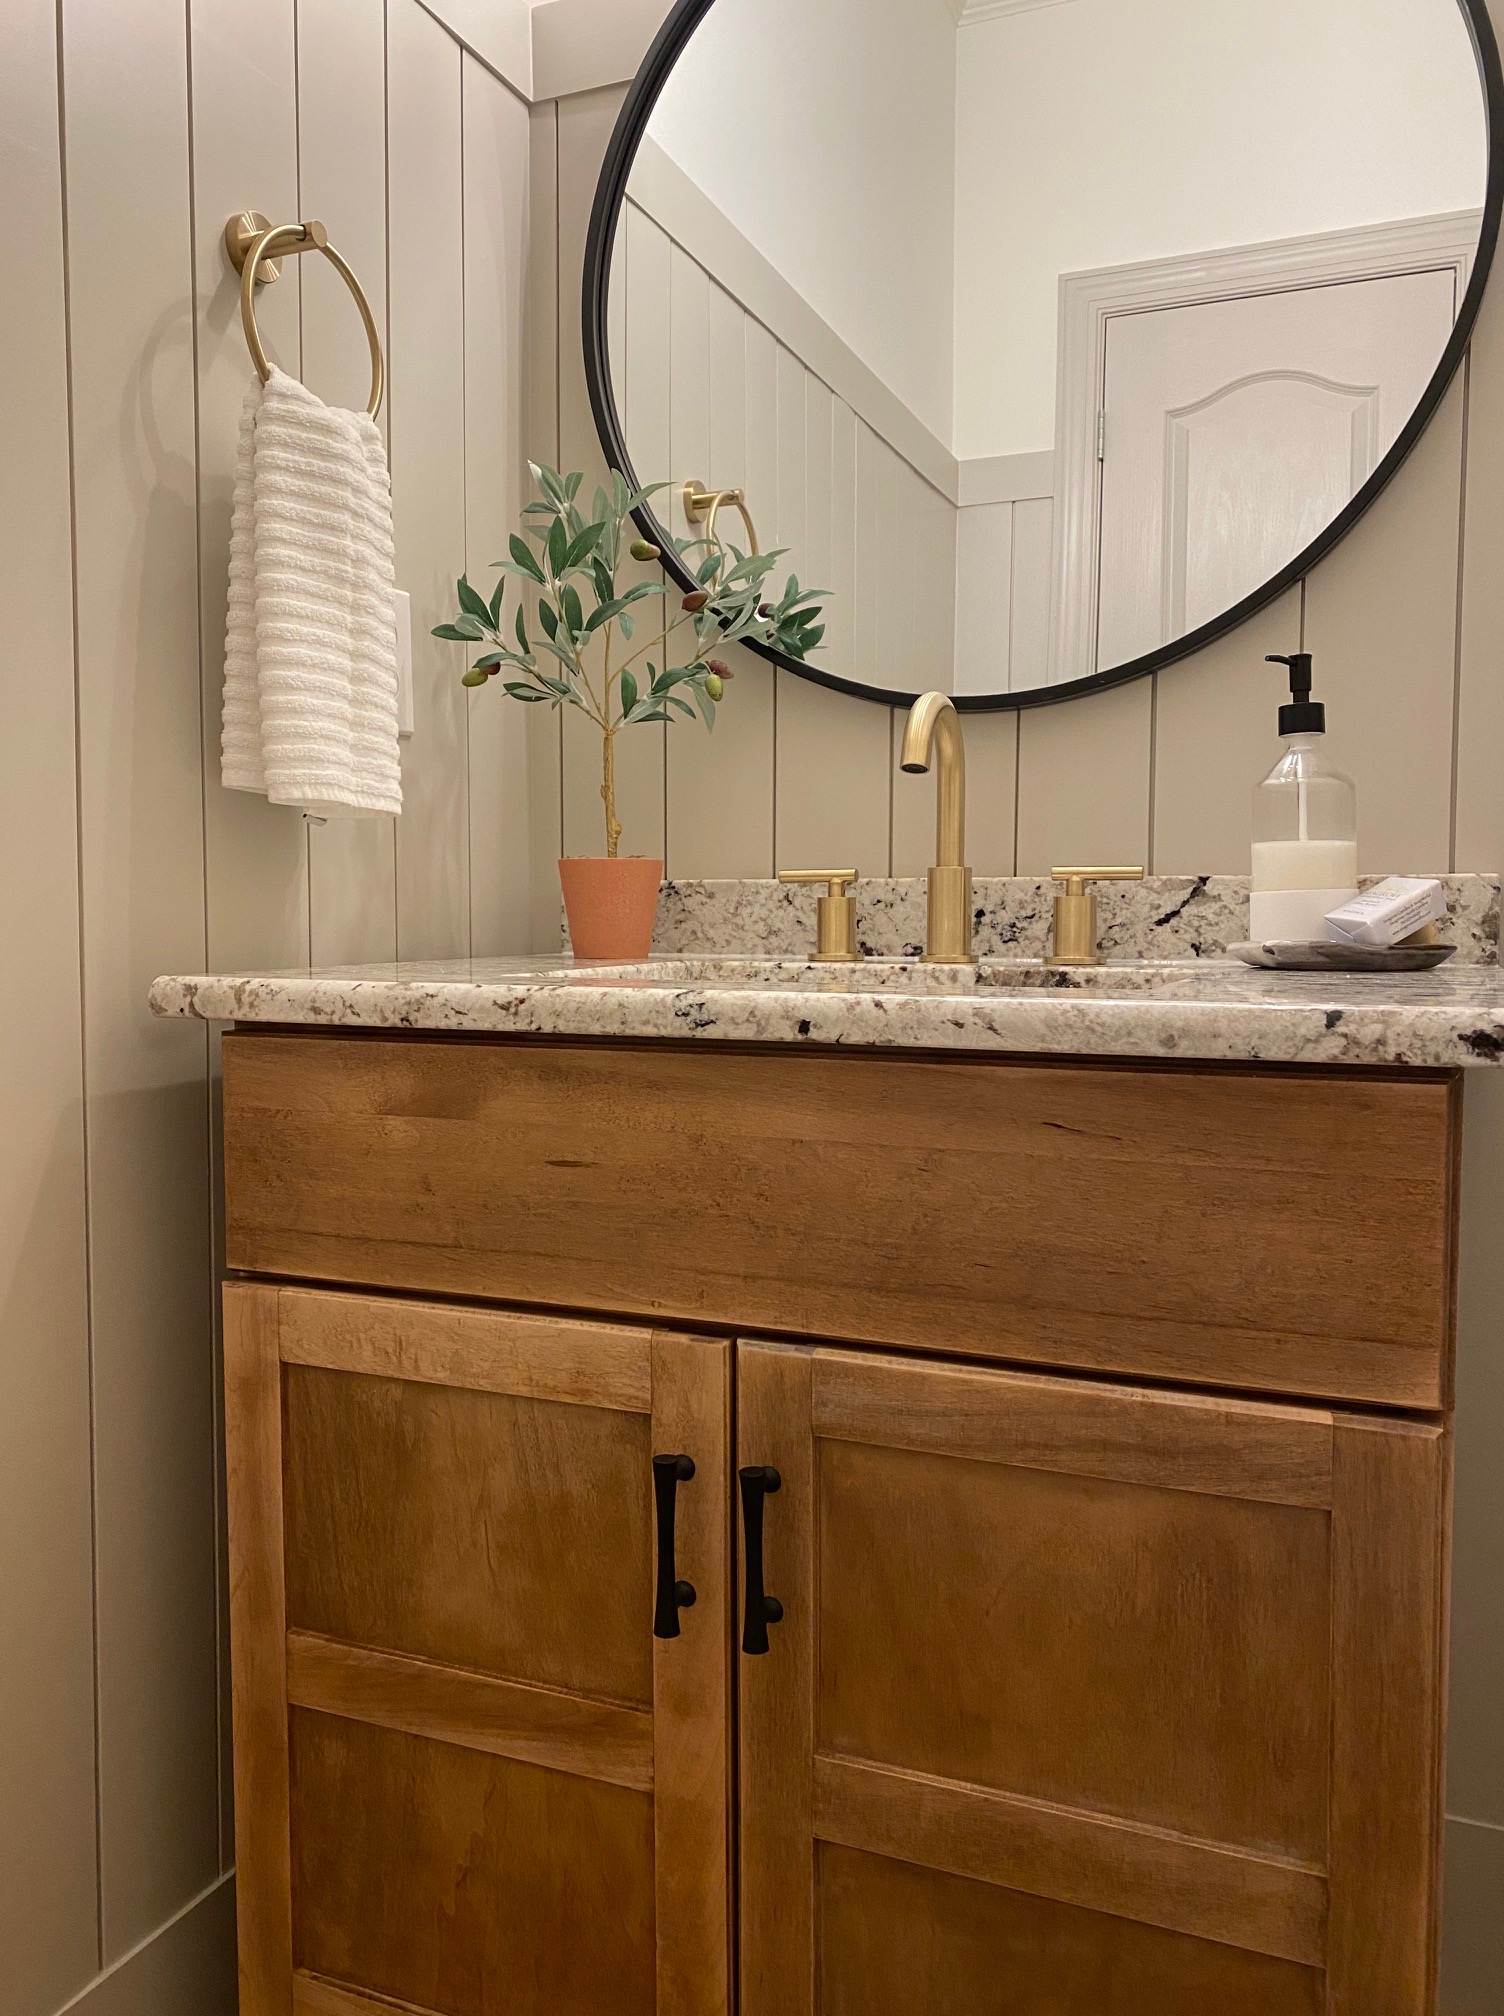
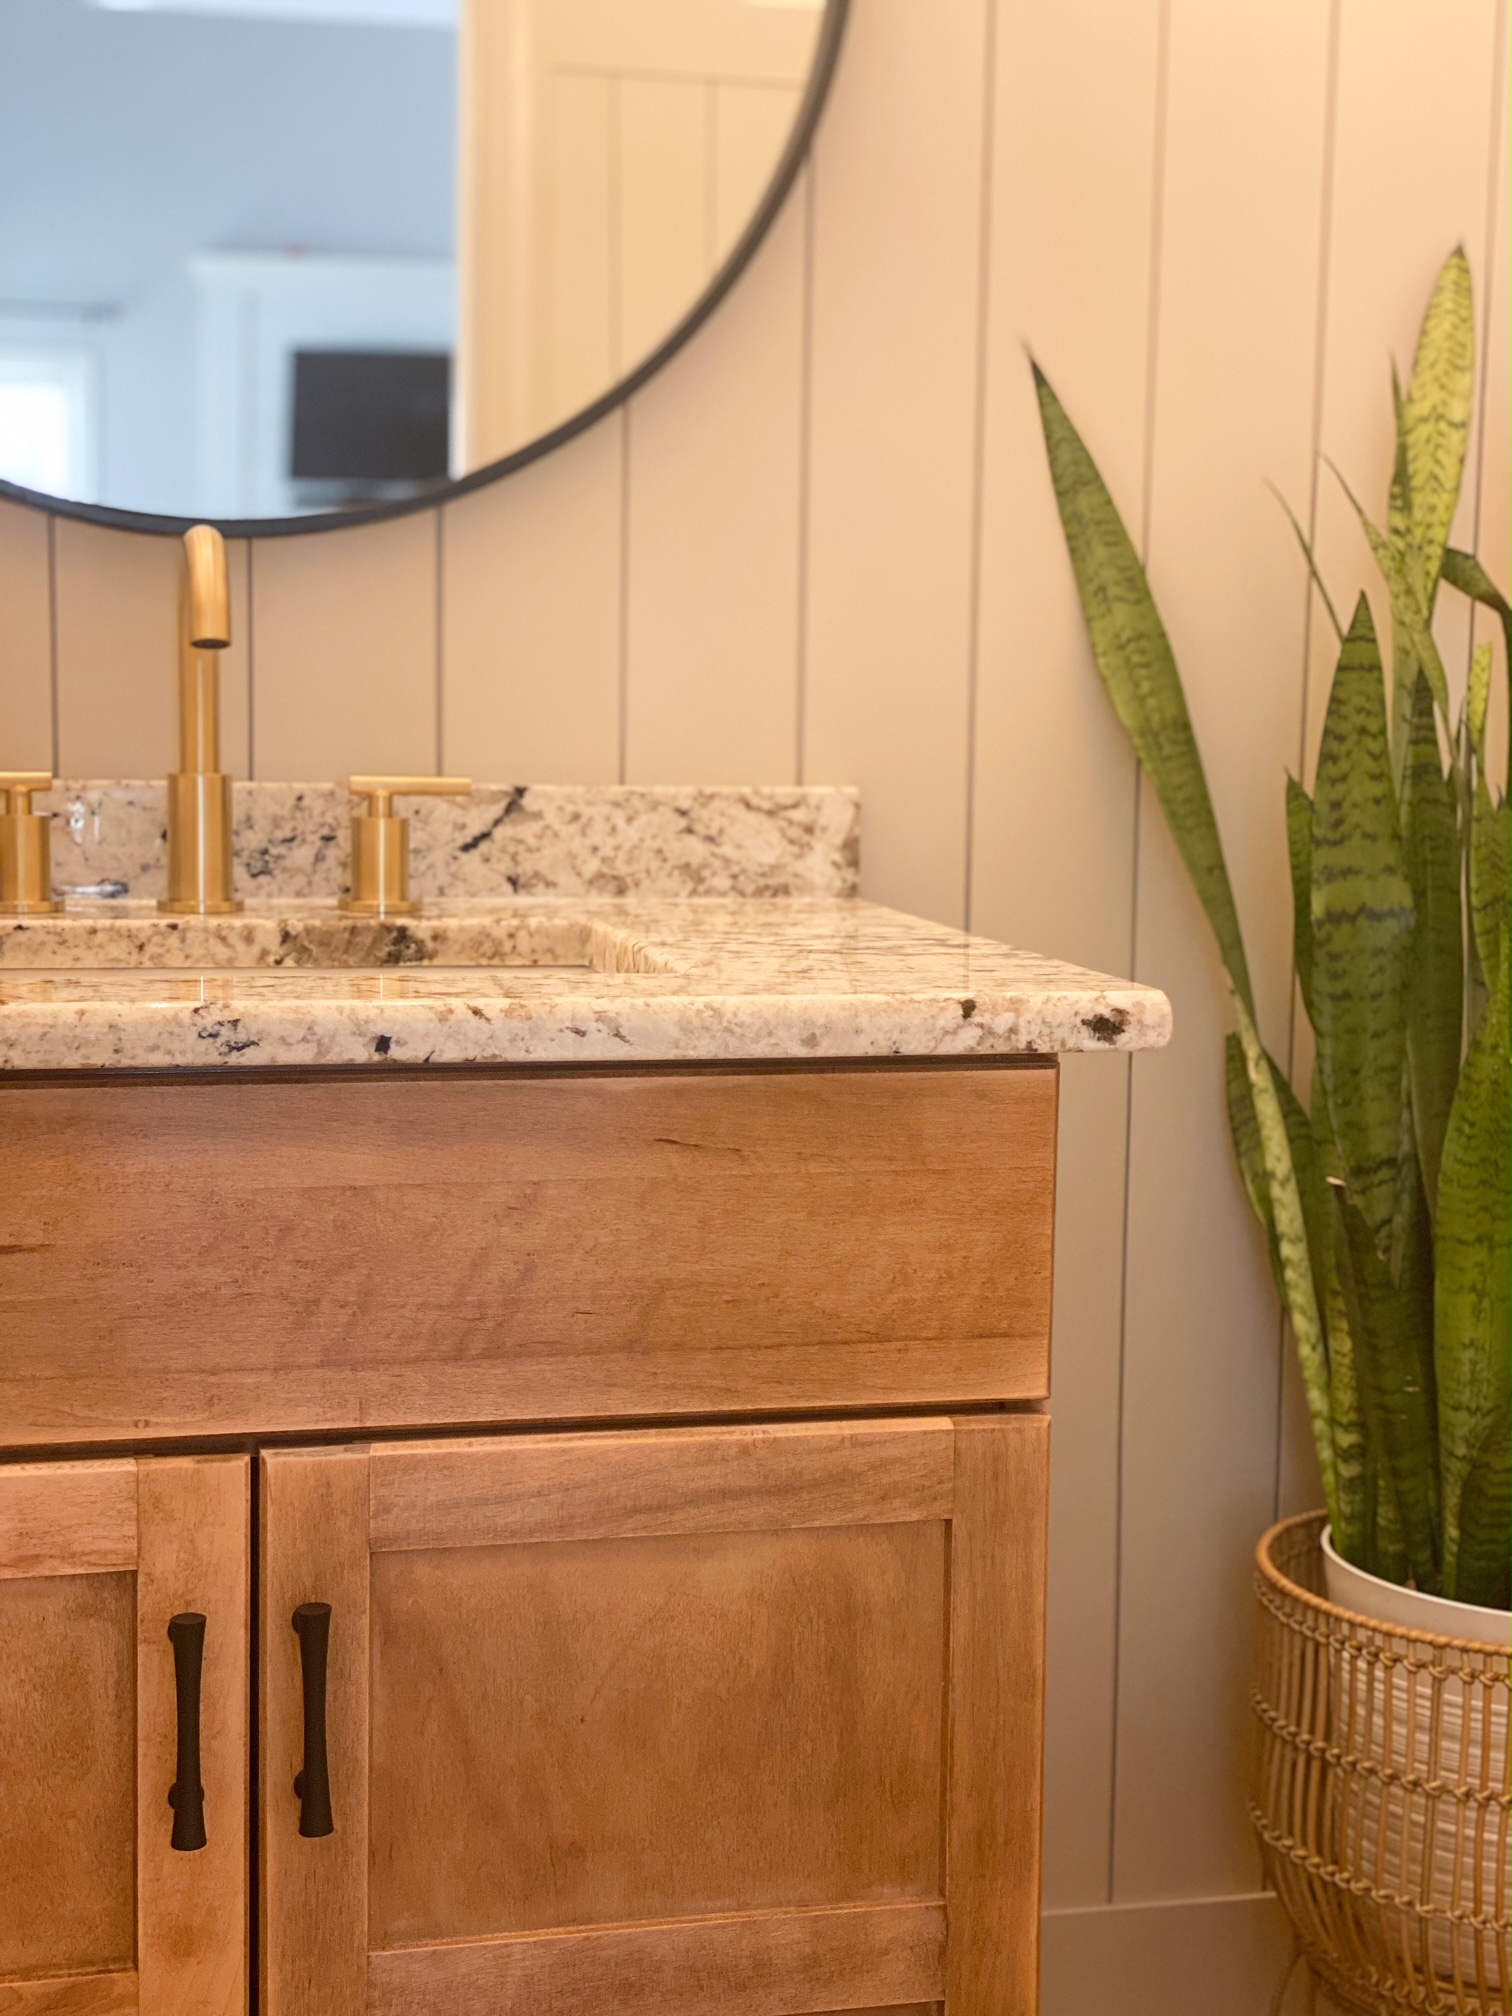
As paint was drying on the walls, I decided to update the existing vanity and strip the brown stain. I saw this inspirational photo which solidified my decision. Our granite was very similar in coloring.
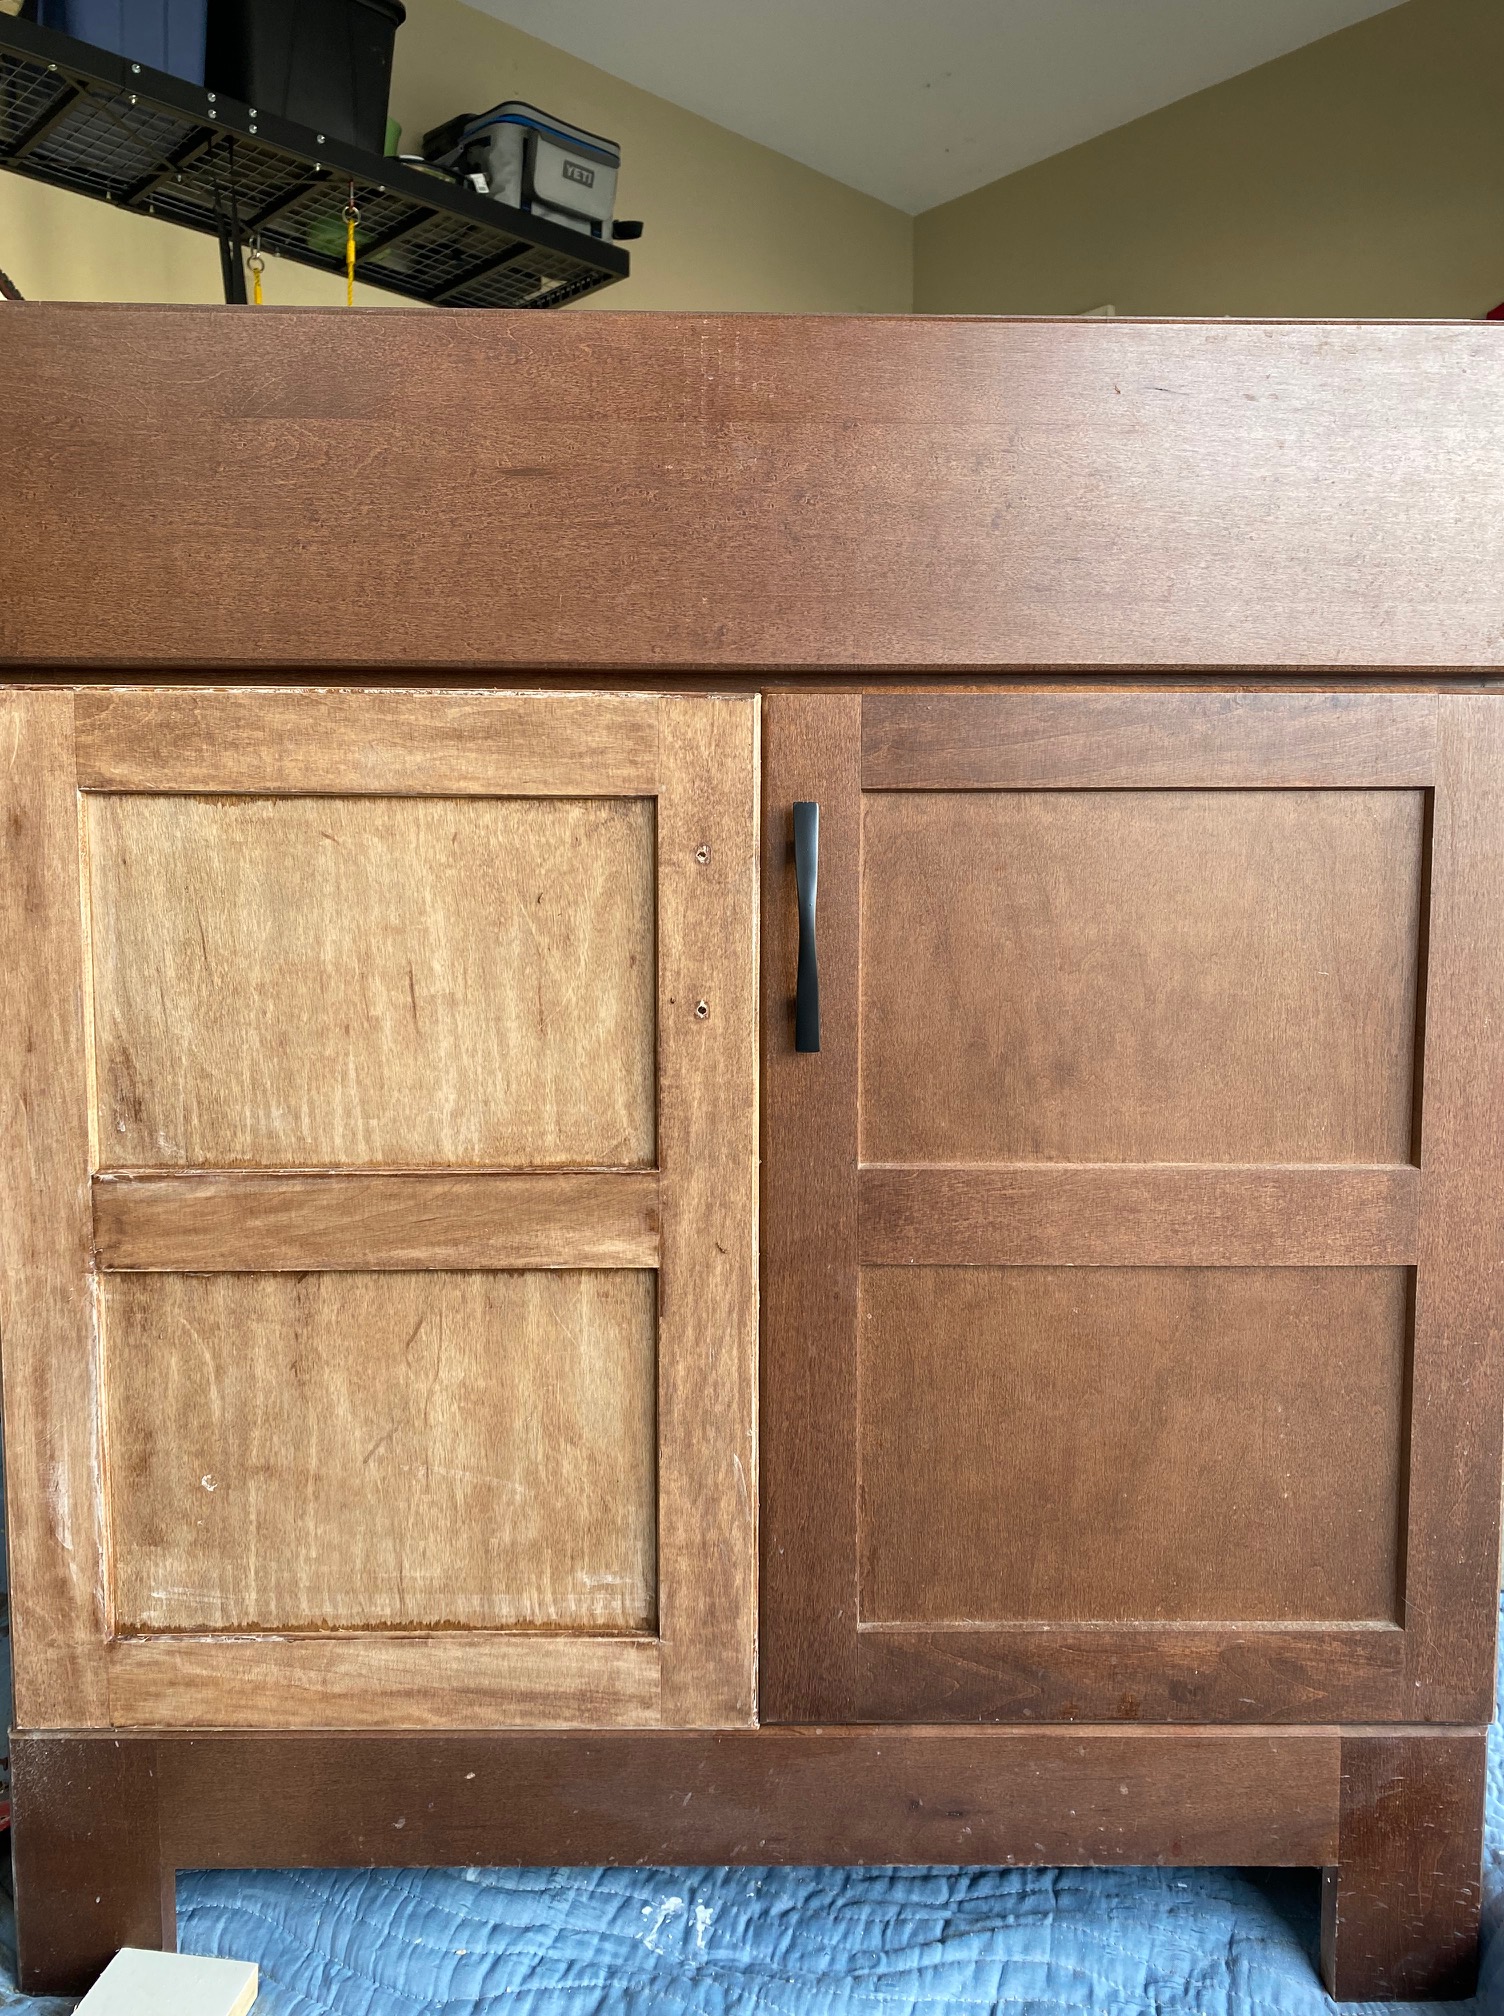

I first tried a couple rounds of oven cleaner as stripper but I didn’t love the results. You can see the beginning process in the left photo. Next, I went the route of Citri Strip and it did much better. I also coated the doors with Citri Strip and wrapped them in plastic wrap to let them sit overnight before scraping off the product and stain. The result revealed a beautiful color that was very similar to what I was hoping for.
With a little grit, I cleaned up the corners to get it to match using steel wool and 220 grit sandpaper.


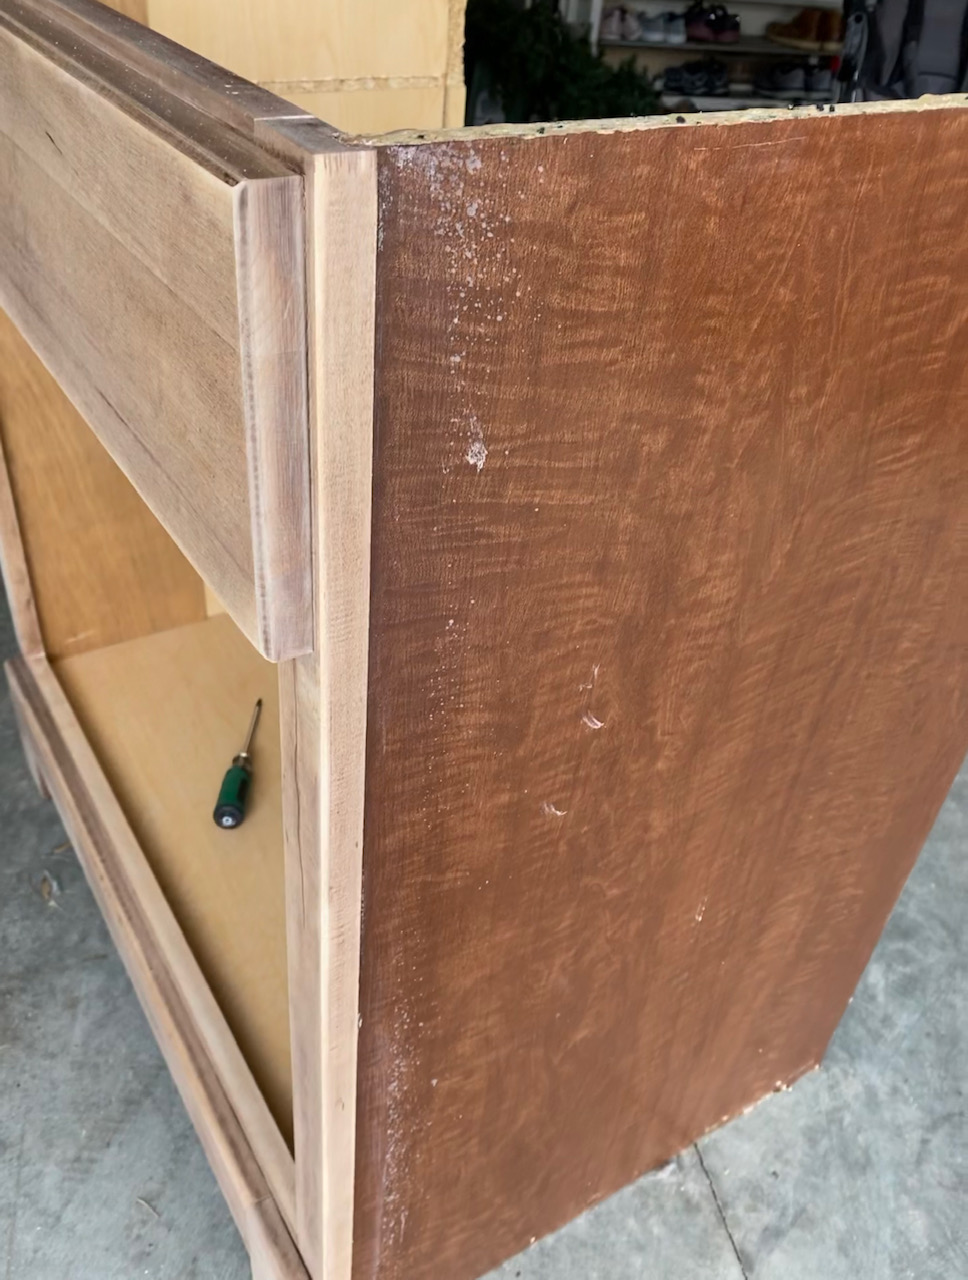

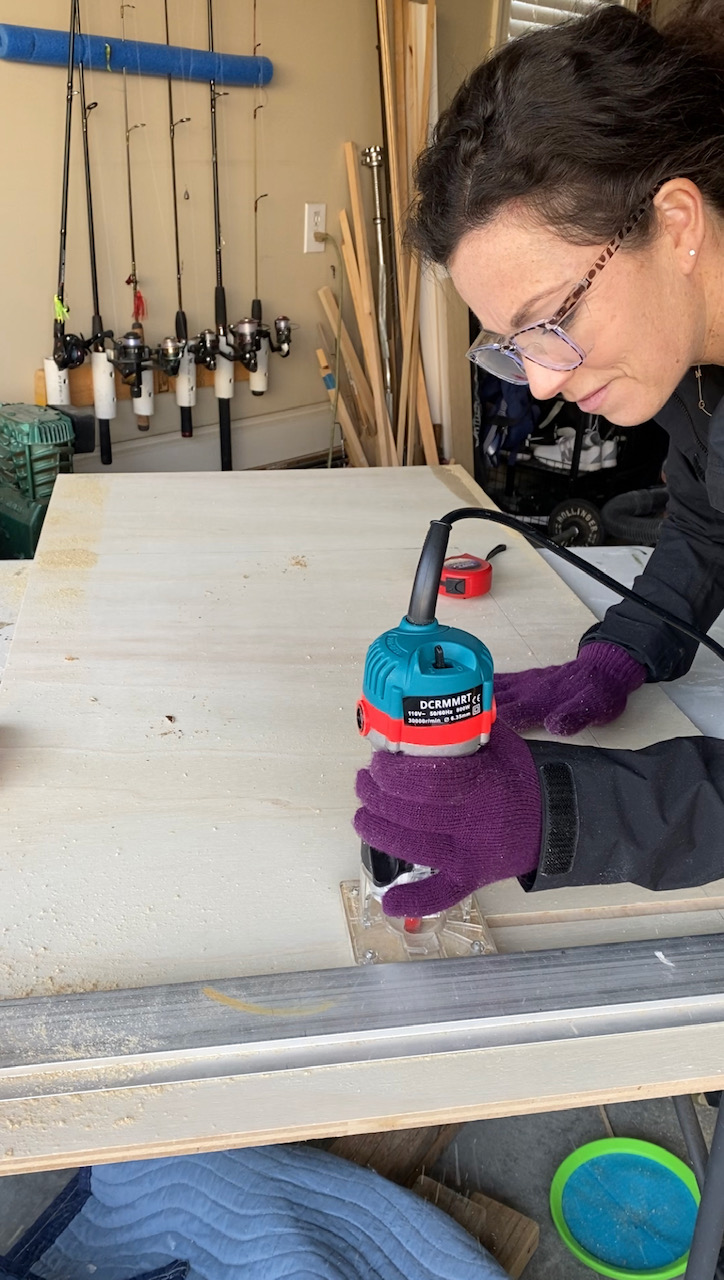
Where this vanity got tricky was the fact that I had to update the side panels. They were not made of real wood but had a veneer finish; therefore, stipping them of stain wasn’t an option. I had to replace the side panels with new 1/2 inch sheets of plywood. We were out of scrap wood that met the size requirements so I purchased 2×4 sheets from Home Depot and cut those down to size. Without using a table saw, I used a guide, clamps and my skill saw to trim it to size. I feel much more comfortable with this tool vs. a table saw.
This also allowed me to try out my new router tool to create a ledge for the cabinet shelf to rest in, just as it did on the original side panels. This was such a fun tool to use. I look forward to future projects when we can try out different bits that it came with.

After the new side panels were cut to size and the ledge routed, I had the task of matching the stain to the stripped down vanity color. I did this with a combination of Special Walnut, watered down white paint as a white wash, and Dark Walnut. I ended up doing 2 more additional coats of dark walnut to darken it up more and found the perfect match.
After stain, the side panel was attached with wood glue and 1 inch brad nails. I then finished it off with 1 coats of clear Matte Polycrylic. This is my favorite poly and is easy to work with. Tip: Between coats, you have to use 220 grit sandpaper to get the smoothest finish.
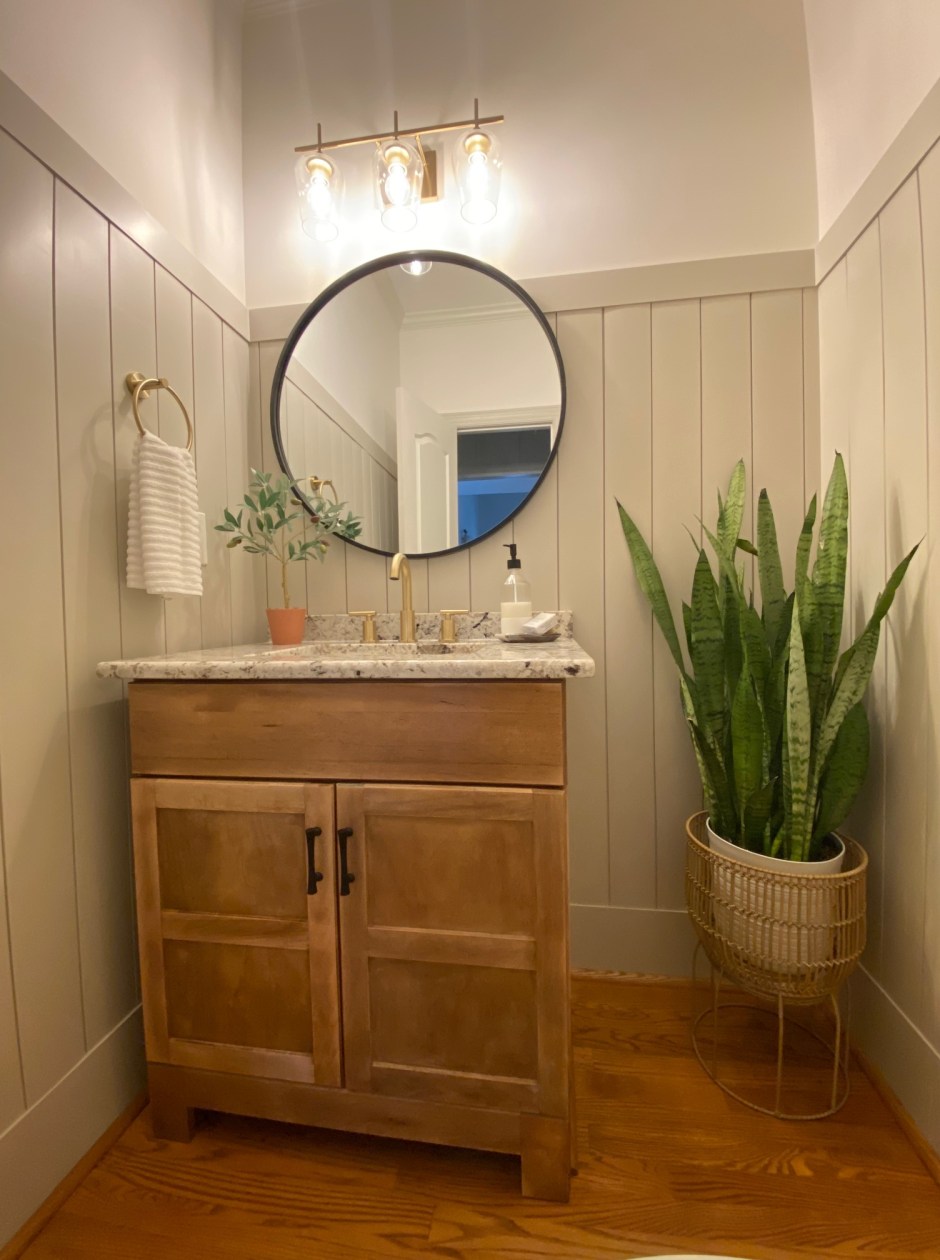
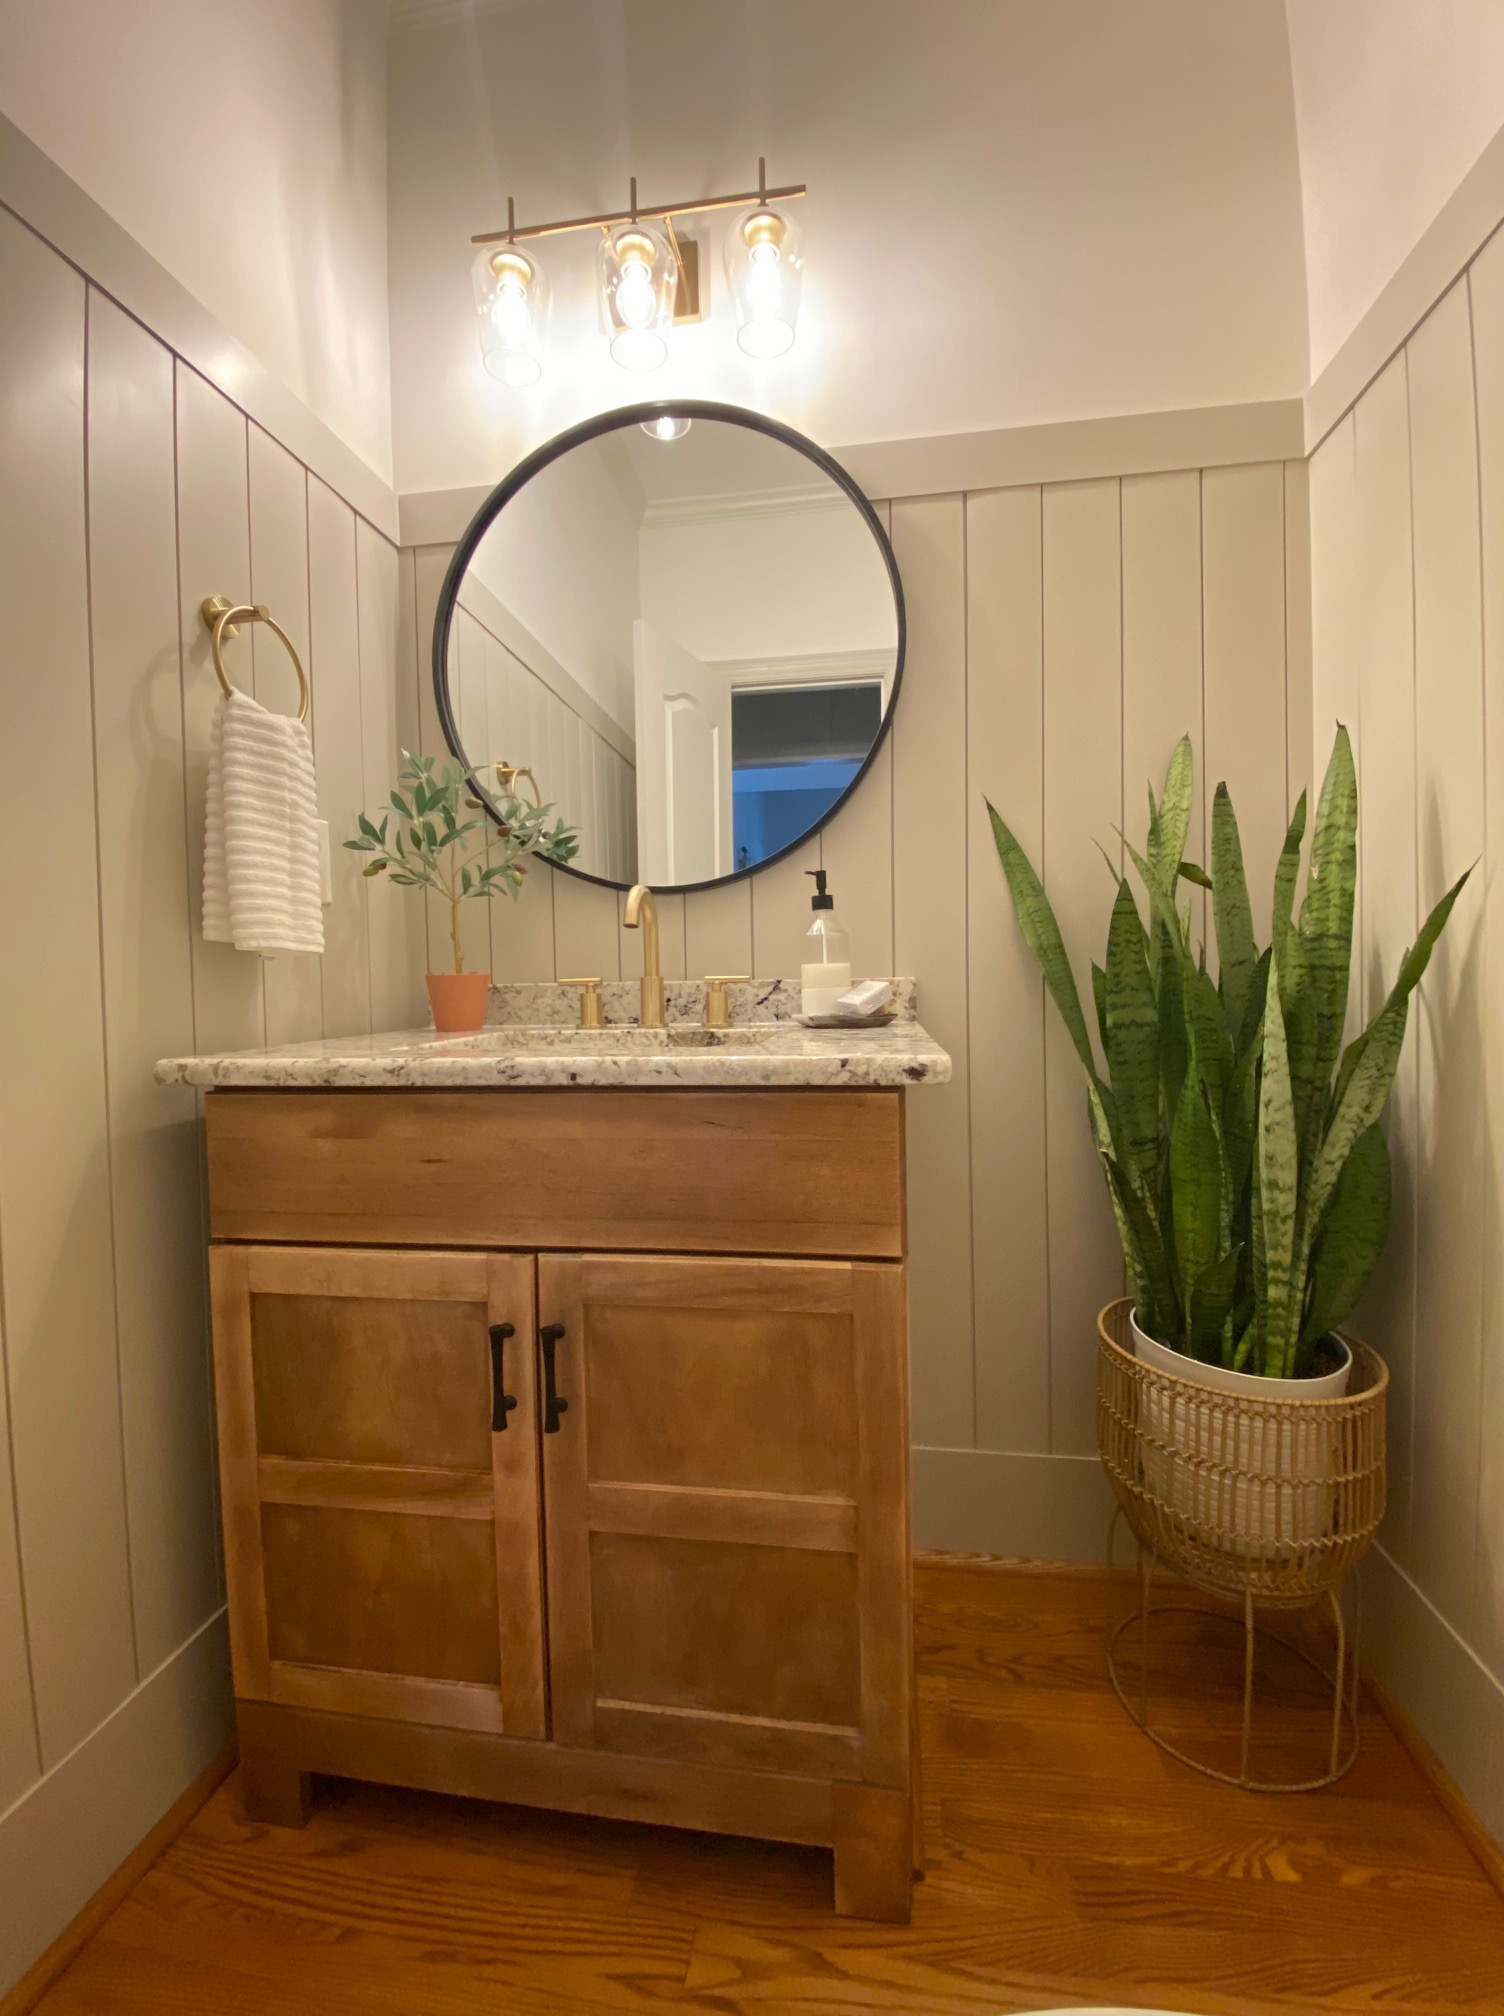
Check out the progression of adding the vanity back into the space, the counters, doors, faucet and new handle pulls.


Similar Mirror, here.
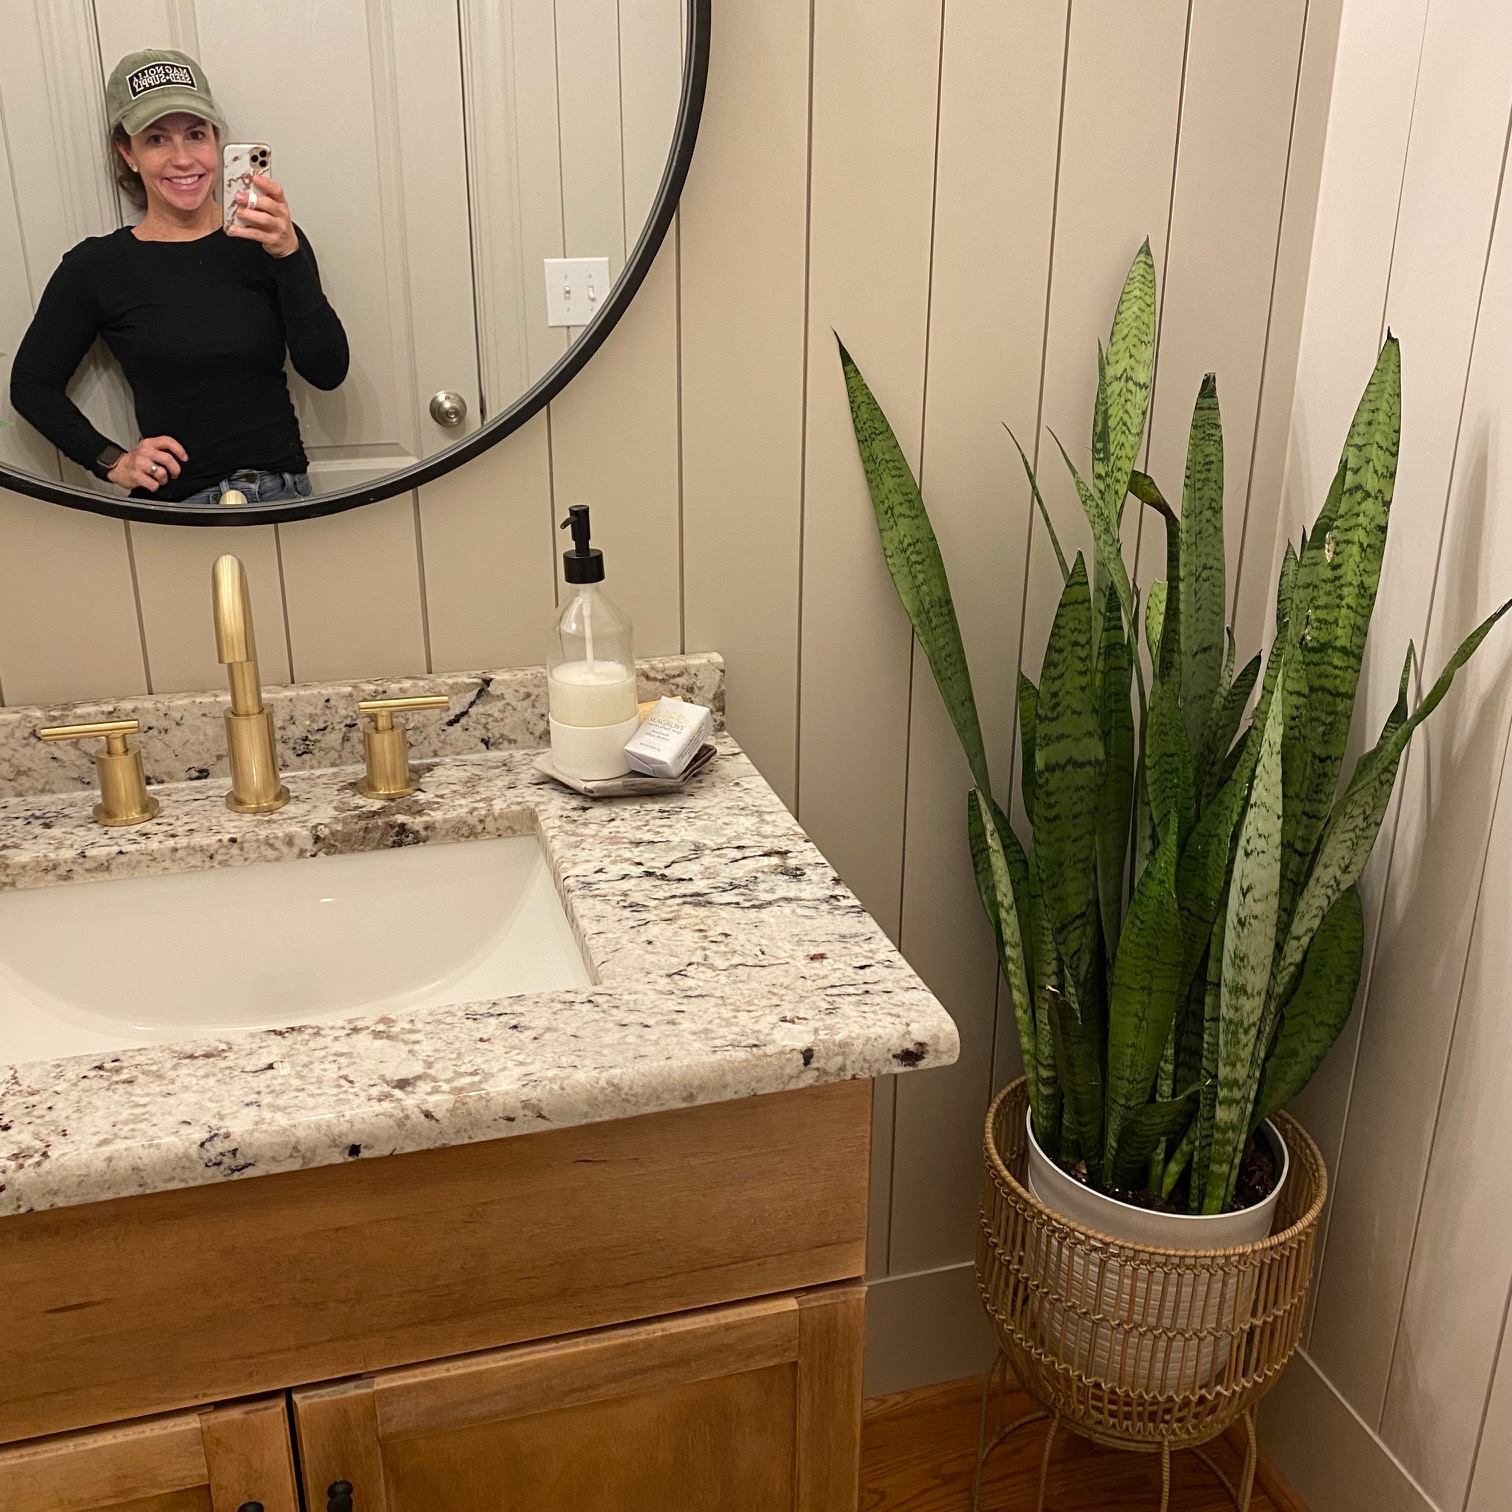
Adding in the finishing touches was one of my favorite parts. To fill the dead corner space, I found this giant snake plant at Home Depot for $22! The plant stand was an awesome find at Marshalls.
My favorite piece is the room is this watercolor lily. It was a gift to my grandparents by one of their church members. They had is framed by a local business who made a special pocket on the backside to hold the card that was handwritten and included with the art. The special note is a reminder of the impact they had on so many lives and that motivates me to live life to the fullest.


Before we look at the completed space in its entirety, let’s remember where we started again:


LINKS:
Towel Ring and Toilet Paper Holder
What do you think about the Powder Room transformation? Would you believe it was completed for less than $600? Most of that cost went to lumbar because we went with primed pine vs primed MDF.
I hope this inspires you to make the most of your space and transform it with a little paint and a little elbow grease. The before and after can be exactly like your mood board.
Having kids brought more excitement back to Halloween. I now understand why it was so much fun for my parents to dress my brother and I up in costumes. I may still question the logic behind some of the costumes <Insert this throwback below>
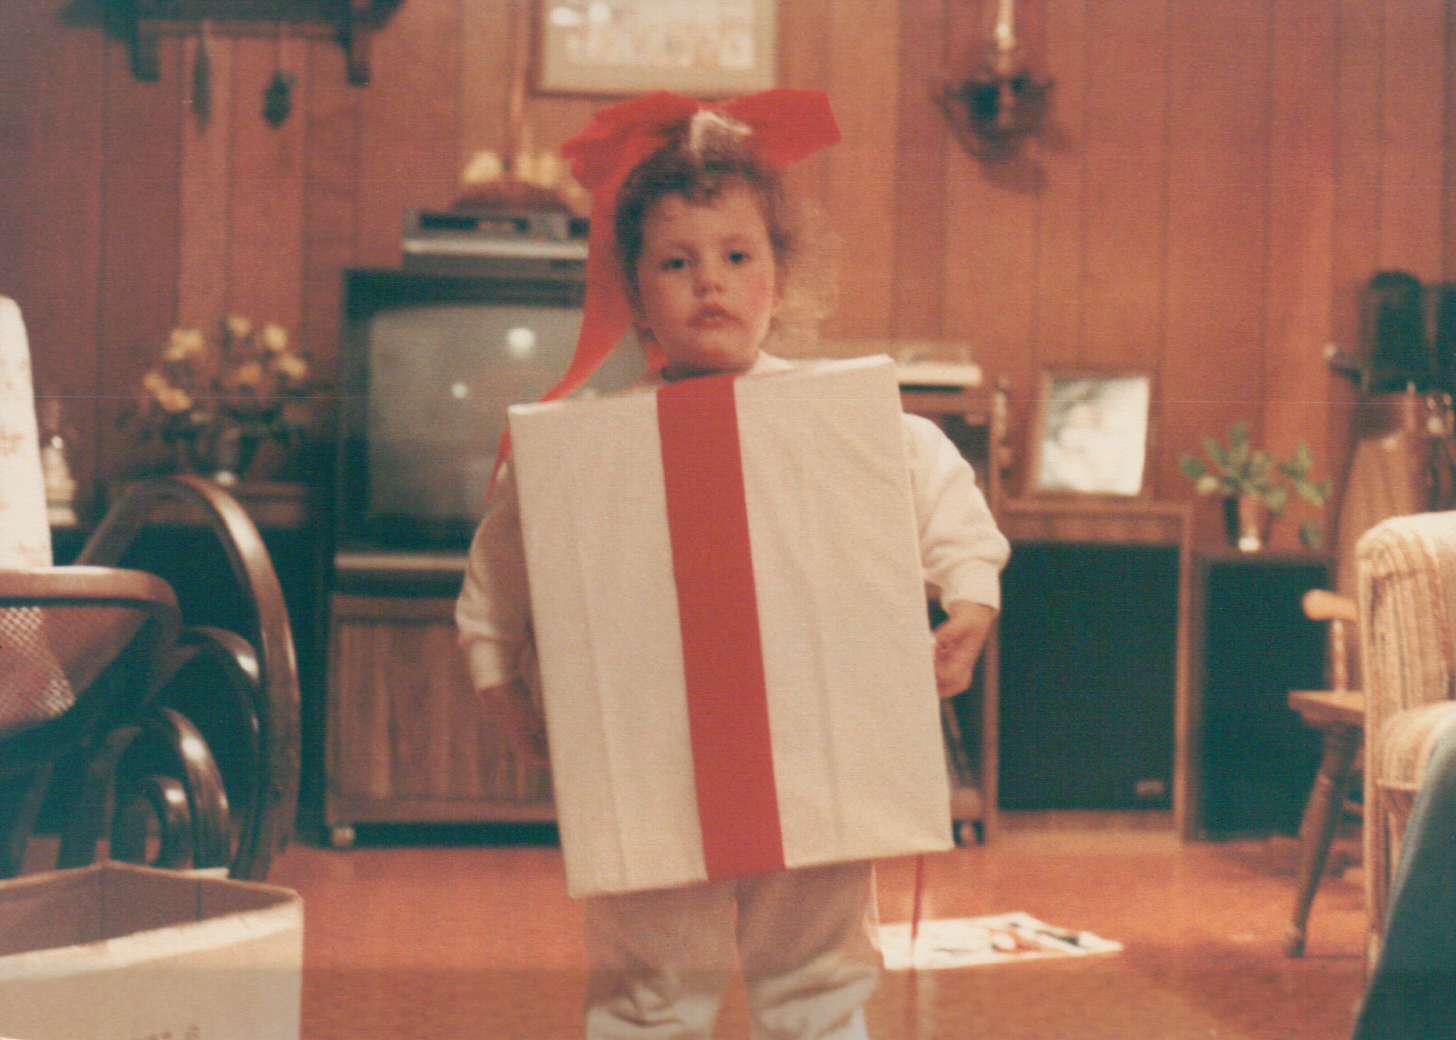

A walking present? I need to ask my mom if I requested this number.
I hope you will find inspiration in my attempts to DIY some of our costumes the past few years.
Football Player & a Baby Football
The first year we had 2 boys to dress for Halloween, I kept it simple and went with a football player and baby football. We had an ECU jersey which was gifted to us as my husband is a proud Pirate graduate.


I searched Pinterest for a DIY football padding template. I used this one, Padding Template. The only thing needed for this, foam, scissors, string and hot glue. I happened to have all these items on hand from past home projects that required these items.
As for the baby football, I bought a brown onesie from Blanks Boutique . The quality of their products are wonderful. I always bought from them for majority of my monogramming and embroidery items I made for clients when that was a business of mine.
I cut strips of white fabric to mimic that of a football and sewed them with a simple stitch down the center of each. I set the stitch spacing to a wider length as I knew I’d also be removing the white fabric after Halloween to add a proper fall turkey applique for the upcoming Thanksgiving holiday. (I’m always looking for multi-purpose uses for things in the home and with clothing.)
Where The Wild Things Are


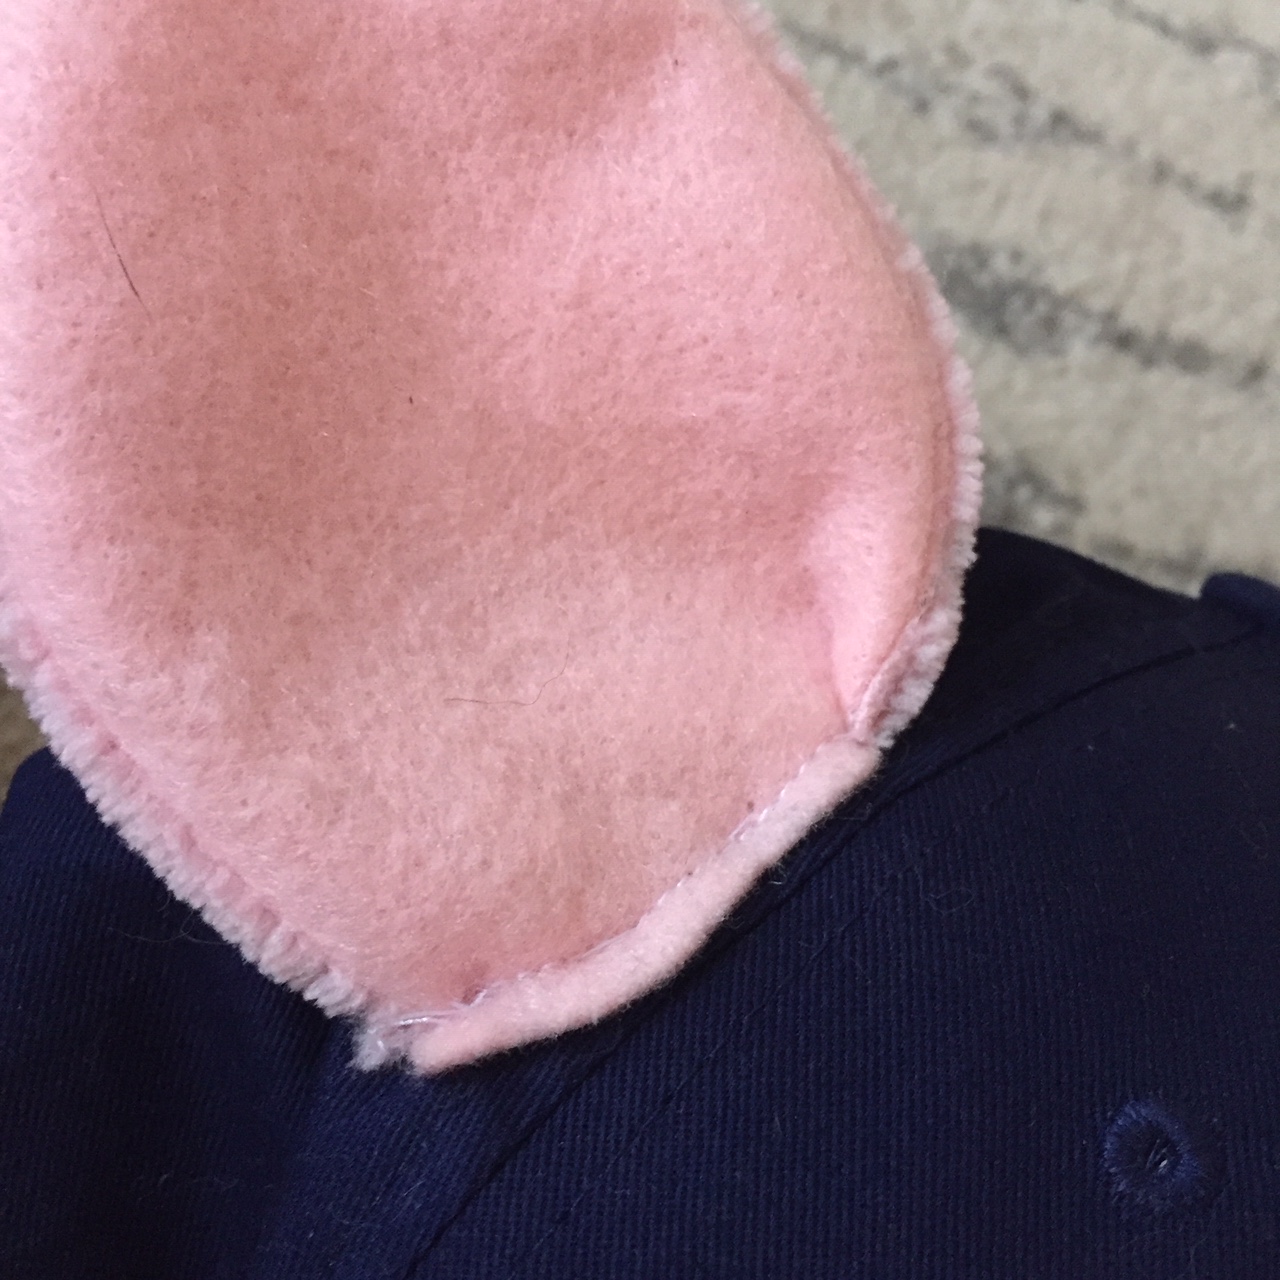
Our oldest loved reading this classic children’s book beginning at the age of 3. His love for the book inspired their Halloween costumes. This dragon caught his attention at TJ Maxx which I thought we could easily work into the theme.
Wanting to find an option that had multi-purposes for our youngest, I took to finding ways to make his costume. I found a sherpa onesie on sale for 50% off at Baby Gap that was the main necessity for him to become Max. Here is a similar option for less, baby Sherpa .
Between Michaels and Walmart, I was able to find faux fur that had wire inside and oversized tan buttons that I could easily add to the sherpa and remove after Halloween.
The crown was a party pack (Target) left over from our youngest’s 1st Birthday party (which happened to be the same theme). I hot glued a small bit of faux fur to the base of the crown, then lightly stitched it to the top of the hooded sherpa onesie. I used more of the faux fur to attach the tail.
Once again, the sherpa was put to use after Halloween as I was able to easily remove the stitched fur additions.

I’m linking ready-made costume options below:
The Three Little Pigs and The Big Bad Wolf
I cannot take credit for this idea. One of my close friends dressed up in costume with this family theme the year prior and we loved it.


There were pig headband sets but I knew our boys wouldn’t keep them on. I opted to make a template for the ears and sew them onto hats and a beanie for our youngest.
I first sketched out a basic template for the ears on paper, then used the paper template to trace onto pink fabric that I already had. I made the ears double-sided, with two different fabrics. You could also use inexpensive felt sheets. I first sewed the ear edges then flipped them right side out before stitching to the hats.
The alligator clip pig tails were at Target last year (2018).
Overalls were found at Target. This year’s inventory at Target has more trendy detailing on the denim. HERE
As for the noses and wolf mask, Amazon had the best deals:
Pig Costume 1 Pig Costume 2 Pig Ear, tail, and nose set
Toy Story
This year’s theme is Toy Story. Our oldest wanted to be Woody and our youngest chose Buzz Lightyear, who he absolutely LOVES. I’ve just recently made the vest for the Woody costume which I will share soon. There will be more to come for this post once the final touches have been added.
Should you wish to buy a ready-made costume, here are some of the best deals I’ve found:
*edited below 2021
The Wizard of Oz

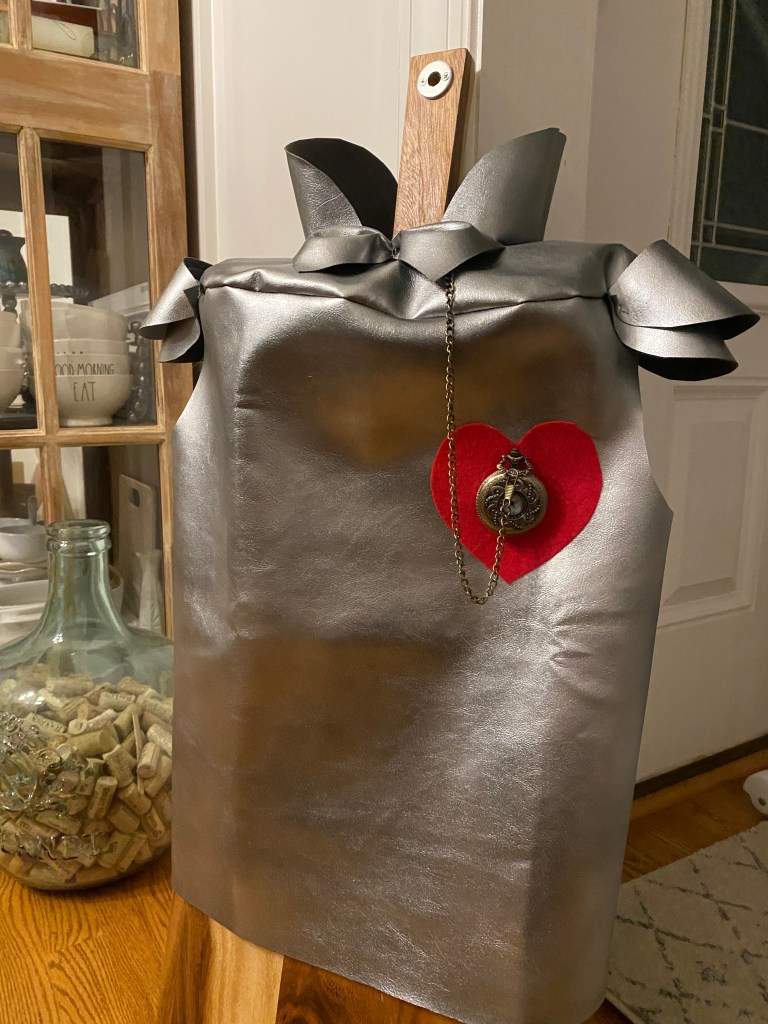


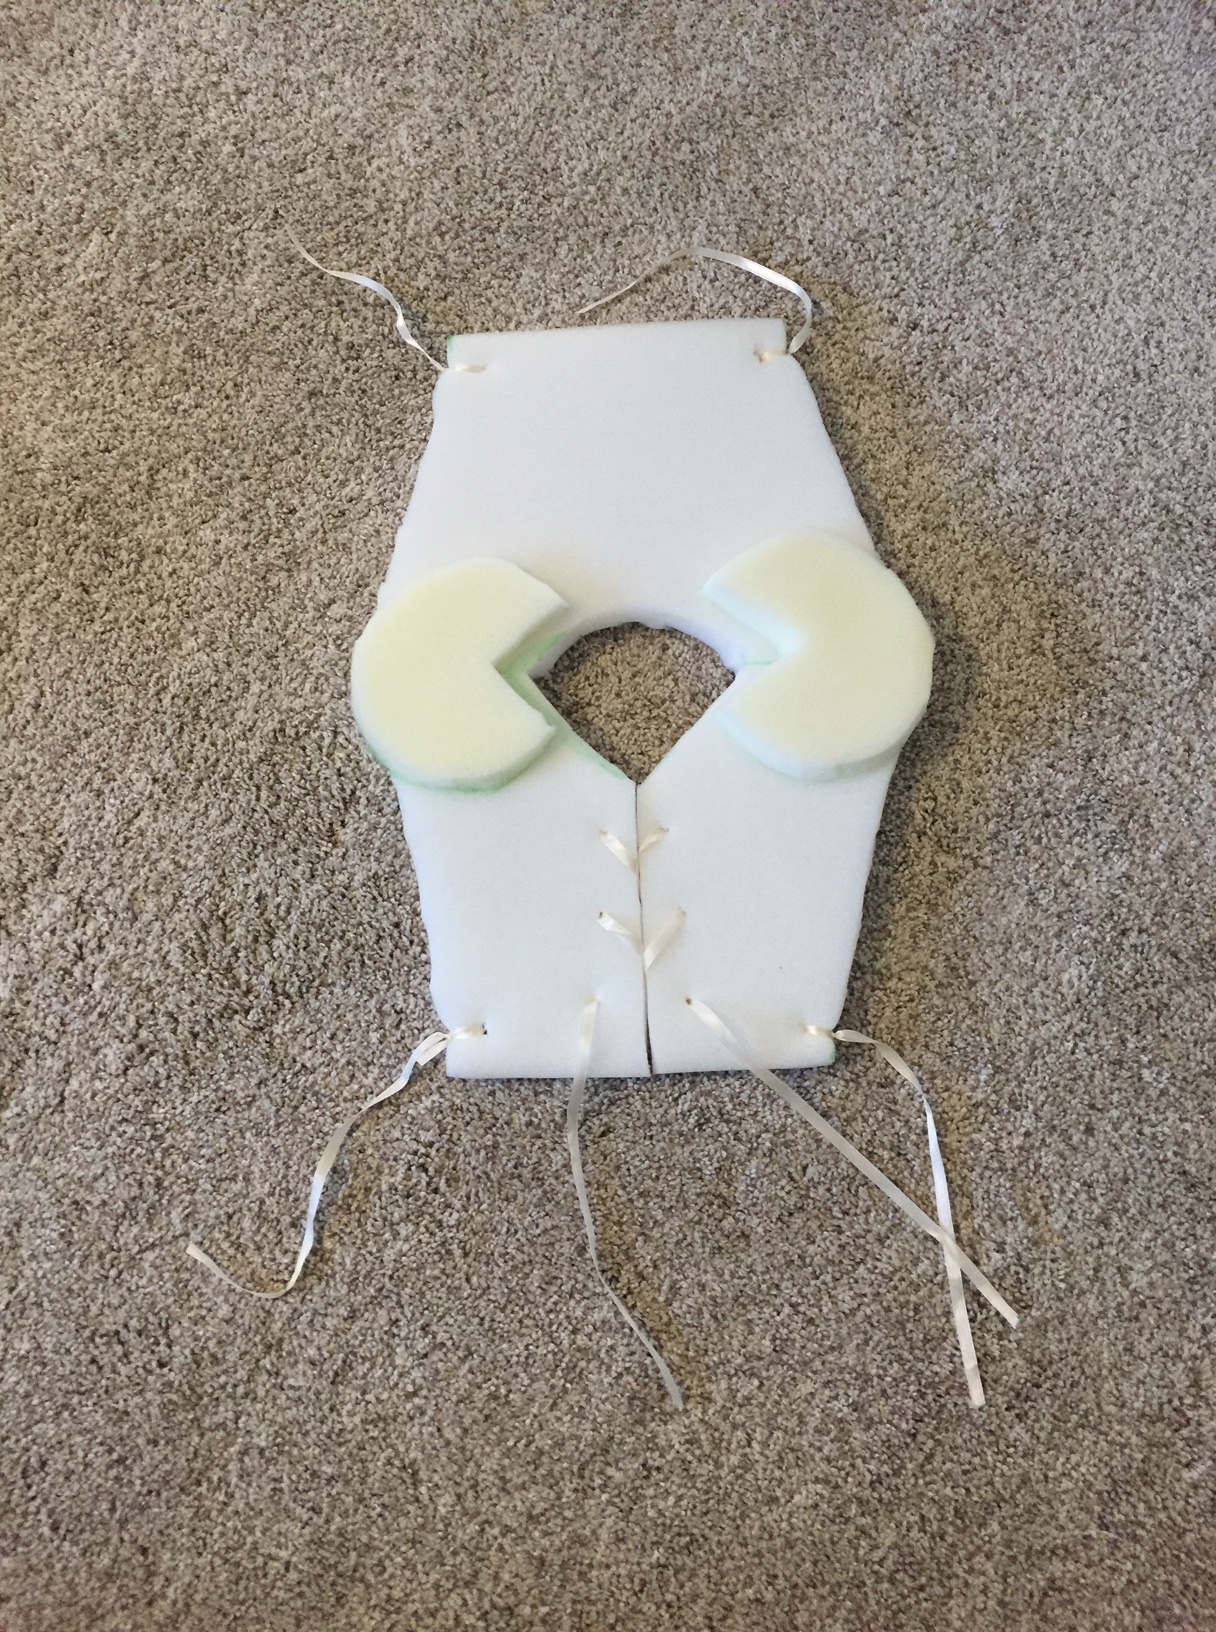
I don’t have a tutorial for how I made the Tin Man costume. I found an image of a similar costume and determined what I could buy fabric wise that would have stability and hold shape. A quick trip to the fabric store, I didn’t find a silver faux leather but did find it in black and decided to paint it. That idea worked!
I measured our oldest for shoulder width, body circumference and length and cut the fabric accordingly. I sewed the seams then painted it silver. As for the collar and shoulder detail, I also cut them to fit the body of the costume and hand stitched them to the bodice.
The scarecrow costume was fairly easy. The hat was made with black felt sewn together and adorned with jute and rattan. The fabric around his head and face was something I already had and had stretch to it. I cute out a hole for his face (not centered might I add) and loosely wrapped a piece of string to match the scarecrow look of the movie. We already had overalls and stuffed the pockets with rattan pieces. (Can be found at the $1 store.)
We had fun painting faces for the final family look.


It’s hard to believe Halloween is just around the corner. There were times when I was forced to DIY costumes because they had been sold out.


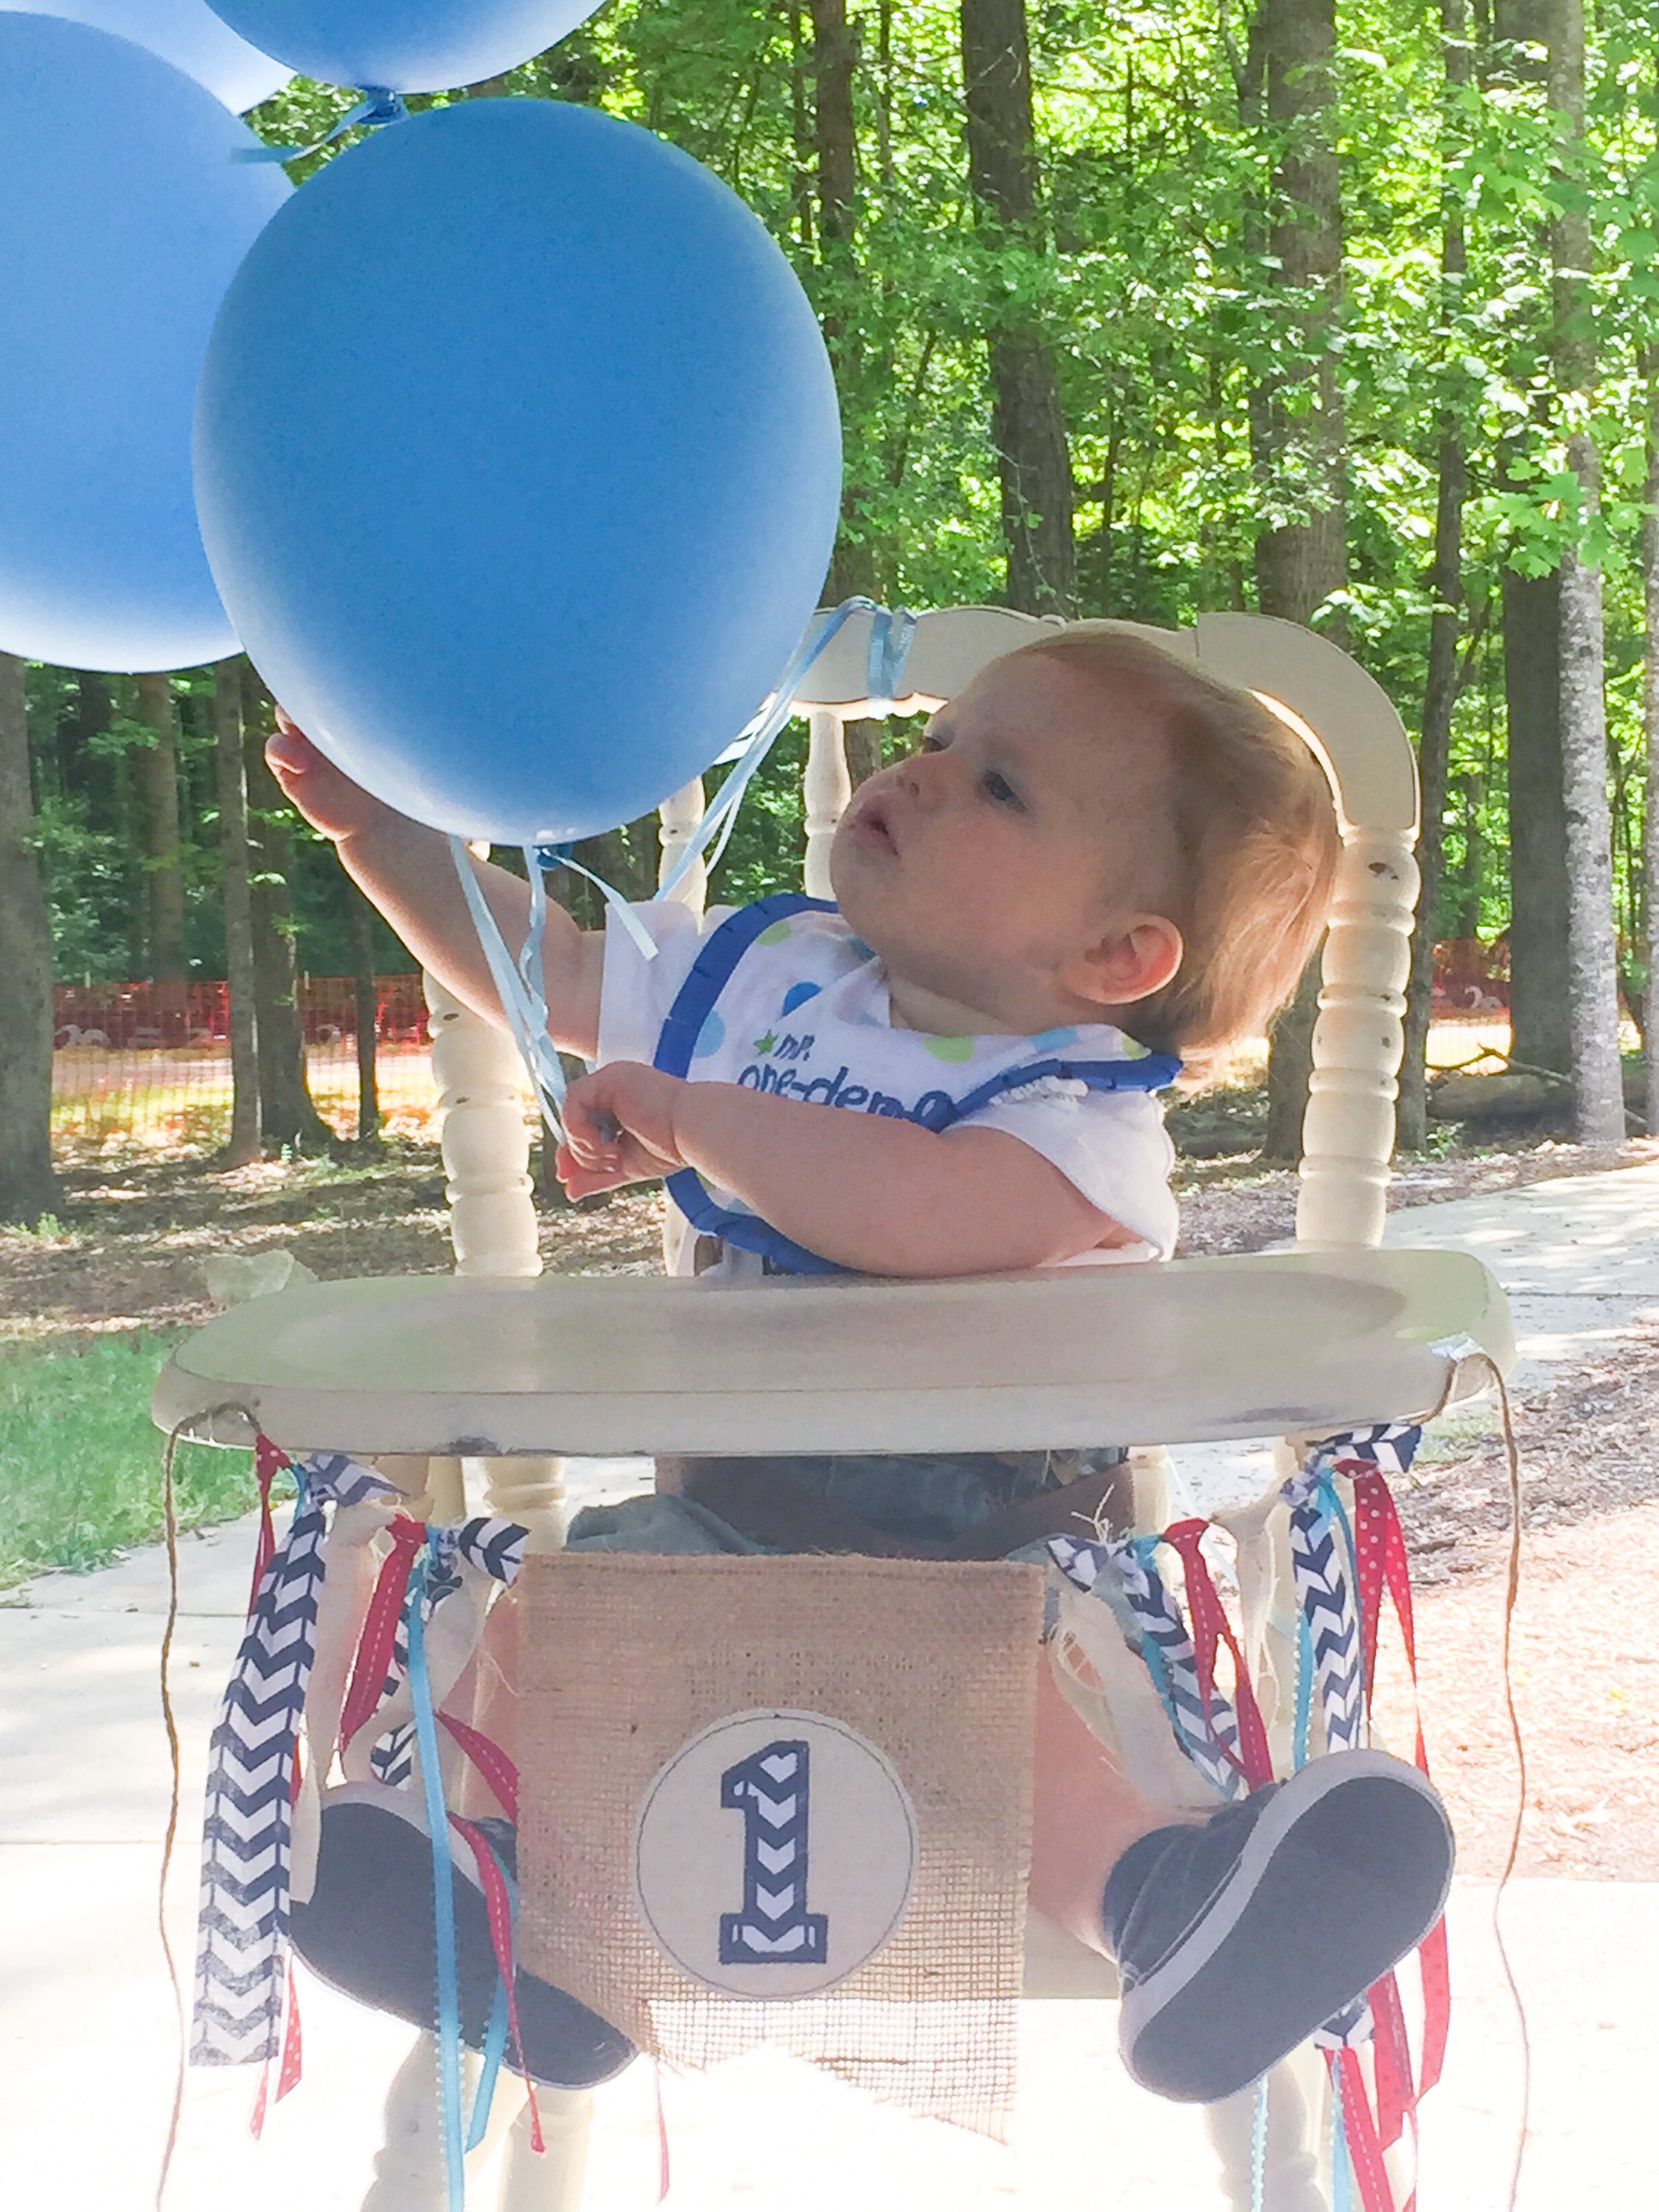
Admittedly, I was “that” mom who planned out a Pinterest worthy themed party for our first borns 1st birthday. Yes, it is something to celebrate but in hindsight, I realize he remembers nothing. My strategy for every party moving forward has been to keep things simple and family only until his 5th Birthday came around.
By 5, he had established a good group of friends and wanted to include them in his party (but only deciding so until the last minute). This Rock Party theme was pulled together in 1 weeks time. If you’re looking for a quick last minute party idea for a little boy, this is it.
I’m also sharing additional party themes we used in years past in hopes that you will get inspo and ideas to tailor for your kiddo.
Theme was derived from our boys LOVE of the outdoors, needing to collect every shiny & unique rock for his growing collection, and all things outdoors. A quick search on Pinterest and I knew what to do.


Materials:


Previous party theme ideas for boys:
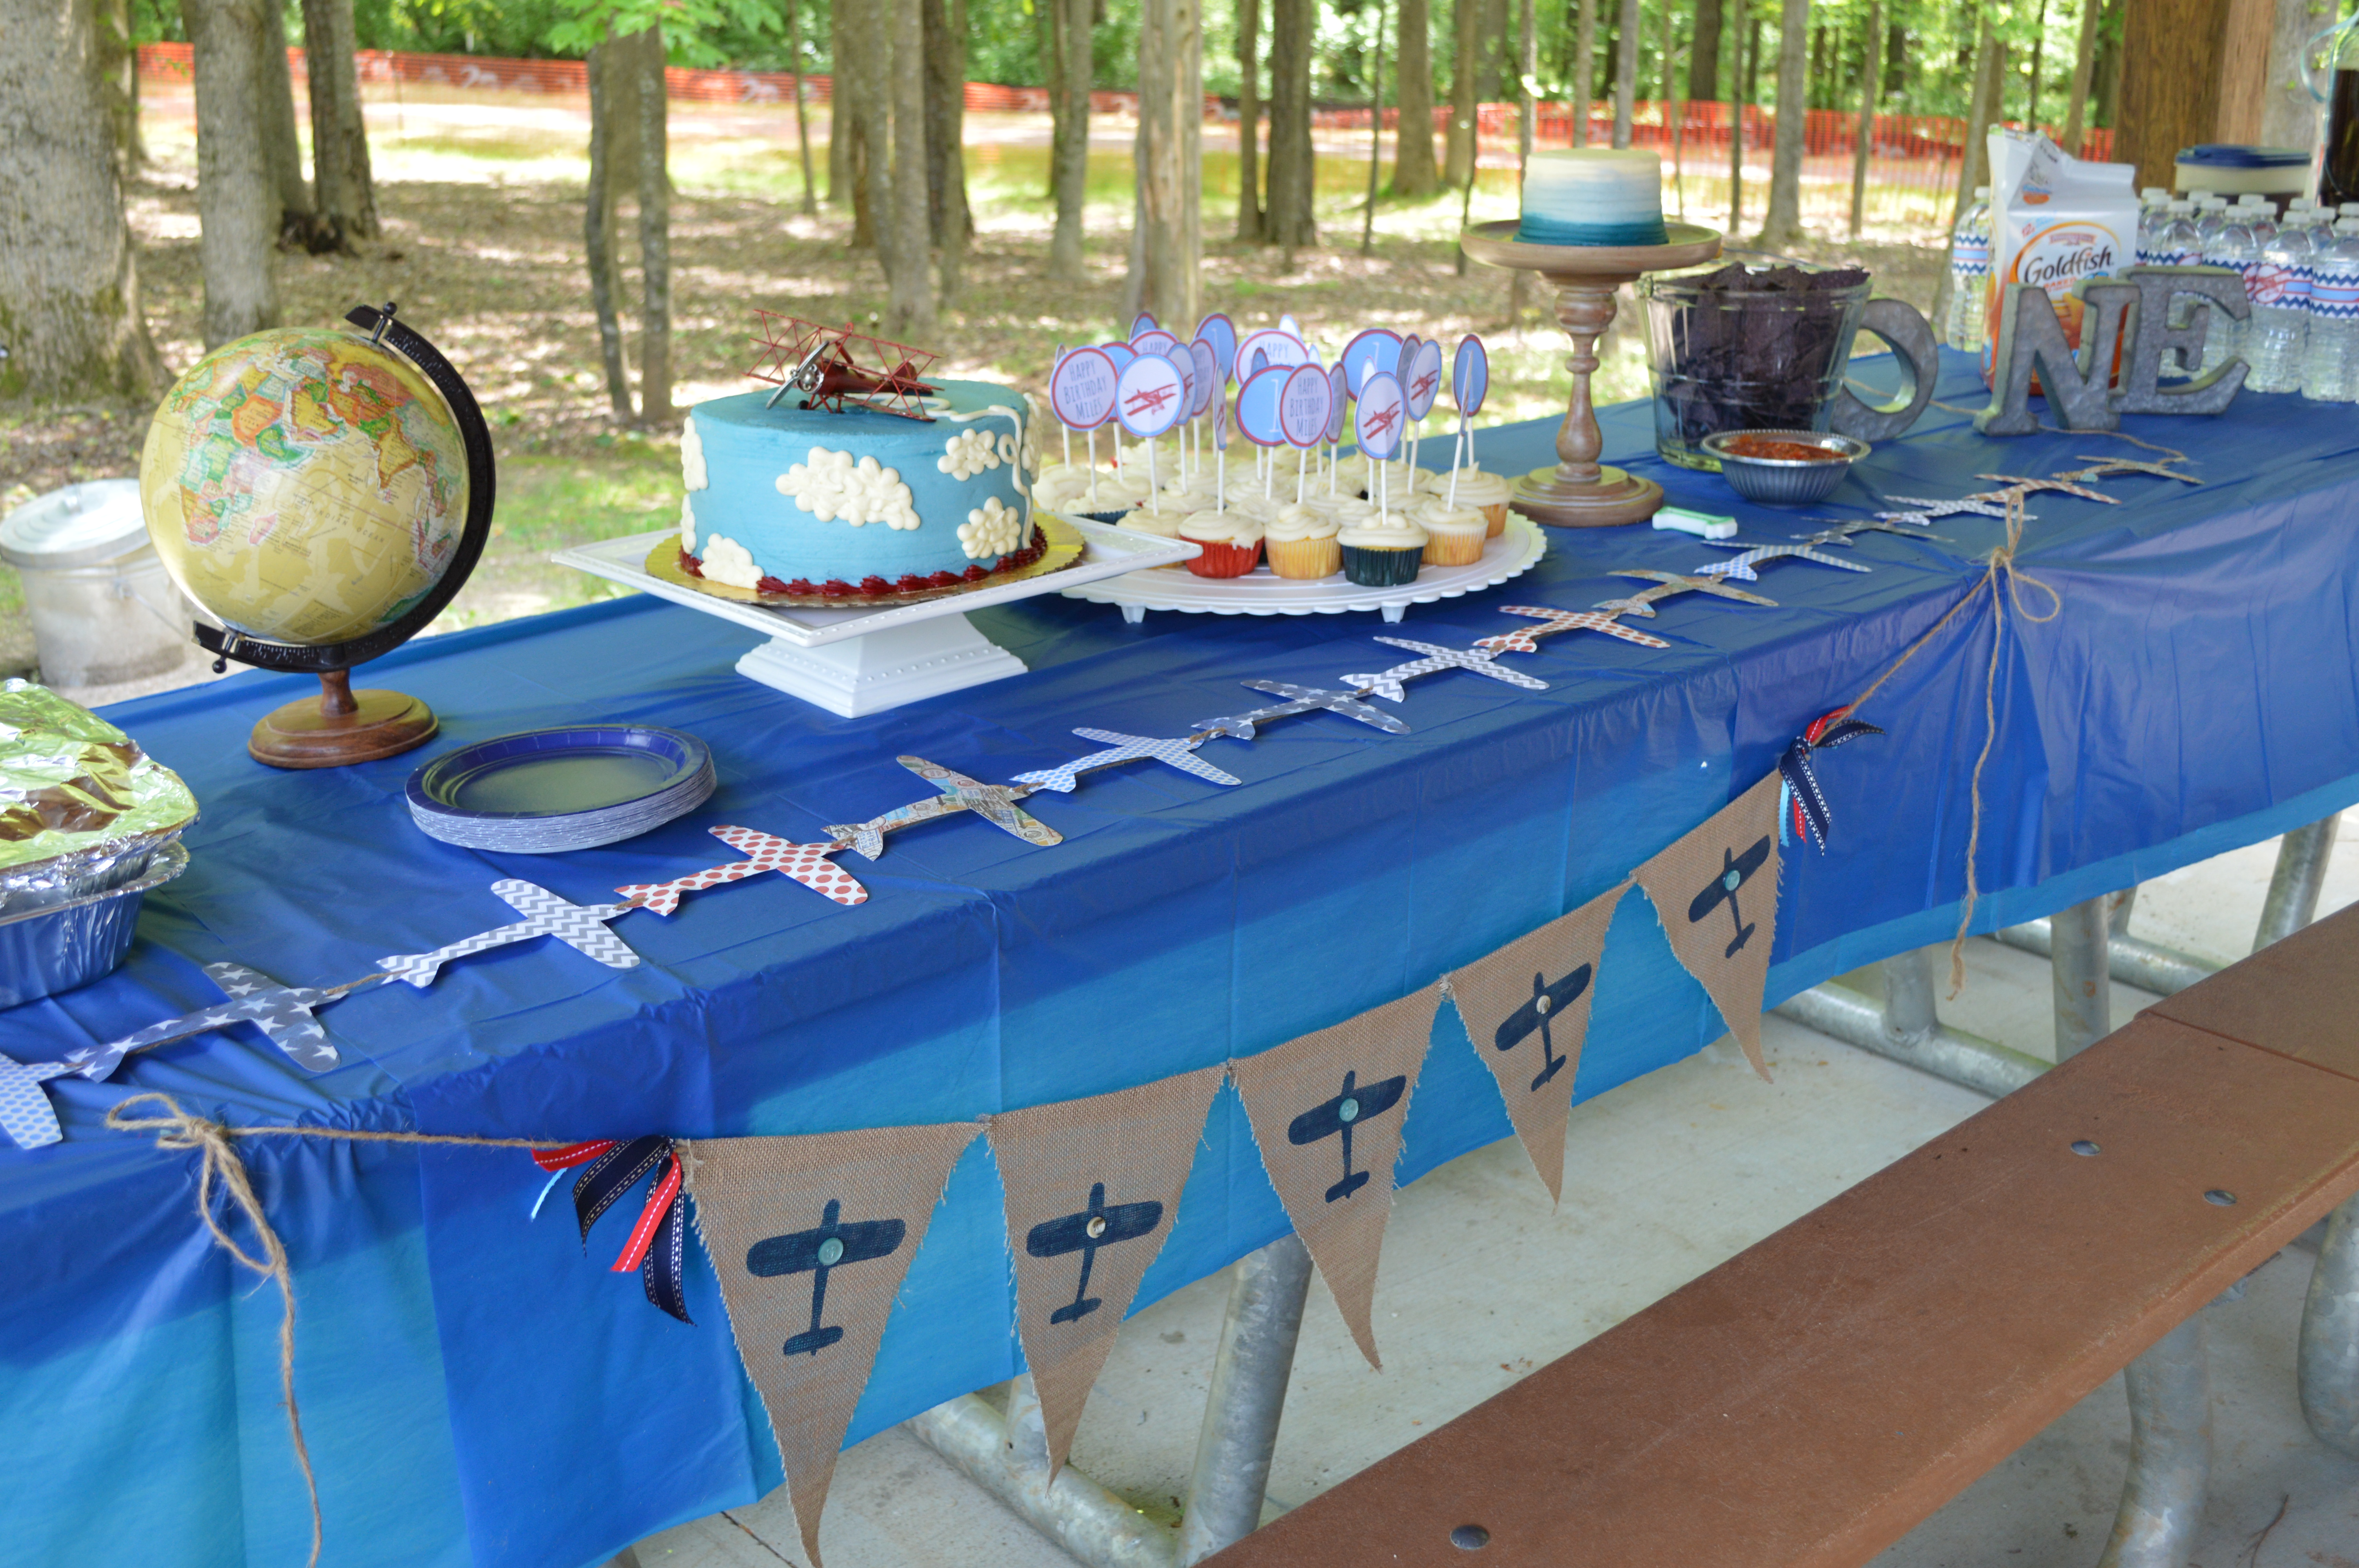
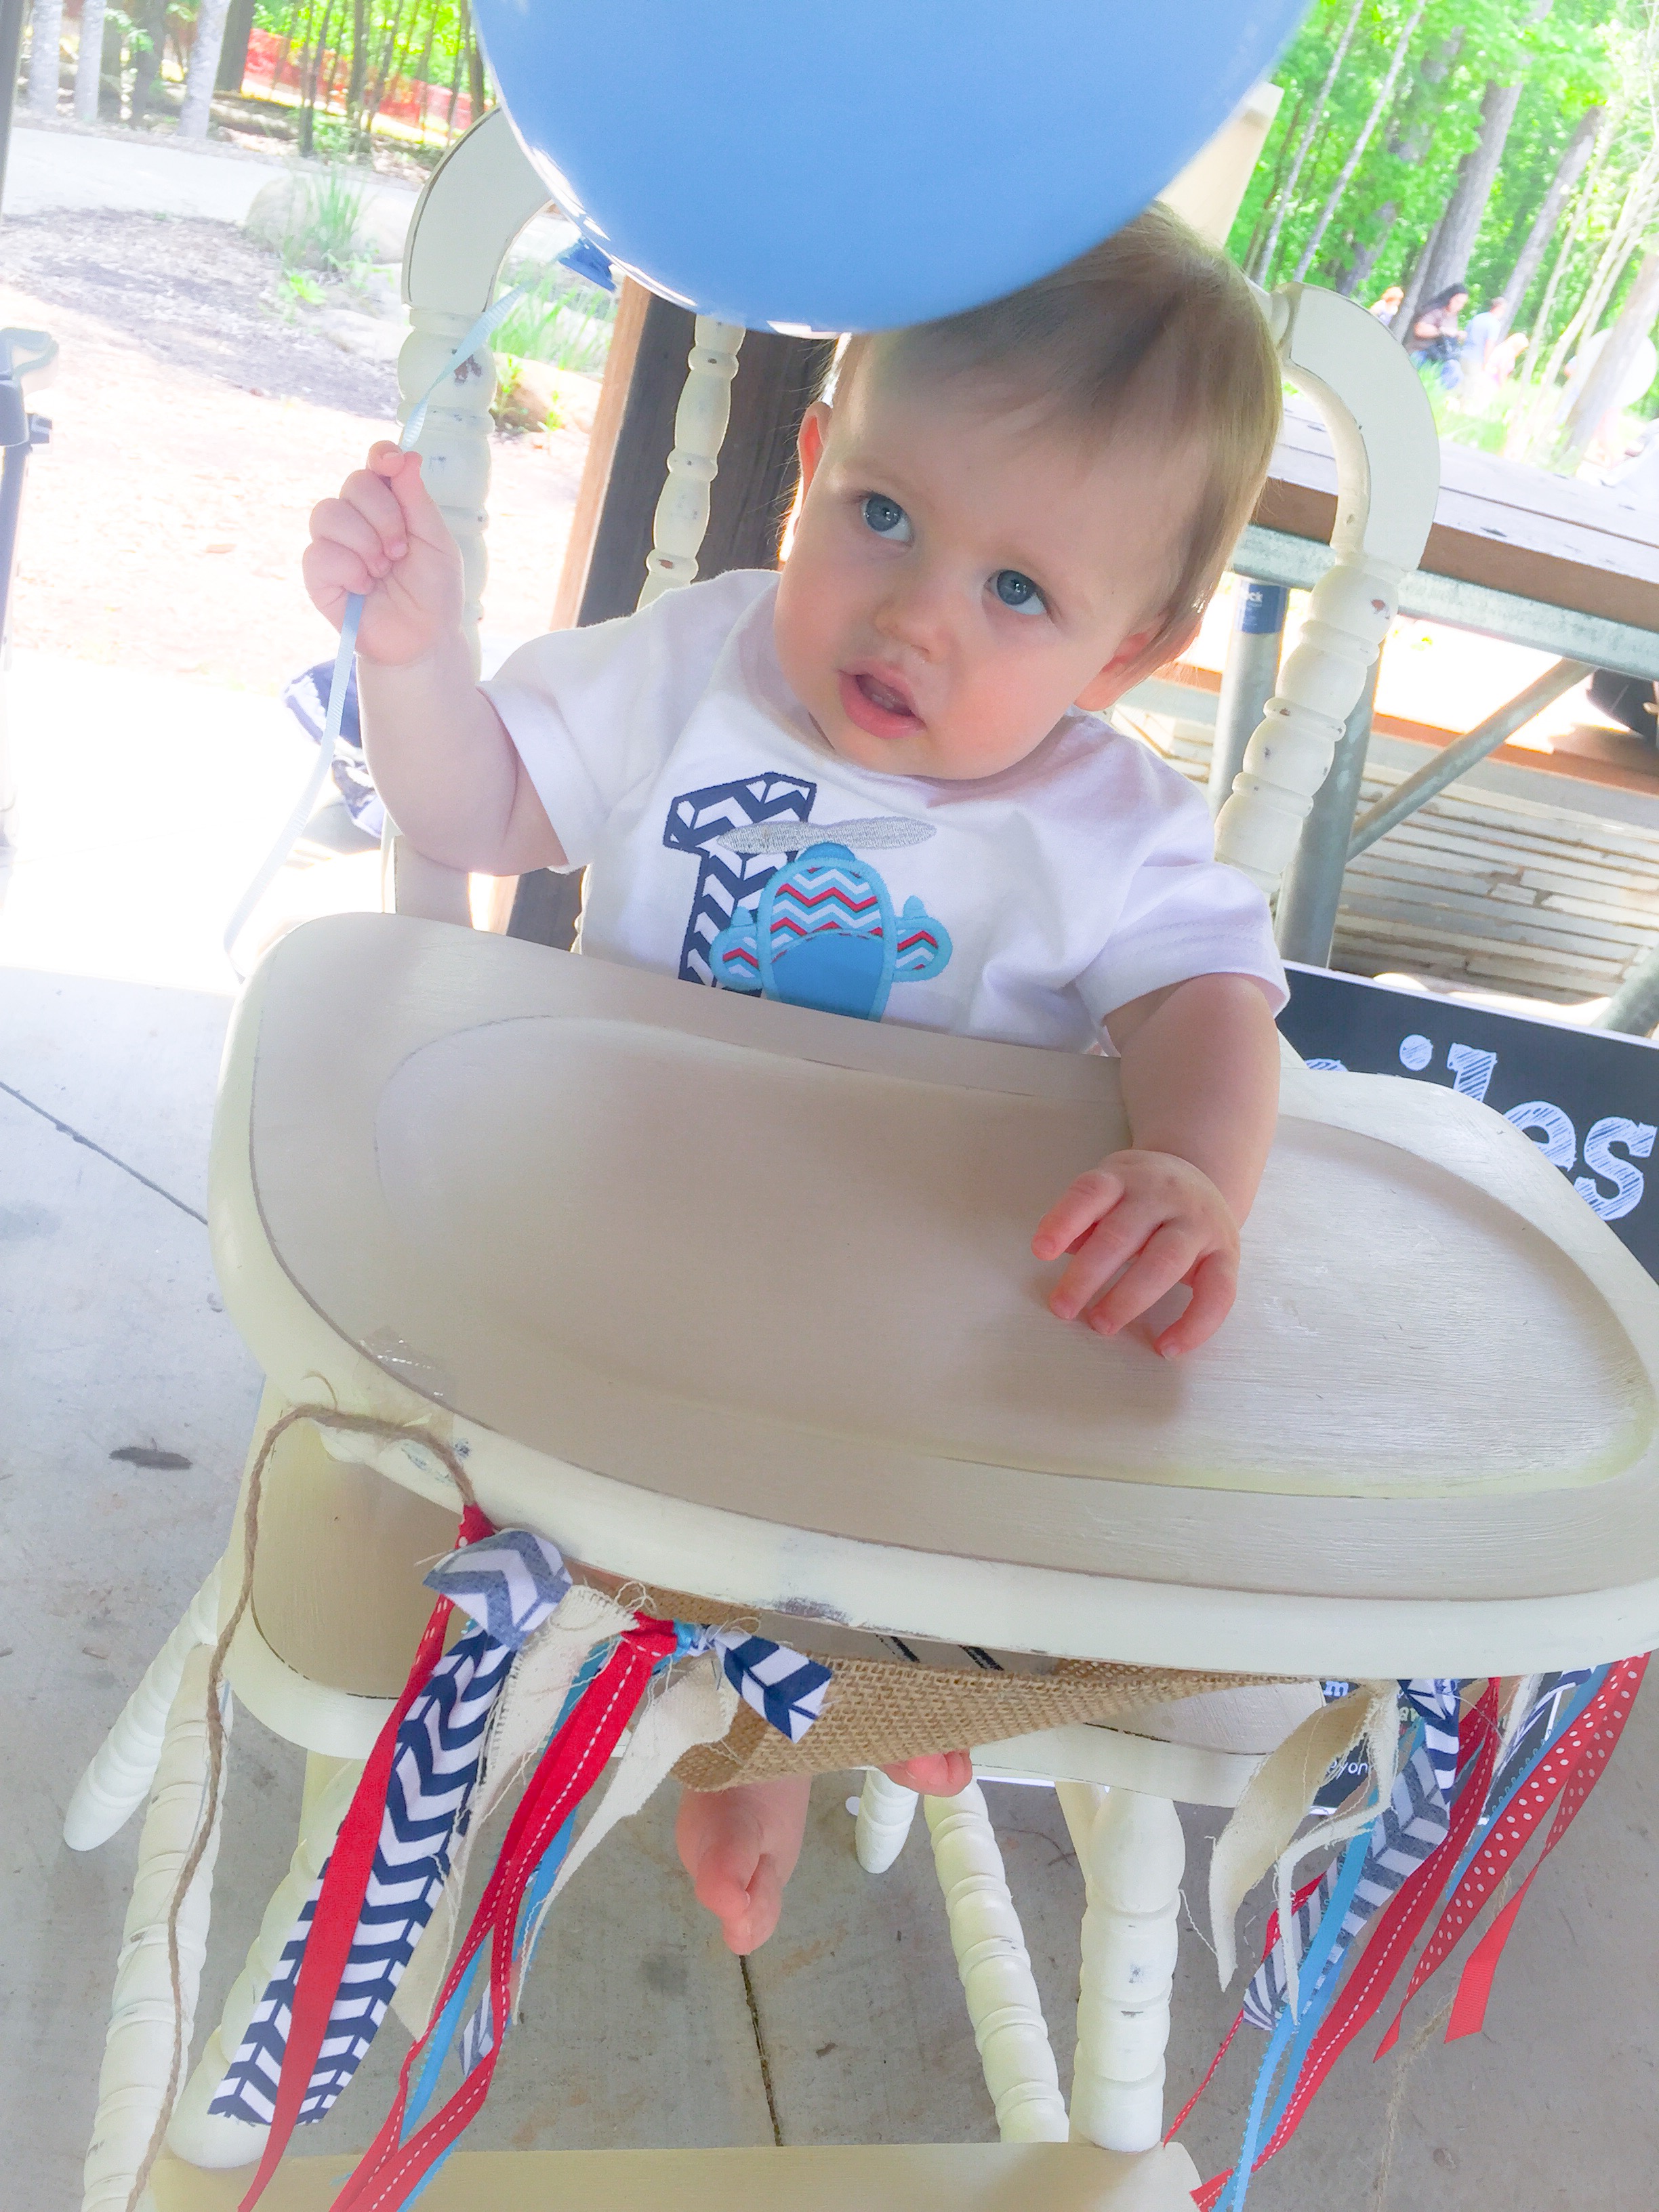
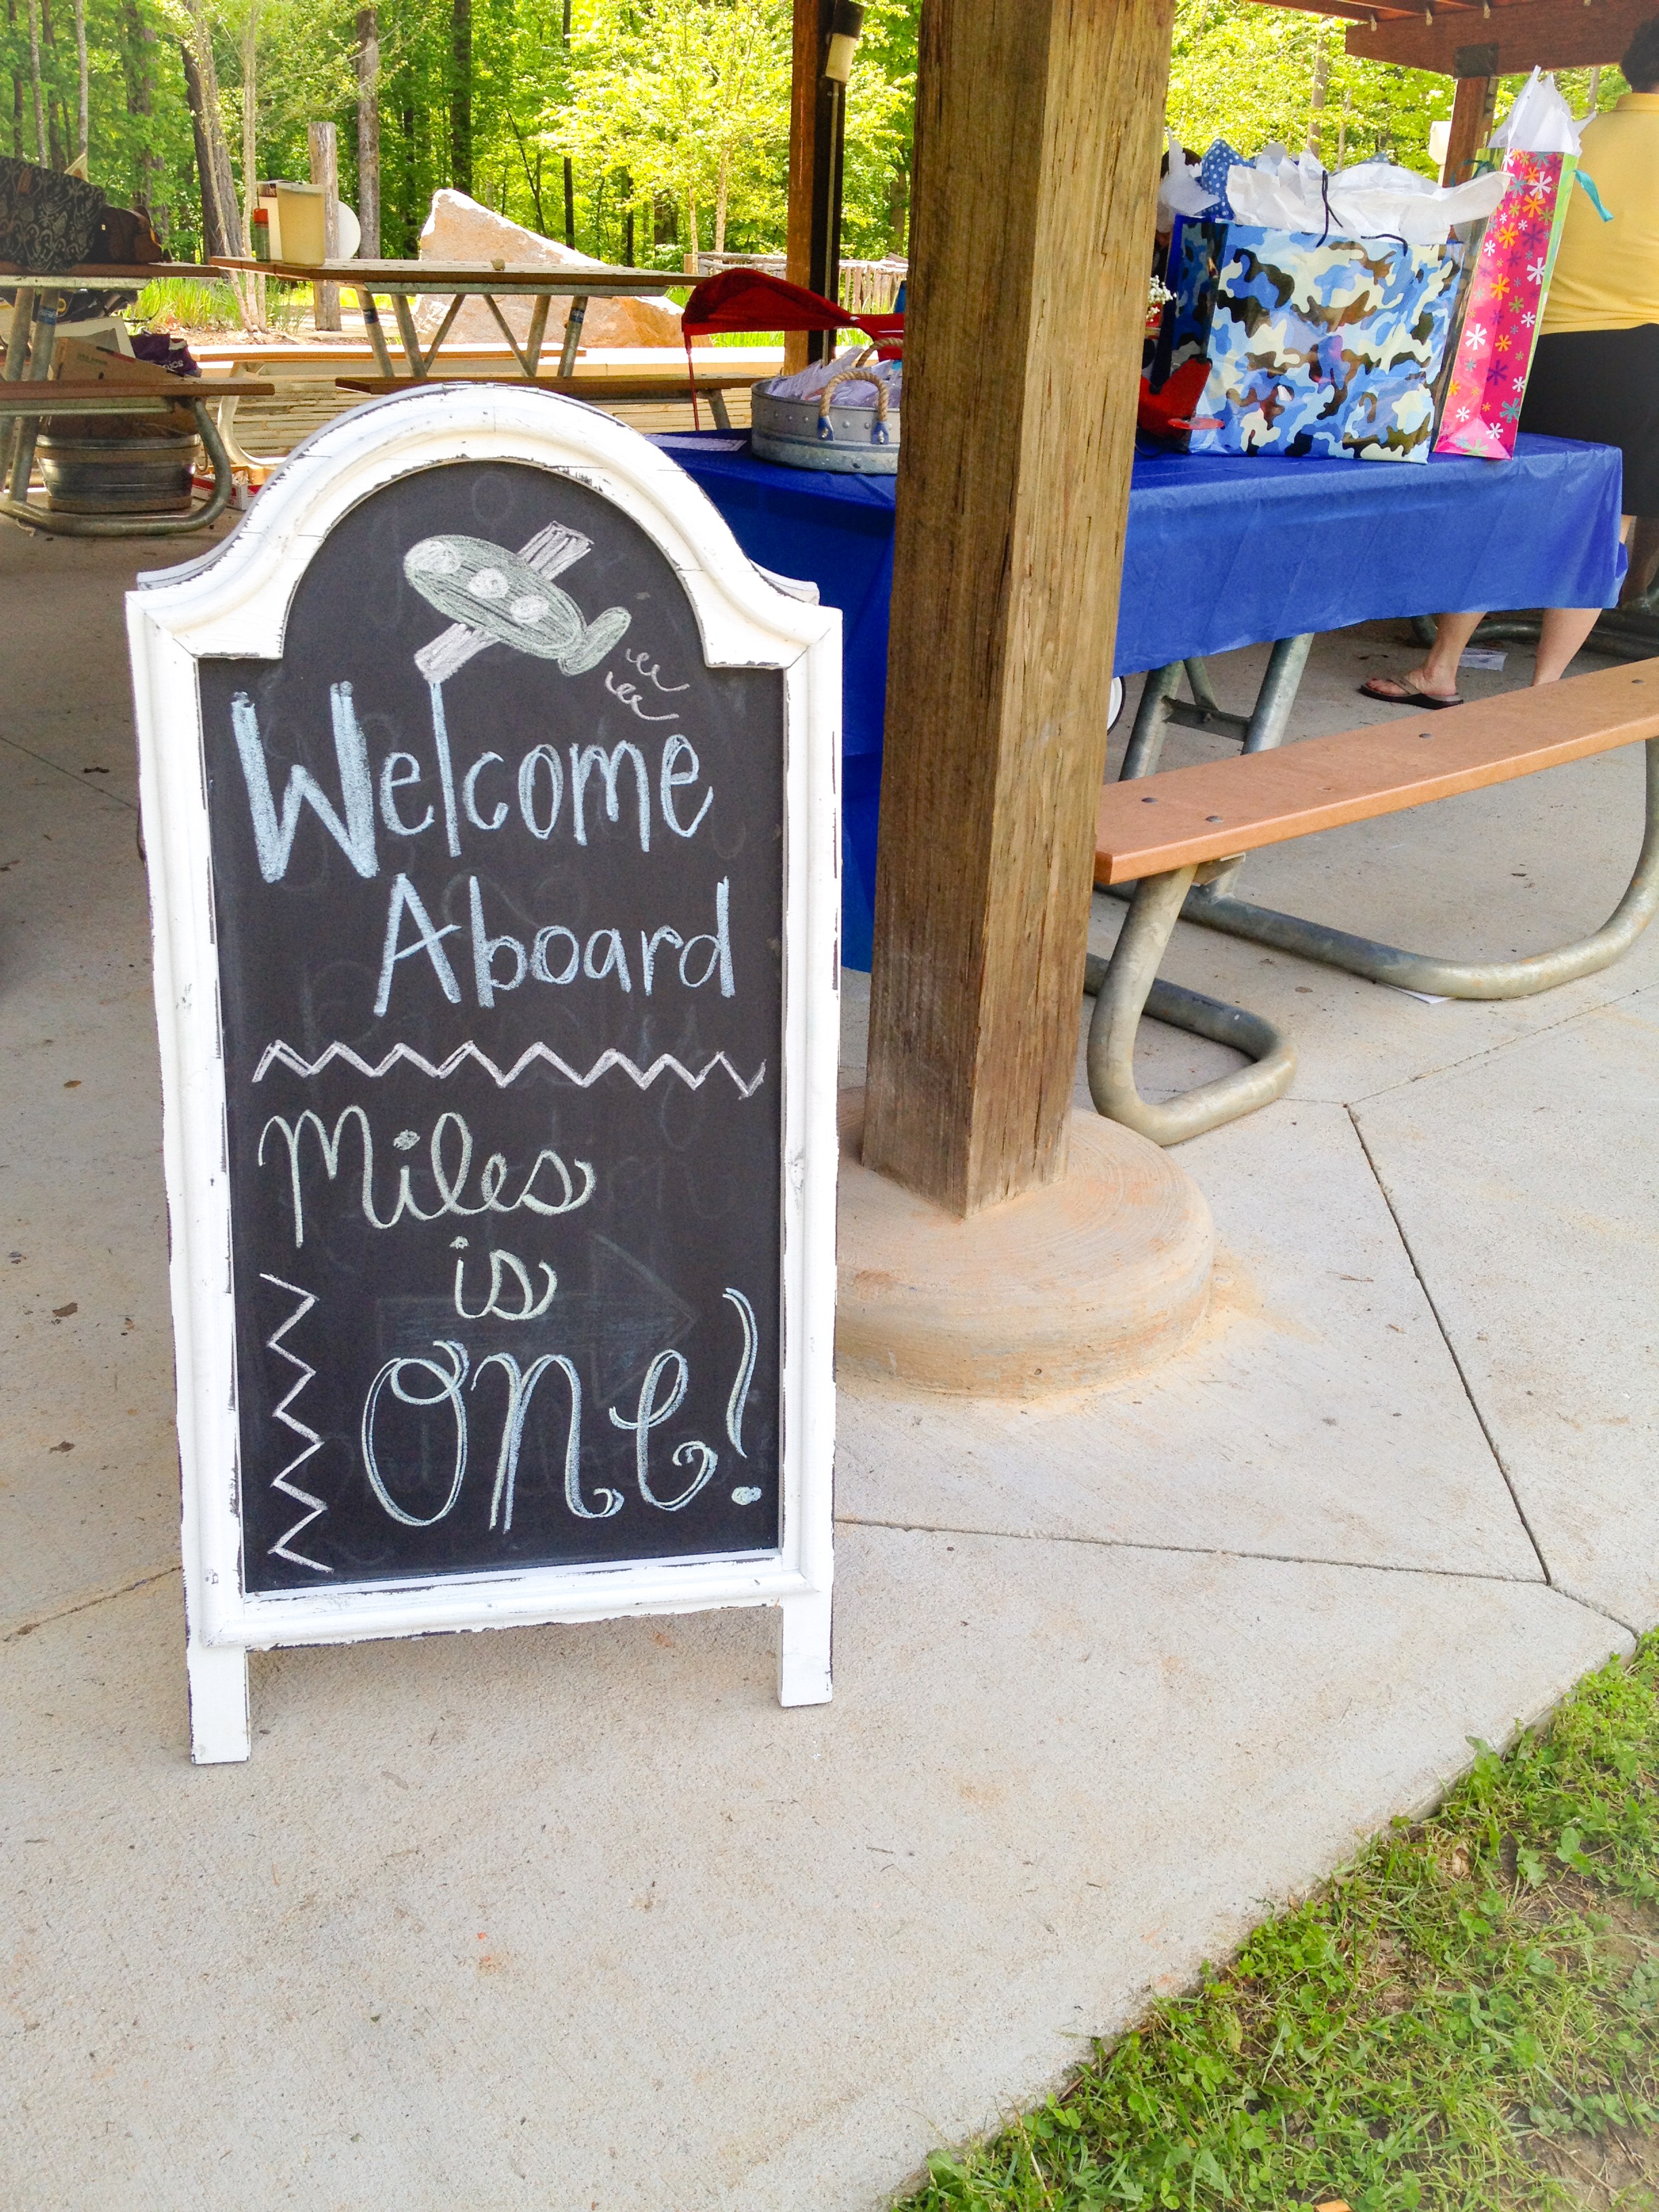
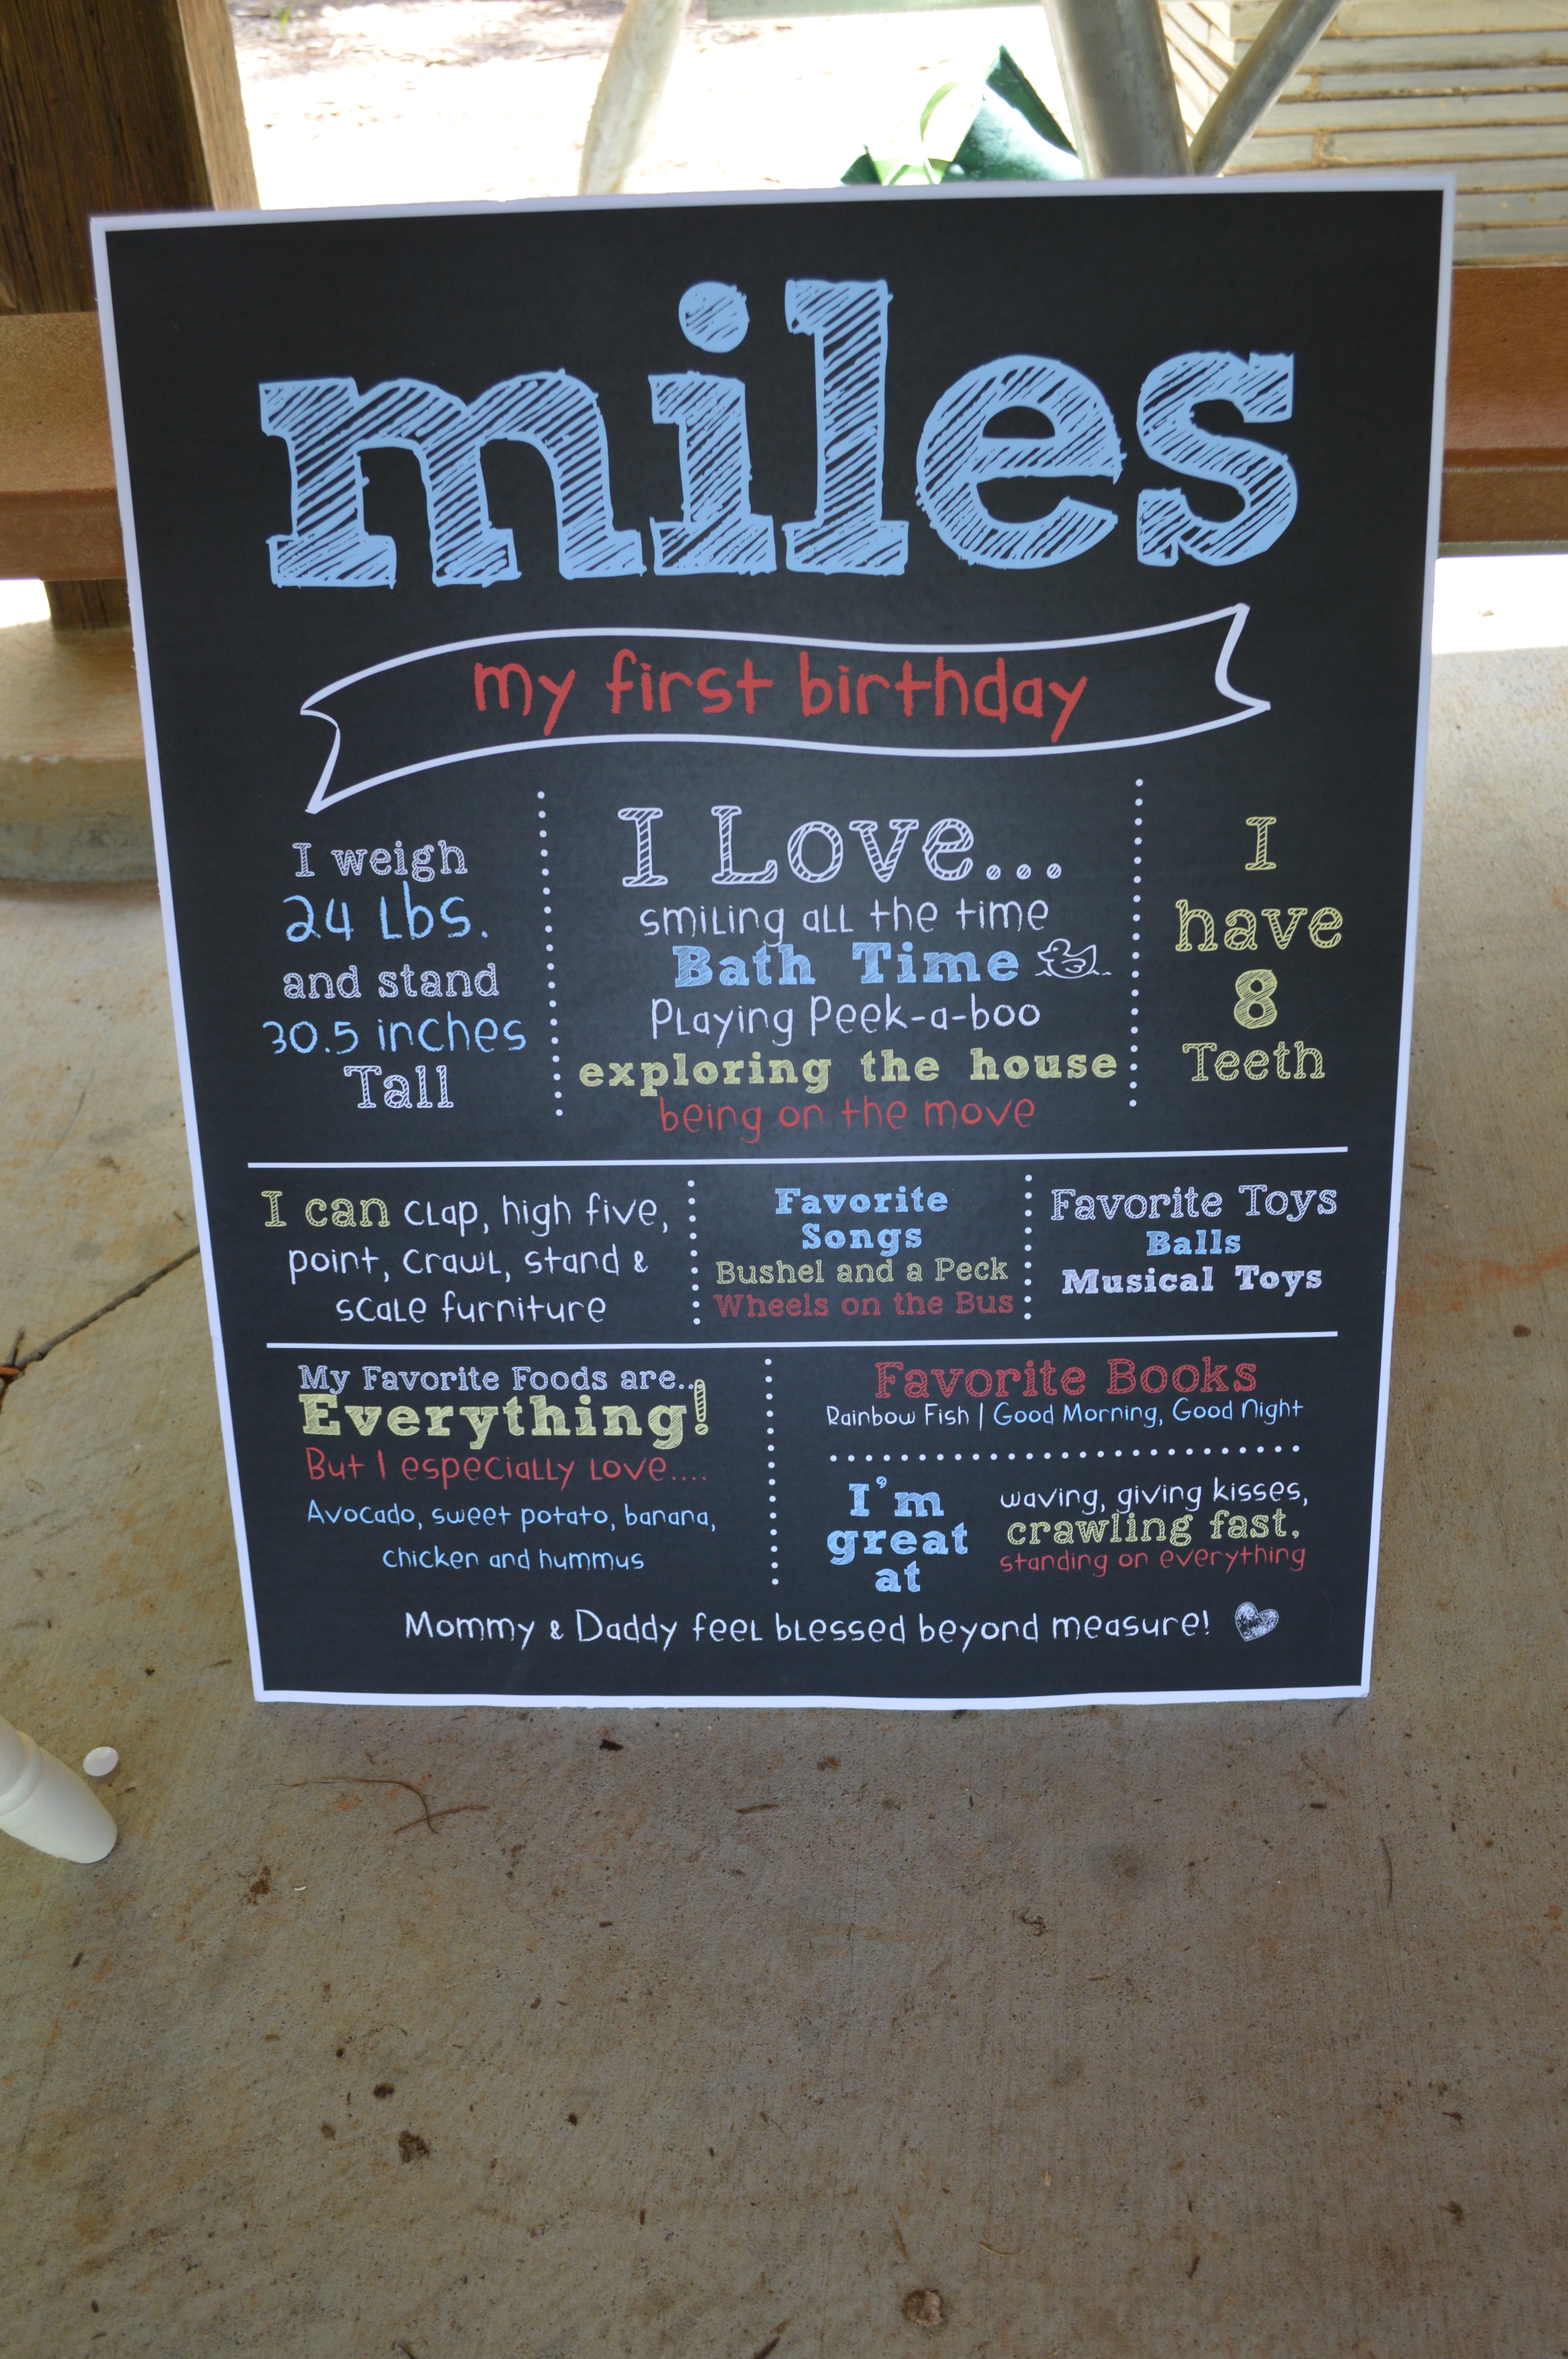
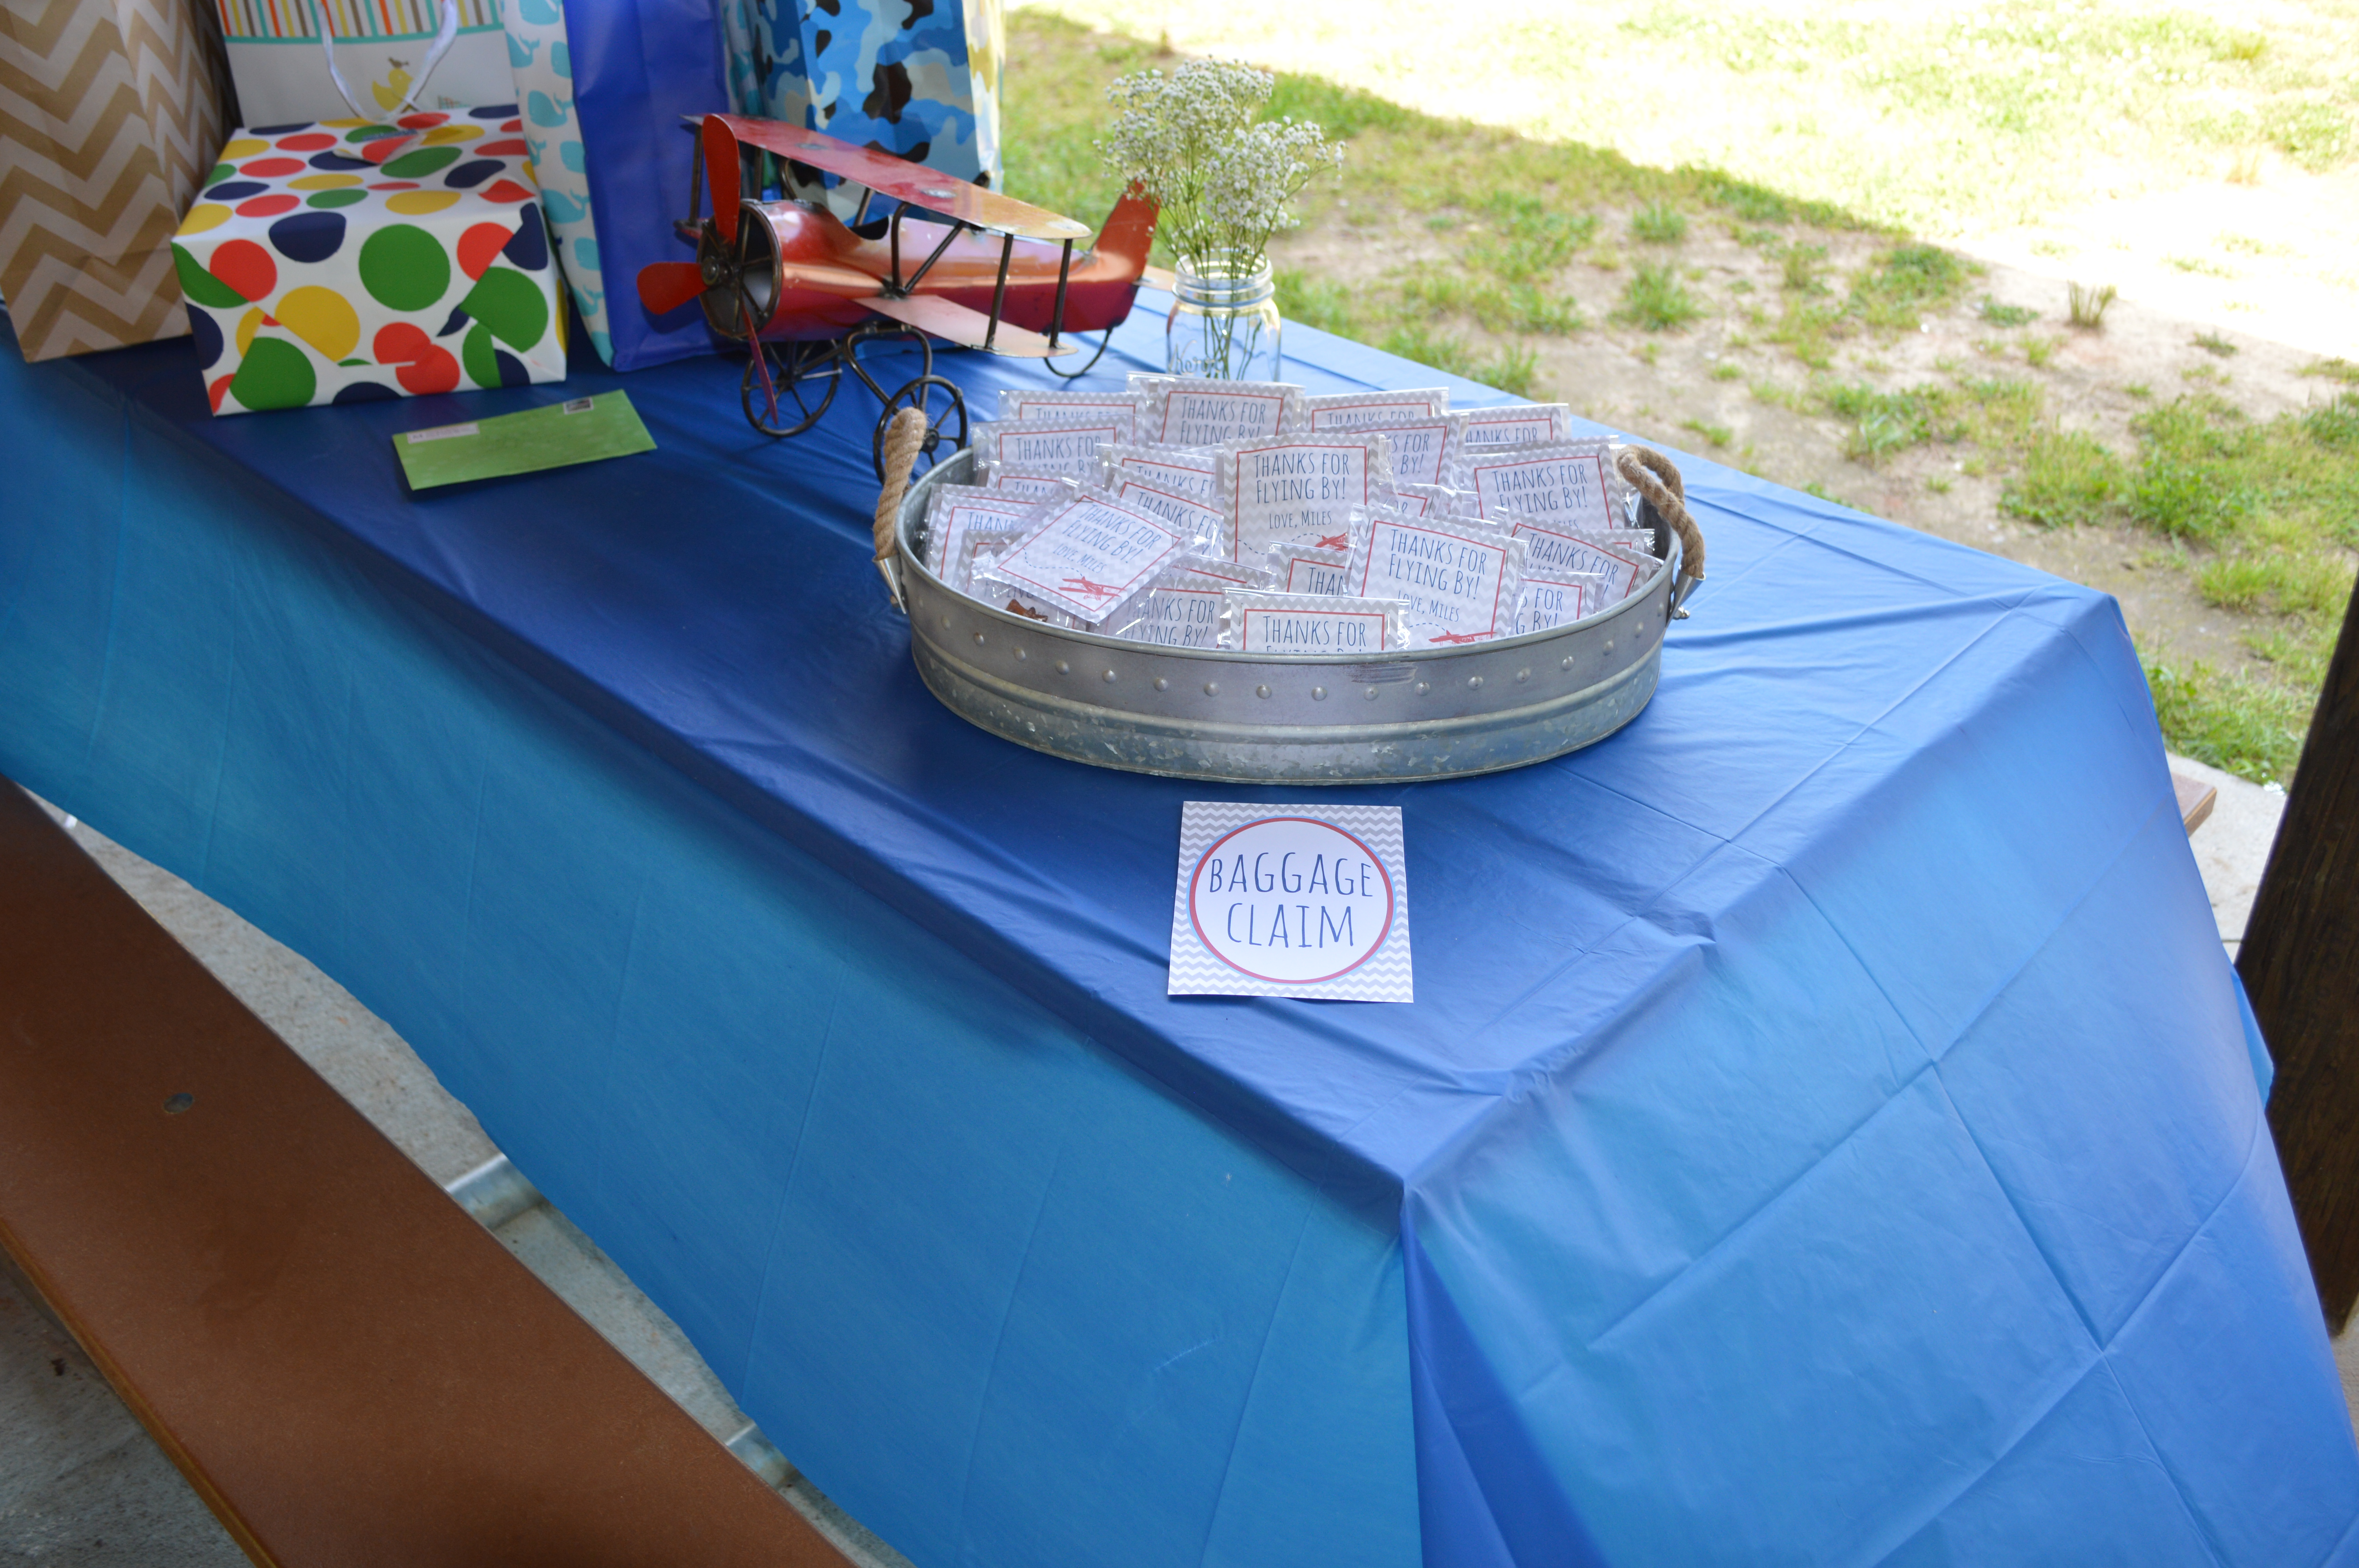
Airplane


Dinosaur


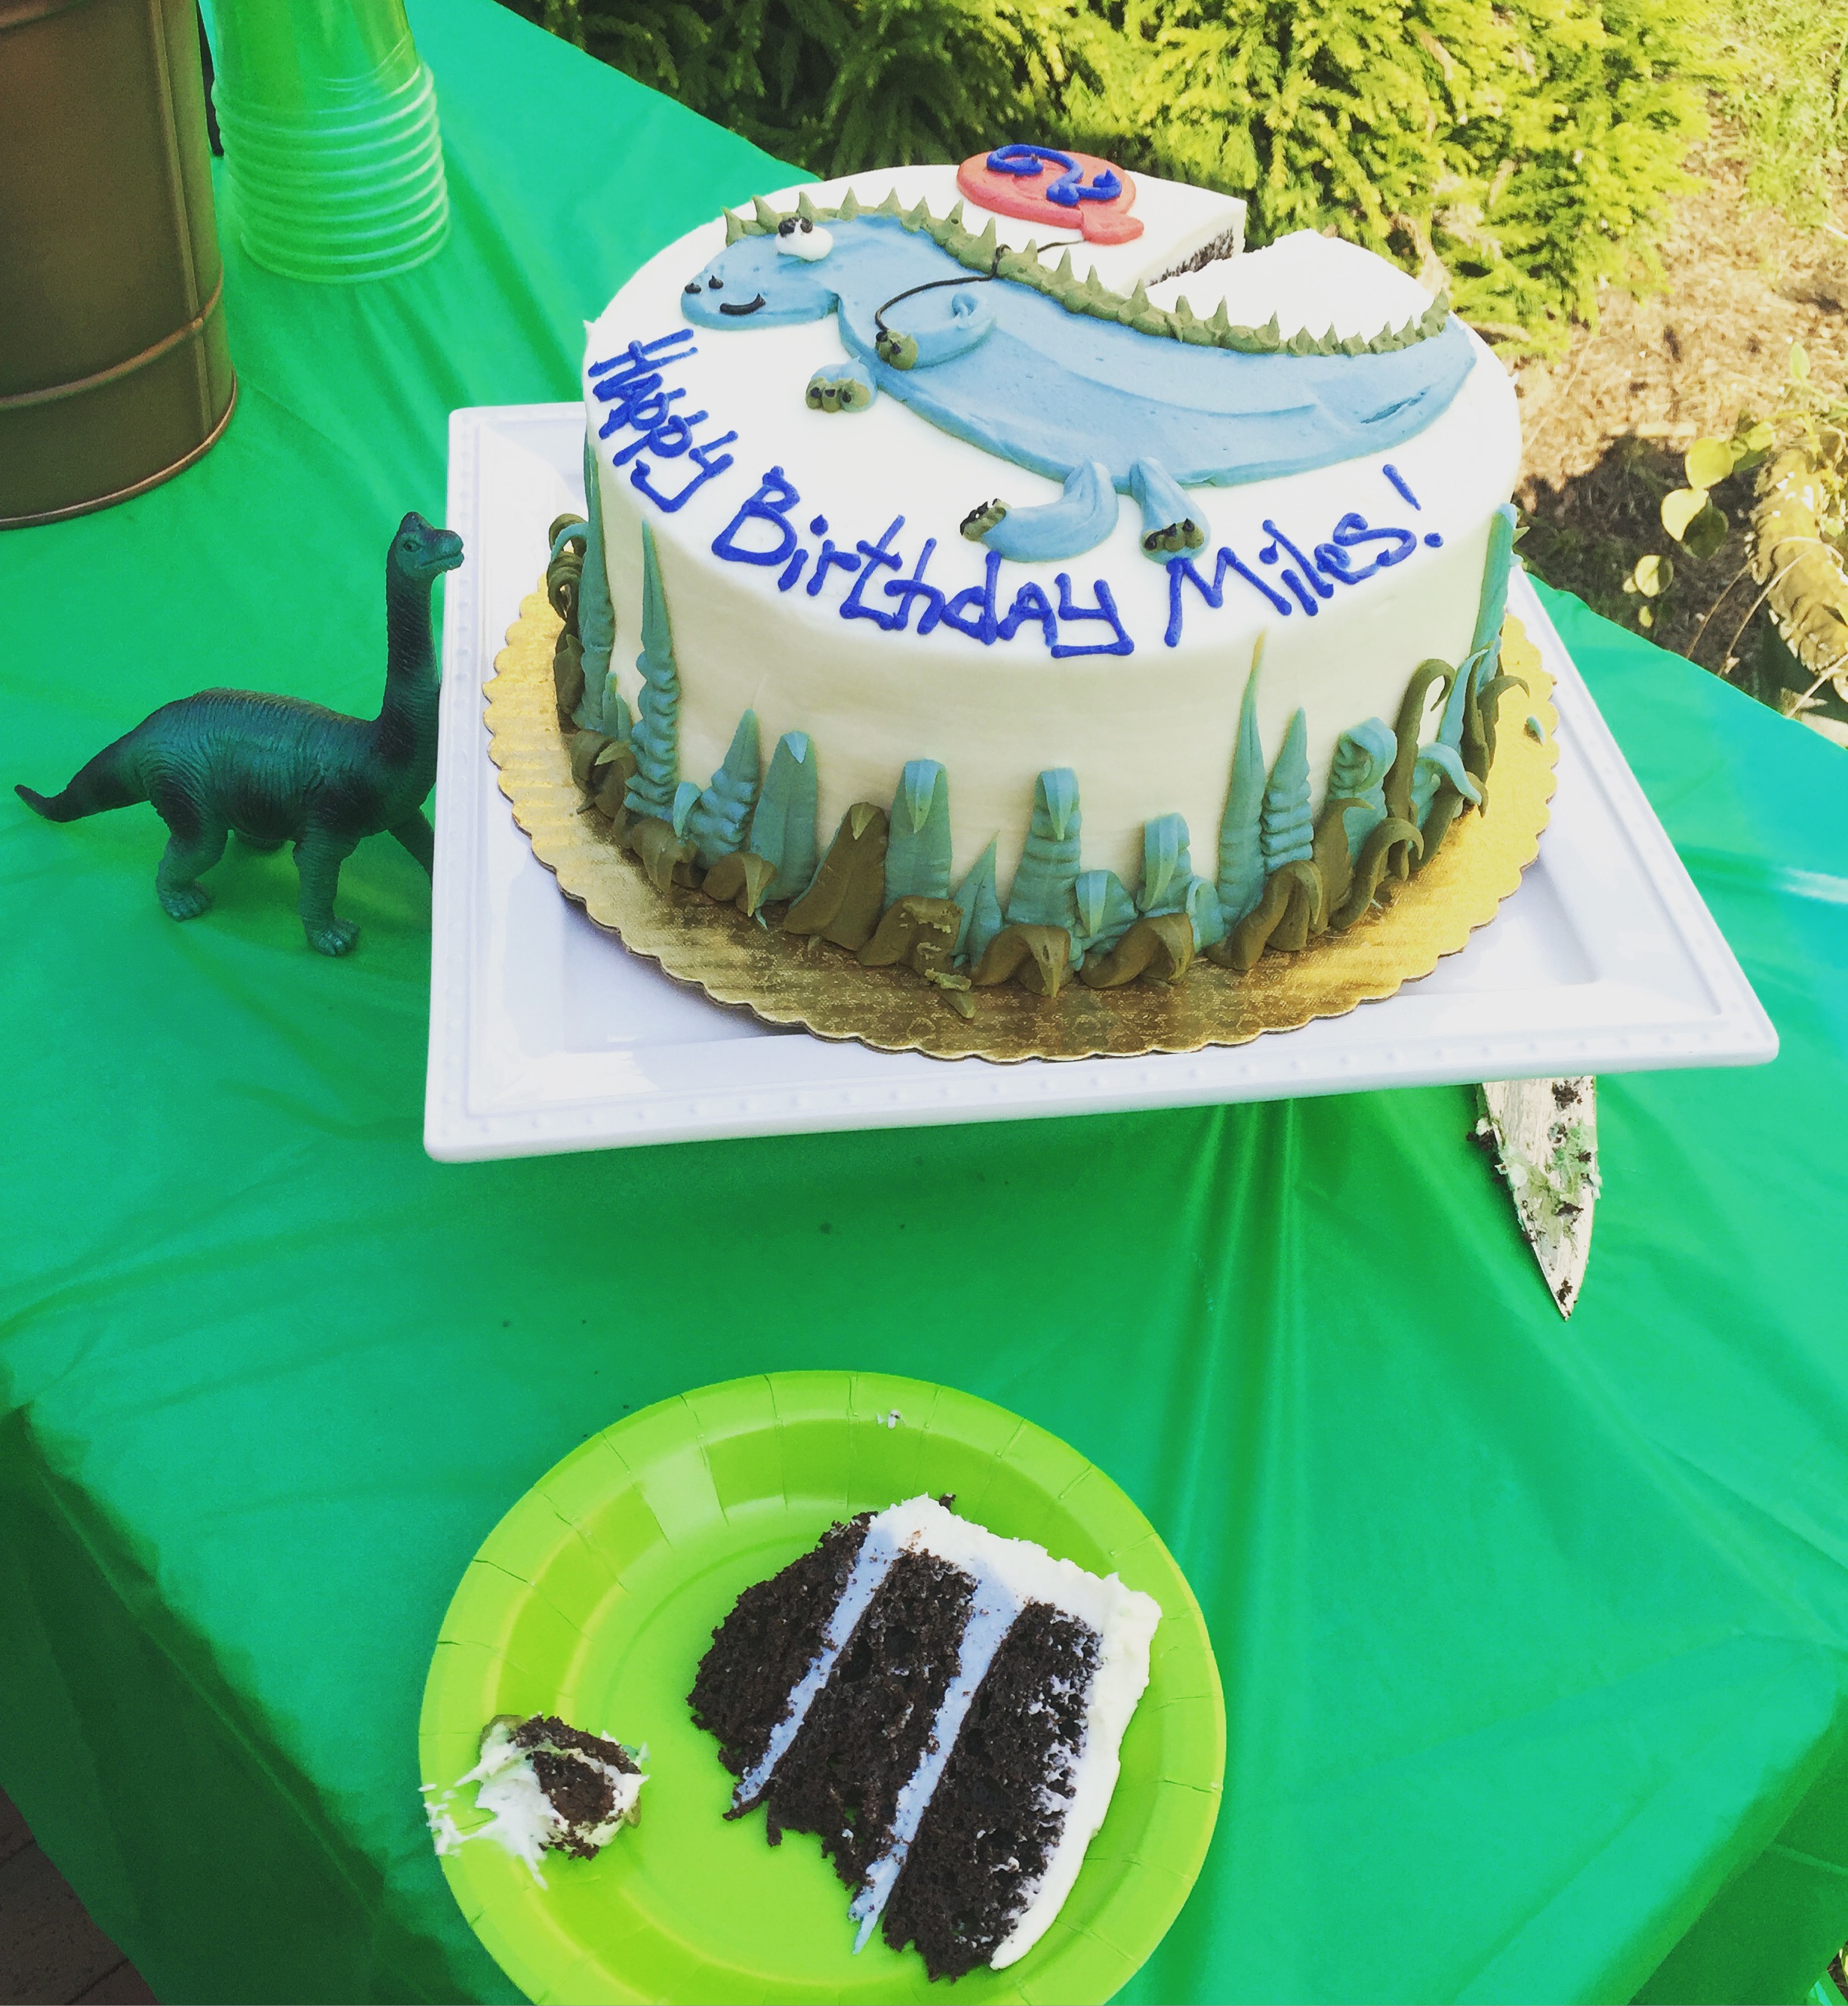
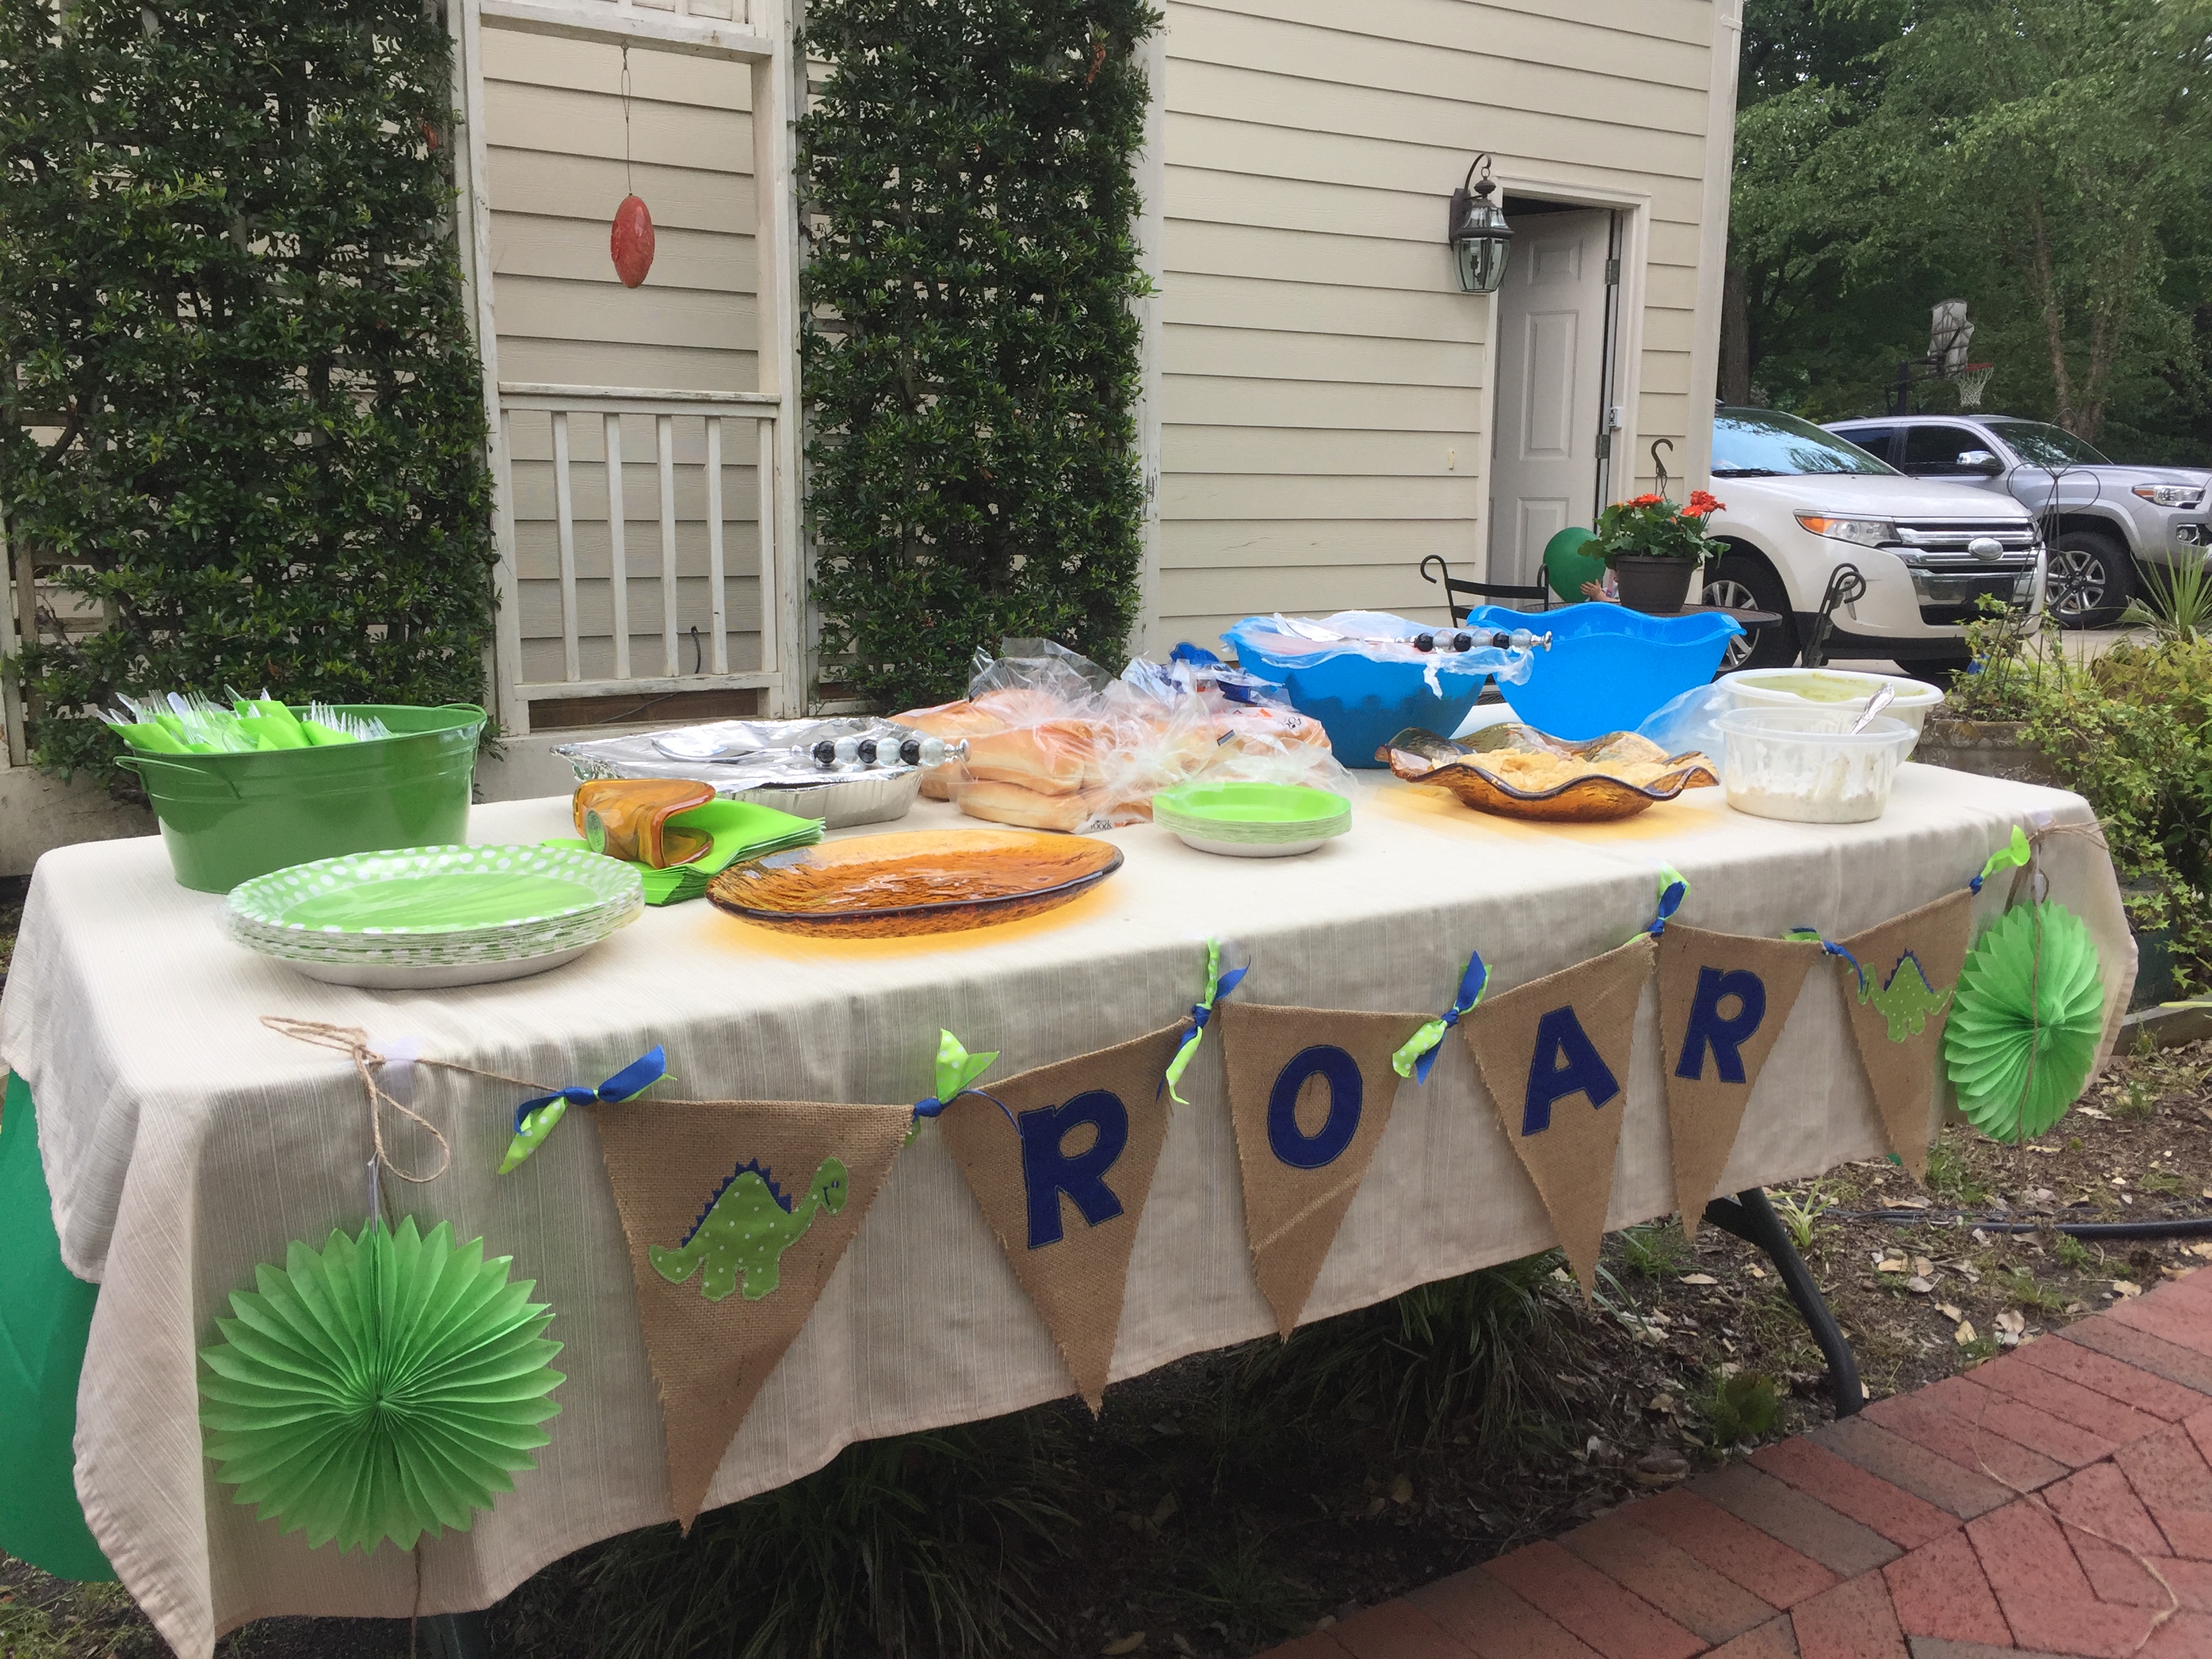


I was pregnant with our second child when we celebrated our boy’s second birthday. His dinosaur birthday cake doubled as a gender reveal. Celebrating our boy’s birthday and becoming a big brother to a baby brother was extra special.
Construction


Wild Things


Sources:
All Cakes except the Construction cake – Whole Foods, Construction Cake decorated by me.
Embroidered shirts – Stitched by me
Printables – Etsy
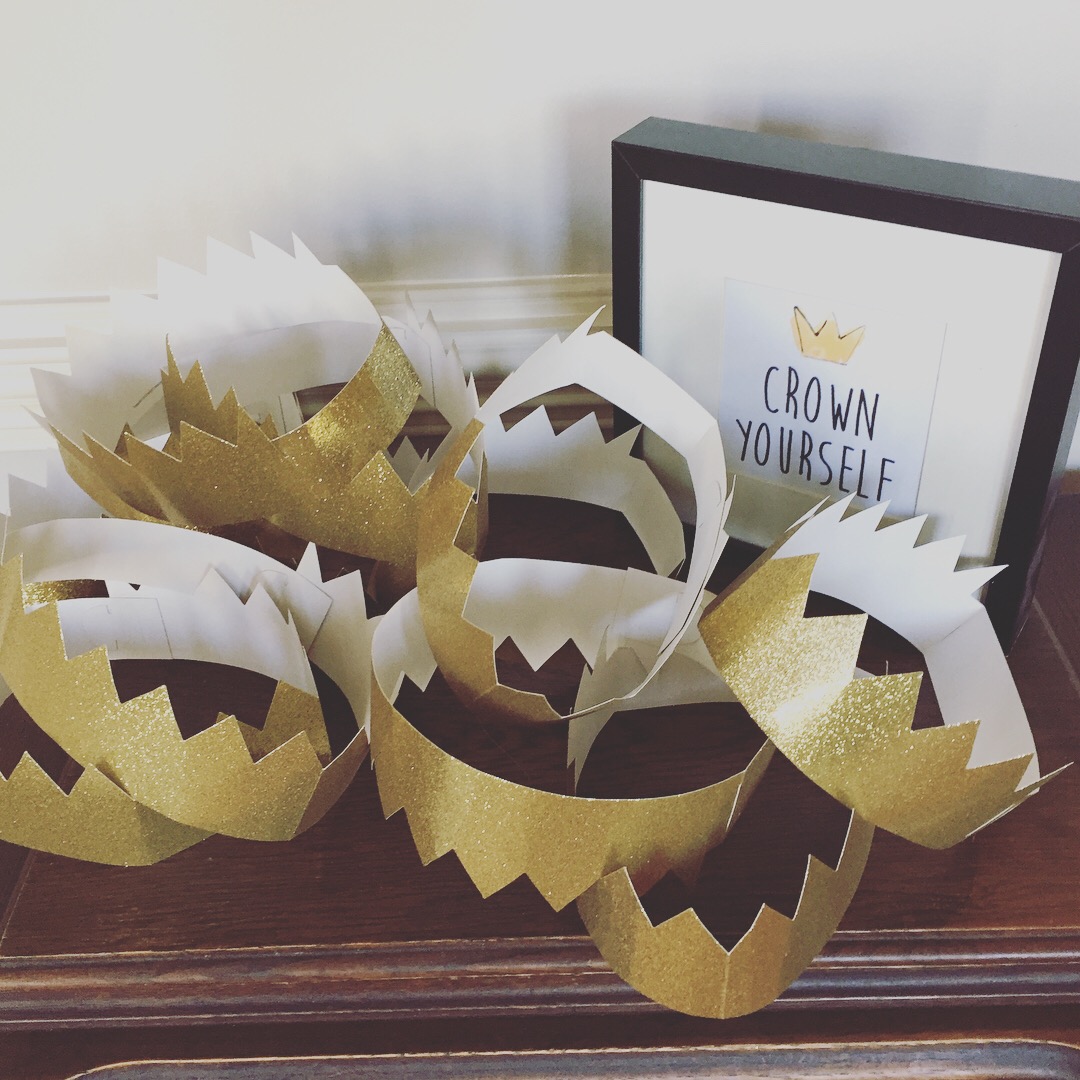
Crowns – Target in the party supply section
Sandbox – Amazon
If you have questions about specific sources, printables and homemade decor items, comment below.

After our first born was comfortable with finger foods, I searched for easy breakfast options that would pack in the nutrition and make our morning routine simpler. The ingredients are basic and almost always on hand in our house.
When I discovered the the author of this recipe deleted their website leaving me without the recipe, I was forced to come up with my version of the original.
These muffins are also freezer friendly. We often freeze 1/2 of the freshly baked muffins and pull them out individually as needed at a later time when a quick breakfast is needed.

Power Muffins
non-stick cooking spray
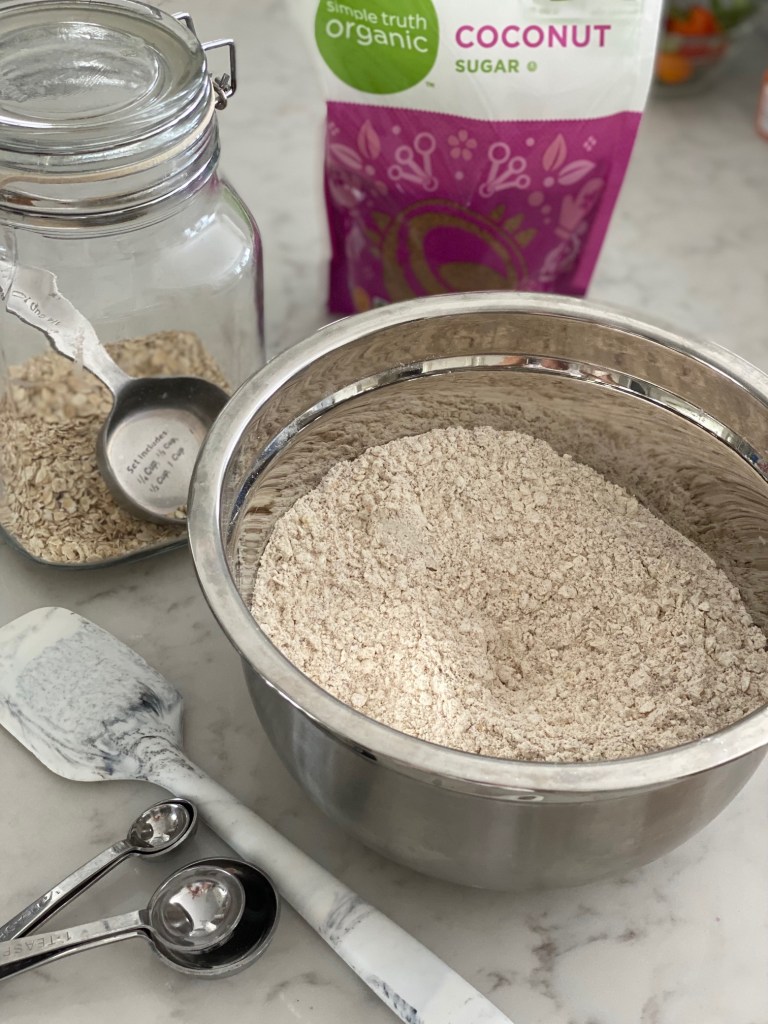
2 cups whole wheat flour (you can substitute almond flour, 1:1 ratio may work but if the batter is too wet, you may need to add more)
1 cup plain oats, quick or regular (we always have rolled oats on hand)
1/2 cup sugar (or substitute honey or coconut sugar)
1 teaspoon baking soda
1 teaspoon baking powder
1/2 teaspoon salt
1.5 cups of nonfat vanilla yogurt
2 large eggs, lightly beaten
4 tablespoons unsalted butter, melted and slightly cooled
1 teaspoon vanilla extract
1.5-2 cups of fresh blueberries (I’ve also used frozen and they worked fine. Do not thaw ahead of time if using frozen.)
Optional add-ins: shredded zucchini (1 small), chia seeds, & shredded carrot. Your little ones will never know!


Heat oven to 350.
Line a muffin tin with liners or parchment paper squares.
In a bowl, combine dry ingredients – flour, oats, sugar, baking powder, baking soda, and salt. In a second bowl, combine the yogurt, eggs, butter, and vanilla.
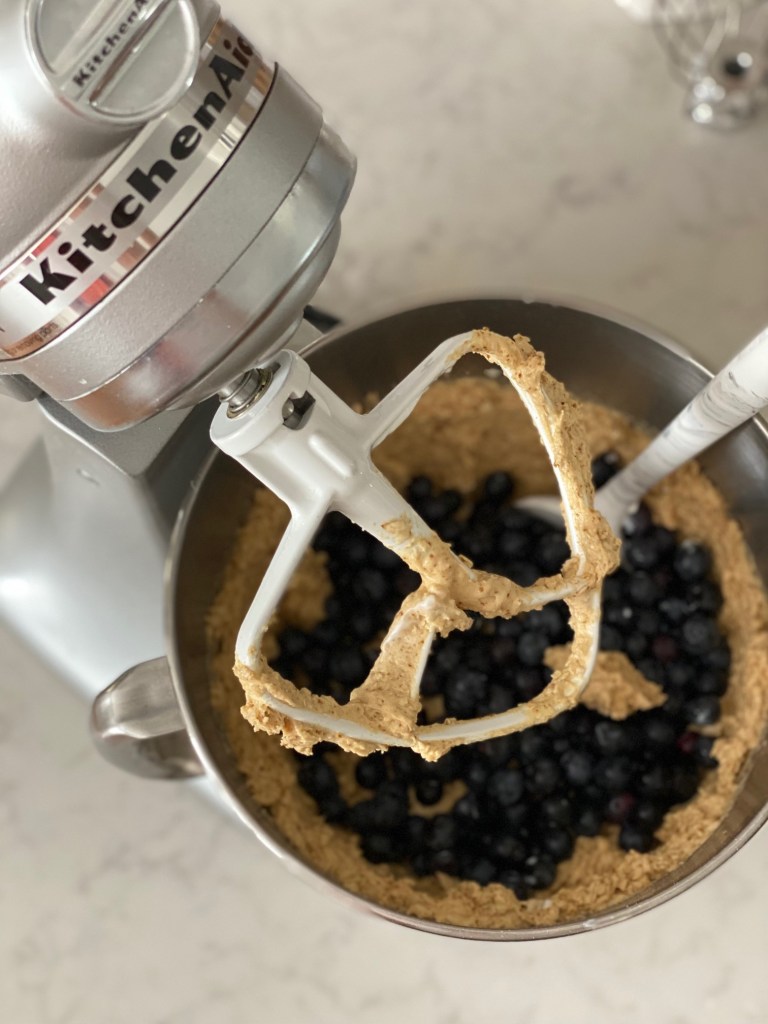
Fold the yogurt mixture into the dry mixture and stir to combine well.
Gently fold in the blueberries. *the mixture should be very thick and sticky in consistency.
(If you’re opting to add in shredded veggies and/or chia seeds, fold them in at this step.)
Spoon the mixture into the muffin tins and bake until the top is golden and it springs back when gently touched, about 20-25 minutes.
Makes 12-15 muffins depending on how you portion batter.
Note: these can be frozen to use as needed.


*If you are looking for another gluten free option, try this delicious version from Sally’s Baking Edition.
Happy baking friends! – Amanda
This first recipe is pretty, healthy, & festive for any Summer party you’re invited to bring an appetizer.
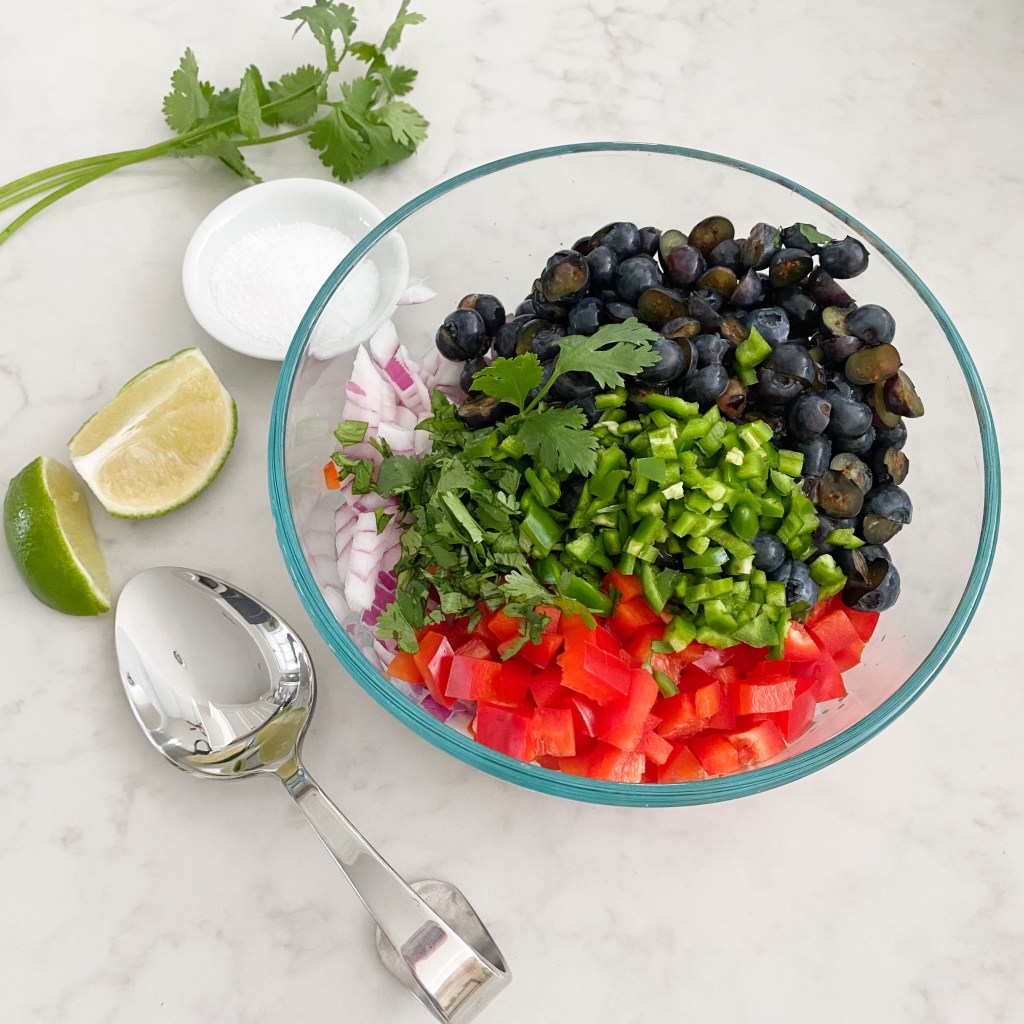
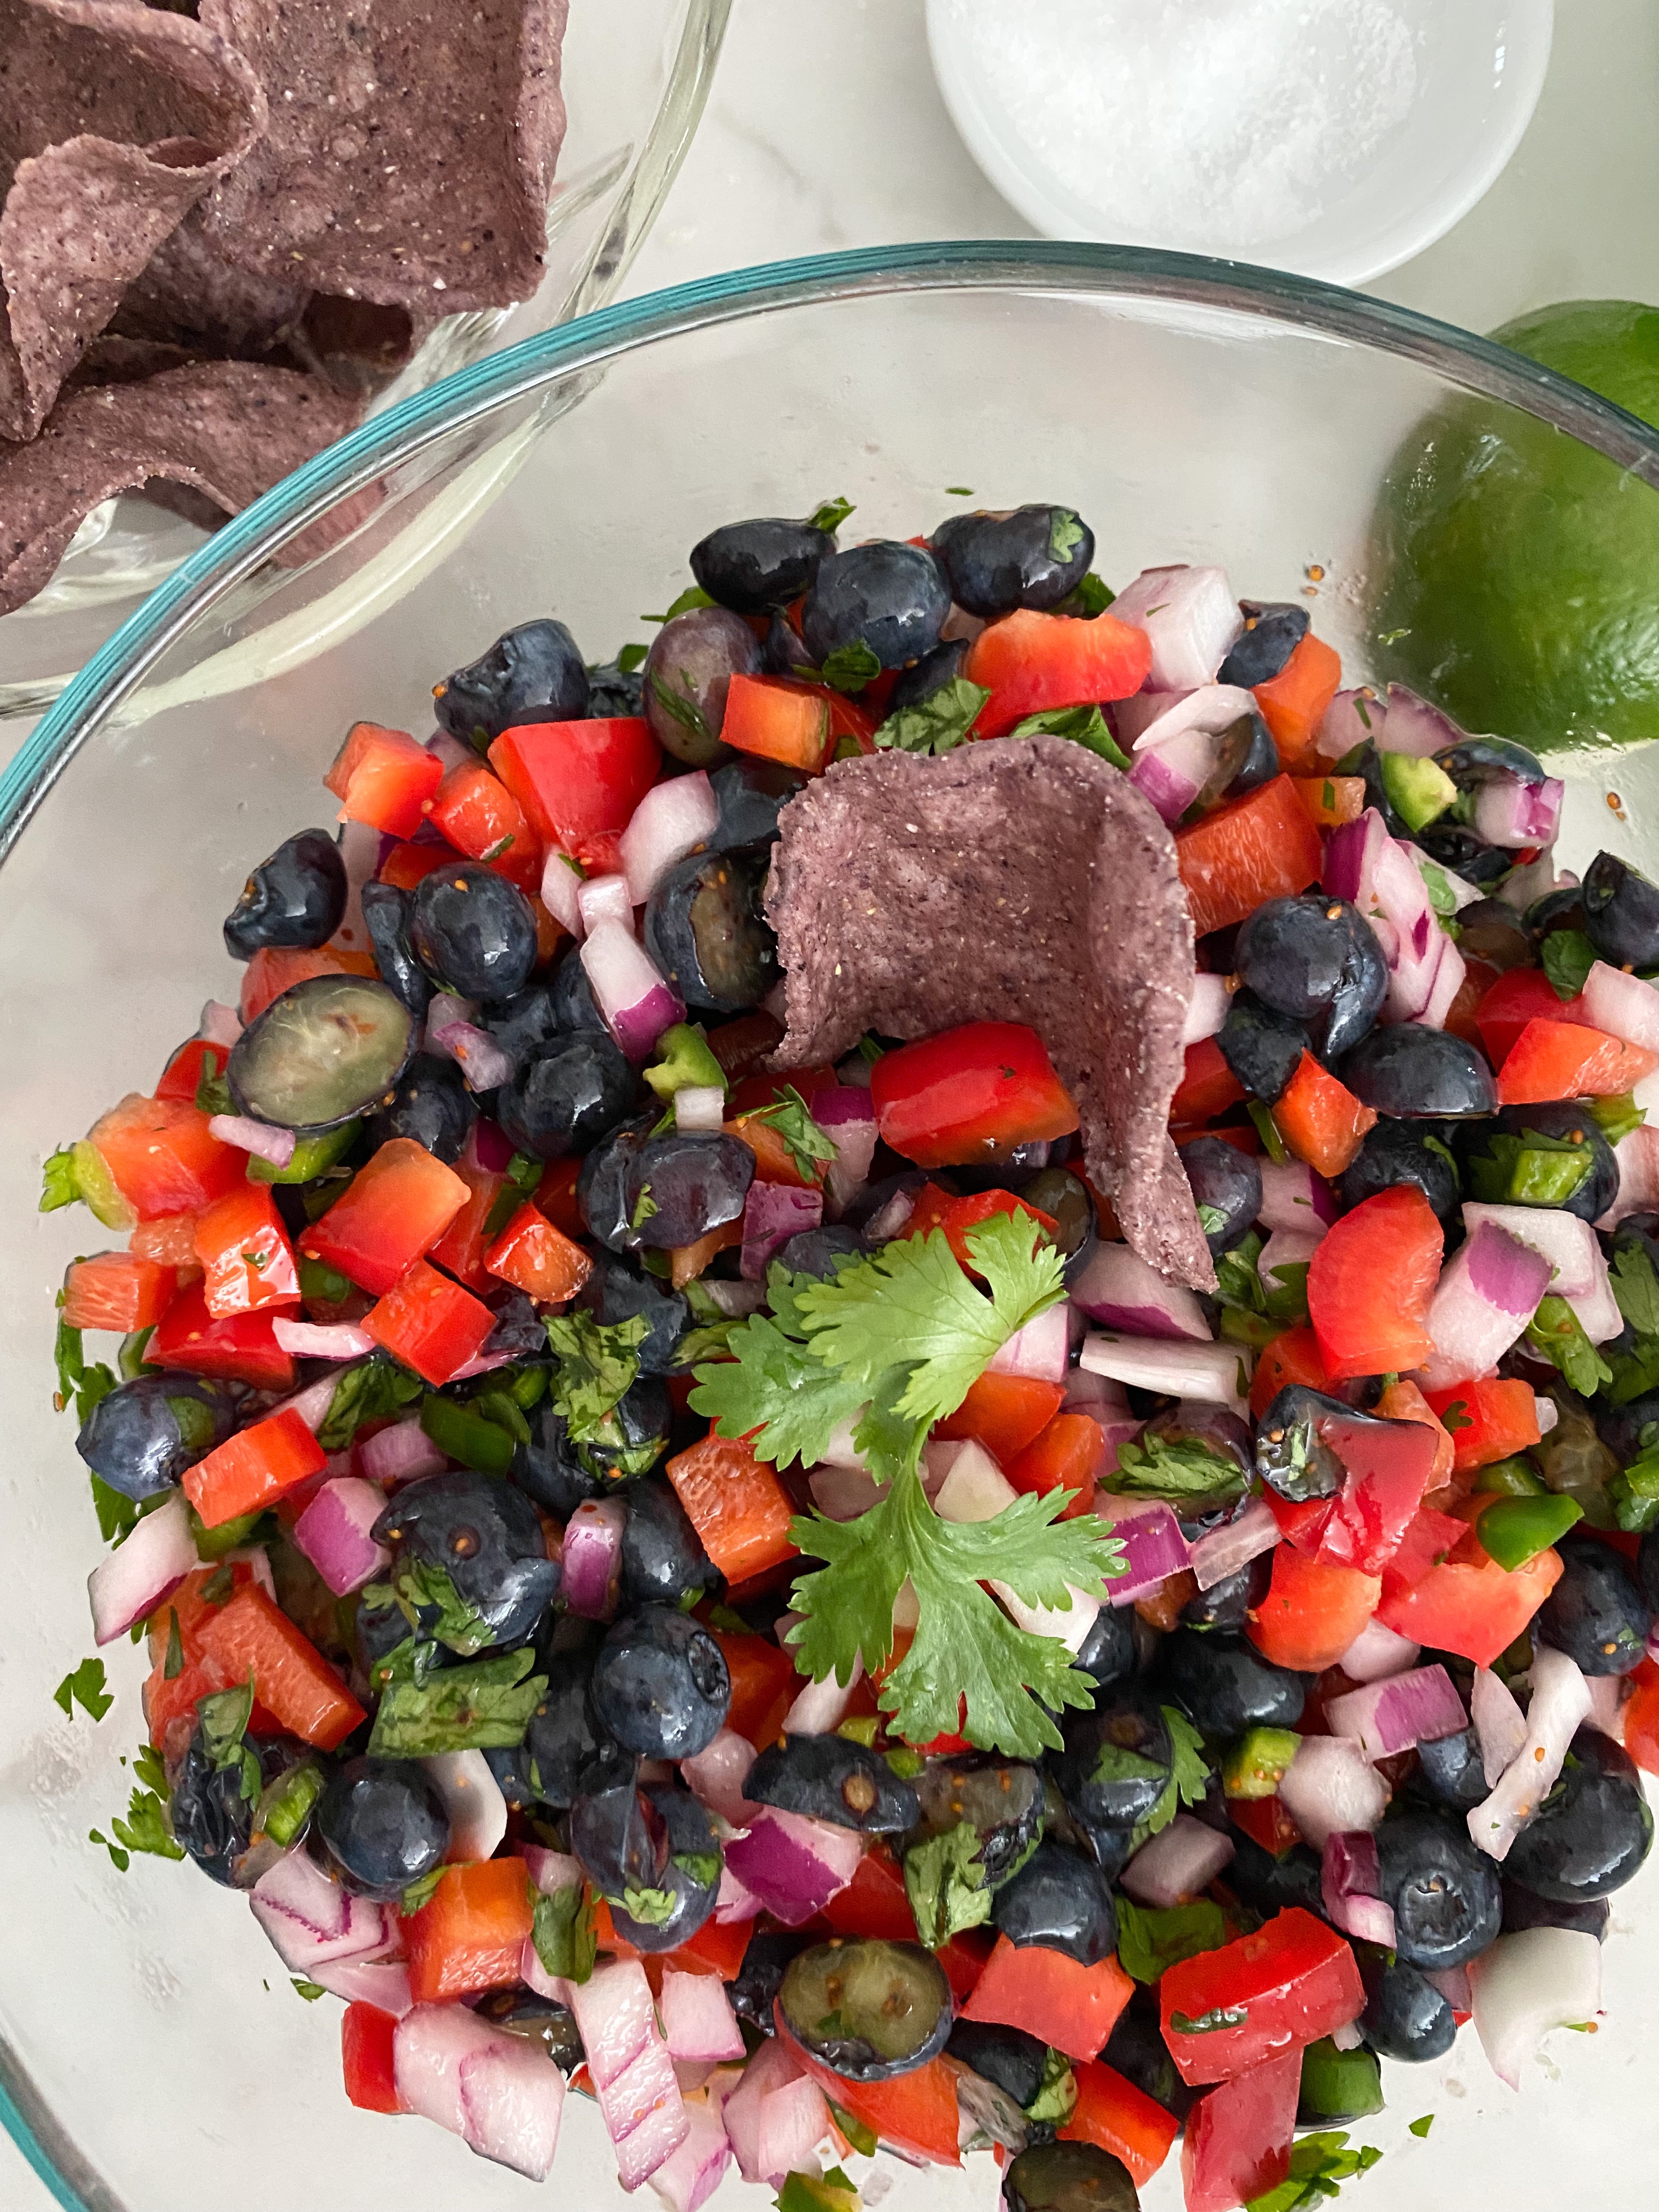
2 cups course lunch chopped fresh blueberries
1 cup whole fresh blueberries
1/4 cup of fresh lime juices
1/3 cup of chopped cilantro
2 jalapeño peppers, seeded and minced
1 diced red bell pepper
1/2 chopped red onion
Sea Salt to taste
Coarsely chop 2 cups fresh blueberries. Stir together chopped fresh blueberries, 1 cup whole blueberries, fresh lime juice, chopped cilantro, 2 seeded and minced jalapeño peppers, diced red bell pepper, 1/2 chopped red onion, and 1/2 teaspoon kosher salt in a large bowl. Cover and chill until ready to serve.
Serve with a mix of blue and regular corn chips.
Any leftover salsa is great topped on grilled fish or chicken.
Prep: 15 min, Cook: 5 min, Cool: 10 min, Chill: 1hr (or serve immediately)

Also known as summer succotash, this recipe becomes a staple side item in our home, paired with BBQ chicken, grilled fish, or included in a veggie dinner. We have even used left overs on top of a southwest style salad.
3 cups fresh corn kernels (6 ears)
1 tablespoon olive oil
1 tablespoon fresh lemon juice
1 cup of fresh baby lima beans*
1 tablespoon fresh basil leaves, cut into thin strips
1/4 cup diced red bell pepper
1/2 teaspoon kosher salt and 1/4 teaspoon dried crushed red pepper
*1 cup frozen baby lima beans, thawed may be substituted
Saute corn kernels in hot oil in a large skillet over medium-high heat 3 minutes or until tender; add lima beans, and cook 2 minutes. Add bell pepper and cook 2 minutes until slightly tender.
Remove from heat, and let cool 10 minutes. Toss together lima bean mixture and next 4 ingredients in a large bowl.
Cover and chill 1 hour. (You may also serve immediately.)
Given that we have an abundance of cherry tomatoes and okra in our Summer garden this year, I’ll be making this variation of succotash next.
Best – Ever Succotash Recipe Source: Southern Living


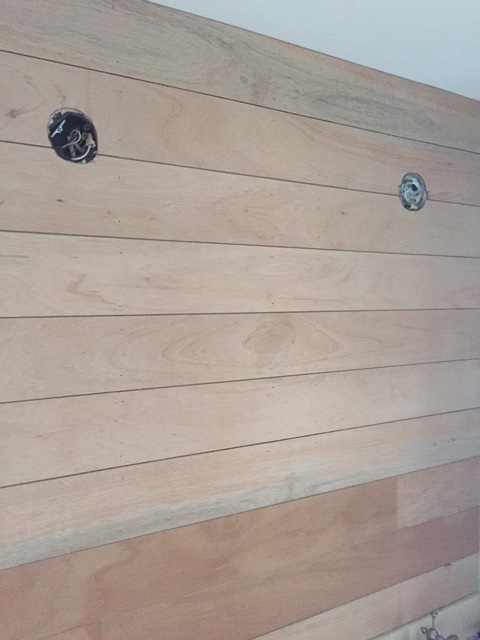
If you’re looking to add shiplap to a wall or room in your home on a budget, this post is for you. I’m sharing how you can update a standard builder grade bathroom into a modern farmhouse design.
We transformed this space:

Into this newly designed space for a total of $315. The shiplap wall only cost a little over $15.


Start by measuring your walls. In this case, we were only doing the mirrored wall which made for simple math when deciding how much 1/4 inch plywood we needed.
For ease, we had Home Depot rip down 2 sheets of 1/4 inch plywood into 6 inch planks. (we did have some scrap that we measured out to smaller planks that we knew we could use where some boards needed to be ripped down to less than 6 inches.) We also knew we wanted to continue the shiplap in the shower/toilet room and would use the extra planks in there.
Simple steps to hang the planks:
Our new lights against the freshly painted white shiplap.

I wanted to further update the space and bought these handles for our existing cabinet doors and drawers.
I also really like these handles but admittedly, I didn’t price around for hardware for the best deal like I normally do and just made a decision at Home Depot.
I also spray painted our existing towel rings to match. (This cost nothing as I already had flat black spray paint for metal.)
When deciding on mirrors, you do need to measure out what range in size you can shop for. I knew what my maximum height and width could be above each sink and searched online first.
Hobby Lobby frequently has a 50% off sale on their mirrors. Luckily for me, the sale was going on when I was shopping so I made a quick run to the store and snagged the last two. These mirrors had the perfect amount of coastal farmhouse vibe we were going for.
Here is a little video highlight featuring a trick for hanging hardware on cabinet doors and drawers. Click Here
A quick trip to Marshalls for accessories – rug, vanity decor, and fresh linens, I snagged YOU LOOK GOOD sign from the inventory of The Homestead Haven (my side gig with my bestie), and then shopped our home for the rest to complete this room design.
You can shop this sign and others in our Etsy shop, here. By the way, this sign is interchangeable. The wooden insert comes out of the base and can be changed seasonally or with other design offerings in our shop. I’m forever changing decor in our home and love this creation of ours making it easy to do so inexpensively.


The best part about the room design, our two boys (ages 5 and almost 3) complimenting each individual new detail in the room. They seemed to really appreciate the hard work and love that went into freshening up this space. Mission accomplished.
Please comment with any questions you may have and follow along via Instagram for our next project.


Seeing potential in our home has always been a fun challenge for my husband and I. We prefer to start with a clean slate and add finishing touches that fit our style. One main thing our home lacked on the exterior when we moved was curb appeal. We made plans early on to add a patio and landscaping to the back so that we could enjoy the views, pond, and entertain friends and family.
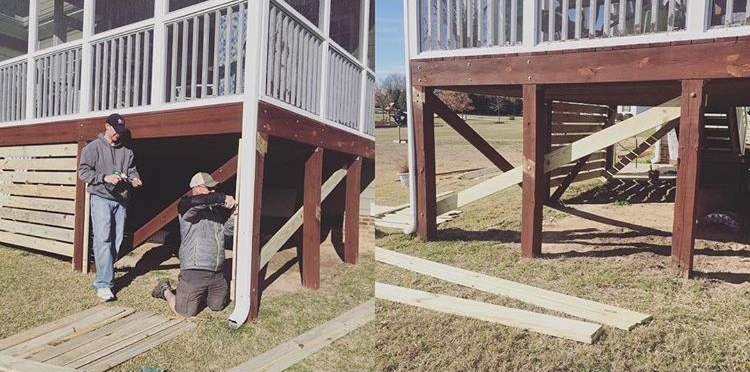
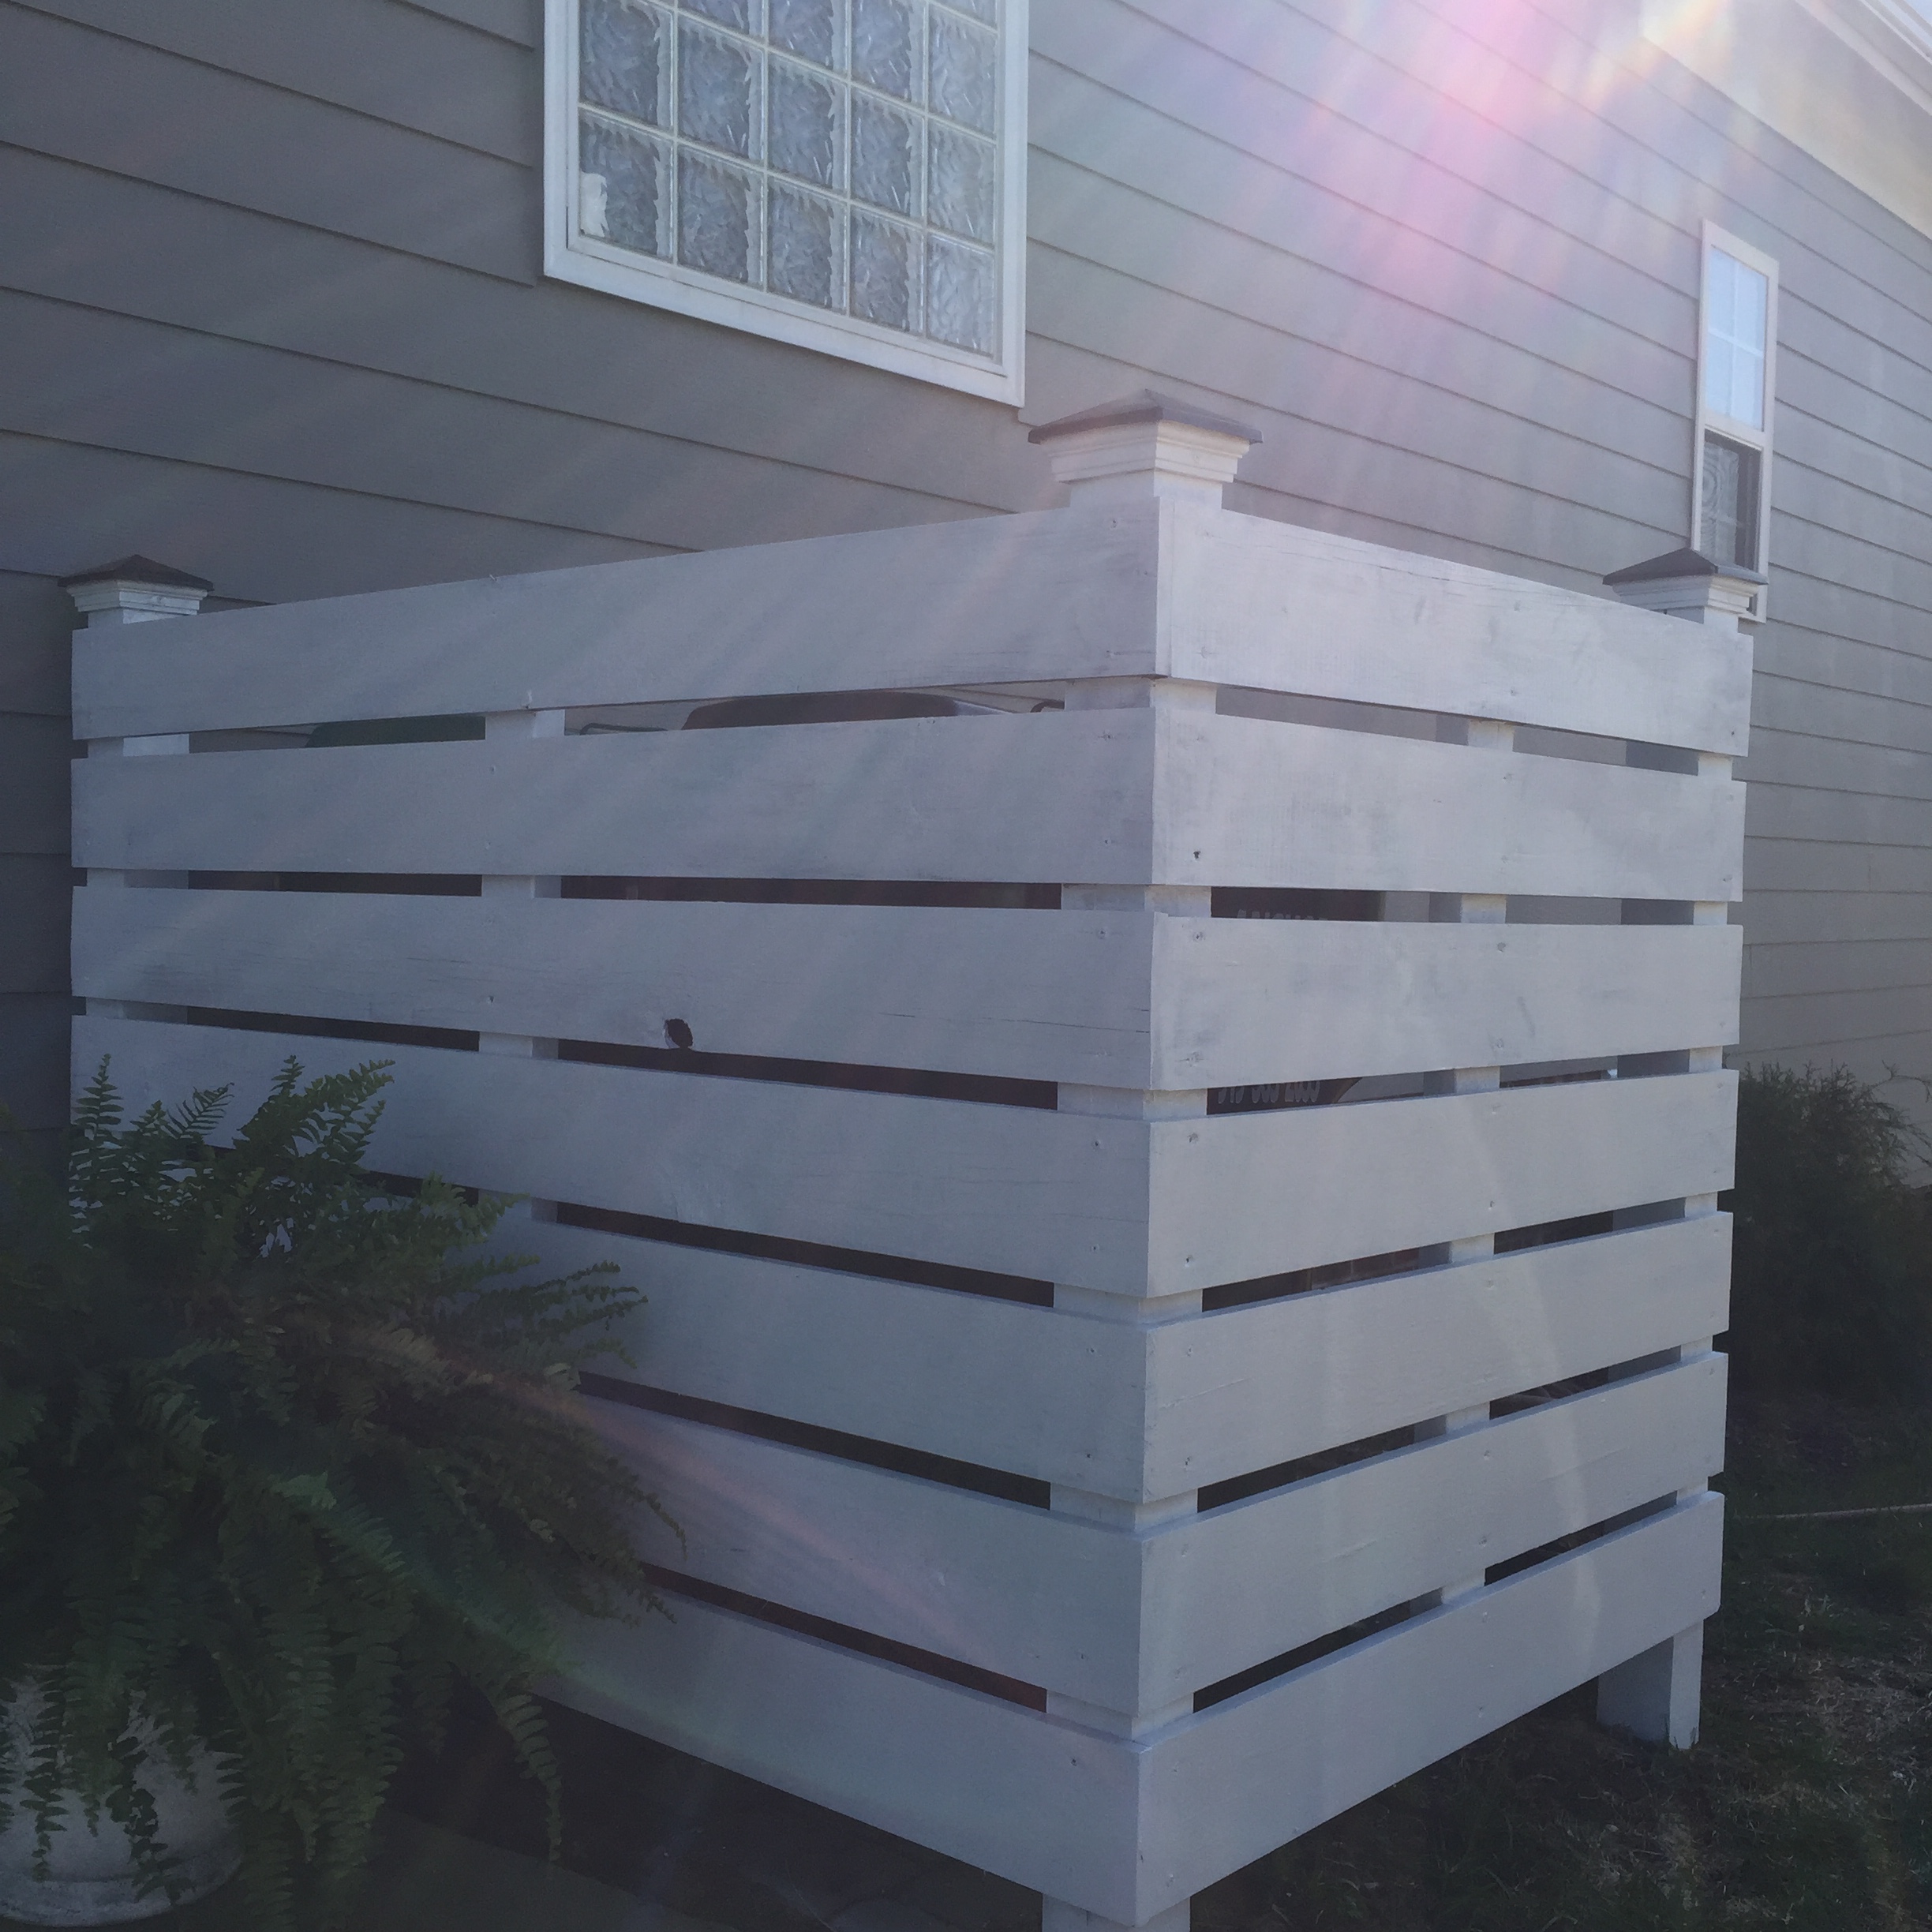
If you are looking for a way to add a deck skirt but don’t necessarily want the look of lattice, this tutorial might be for you. We loved that there was great storage under our screened in porch but really disliked that everything was visible.
We sketched out the look we had in mind to send in to our HOA for approval and began measuring how much wood we would need.

Basic Materials List:
1x6x8 pressure treated boards
2×2 pressure treated boards
Galvanized screws
Lag Bolts
The first step for us was to add new support boards to the interior of the posts that would allow the horizontal boards to be flush with the posts. You can see from the pictures above what this process looked like. New boards were added first, then the old exterior boards were removed from the sides.
Step two, we ran 2×2 posts along the deck posts leaving space for the horizontal boards to be attached to them and remain flush with the deck posts.
Each horizontal board had to be measured individually because the deck posts had natural inconsistencies that happened over time.
Use a piece of scrap wood from you cuts to make a spacer the width you want your boards to be spaced apart. Ours are space just under an inch apart.
It’s easiest to work from the top down when adding each horizontal board as your deck is already level.
The most challenging thing for our project was making a door for us to easily access everything we were storing. We originally planned to make two swinging doors that carried over the deck skirt design but we determined that the weight of the wood would eventually cause the doors to sag. We didn’t want that.
With some insight from my brother, he suggested making a removable panel that would match the deck skirt. The trick was determining a way to hang it so that it would be removed easily. We decided to add lag bolts, two on each side of the opening, from Home Depot.
We notched out the sides of the door panel, at an angel, to allow for the homemade door to easily drop on and lift off when we needed to access things.


We opted to wait for the treated boards to dry out in the summer sun and then prime & paint them to match our trim. After having the natural look of the wood for so long, we began to also love that look but ultimately went with a cleaner look with the white. It has brightened the space so much and now lets our landscaping colors pop.


It’s hard to believe we started with a small concrete slab at the base of the deck stairs and now have an outdoor living area that allows us to enjoy the outdoors so much more.
Please see this post for an easy DIY trash can hideaway.
As I’m typing, 4 yards of mulch is being dumped on the driveway so I guess I need to wrap it up and start filling the wheelbarrow to freshen up our natural areas. Don’t worry, the hubby is almost finished with work so we’re going to work together while the kids play outside on this beautiful Spring day.
Let us know if you have any questions. Tag us if you tackle this DIY deck skirt, @4havenssake on Instagram & Facebook, we’d love to see.
Two of our best friends live in the heart of NC wine country, Yadkinville, NC. Starting in 2011, we ventured to different vineyards with them in the beautiful countryside and have found some hidden gems in our beloved state.
Here you will find options for self-guided tours as well as tour-guided NC Wine trails. I’ve provided tips for each trail but you’ll find some of the vineyards are repeats so tips won’t be repeated as well.
If you’re looking for a guided tour, you can book with Yadkinville Valley Wine Tours. They offer tours with pre-set vineyard stops or you can customize your own wine trail. They were wonderful to work with and accommodating to our requests.
Our first adventure throughout Yadkinville was a ladies only trip. It was a great way to see a few vineyards, have a tour guide who provided information on the vineyards and the wine making process at each, and safely navigate us along our wine trail.


Trail 1: This tour was with YVWT and consisted of the following:
Laurel Gray Vineyards
Shiloh General Store
Shadow Springs
Dobbins Creek
Raffaldini
You could also use this trail for a self guided tour. (With a designated driver of course.)


Trail 2:
Laurel Gray Vineyards
Sanders Ridge
Hanover Park Vineyard
Flint Hill Vineyard for diner and tasting
+Tips for this trail, Flint Hill no longer offers full service dining; however, they do have regular events you can attend for amazing food prepared by their chef. Ziplining and Hiking trails are available at Sanders Ridge if you want to make it a full day at this vineyard.
Trail 3


+Tips for this trail – Enjoy wood fire pizzas at Elkin Creek & Diner at Shelton’s Harvest Grill. The brisket grilled cheese with gouda, caramelized onions & bacon jam, sweet potato fries, charcuterie board & spinach salad are a few things our group enjoyed at Harvest Grill.


Trail 4
(Perfect for a staycation or ladies weekend- book a cottage at Medaloni Cellars. Adorable accommodations, beautiful scenery, live music, and hiking/walking trails)


+ Tips for this trail, West Bend Vineyard frequently has food trucks and live music, check their calendar of events. Their restaurant is across the street, Grapevine Grill, open Thursdays & Fridays 6-9PM. Medaloni & Raylen also have food trucks and live music regularly. For lighter fare, enjoy cheese & crackers at Medaloni. I recommend the Gouda because it’s just so “gouda”. Divine Llama offers llama yoga, hikes with llamas and more. Who wouldn’t want to sip their wine in the company of these friendly llamas?

JOLO Vineyards – If time allows, add this stop or schedule it for day 2 of your trip.
Trail 5


+Tips for this trail – Hanging Rock State Park is not far if you want to add some outdoor adventure to your trip. You could easily set up your camp site ahead of time but keep in mind state parks close their gates at night.
Trail 6
Elkin Creek Vineyard & Winery
Carolina Heritage Vineyard & Winery Raffaldini Vineyards
Dobbins Creek Vineyards
Brandon Hills Vineyards
+Tips for this trail – Elkin Creek offers cabin rentals to make this a perfect option for a ladies/couples retreat.
Trail 7
Camp at Stone Mountain
Laurel Gray Vineyards
Raffaldini Vineyards
Piccione Vineyards
+Tips for this trail – Stone Mountain offers hiking trails with beautiful scenic views if you wish to add outdoor adventure to your trip.


")
I hope you have fun planning your NC Wine Trail. I’d love to hear your feedback and suggestions if you venture to other vineyards I didn’t mention.
Cheers!
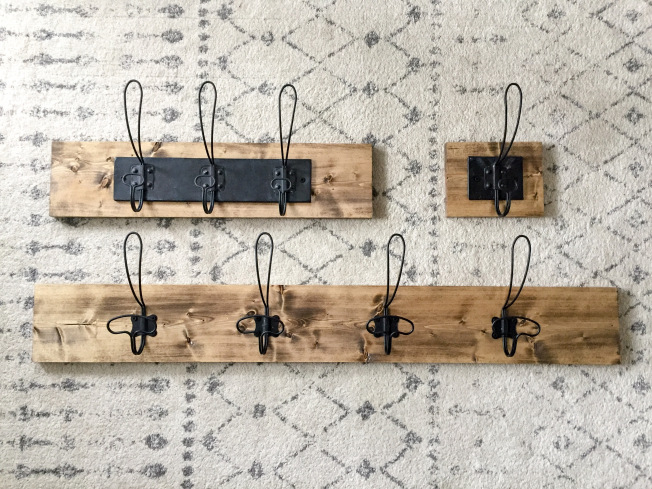
This simple DIY project is perfect for a rainy day. You can plan ahead and snag these hooks for 1/2 off when they are in the sale rotation at Hobby Lobby.
Materials:
1- 1×6 Pine Board (1 board allowed for the 3 different wall hooks you see pictured)
Wall Hooks – sourced from Hobby Lobby (they are frequently 50% off)
1 inch black screws (quantity dependent on how many hooks you plan to make)
Stain color of choice (we used Special Walnut by Minwax)
1/4 inch drill bit (attachment for your drill to make a hole in the metal wall hook)
2 inch black screws (quantity dependent on number of wall hooks you make)
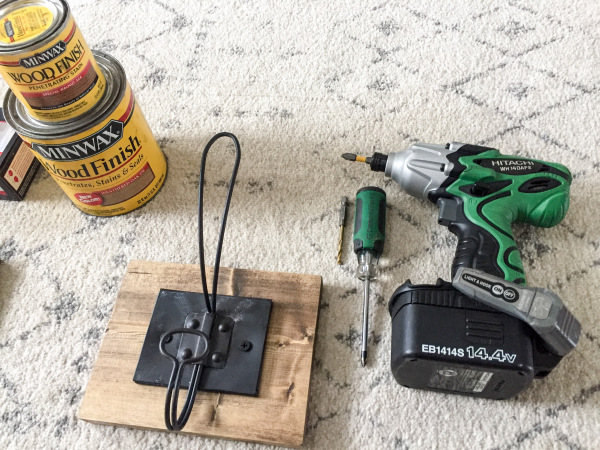
This budget friendly DIY can cost as little as $40 for all 3 wall hooks. Hobby Lobby frequently offers their drawer pulls and metal wall hooks at 50% off. You can find each hook at these links – Single Retro Iron Hook, Triple Retro Iron Hook, single iron hook (not available online). If you don’t want to wait for the hooks to go on sale, you can use a 40% off mobile coupon for one item.
Steps:

Our 5 hook set was added above a shoe bench in our garage to create a simple hall tree and catch all for jackets & book bags.
If you love the look and just don’t have the time or tools to make these, you can send us a message at The Homestead Haven as we have them in our shop inventory ready to ship. (They’re currently not online in our Etsy shop and solely made for our vendor markets.)
I recently inherited a few items from my grandparents as the family prepared the home for an estate sale. One item, a solid wooden desk, I wanted for my boy’s bedroom and loved the idea that they would ledger on the same desk that my father and his brother used as kids.
The desk had stains from drinks, small divots and scratches in the wood but overall, was in great condition.
I knew I wanted to incorporate olive green into the bedroom because it matched an army trunk that was my Grandfathers’. I first checked out Magnolia’s line of chalk paint at Target, Magnolia Paint , but I didn’t like the $32 price tag. If you are one who likes convenience of a pre-made-ready-to-use chalk paint, they have a great selection of paint colors for your project.
If you’re like me and like to decorate on a budget, this Chalk Paint recipe is for you.
I ventured to Sherwin Williams to collect a few samples of olive green paints. Like any color, there are so many variations & shades I thought I’d like best but I ended up eliminated them from my final selection first.
Final paint selection, SW Oakmoss


This shade of olive green matched the army trunk perfectly and looked great with a black and white gingham pillow that I had already sewn for a desk chair.
Steps to refinish your furniture:
For an alternative chalk paint recipe, you can try out Natalie’s (of The Vintage Porch), here. She provides great tips on finishes, brush selection, and amazing before & after pictures of projects she has tackled.
Check out the before and after of the desk:


I found this sleek little chair at Marshalls & love how it brings out the original color of the desk and also ties in the wood of the boys bunk beds.
This refinish gives me all #thefeels #meaningfulspaces #meaningfulpieces.

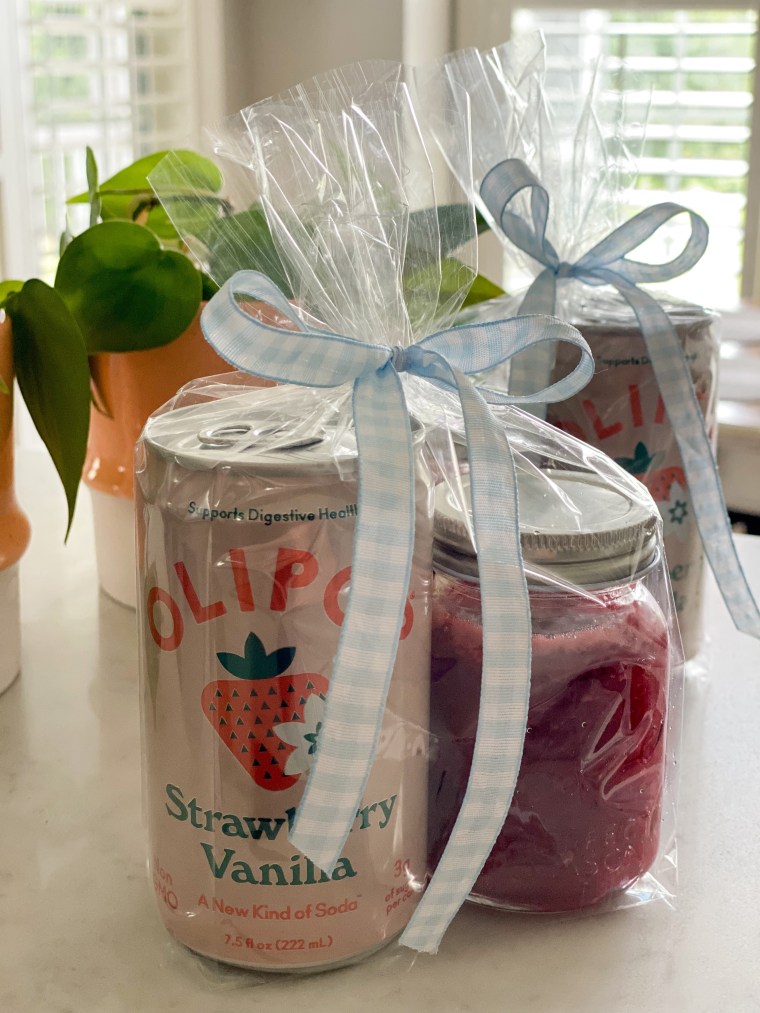
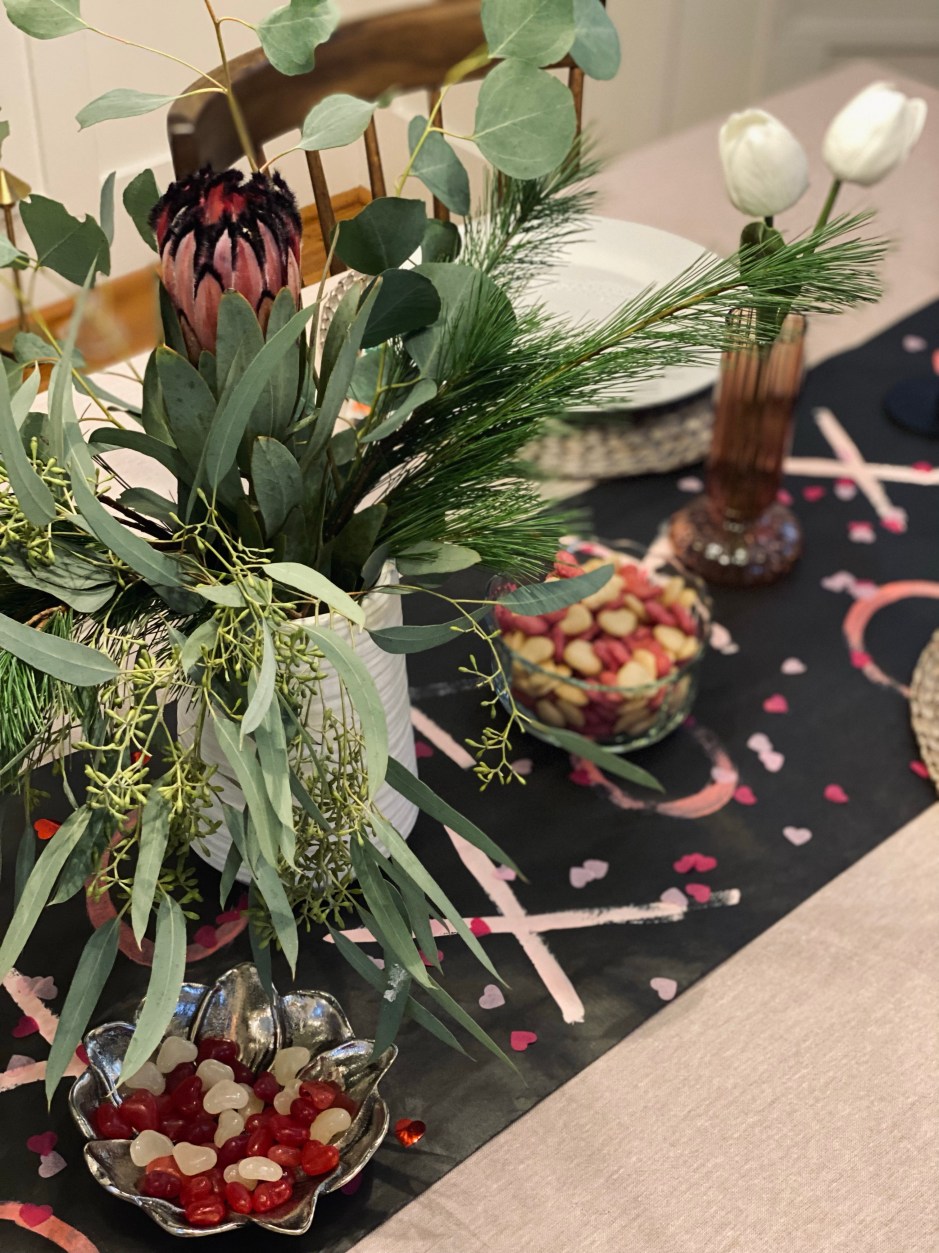
With strawberry season in full swing, I wanted to put together a thoughtful, seasonal gift to say thank you to the incredible teachers who’ve poured into my kids all year long. There’s something extra special about a homemade gift, and I loved the idea of celebrating the sweetness of spring with a “berry sweet” theme!

This little bundle includes a few of my favorite things—simple, homemade touches and a few seasonal finds that pair beautifully together. Whether you’re making something similar for teachers, neighbors, or friends, this combo is sweet, personal, and easy to pull together!
I used some pink kraft paper shreds in the bottom of the colander to nestle everything inside, then wrapped it up in a clear cellophane bag and tied it with pretty ribbon and a card. I’ve included a printable of the tags I designed which you can customize and add your name.
Print these on cardstock, punch a hole and tie the ribbon.

This is a small batch jam with no pectin—just a few ingredients and lots of flavor. Perfect for gifting!

You can double or triple the batch if you’re making these gifts for multiple teachers. I used 4 oz. jars, which are the perfect size for gifting.
For a smaller themed gift idea, you can pair a small jam jar with a mini Olipop Soda, tie it in a small clear bag and include a plant or giftcard.
If you’d like to recreate this gift, I’ve rounded up a few similar or exact items for easy shopping:

Berry colander mulit pack/White Colander Mug/3 Pack White Berry Basket/4 Pack Red Colander/Mini Wooden Spoons/Mini Olipop/Mini Jam Jars/Strawberry Napkins/Strawberry Napkins 2/Strawberry Cards/Clear Gift Bags/Gingham Ribbon
Whether you’re wrapping up the school year or just want to share a little springtime joy, this is a sweet, simple way to show someone they’re appreciated and loved.
Have you ever made a seasonal-themed gift? I’d love to hear your ideas—and if you try this one, tag me so I can see your berry sweet creations!

Turning 40 felt like the perfect time for a reset—an opportunity to step away from the everyday hustle and gift myself a little space to reflect, move my body, and soak up nature’s beauty. When my husband needed to be in Arizona for work (and since I could fly for free thanks to his companion pass—woohoo!), I decided to take advantage of the opportunity and turn the trip into a personal wellness retreat.
For four days, I focused on slowing down, moving intentionally, and soaking up Arizona’s stunning landscapes. Here’s a recap of what made this solo trip such a refreshing escape.
Nothing sets the tone for a trip like a good hike after a long travel day, and Piestewa Peak did not disappoint. The climb was a challenge, but reaching the summit and taking in the panoramic views as the sun dipped below the mountains was absolutely worth it. There’s something about standing at the top, watching the sky transform, that makes you feel both small and limitless at the same time. It was the perfect way to kick off my time in Arizona—just me, (and several other hikers), the trail, and that golden-hour glow.


I signed up for unlimited yoga at a nearby studio, which offered a variety of hot yoga classes. Before class each time I laced up my running shoes and went for a morning run, winding through beautiful neighborhoods with stunning mountain views. There’s something so peaceful about running in a new place, letting the scenery unfold, and viewing the achitecture and landscaping as you go.


Hot yoga was a regular practice of mine when we lived in Wilmington, NC and recently I reincorporated it back thanks to the amazing studio I found locally. Each session here in Arizona felt like a reset—sweating out tension, deep stretching, and grounding myself in the present. There was also something so freeing about not knowing a single sole in the studio for class.

Part II of Day 2: A Private Oasis & Total Relaxation
One of the highlights of this trip was my micro boutique hotel—a true oasis tucked away from the busyness of the city. With a pool, hot tub, fire pit, and even a cold plunge, it felt like a spa retreat all on its own. I spent time simply being—reading by the water, listening to music on the Bose speaker they provided, taking refreshing dips, and soaking up the Arizona sun. It was a reminder that rest is just as important as movement, and this space gave me the perfect environment to fully unwind.

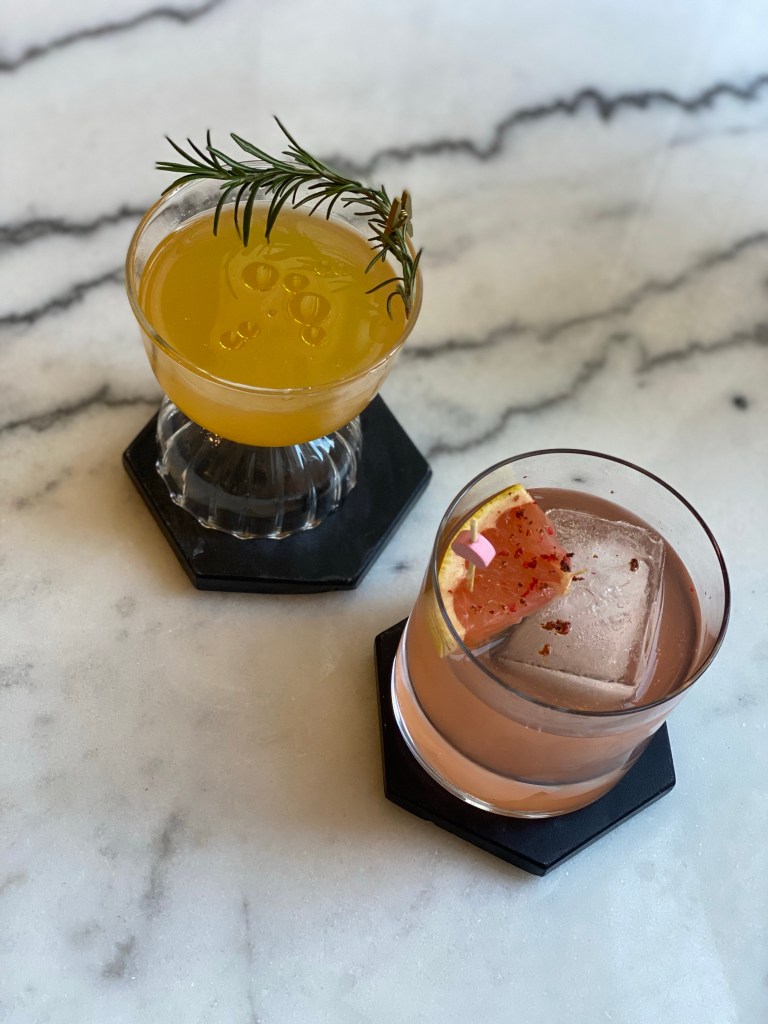
After my time by the pool, I went to The Henry for dinner. Adam and I had eaten here a couple years prior when we visited a few national parks and Scottsdale, AZ. We loved the ambiance of the restaurant and were blown away by the food that is prepared in their craft kitchen. They have a great happy hour menu, robust menu offerings for breakfast, lunch and dinner. They truly are the neighborhood restaurant. Just look at their website and you’ll see why we talk about it to this day.


When Adam and I traveled out west in April of 2023 to visit Bryce, Zion National Parks and other bucket list stops, we passed through Sedona at the end of our trip but didn’t have time to explore. Knowing I’d only be 2 hours away on this trip, I made it a priority to incoportate it into my itinerary as an adventure day. I got coffee for the road at Black Riffle Coffee Co (which i was excited to know was walking distance from my rental) and made the drive to Sedona. I spent the day hiking three different trails, each one offering something special—red rock views, peaceful forested paths, and that unmistakable Sedona magic.


The landscape here is breathtaking, and I could feel the grounding, calming energy with every step. It was the perfect way to wrap up my wellness retreat, feeling strong, clear-headed, and deeply refreshed.
If you have one day to spend in Sedona, just know that it is an easy day trip from the Phoenix/Scottsdale area. I’m sharing a simple itinerary if you want to squeeze in hikes and see the area.
12 hours in Sedona:
Leave Phoenix by 6AM. If the timing is right, you can catch the sunrise as I did at Aqua Fria National Monument along the way. It was right off of an exit.
Arrive at Devil’s Bridge via Mescal Trailhead around 8AM and hike the beautiful trail. There is some rock scrambling as you get closer to the bridge but it wasn’t too difficult for a seasoned hiker. I would feel comfortable if our 3 sons were to hike it at ages 10, 8 and 4. Be sure you also check out the short trail that leads you to the underside of Devil’s Bridge. Allow 2 hours for this hike. During peak tourist season, you may need to allow more time if there is a long line to take picture on Devil’s Bridge.
*It’s not as narrow as it appears in pictures. It’s a wide area to walk across and again, I would be okay with our boys going on it but they would, of course, be holding our hands.
Drive to Fay Canyon Trail (10 Minutes) – This is a shorter hike. You can not miss the offshoot trail that leads to another arch. It is more scenic than the trail end of Fay Canyon. Allow 1.5 hours total for this hike.
Stop in town for a quick bite to eat or enjoy snacks you bring for the hikes as I did. I wanted to hustle to get in as much in as possible.
Drive to Cathedral Rock – 18 minutes from Fay Canyon. Pit stop at the Chapel of the Holy Cross that’s along the drive.
Cathedral Rock is considered difficult on Alltrails and I would agree. There is a lot of rock scrambling to get to the top. I pushed through the uncomfortable and challenging path to get to the top and I’m glad I did. The views were worth it.
Drive back to Phoenix and enjoy the views along the way. If you’re lucky, you’ll see hot air balloons in the sky near Sedona.
Given the time I needed to be out of my rental, I had time to make a cup of coffee, relax in my private Oasis, then head out for another scenic run before I had to shower and prep for the airport.
It’s kind of wild that Adam and I traveled so far together and didn’t spend much time, just the two of us, in Arizona. I did get the best surprise on the last night when he wrapped up work early and was able to join me at my rental for the night.

Stepping away from my normal routine and gifting myself these four days was one of the best things I could have done. Movement, nature, quiet moments, and intentional rest—this trip reminded me how important it is to carve out time to reset. So, thank you to all my friends for encouraging me to go when I almost backed out.
Whether it’s a solo getaway or just taking small moments in everyday life, prioritizing your well-being is always worth it. This is something that I have learned to not feel guilt over the older I get. At the end of the day, I know carving out this time will, hopefully, allow me to be present and live a healthier life so I can be here for our family.
If you’ve ever thought about taking a solo trip, let this be your sign to go for it! Everything you you normally have to do will be waiting for you when you get back. So, go on that trip. Take the time. Miss your family. Let them miss you. Then go back with a refreshed mindset and core memories that you’ll hold with you forever. (Especially if you’re celebrating a milestone birthday like I was). 💛
Would you take a solo trip for a wellness reset? Drop a comment—I’d love to hear your thoughts!
This super simple gift idea is bubbling with love. See what I did there? I created a free printable to make this gift idea quick and easy to assemble for teachers, friends, neighbors, or loved ones.
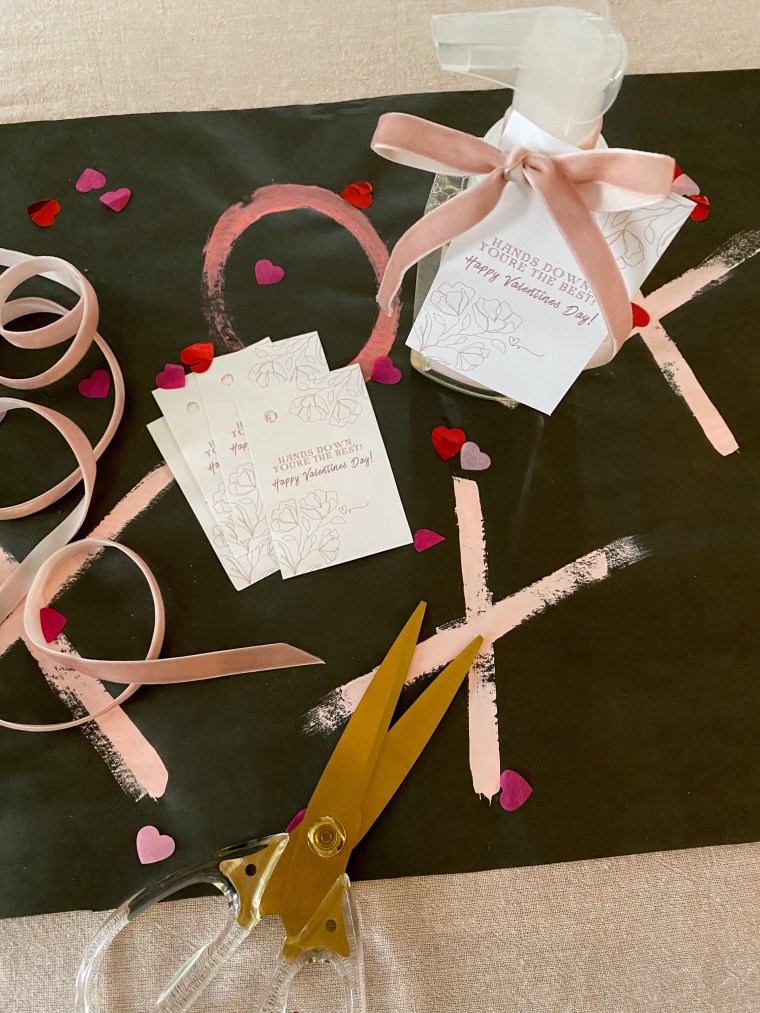
Download and print it HERE.
When I saw these seasonal soaps at Trader Joes a couple weeks ago, I knew immediately what I could do with them as a teacher gift for our son’s teachers. Not only is it practical, these soaps smell delightful.
I paired them with Belgian chocolates, also at Trader Joes, and filled these cellophane bags with shredded red filler and adorned each with pretty red felt ribbon.
You can see from the design and color way of the tag, you have the flexibility to use pink or red ribbon.
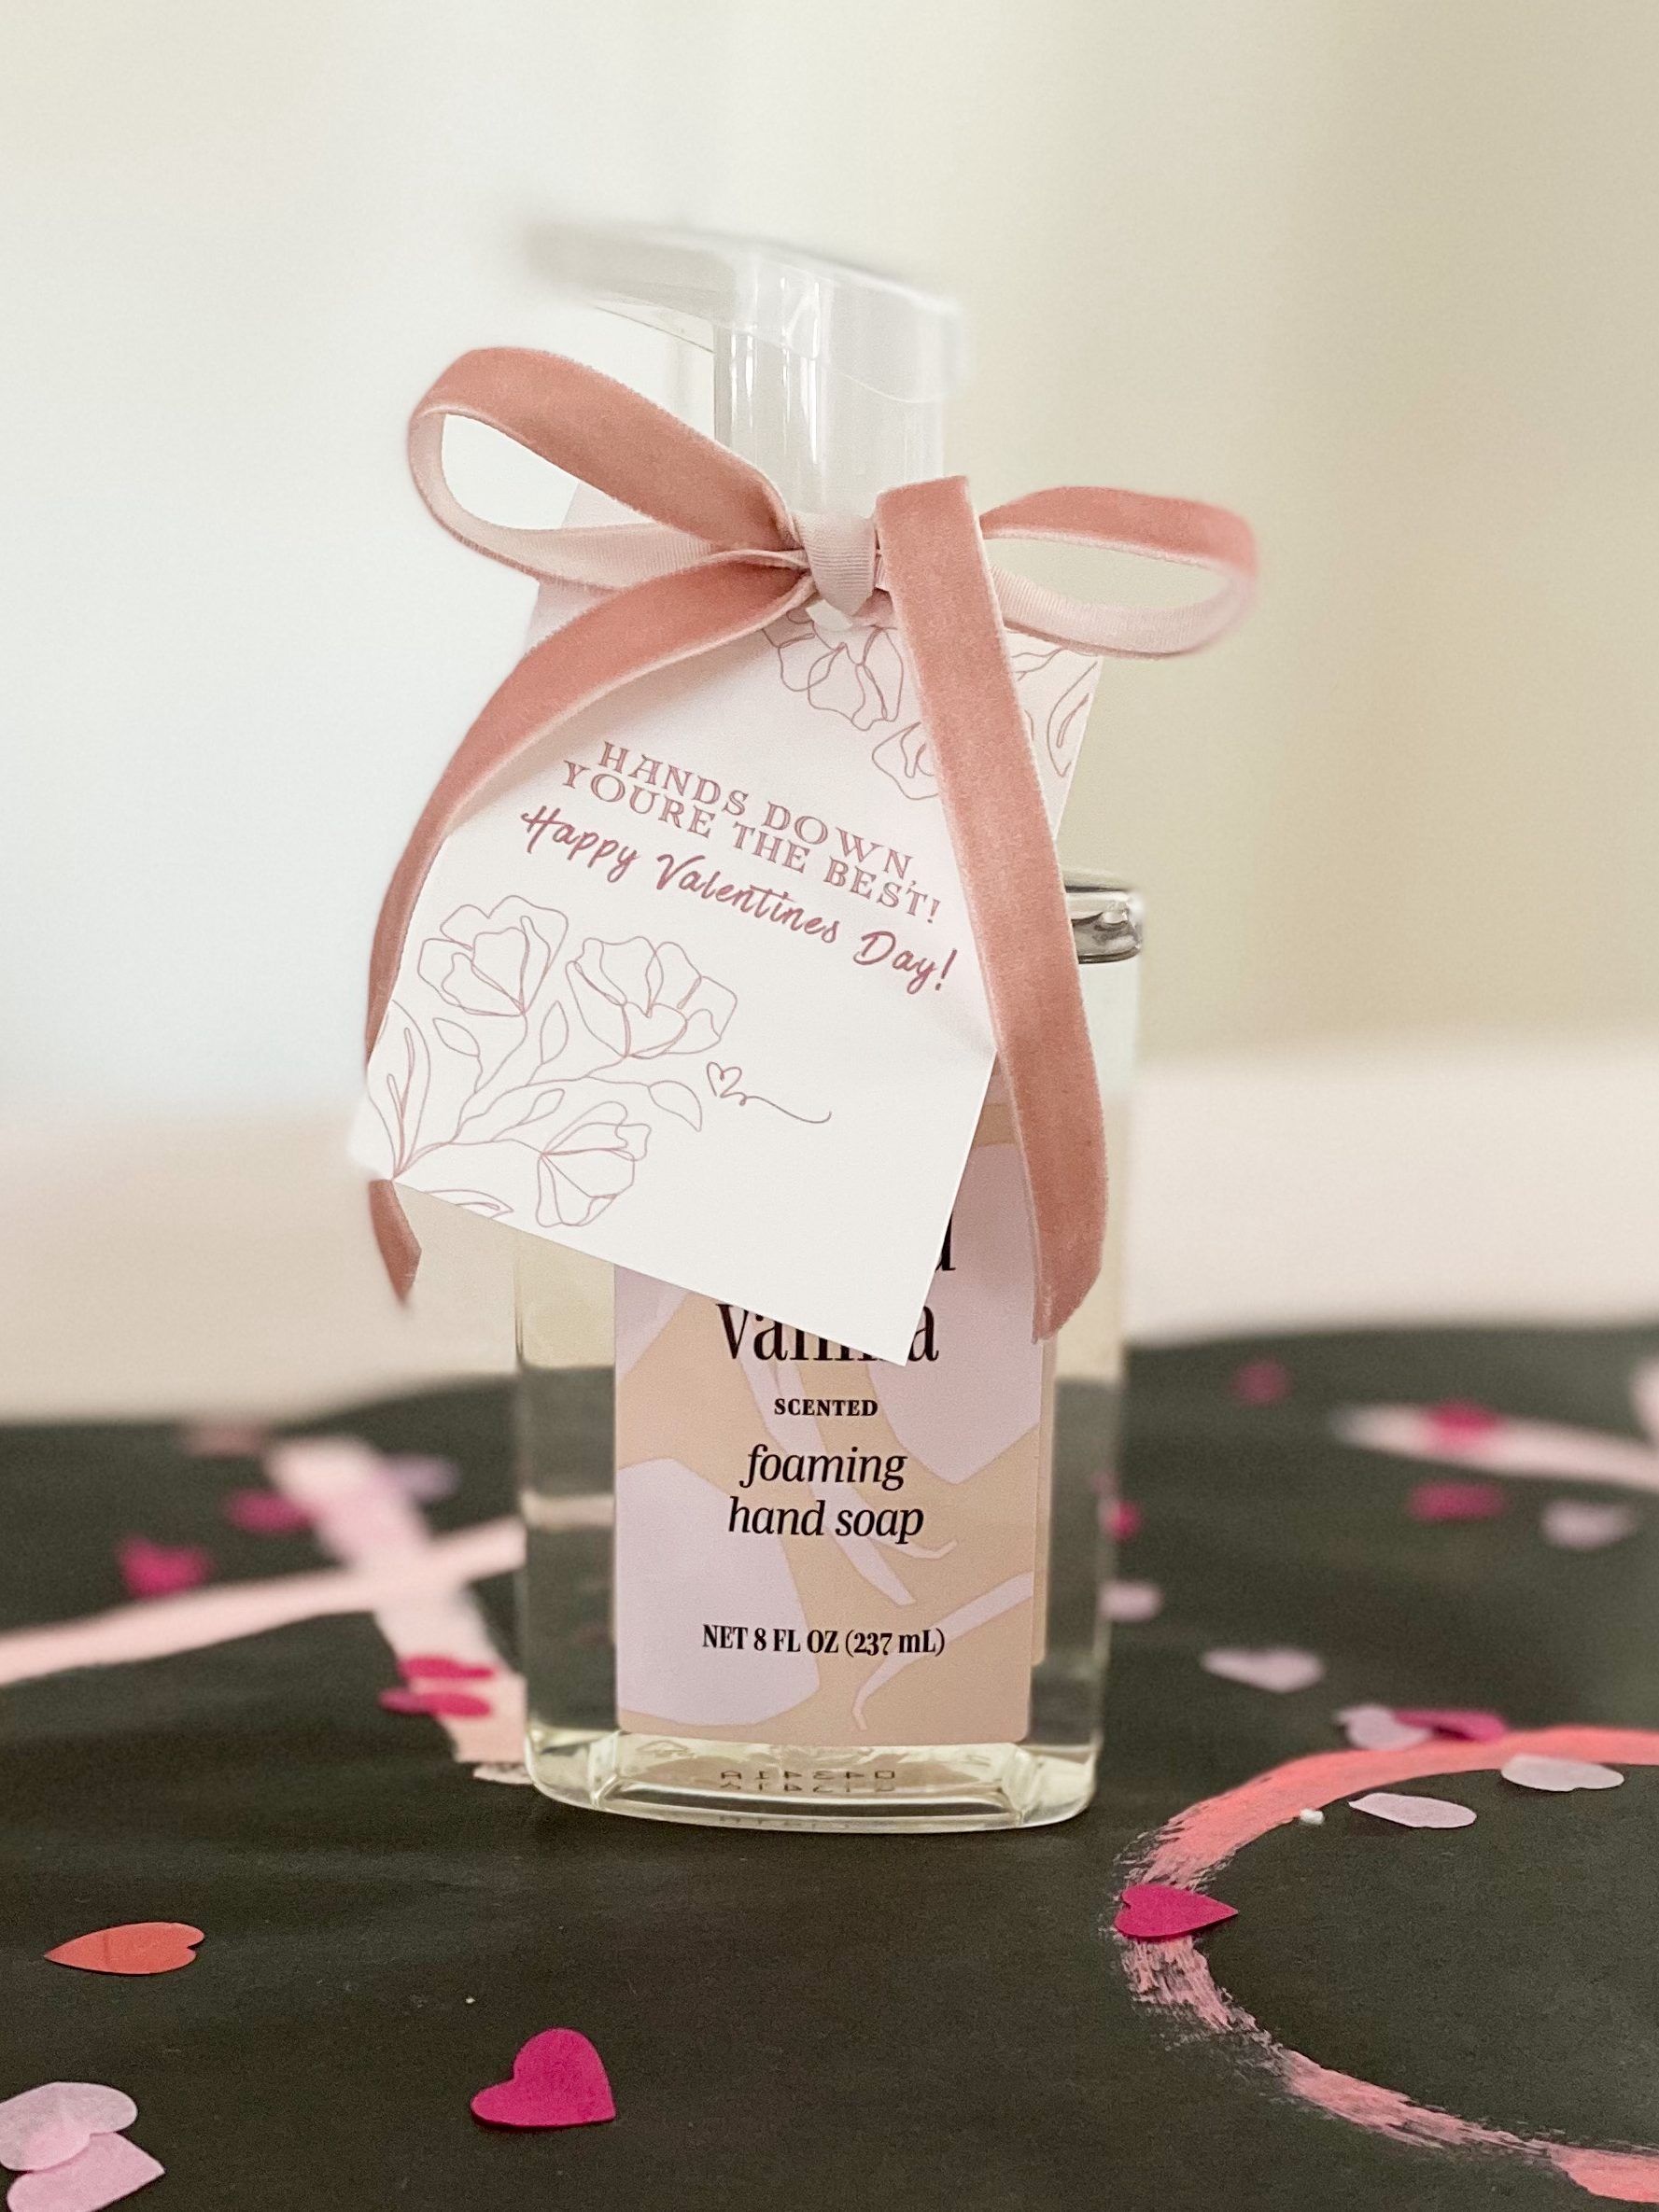

Wishing you a Valentine’s Day that’s hands-down the best! Whether you’re spreading kindness to teachers, friends, or family, a little love goes a long way—no ifs, ands, or hands about it!

We’re three weeks into January, and chances are, you’ve set a few personal or professional goals for yourself. I’ve noticed a lot of people diving into post-holiday organization, clearing out the clutter, and sharing their progress online. While I totally get the motivation, I also feel the overwhelming pressure to “do all the things.”
In full transparency, I’ve had to tune out the noise that constantly floods our social media feeds. Messages like: Do more. Buy this. Try that. Here’s the latest and greatest thing you absolutely need can quickly become too much.
It’s a lot.
Here’s where I’m at: I want practical solutions that work for our family. I approach organizing by first assessing what we already have at home. Then, I figure out how to make it work without overspending on trendy organizational products.
If you’re tired of washing cups nonstop or filling the dishwasher’s top rack every day, let me introduce you to the simplest solution that’s been a game-changer in our home, magnetic cups! The best part? It’s affordable!
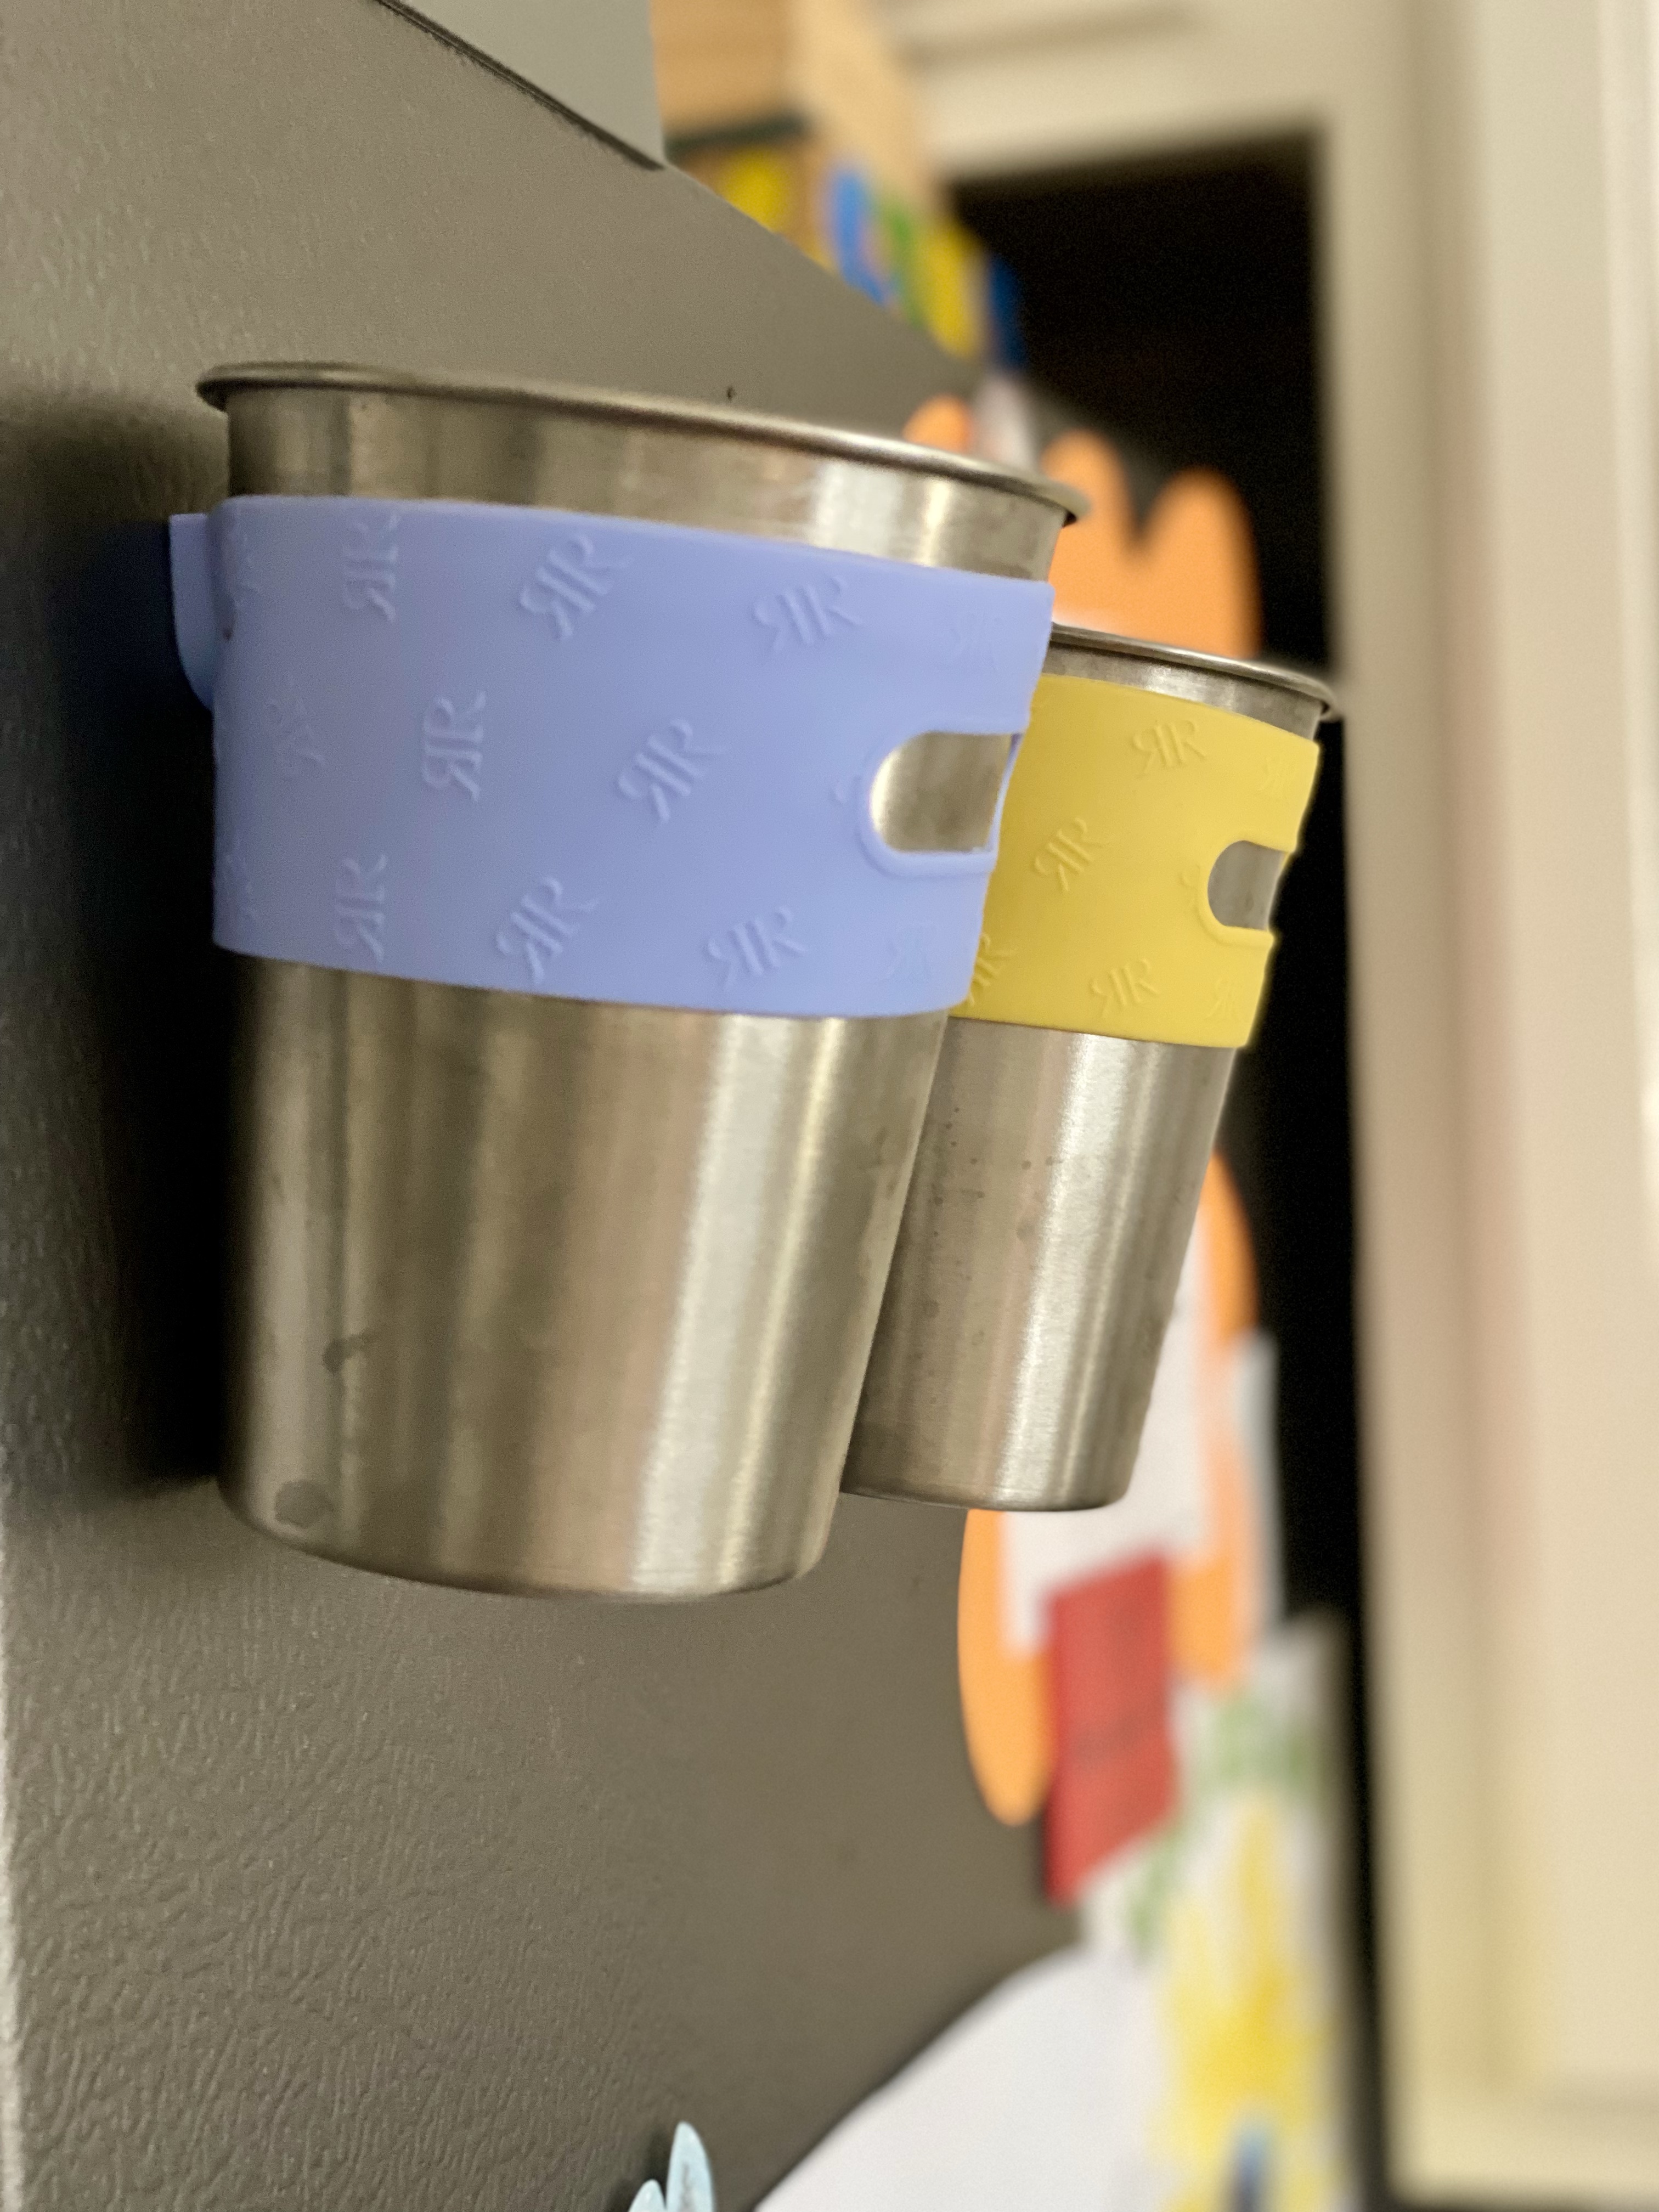
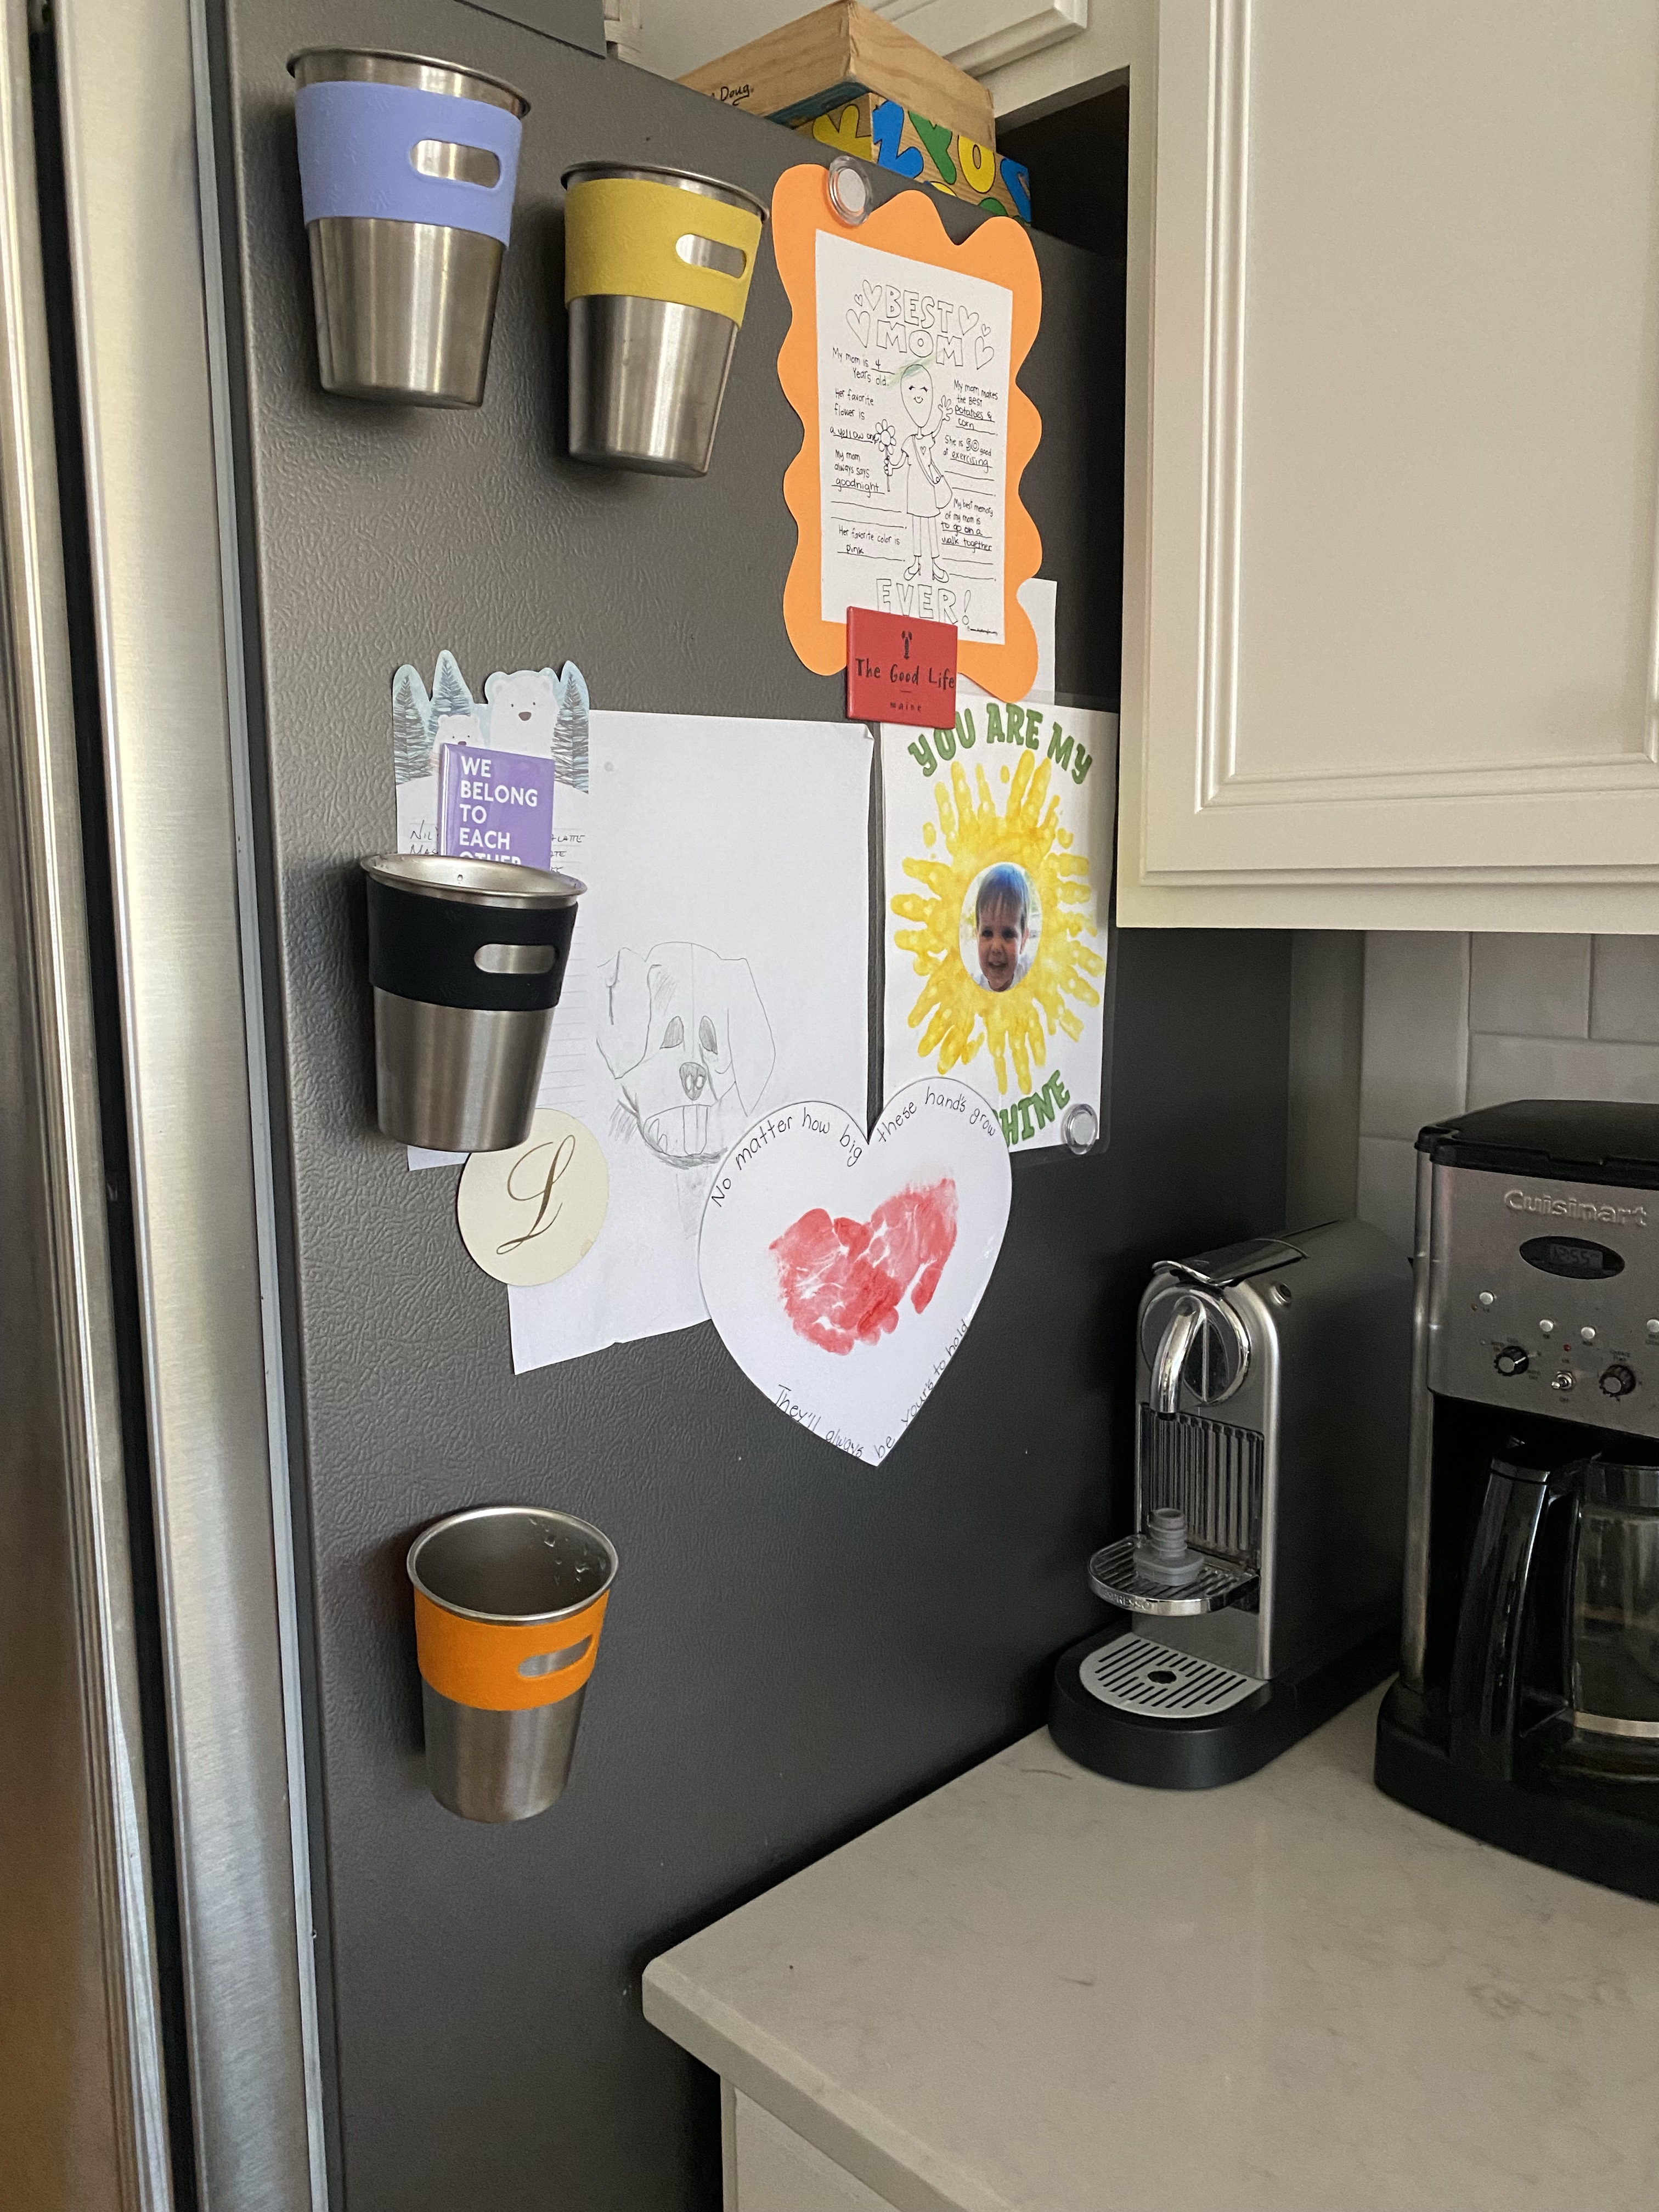
You can look at the various color options here, Magnetic Cups or Magnetic Cups with Lids
Want to know what happened when these small changes were made in our home? It gave our three boys responsibility they could control with their water cups. There was no longer a question about, “who’s cup is this?” Our 4-year-old listened to directions about how to use the cup one time and took ownership in getting his own water, dumping out what he didn’t drink, and putting the cup back on the fridge where he can reach it.
Kids want responsibility.
Now, let’s talk about the fridge and pantry. Do you have family members who open the fridge, take one look, and immediately ask you where something is? Let’s be honest—most of the time, they haven’t even tried to find it.
I came across these acrylic lazy Susans at our local TJ Maxx, and I instantly knew they could help. They’re perfect for organizing condiments, cooking essentials, and all those pantry staples we reach for regularly.

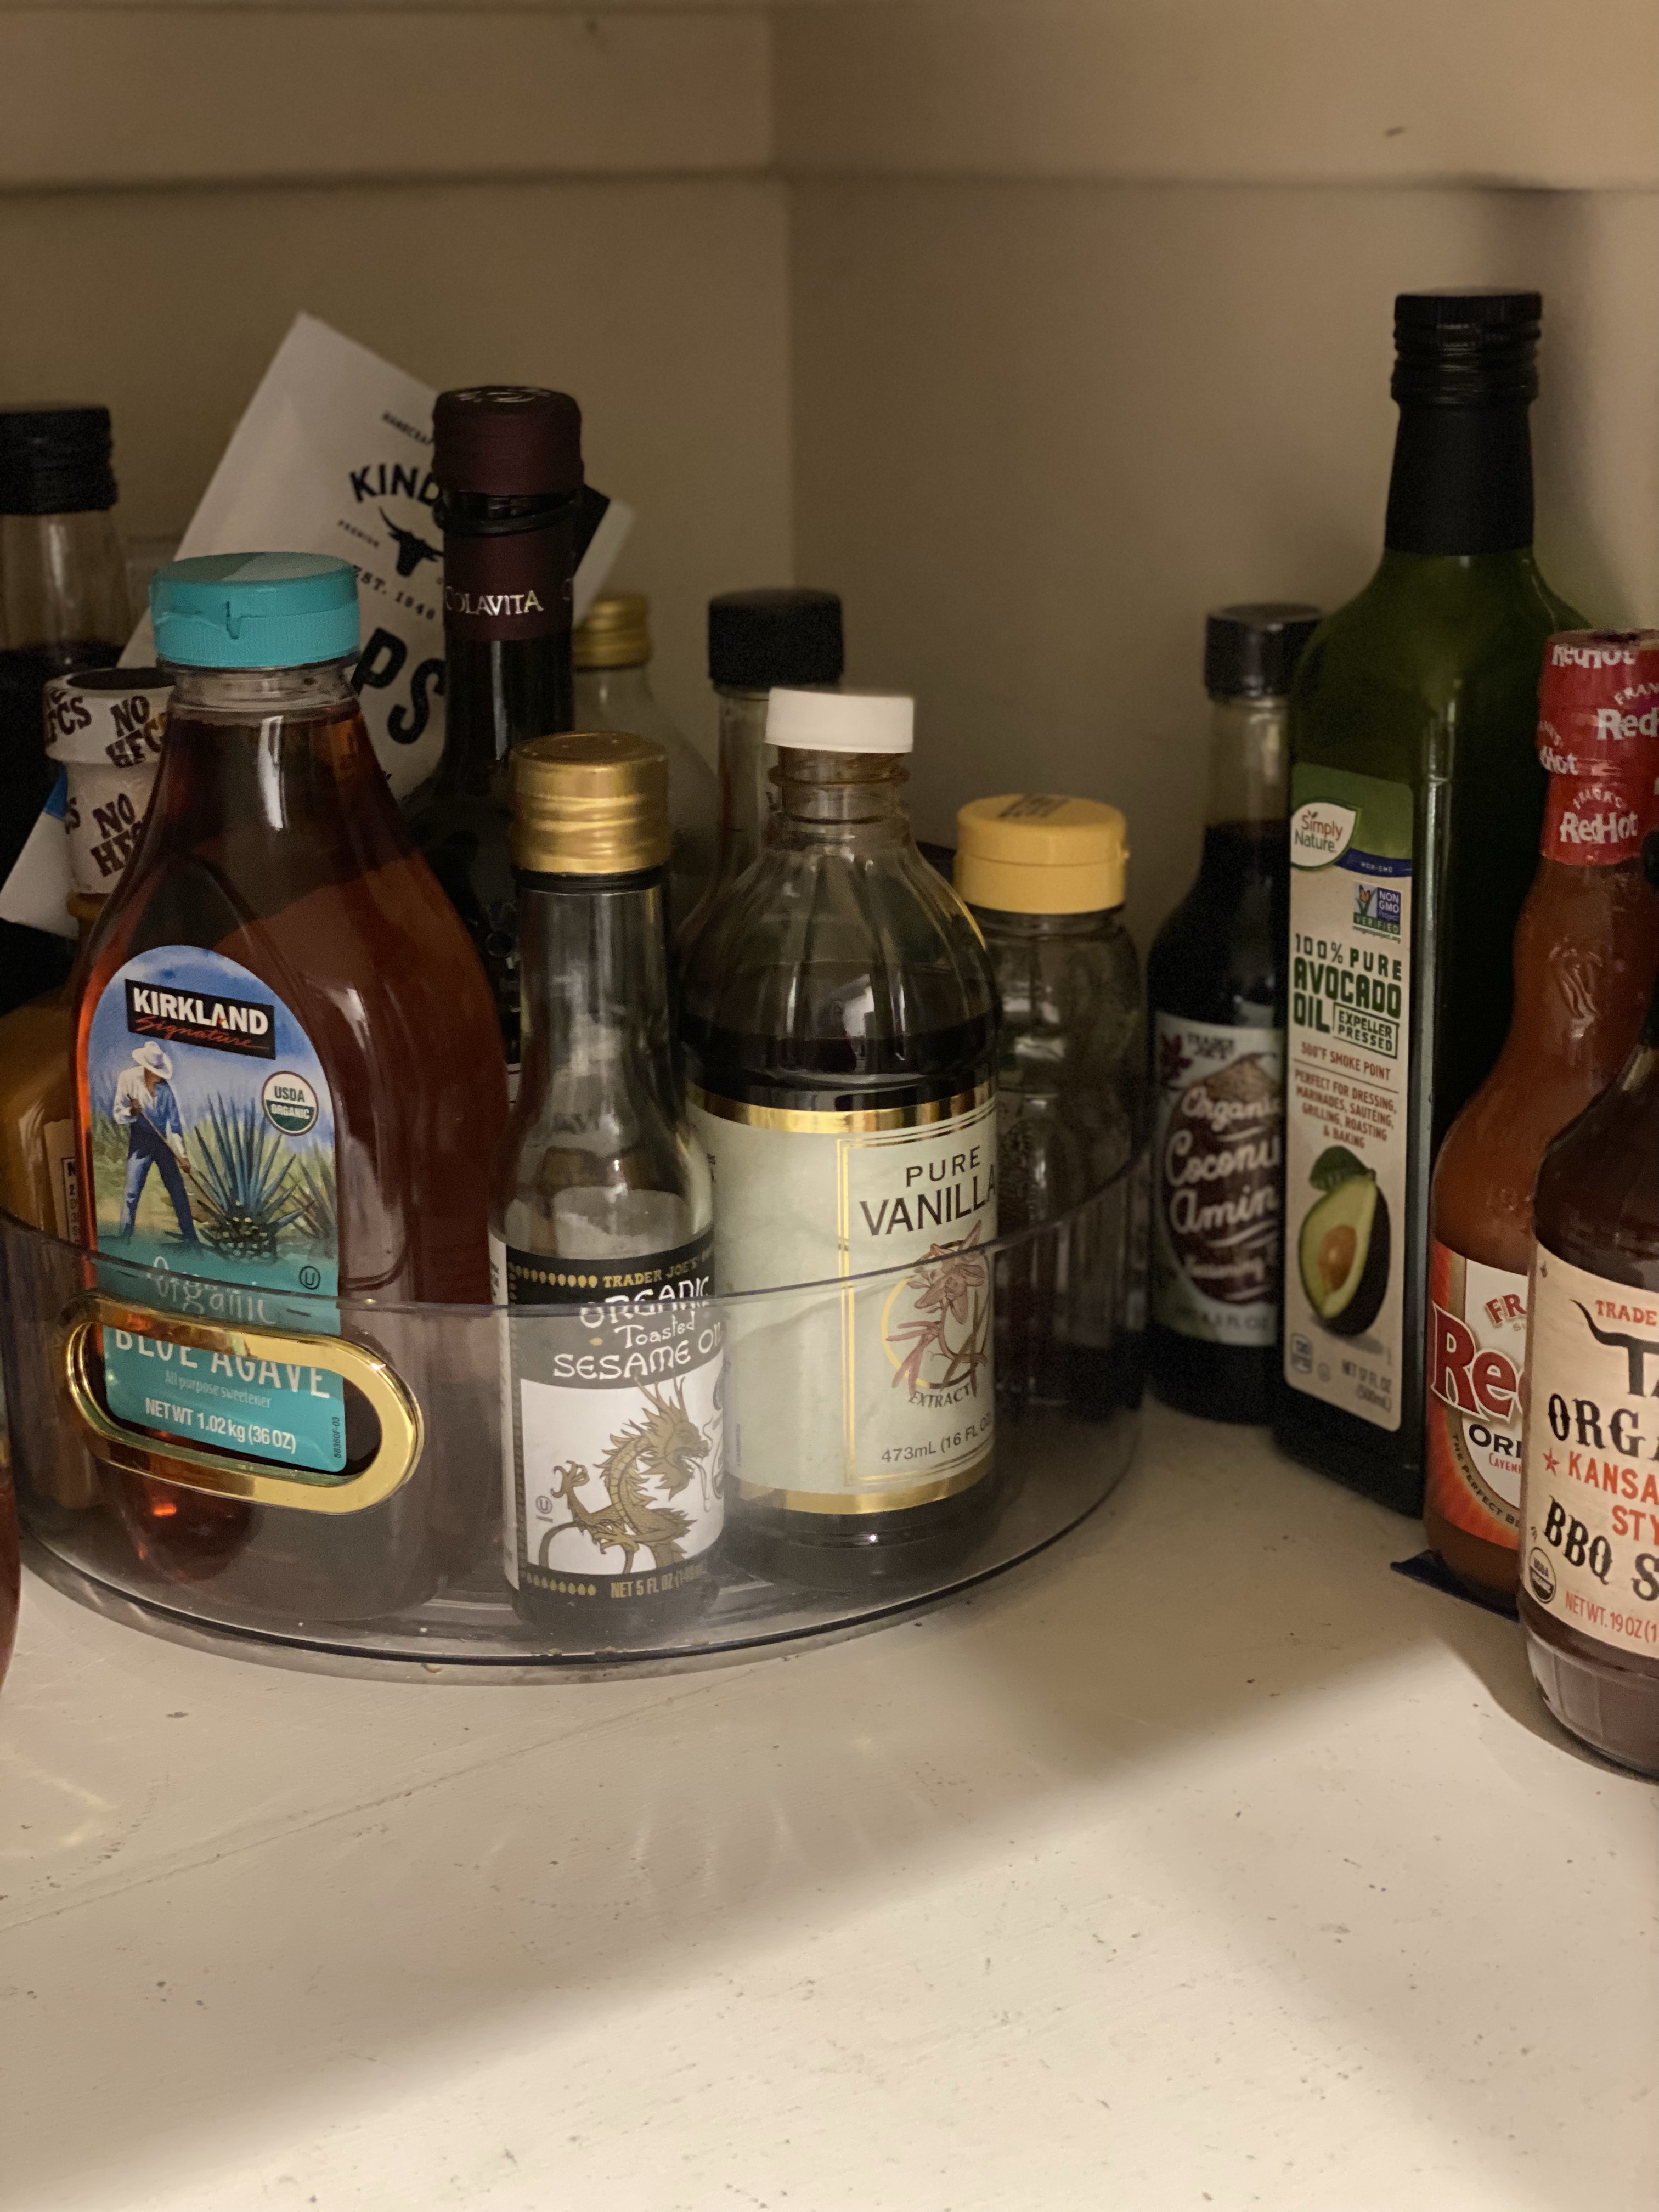
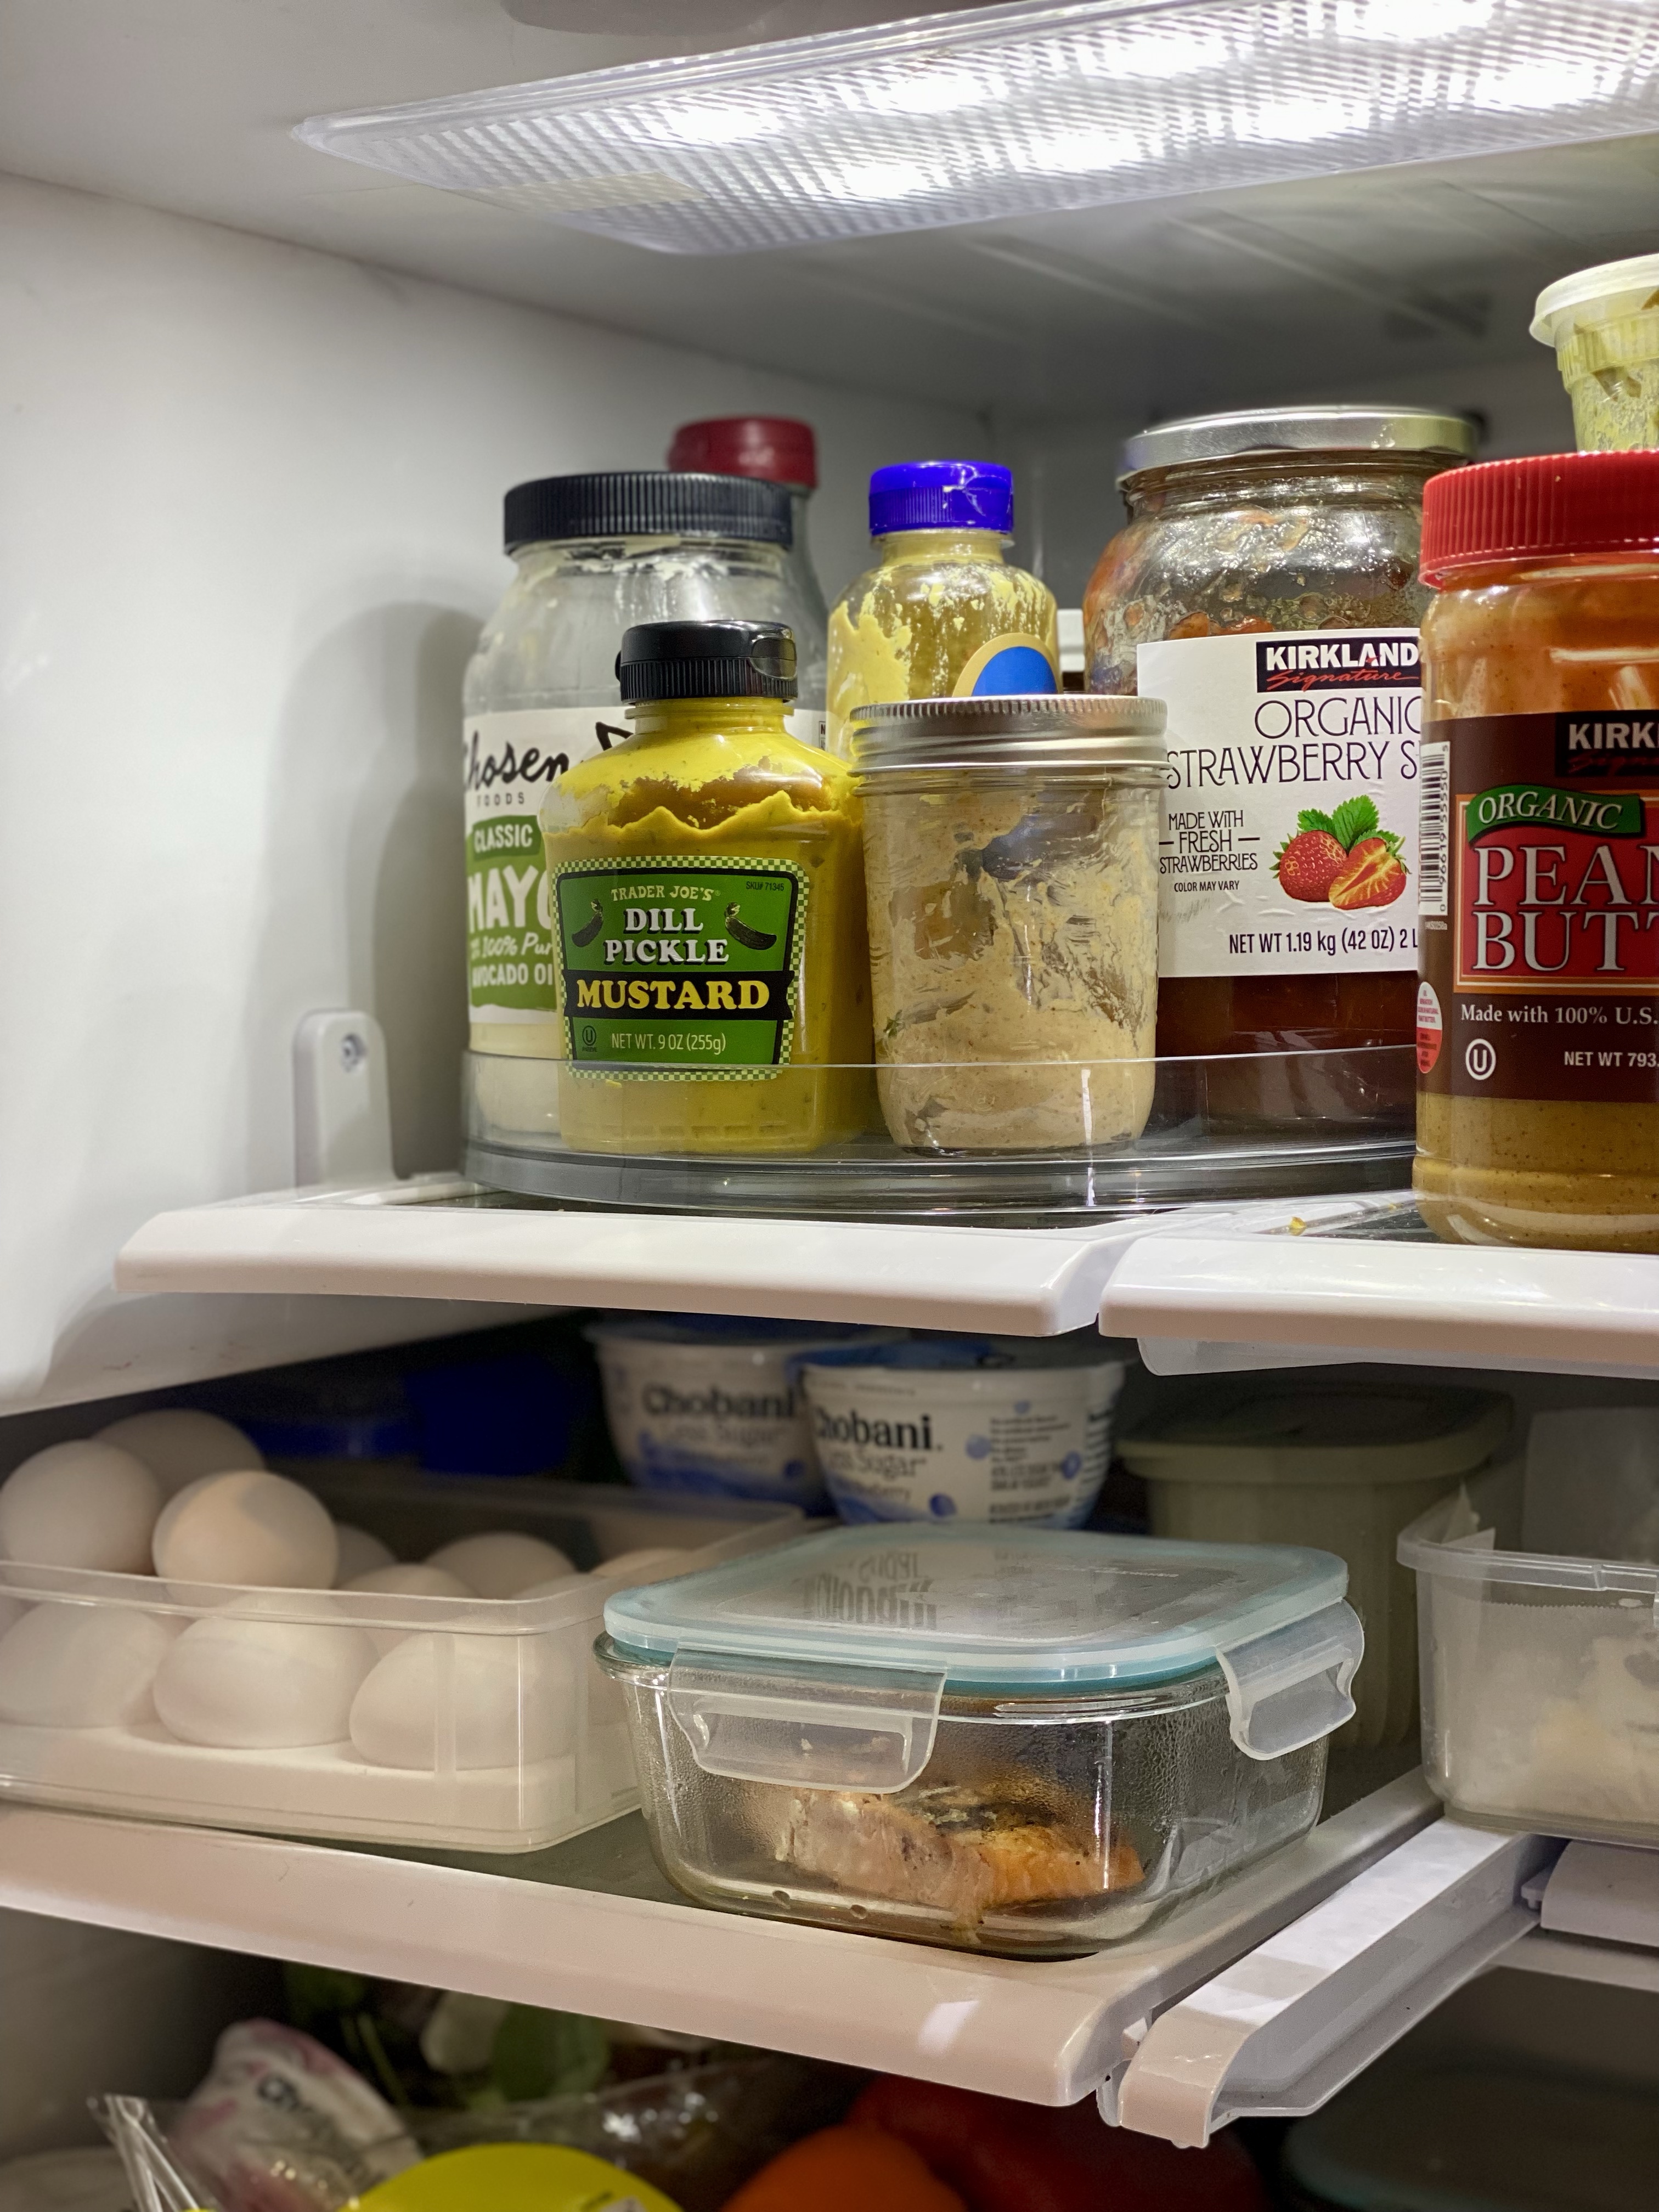
These two small, affordable purchases have made a huge difference. The counters are clearer, and it’s so much easier to find what we need in both the fridge and pantry. This two pack would be perfect, Lazy Susans
I’m reminded of a verse from Ecclesiastes 4:6: “Better one handful with tranquility than two handfuls with toil and chasing after the wind.” It’s such a grounding reminder that more isn’t always better. Sometimes, less is exactly what we need—less stuff, less striving, and less pressure to keep up.
Let’s lean into finding solutions that work for your family—starting with what you already have at home. You might be surprised by how simple changes can make a big impact.

There is something nostalgic about creating a cozy haven during the holiday season. From the moment I pull out the storage boxes brimming with decorations, the magic begins. It starts with putting my favorite childhood Christmas vinyl, Once Upon a Christmas by Dolly Parton and Kenny Rogers, on our son’s record player—a tradition carried over from my parents, who always played it as we decorated our childhood home together. That familiar music instantly transports me back to those warm, joy-filled moments of stringing lights, hanging ornaments, and marveling at the twinkling glow of the tree.
Now, as a mom myself, I feel the same excitement when transforming our home for the holidays. Each piece of decor tells a story, and each tradition we honor—or create anew—brings its own special kind of joy. This year, I’m reflecting on the little moments that make Christmas magical for our family: the sweet smells of baking with my mom, the laughter of my boys as they exchange gifts, and the quiet evenings Adam and I share once the house falls silent.
These are the traditions that make our home feel like a haven during the most wonderful time of the year.

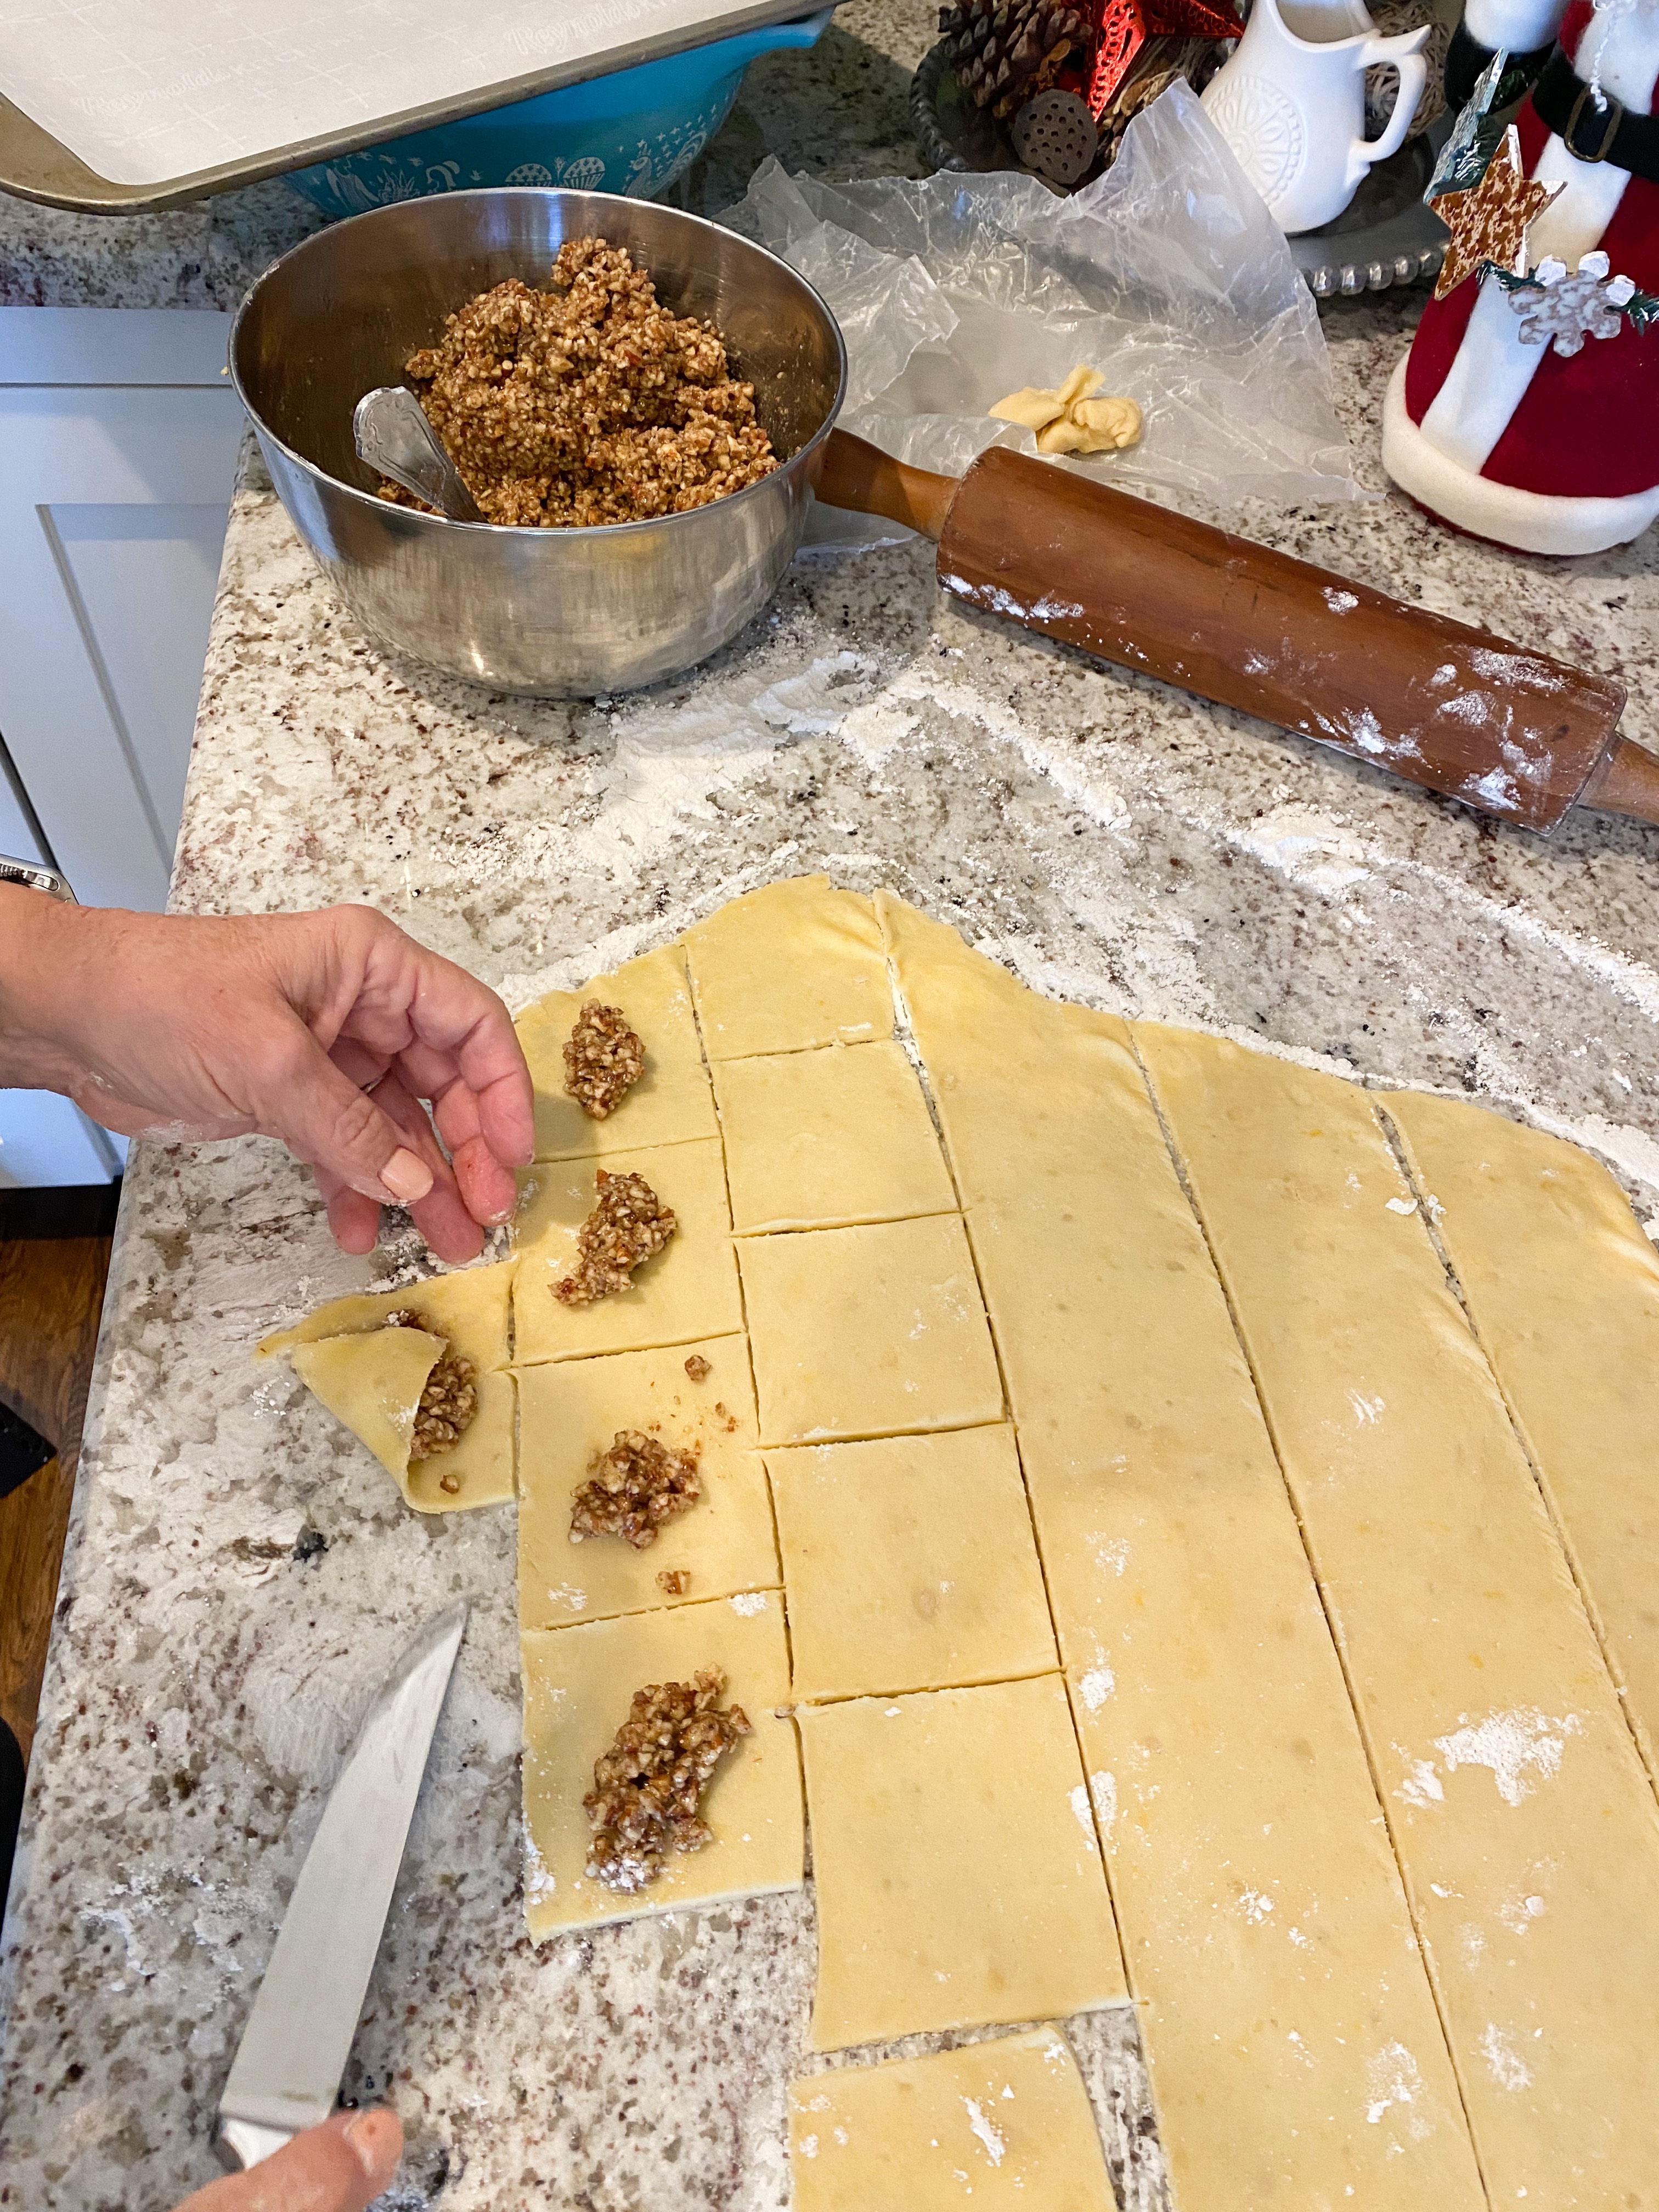
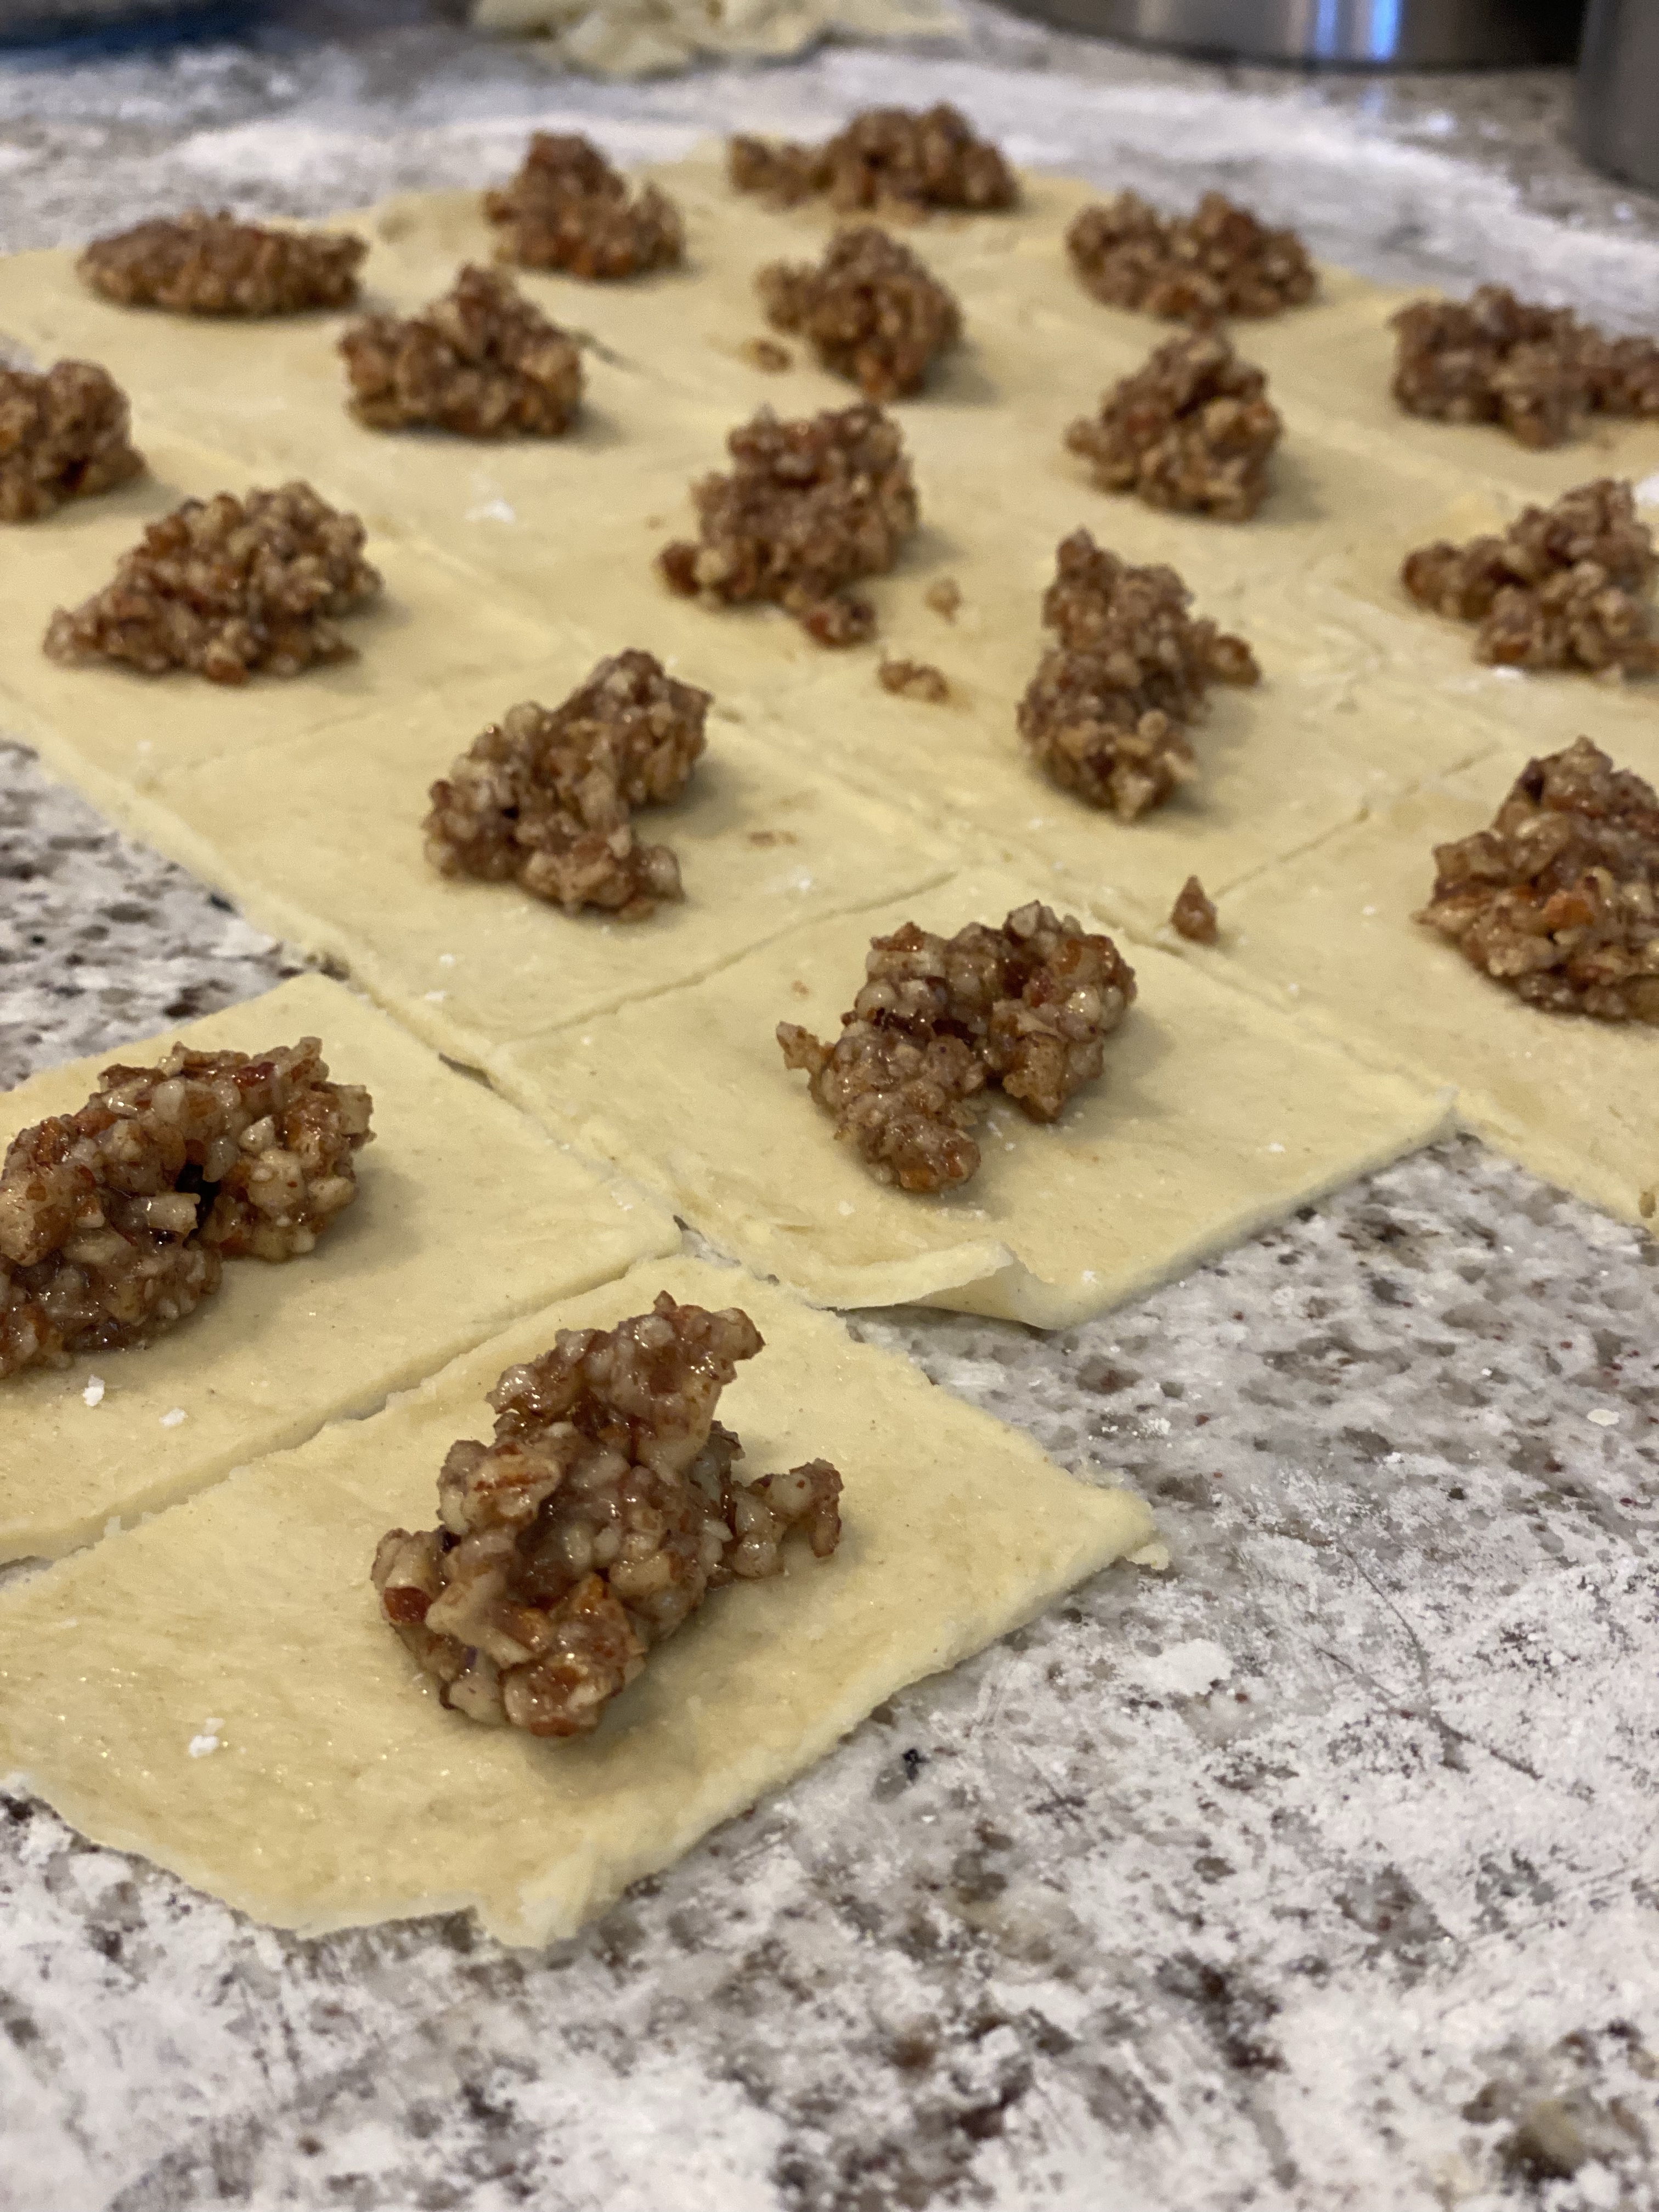
Hungarian Pastry-Making with Mom
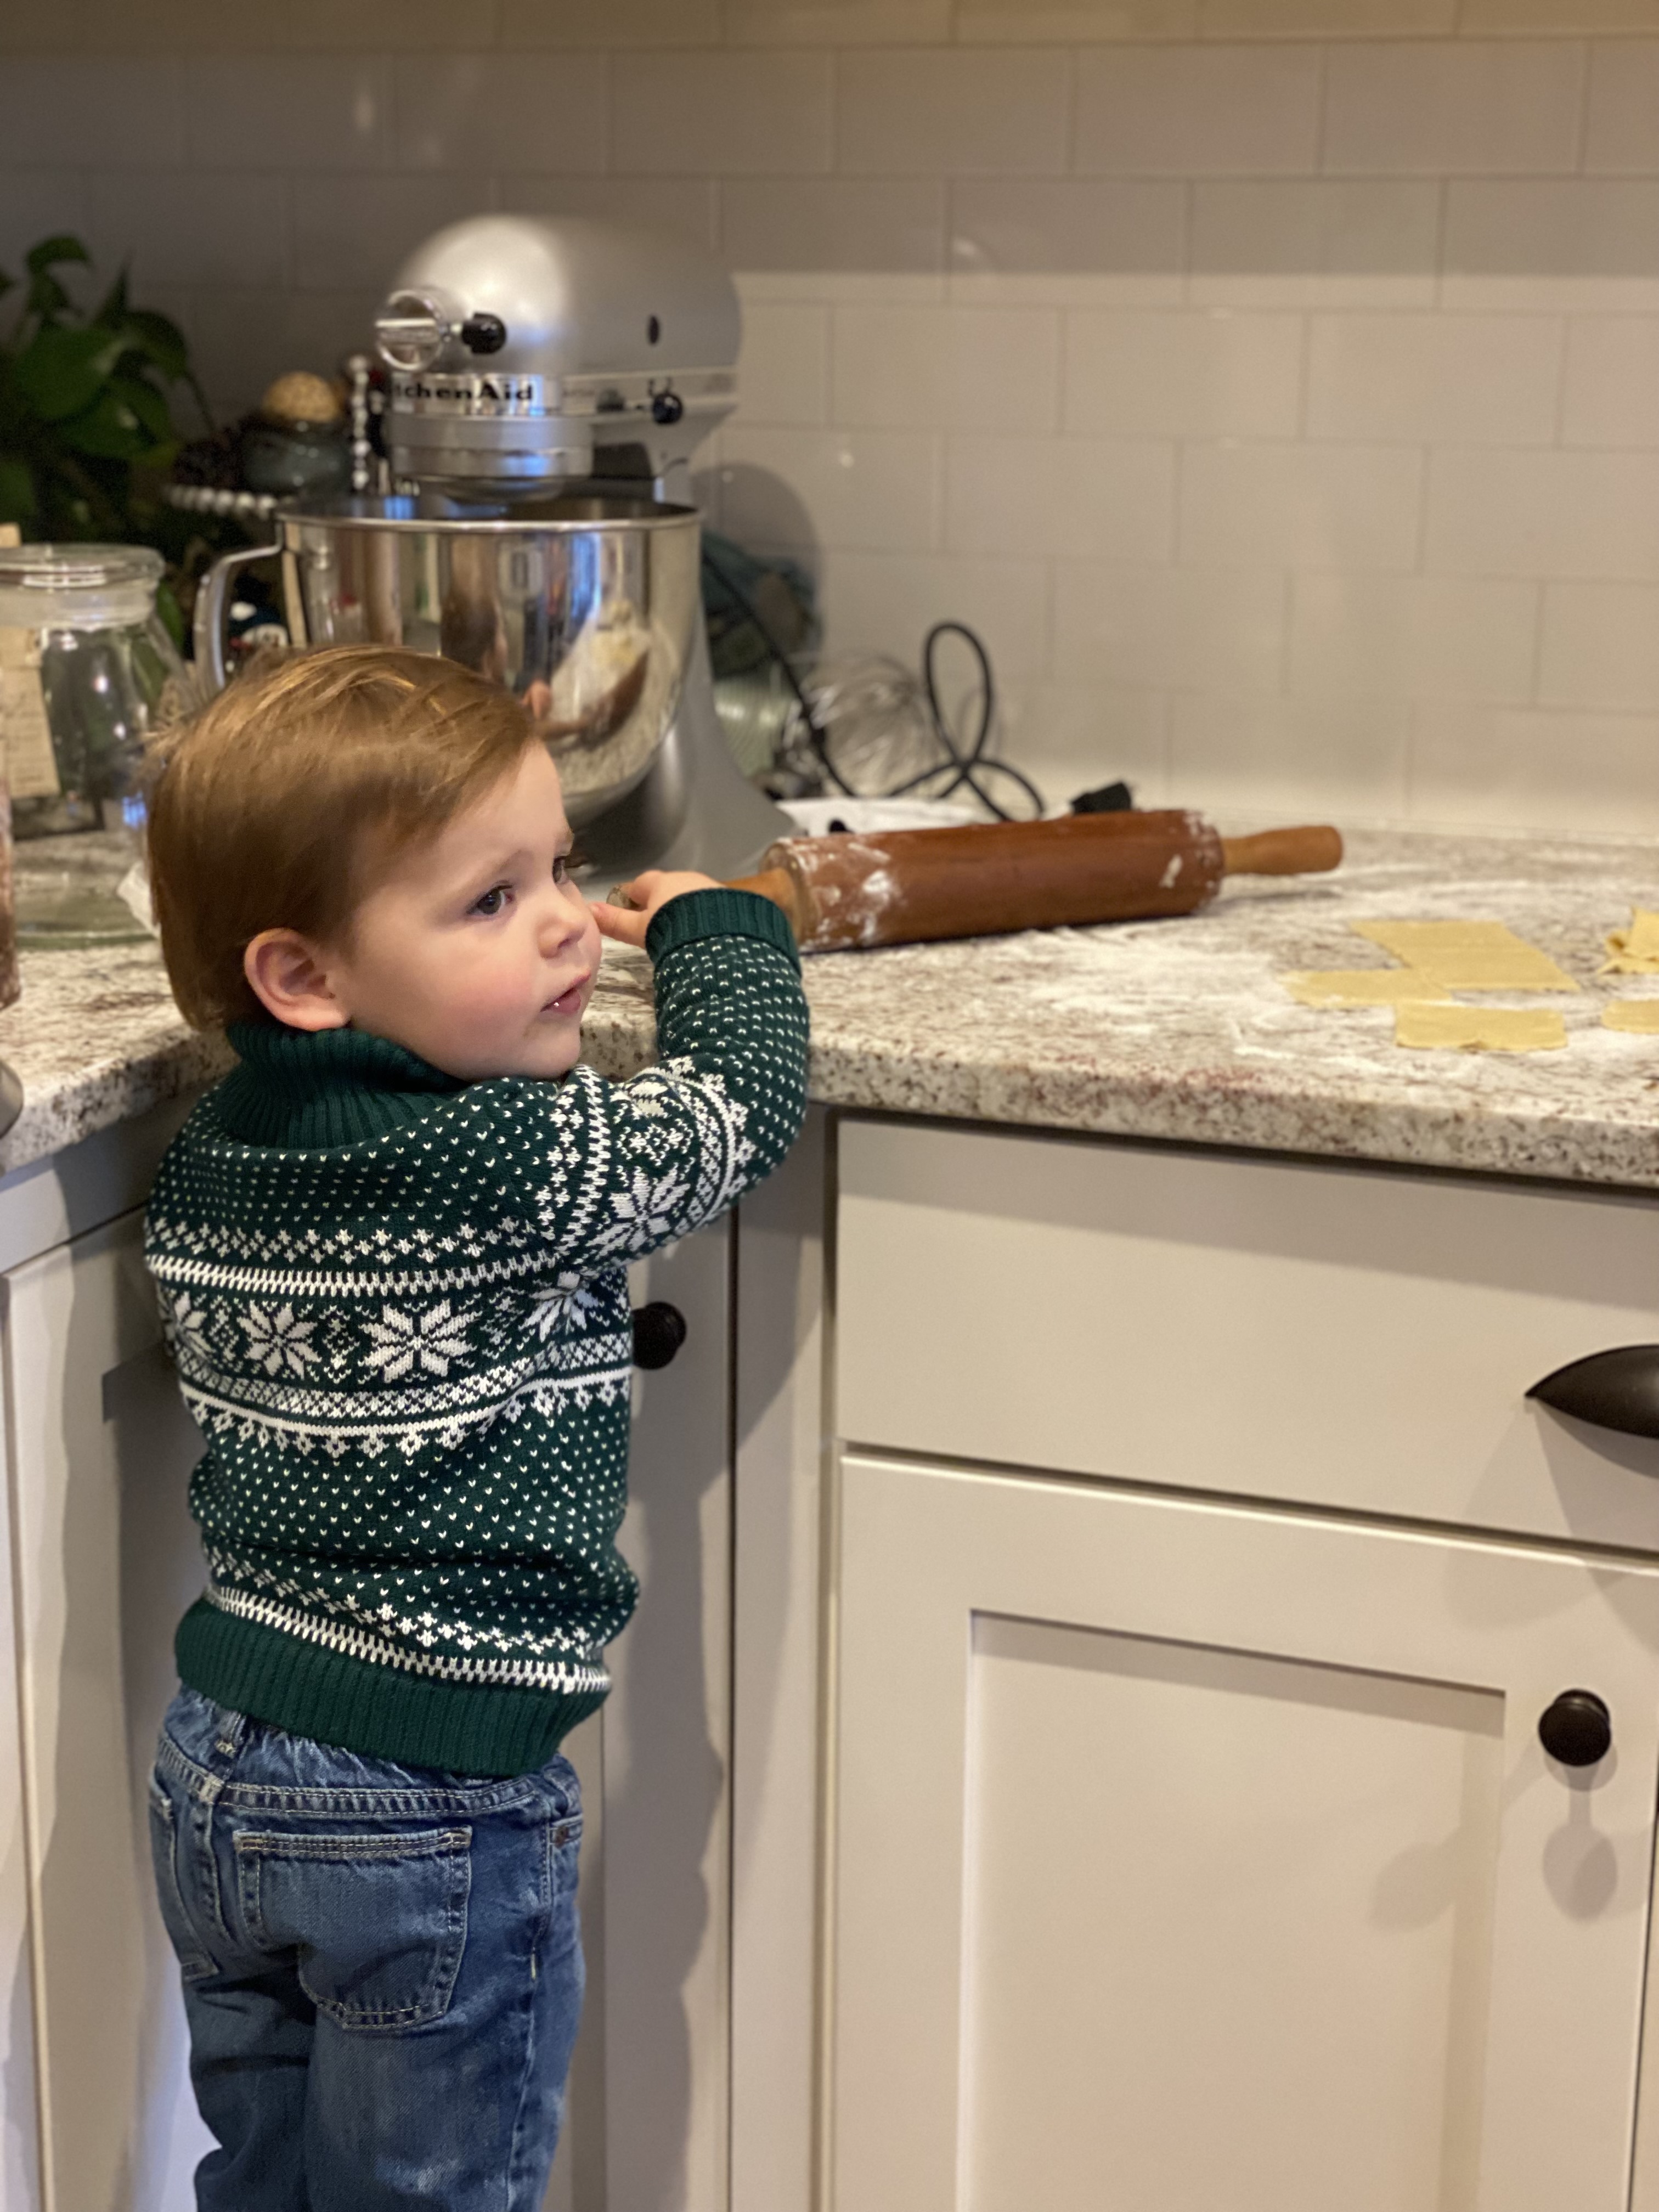
One of my most cherished traditions is baking Hungarian pastries with my mom, using a recipe passed down from my grandmother. This heirloom recipe is a delightful treat filled with a pecan center, surrounded by a dough that is made a day in advance. The following day, we hand-roll the dough, cut each individual pastry, stuff them with the pecan filling, roll them up, bake them, and finally sprinkle them with powdered sugar when they are fresh out of the oven. It’s a process that requires time and care, but it’s one that I always look forward to. Perfecting this recipe has been important to me, but more than anything, I have treasured the time spent with my mom.
Thanks to today’s technology, we can even ask Alexa to play the same Christmas record while we bake, no matter where we are. Over the years, this tradition has evolved; some years have included babies in tow and adjustments to our usual routine. Yet one thing has remained constant: the joy of spending time together while creating a family favorite.


Driving to see Christmas Lights
Another family tradition is driving through neighborhoods to see Christmas lights while listening to Christmas music. The awe and excitement that our kids exude when they see the bright lights is so much fun to witness. Our youngest, in particular, is a BIG-TIME Grinch fan. This year, we’ve made a special point to take him to see as many Grinch decorations as possible because his over-the-top excitement every time he spots one is absolutely contagious. These outings have become a highlight of our holiday season and a tradition we look forward to year after year. We’ve also added in ice skating at Fenton in Cary and seeing the lights at the downtown Cary Park as a newer tradition if our schedule allows each year.


Christmas Eve Church Service
This tradition brings a sense of peace and spiritual focus to the holiday season. The service culminates in a breathtaking moment: with the lights dimmed, the congregation lights candles and sings “Silent Night” together. The glow of the candles and the harmony of voices create an overwhelming sense of serenity and connection, reminding us of the deeper meaning of Christmas.

The Boys’ Gift Exchange (New Tradition!)
This was the first year I had the boys select a Christmas gift for each other. Bonus, they didn’t have to spend their own money but I did have them wrap the gifts. After returning from Christmas Eve service, they ran to the tree begging to open 1 present. I knew that was the perfect time for them to open their gifts to each other. It was such a sweet moment watching them connect after opening the gifts and one new tradition that we will keep going for years to come.


Reading Favorite Christmas Books
The excitement of Christmas morning is always at an all time high but the kids have never been more motivated to go to sleep. We settle down by reading a couple of their favorite Christmas books before lights out.


Couple Gift Exchange: Our Christmas Eve Nighttime Tradition:
This tradition began long before we had kids. We used to live two hours away from family and would travel to spend Christmas with everyone. But that left us wondering—when would we exchange gifts with each other? It felt impractical to pack up gifts for one another, only to bring them back home unopened. And so, a new tradition was born.
Now, even with children, this has become a cherished part of our Christmas Eve. Some years we don’t exchange gifts at all, but instead, we simply enjoy the quiet time together. Often, we’ll make a festive holiday cocktail, sit in the glow of the Christmas tree, and just talk. This uninterrupted time allows us to savor the moment and open gifts slowly, without the usual chaos of the next morning. With three boys, Christmas morning is nothing short of lively, so having this peaceful tradition ensures that our focus is entirely on them when the big day arrives. It’s a sweet, meaningful way for us to reconnect and celebrate the season as a couple.
I hope you will consider starting this tradition with your significant other.

Gingerbread White Russian was something new we tried this year.
1:1:1 Ratio of Vodka, Vanilla Kahlua and Trader Joe’s Gingerbread oat milk creamer. We actually measured out 1.5 of each, less of the Kahlua for less sweetness. Having the TJ’s seasonal oat milk creamer on hand proved to be a delightful twist and made it a seasonally crafted cocktail that had just the right amount of spice.
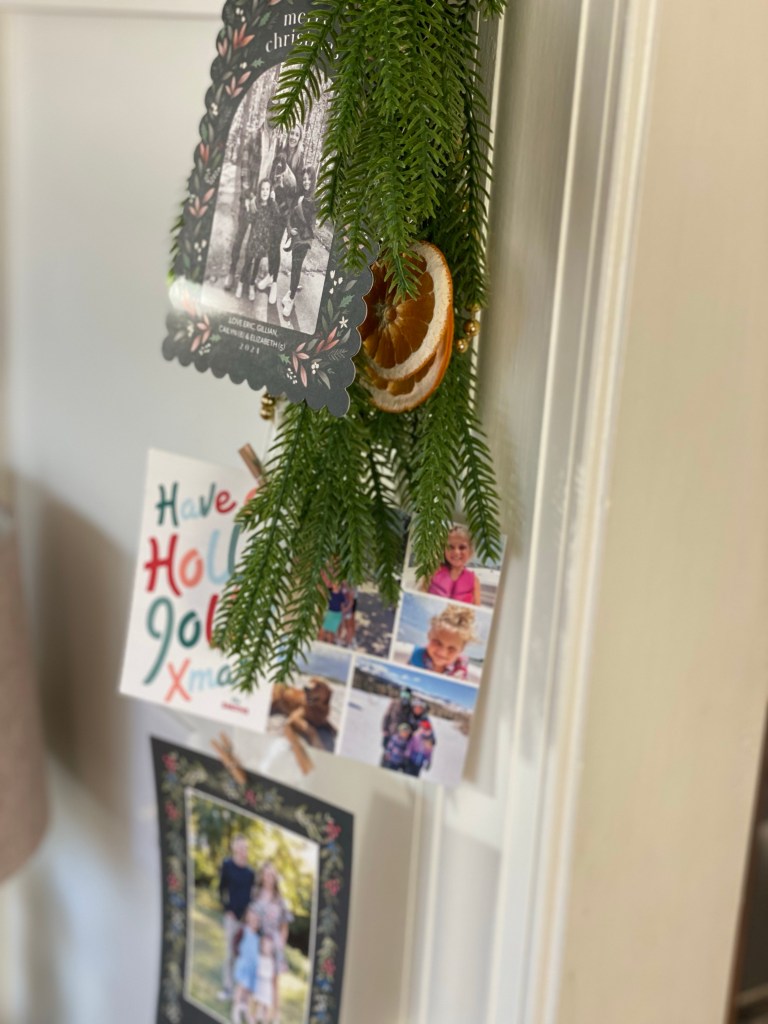
Crafting a Christmas Card Flipbook
Don’t throw out the Christmas cards you receive just yet. Several years ago, I found it difficult to let go of the beautiful cards we had received and brainstormed ways to hold onto them a little longer. I dug through my craft kit, found a box of binder ring closures, and got out a hole punch. Now, I have a few years’ worth of cards packed away with our Christmas decor that I set out each year in a decorative bowl.

If keeping every card isn’t your thing, I encourage you to at least save one of your own cards each year to create a flipbook. Your kids will love flipping through them and seeing how they’ve changed over the years.
Order your supplies today! I’ve linked everything you need to create your own Christmas card keepsake here. (Link supplies), here.
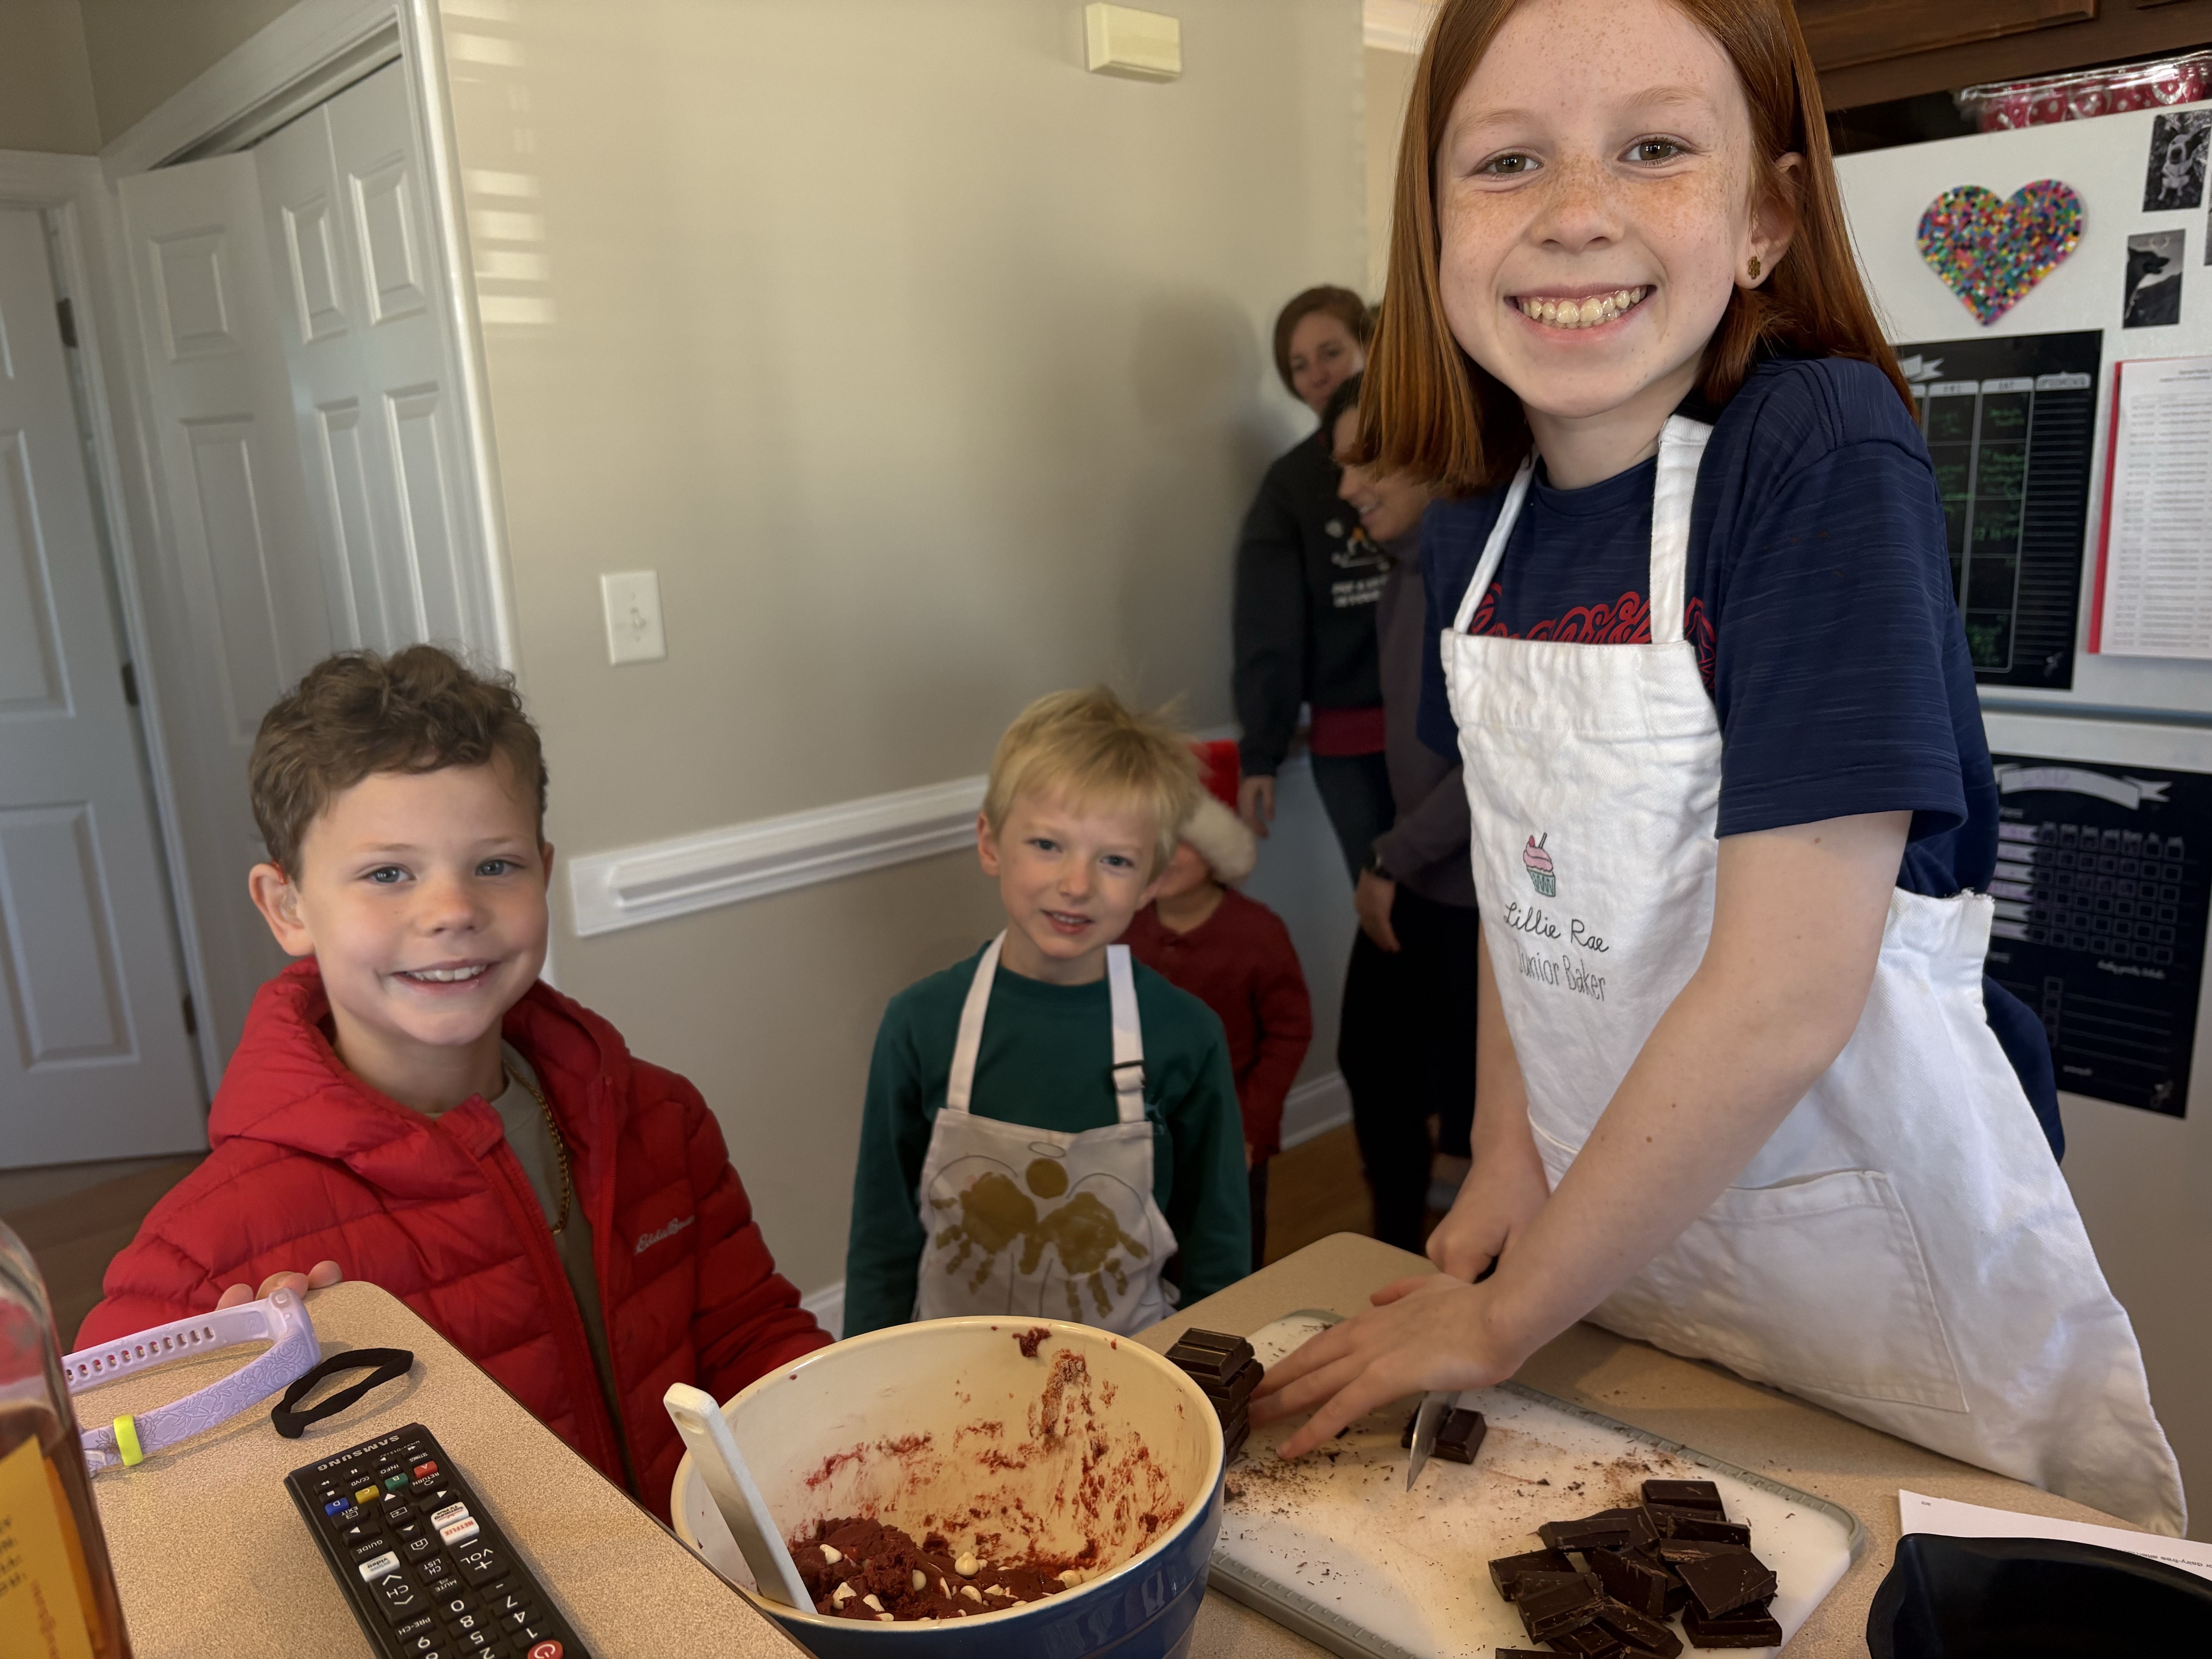
Annual Cookie Bake with Kids
A few years ago, my childhood friends and all of our children began one of my favorite traditions we share. We all gather and make a variety of cookies. It’s such a sweet morning together.


The Mantel Moment
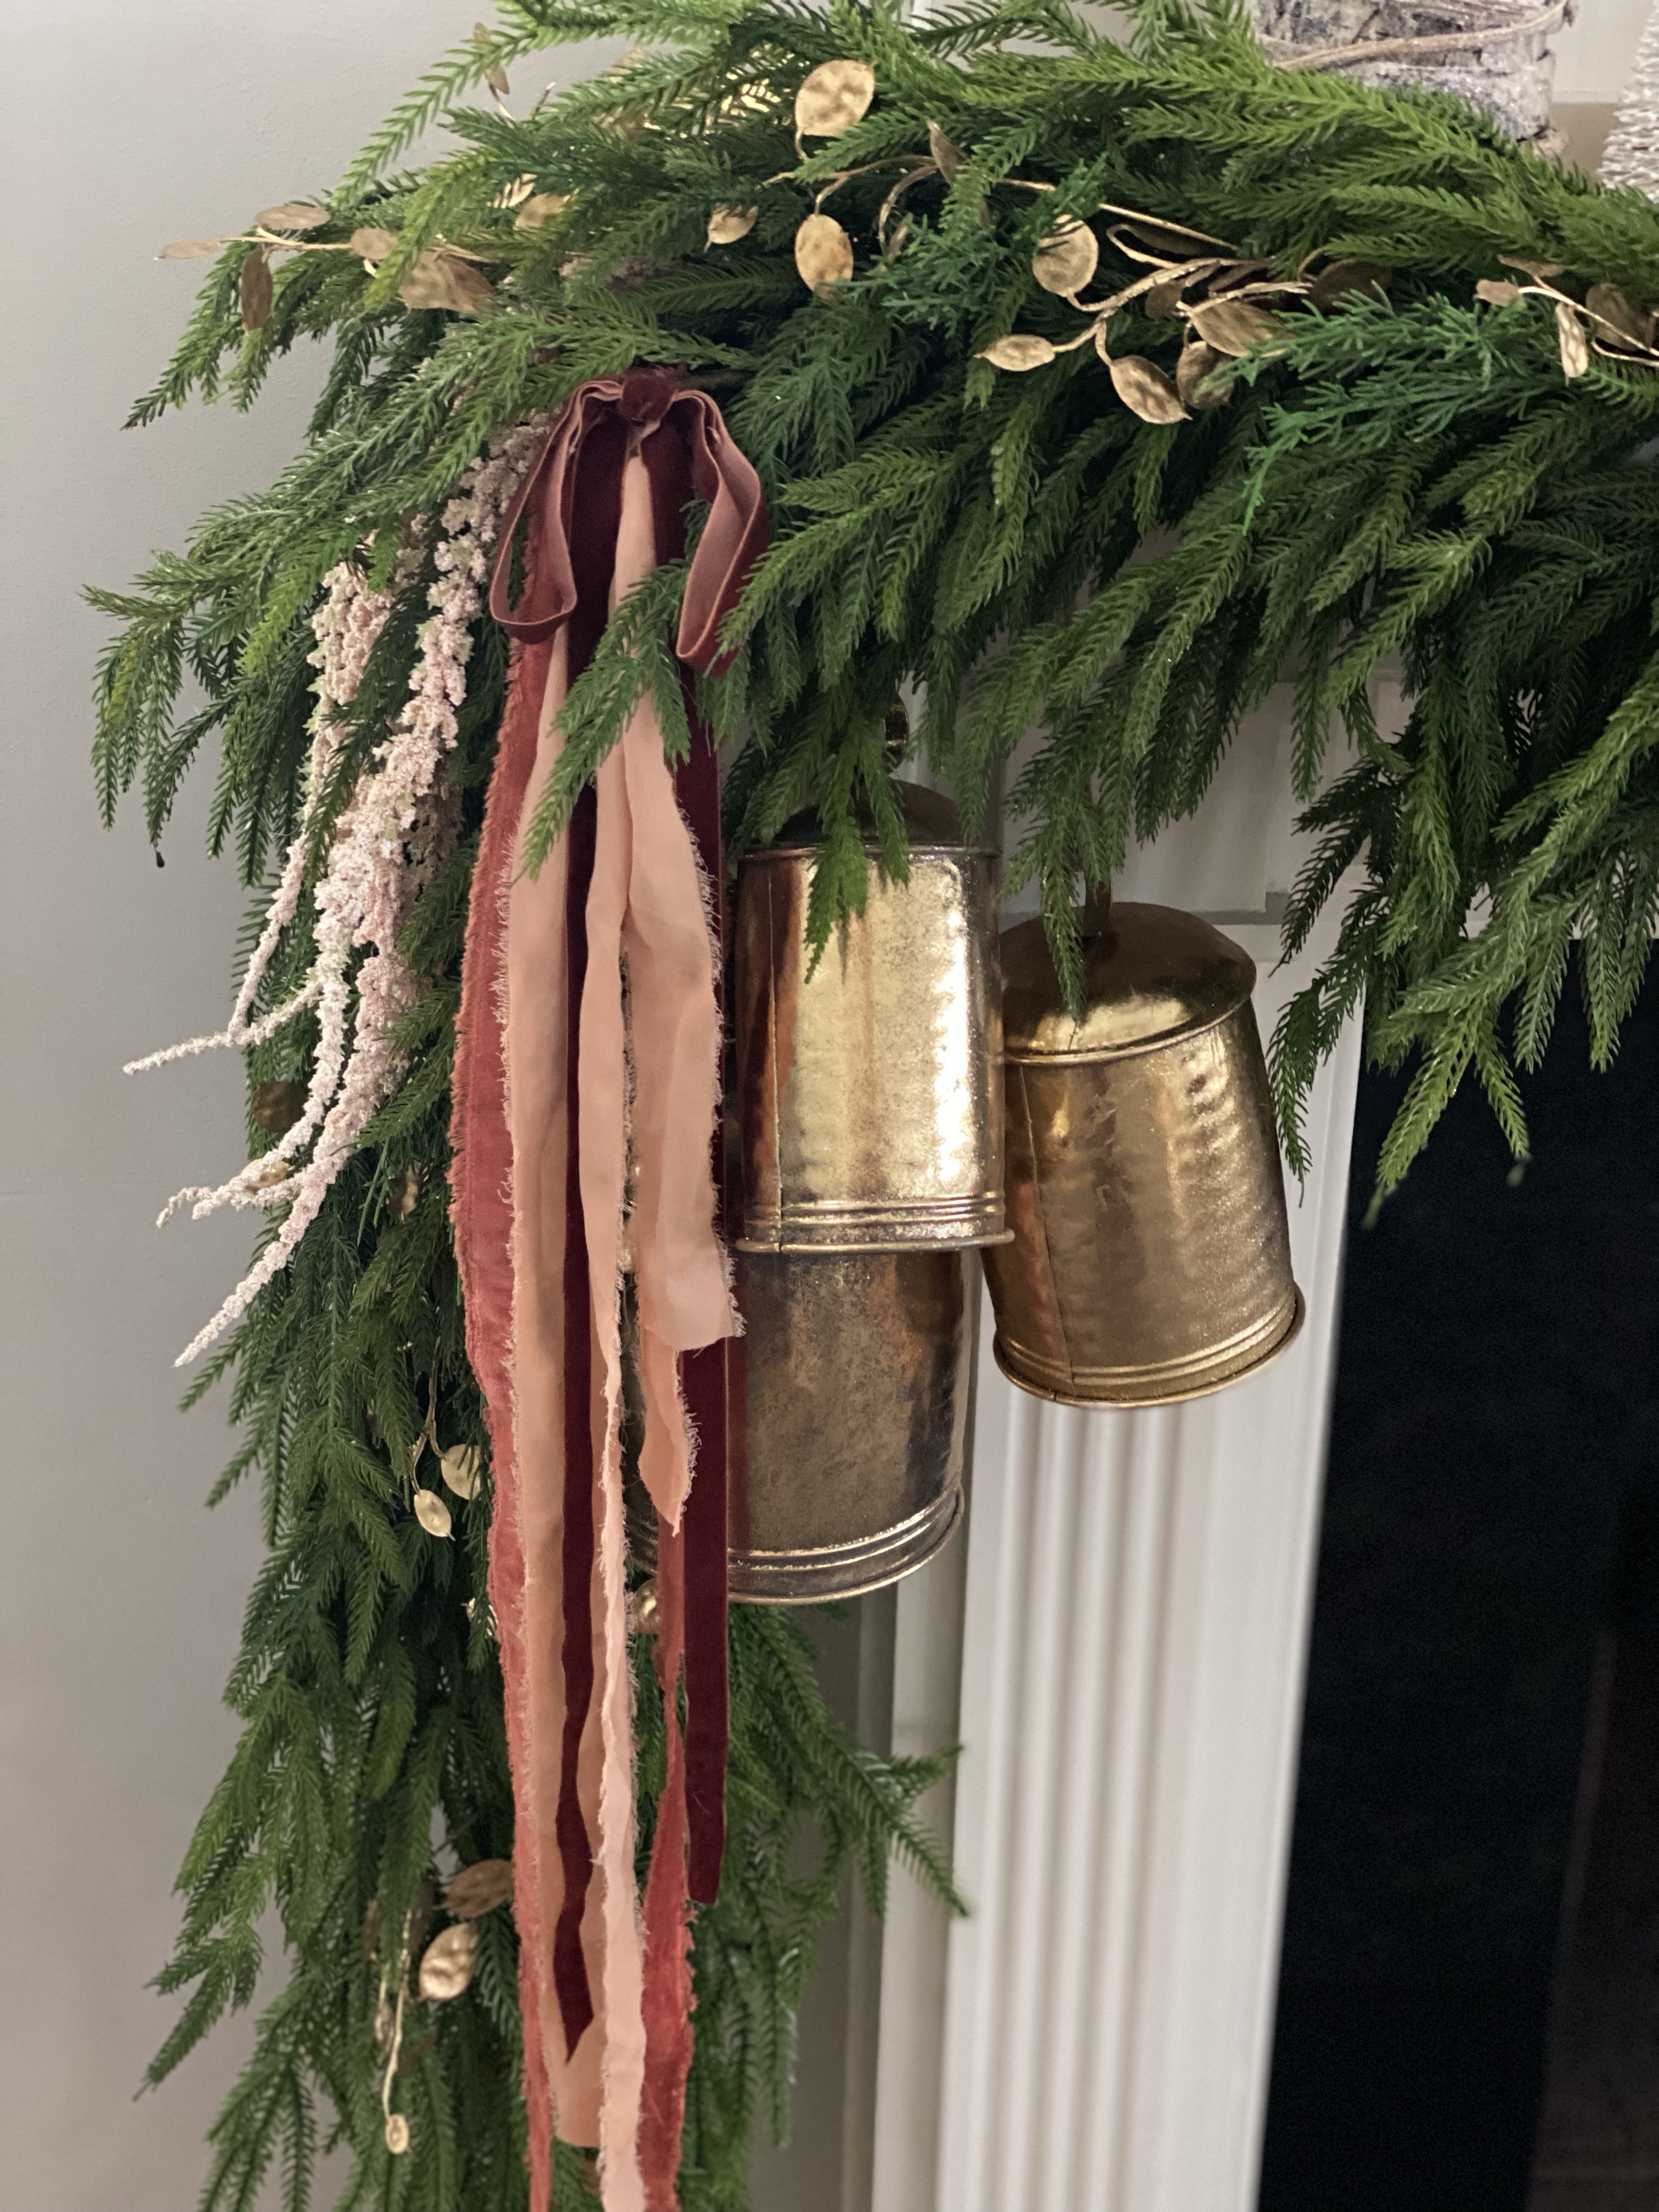
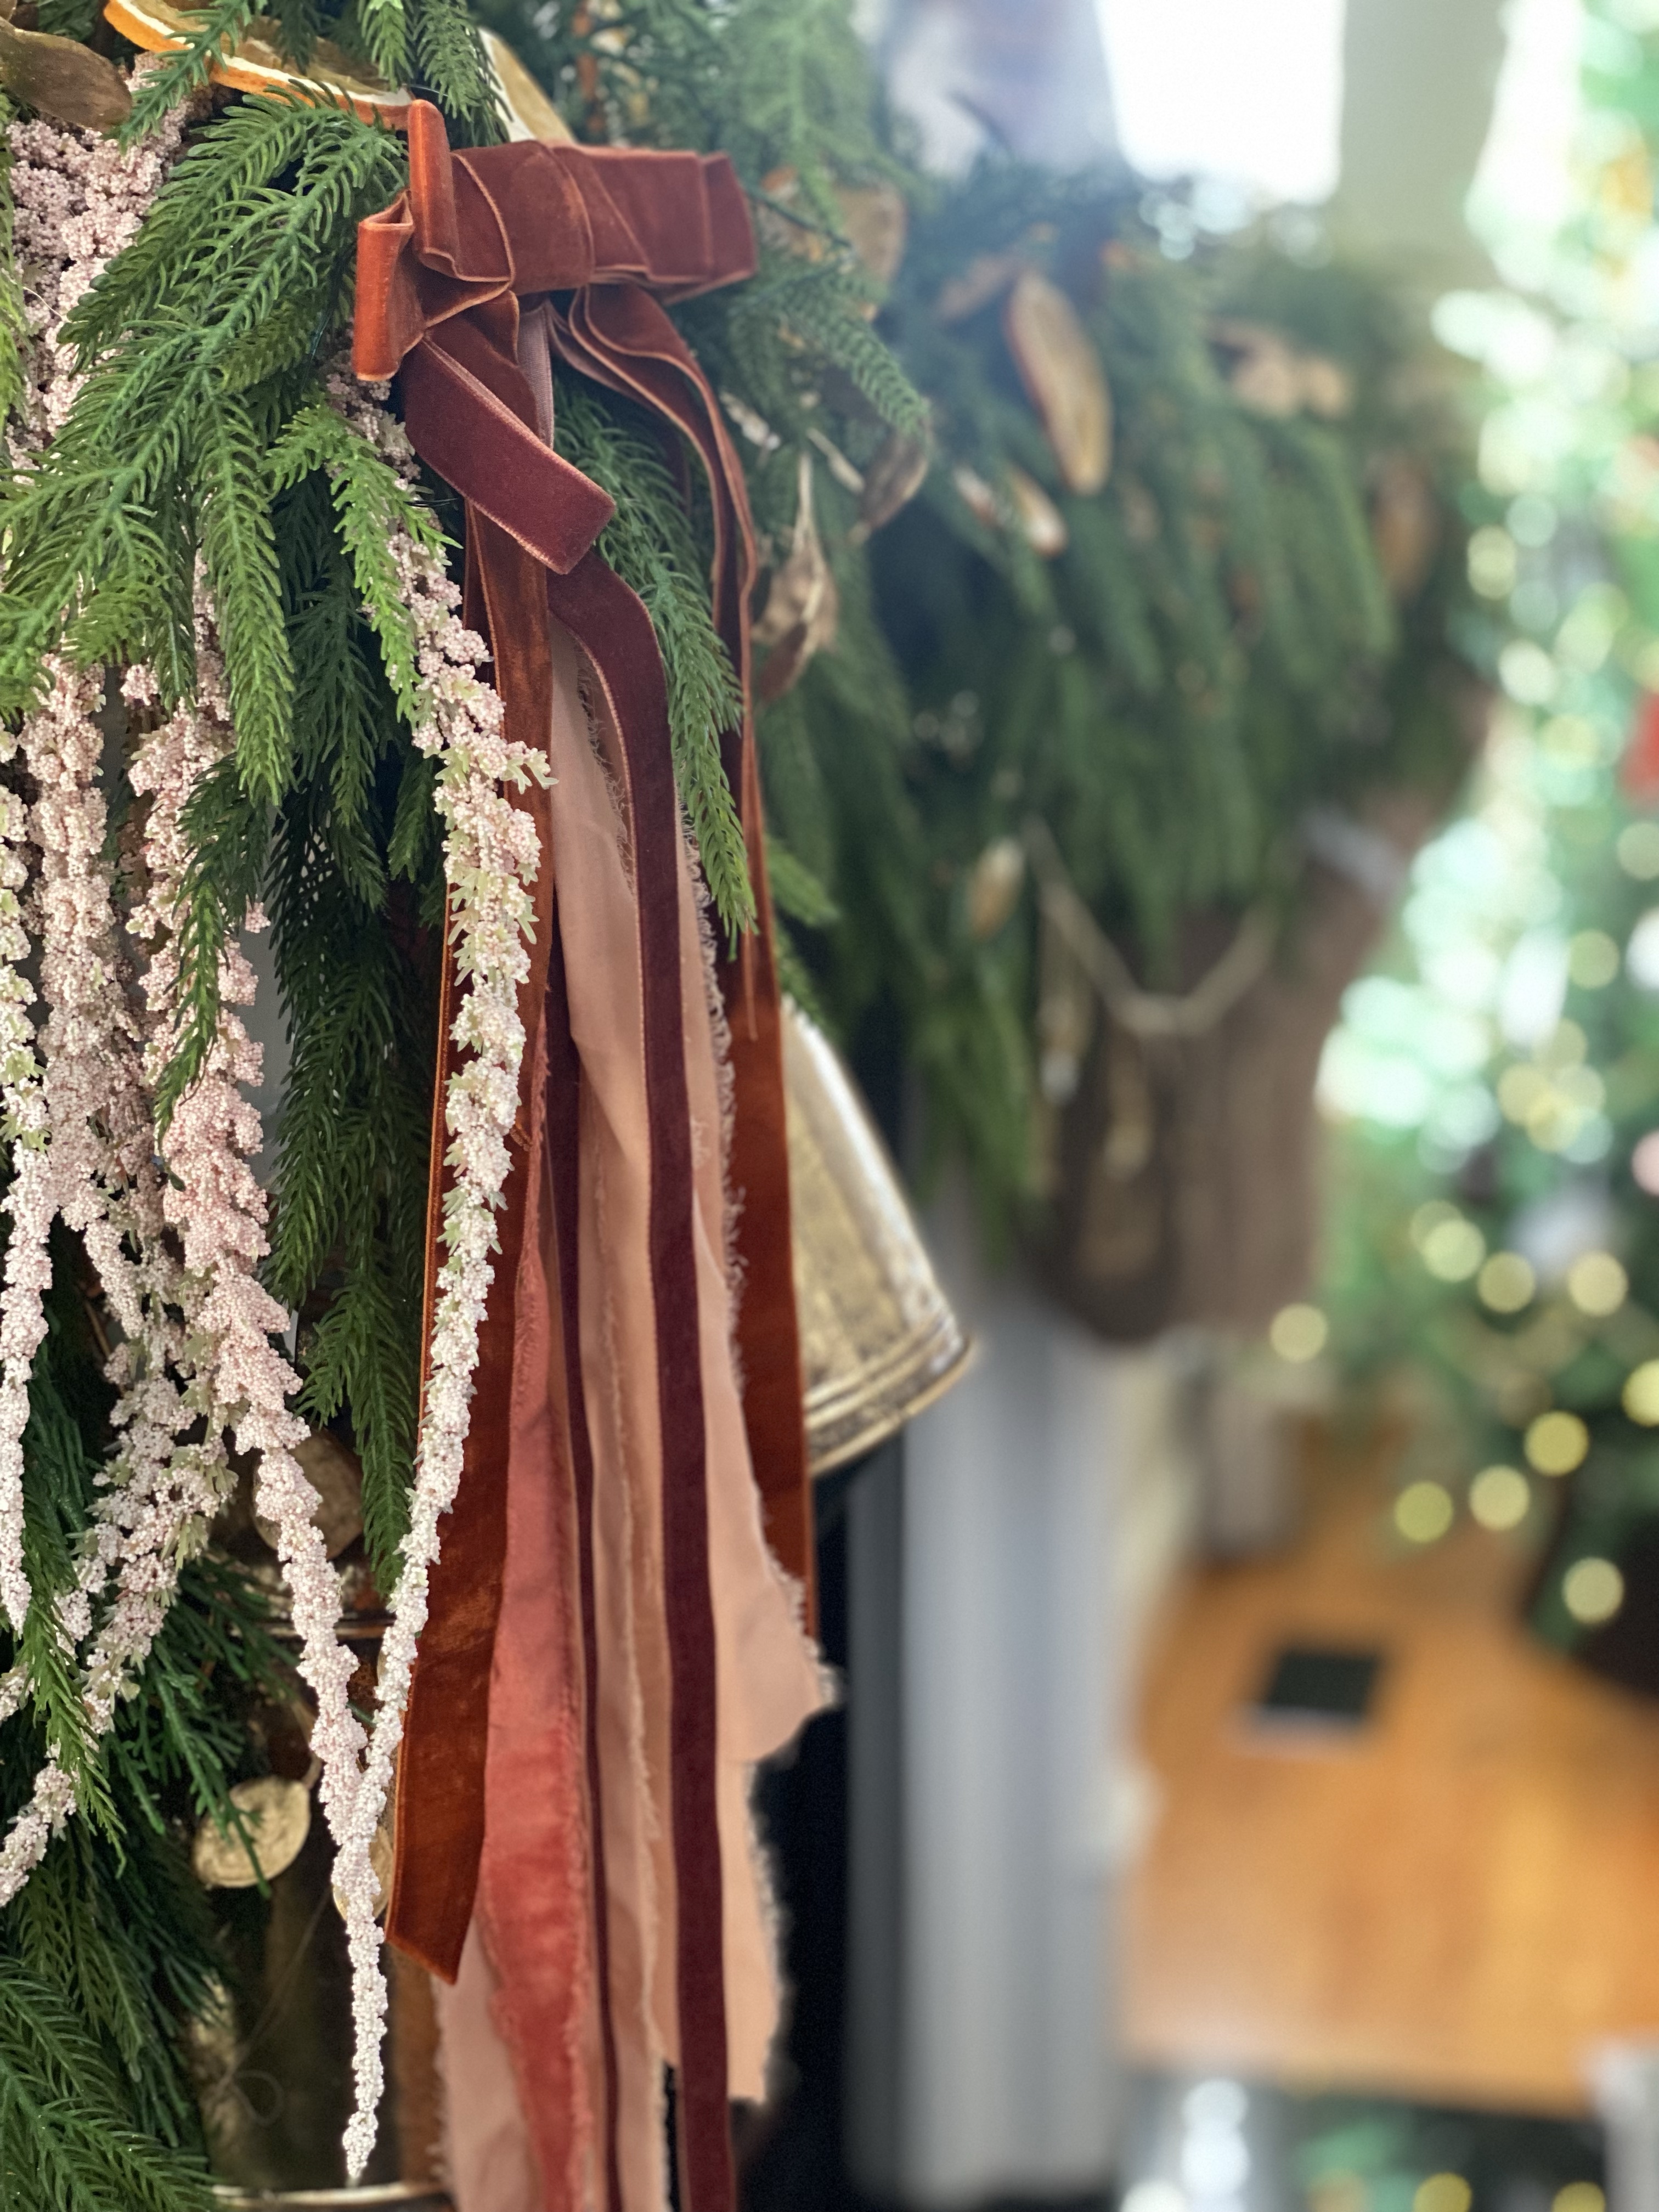


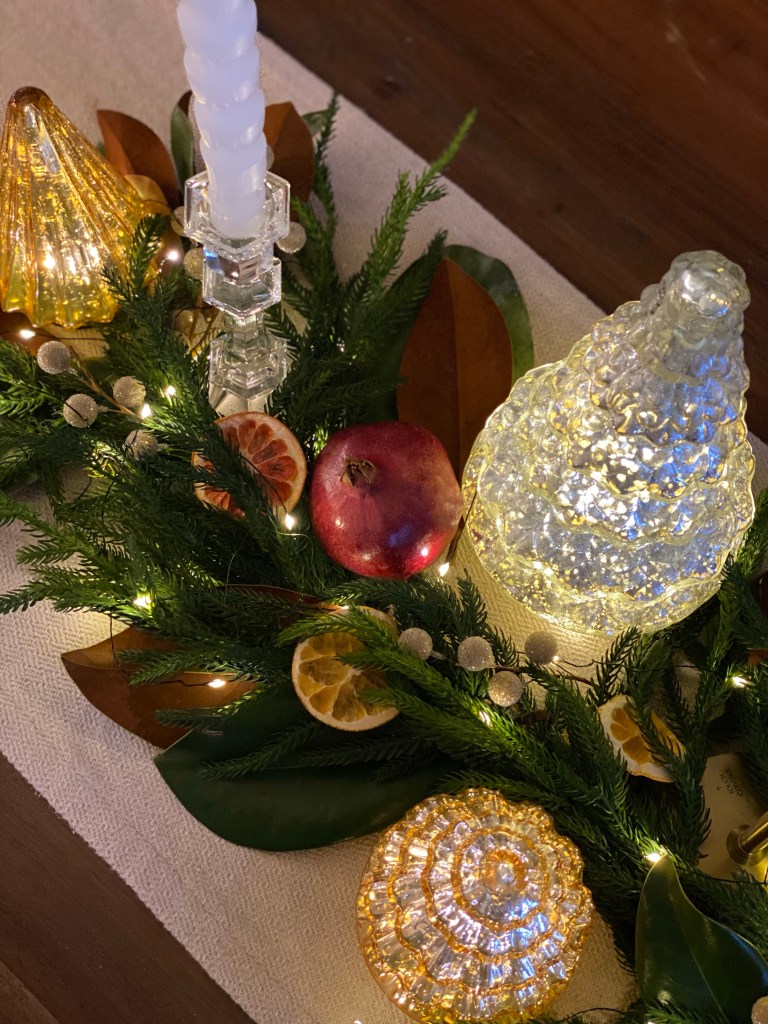
This year’s mantel is, without a doubt, my favorite. It came together during a craft day with a friend when I made a dried orange garland. Paired with delicate gold leaves tucked into the garland, twinkling fairy lights, oversized bells, a Peace garland (a clearance find from last year), and layered ribbon in my go-to color scheme, it feels absolutely perfect to me. The combination of textures, lights, and personal touches creates a centerpiece for our holiday decor that I’ll definitely recreate next year.
If you want to incorporate dried oranges in your decor next year, I’ve shared the how-to here.


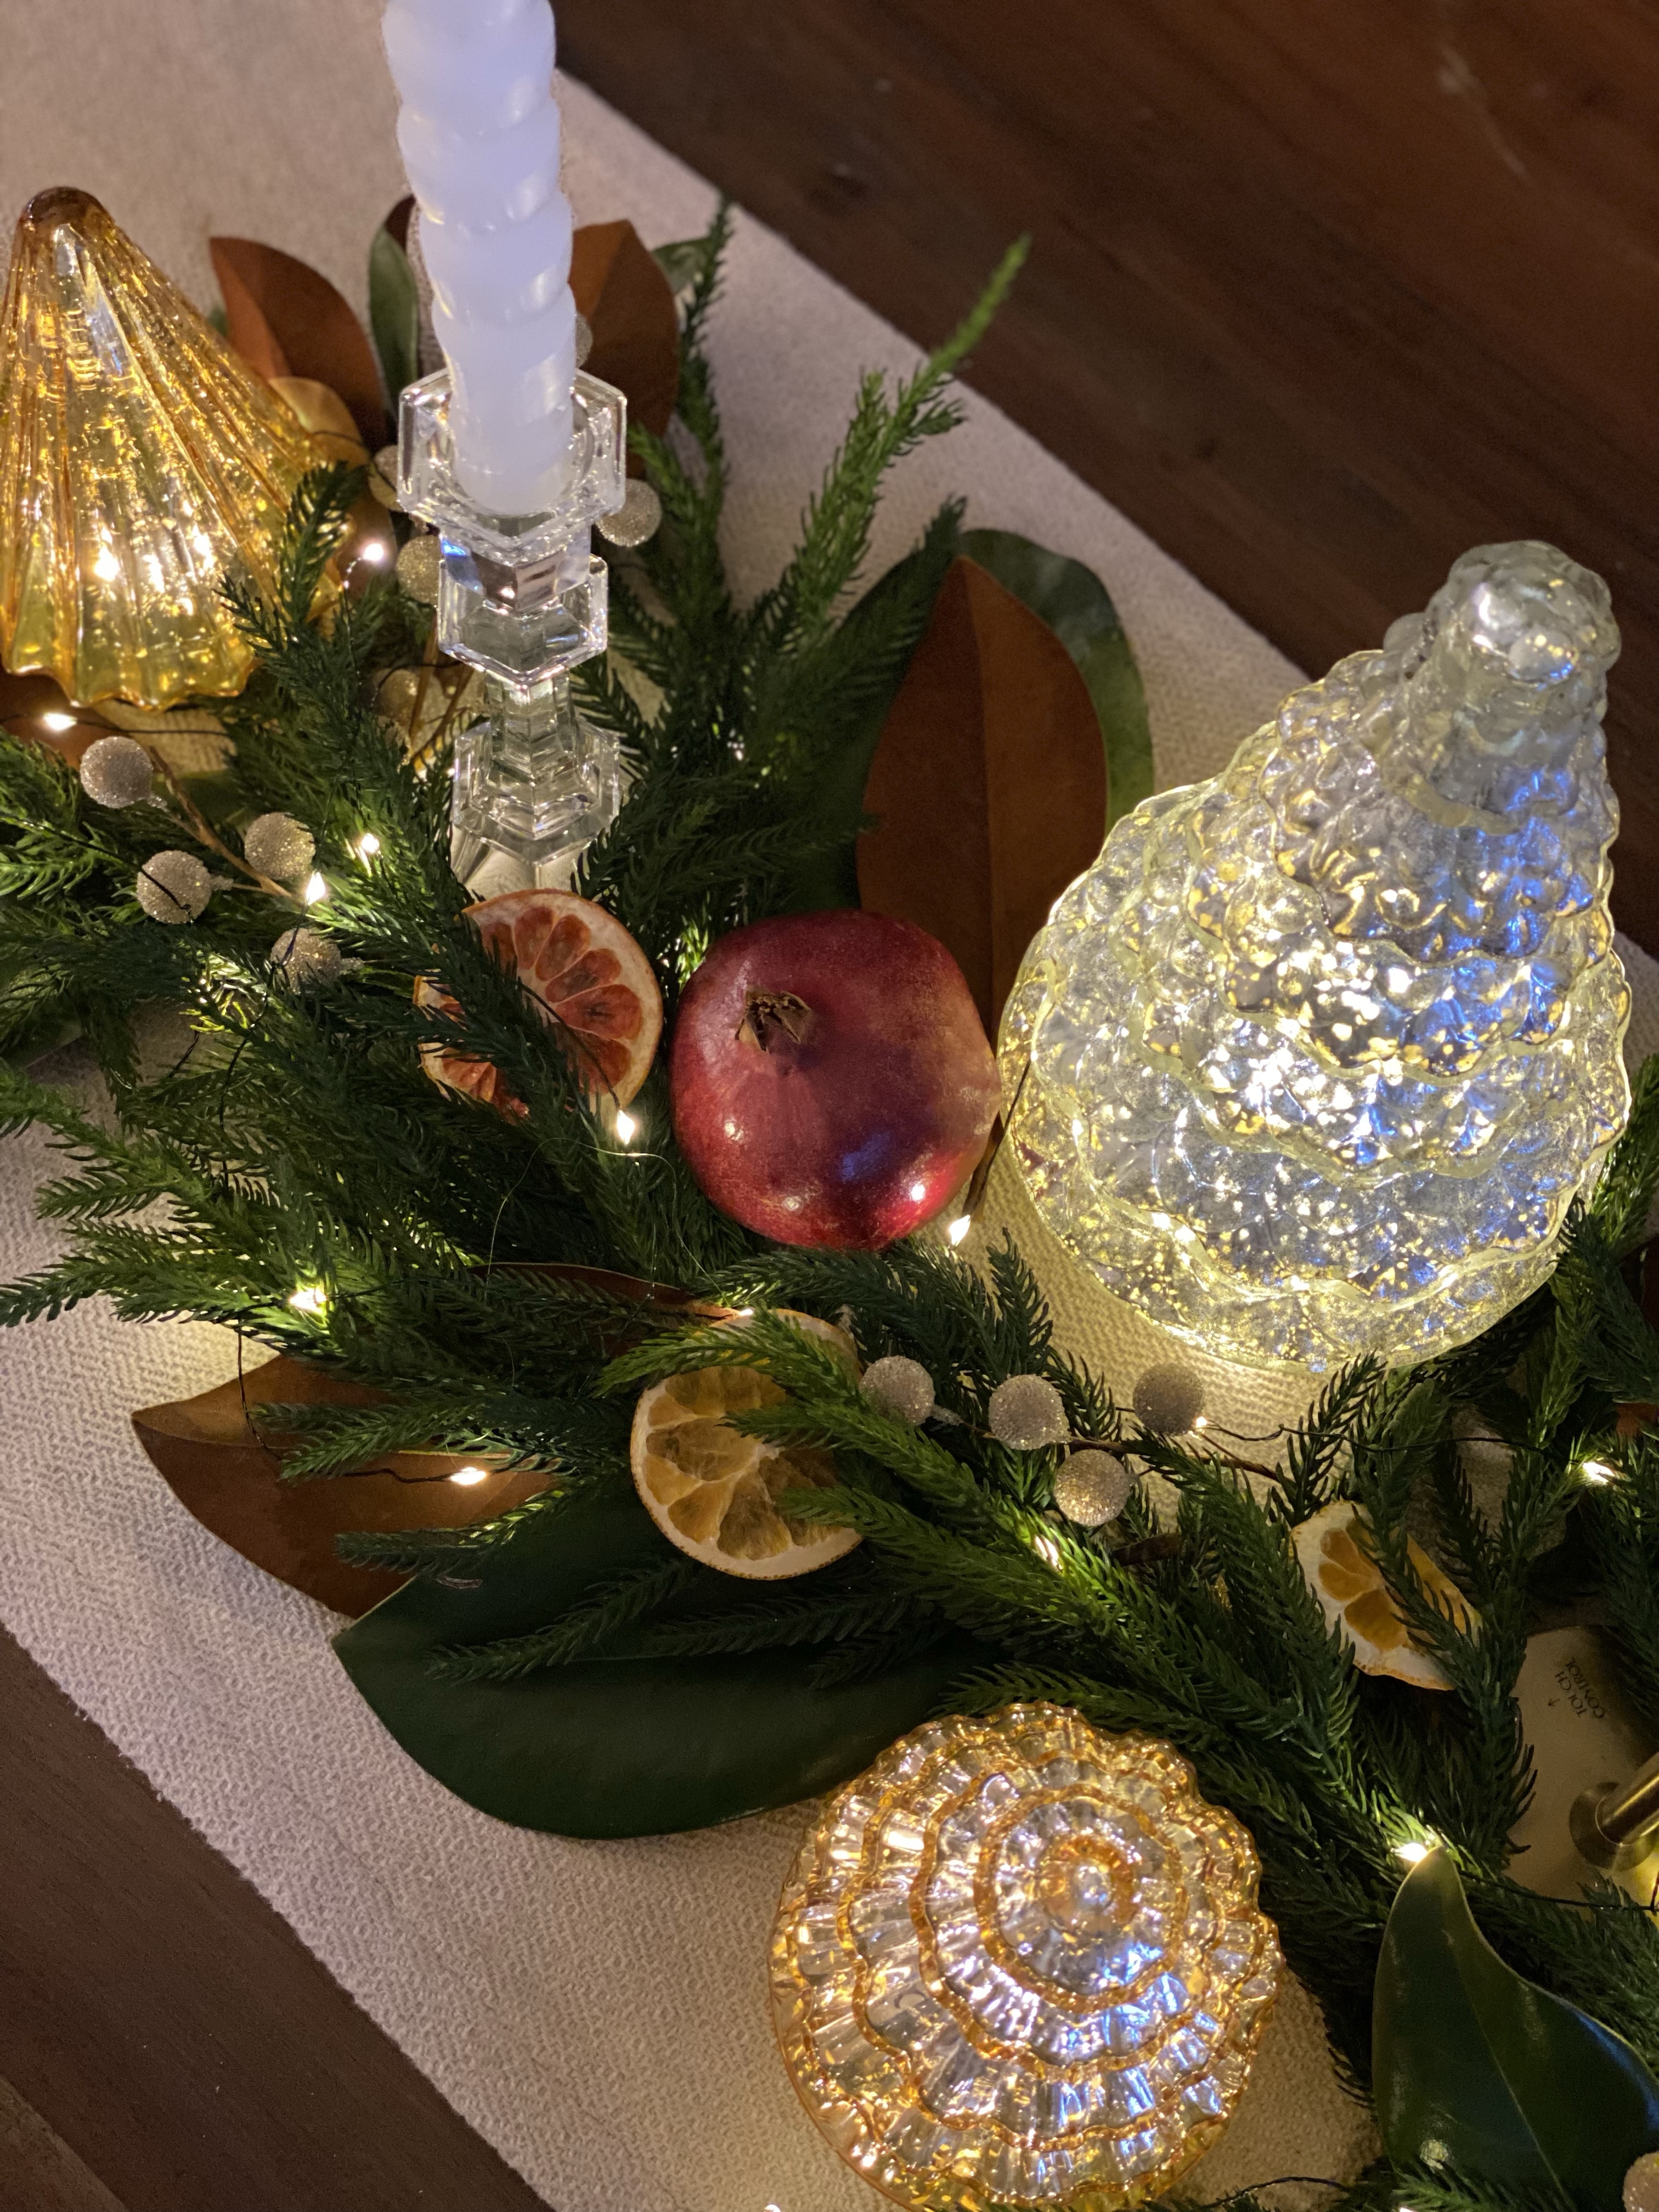
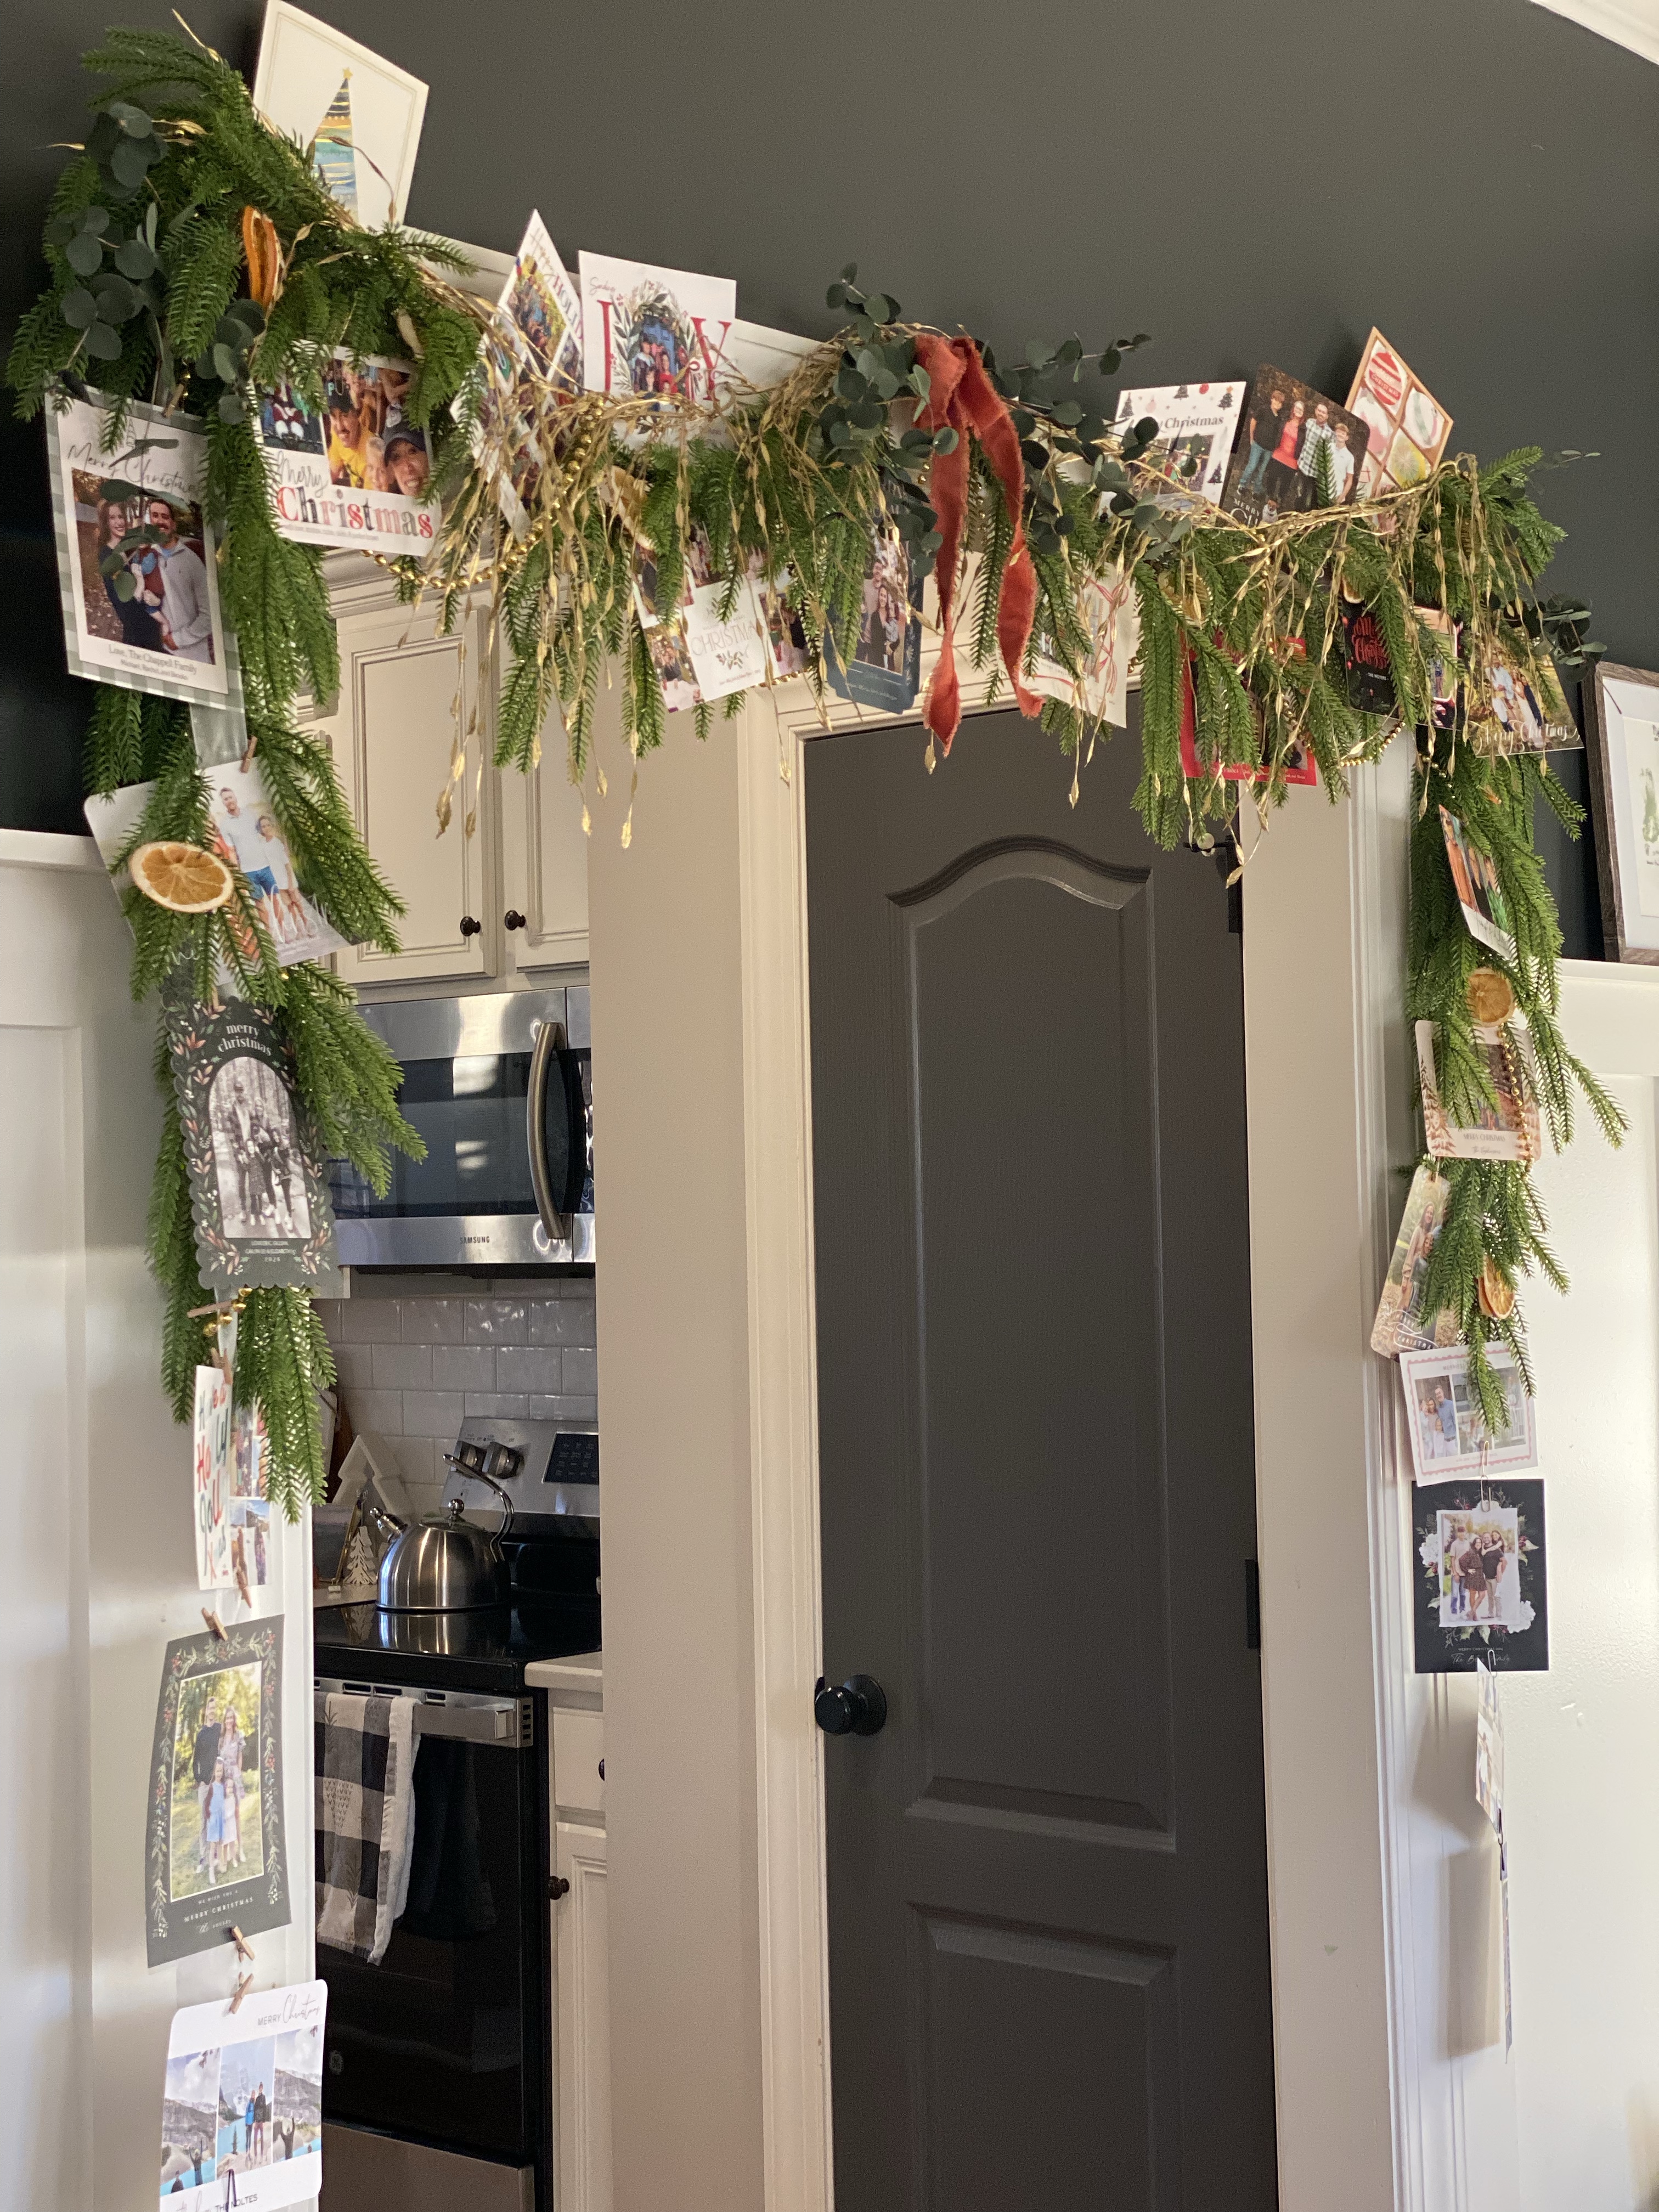
Foraged greenery for porch pots, vases and table decor.


As I look back on our holidays, I’m reminded that the true beauty of the season is found in the simplest moments. The true magic lies in the connections we build, the memories we make, and the love we share.
Creating a cozy haven for the holidays is more than just decorating—it’s about fostering a sense of belonging and joy for everyone who enters our home. Each garland hung, each card kept, and each ritual observed weaves together a story of love, gratitude, and togetherness.
My hope is that this post inspires you to embrace the traditions that bring you joy and to find new ways to make this season special for your own family. From my family to yours, may your holiday season be filled with warmth, laughter, and cherished memories.
Happy New Year!

I’m embracing the sweetness of the season, where nature’s simple beauty meets festive cheer. This year’s Christmas decor was all about organic elegance—dried oranges turned into garlands, ornaments, and little gifts for teachers.
On this Solstice day, December 21st, as we welcome the return of light, let’s celebrate the warmth, love, and hope this season brings. Wishing you all a season filled with light, joy, and moments of stillness.
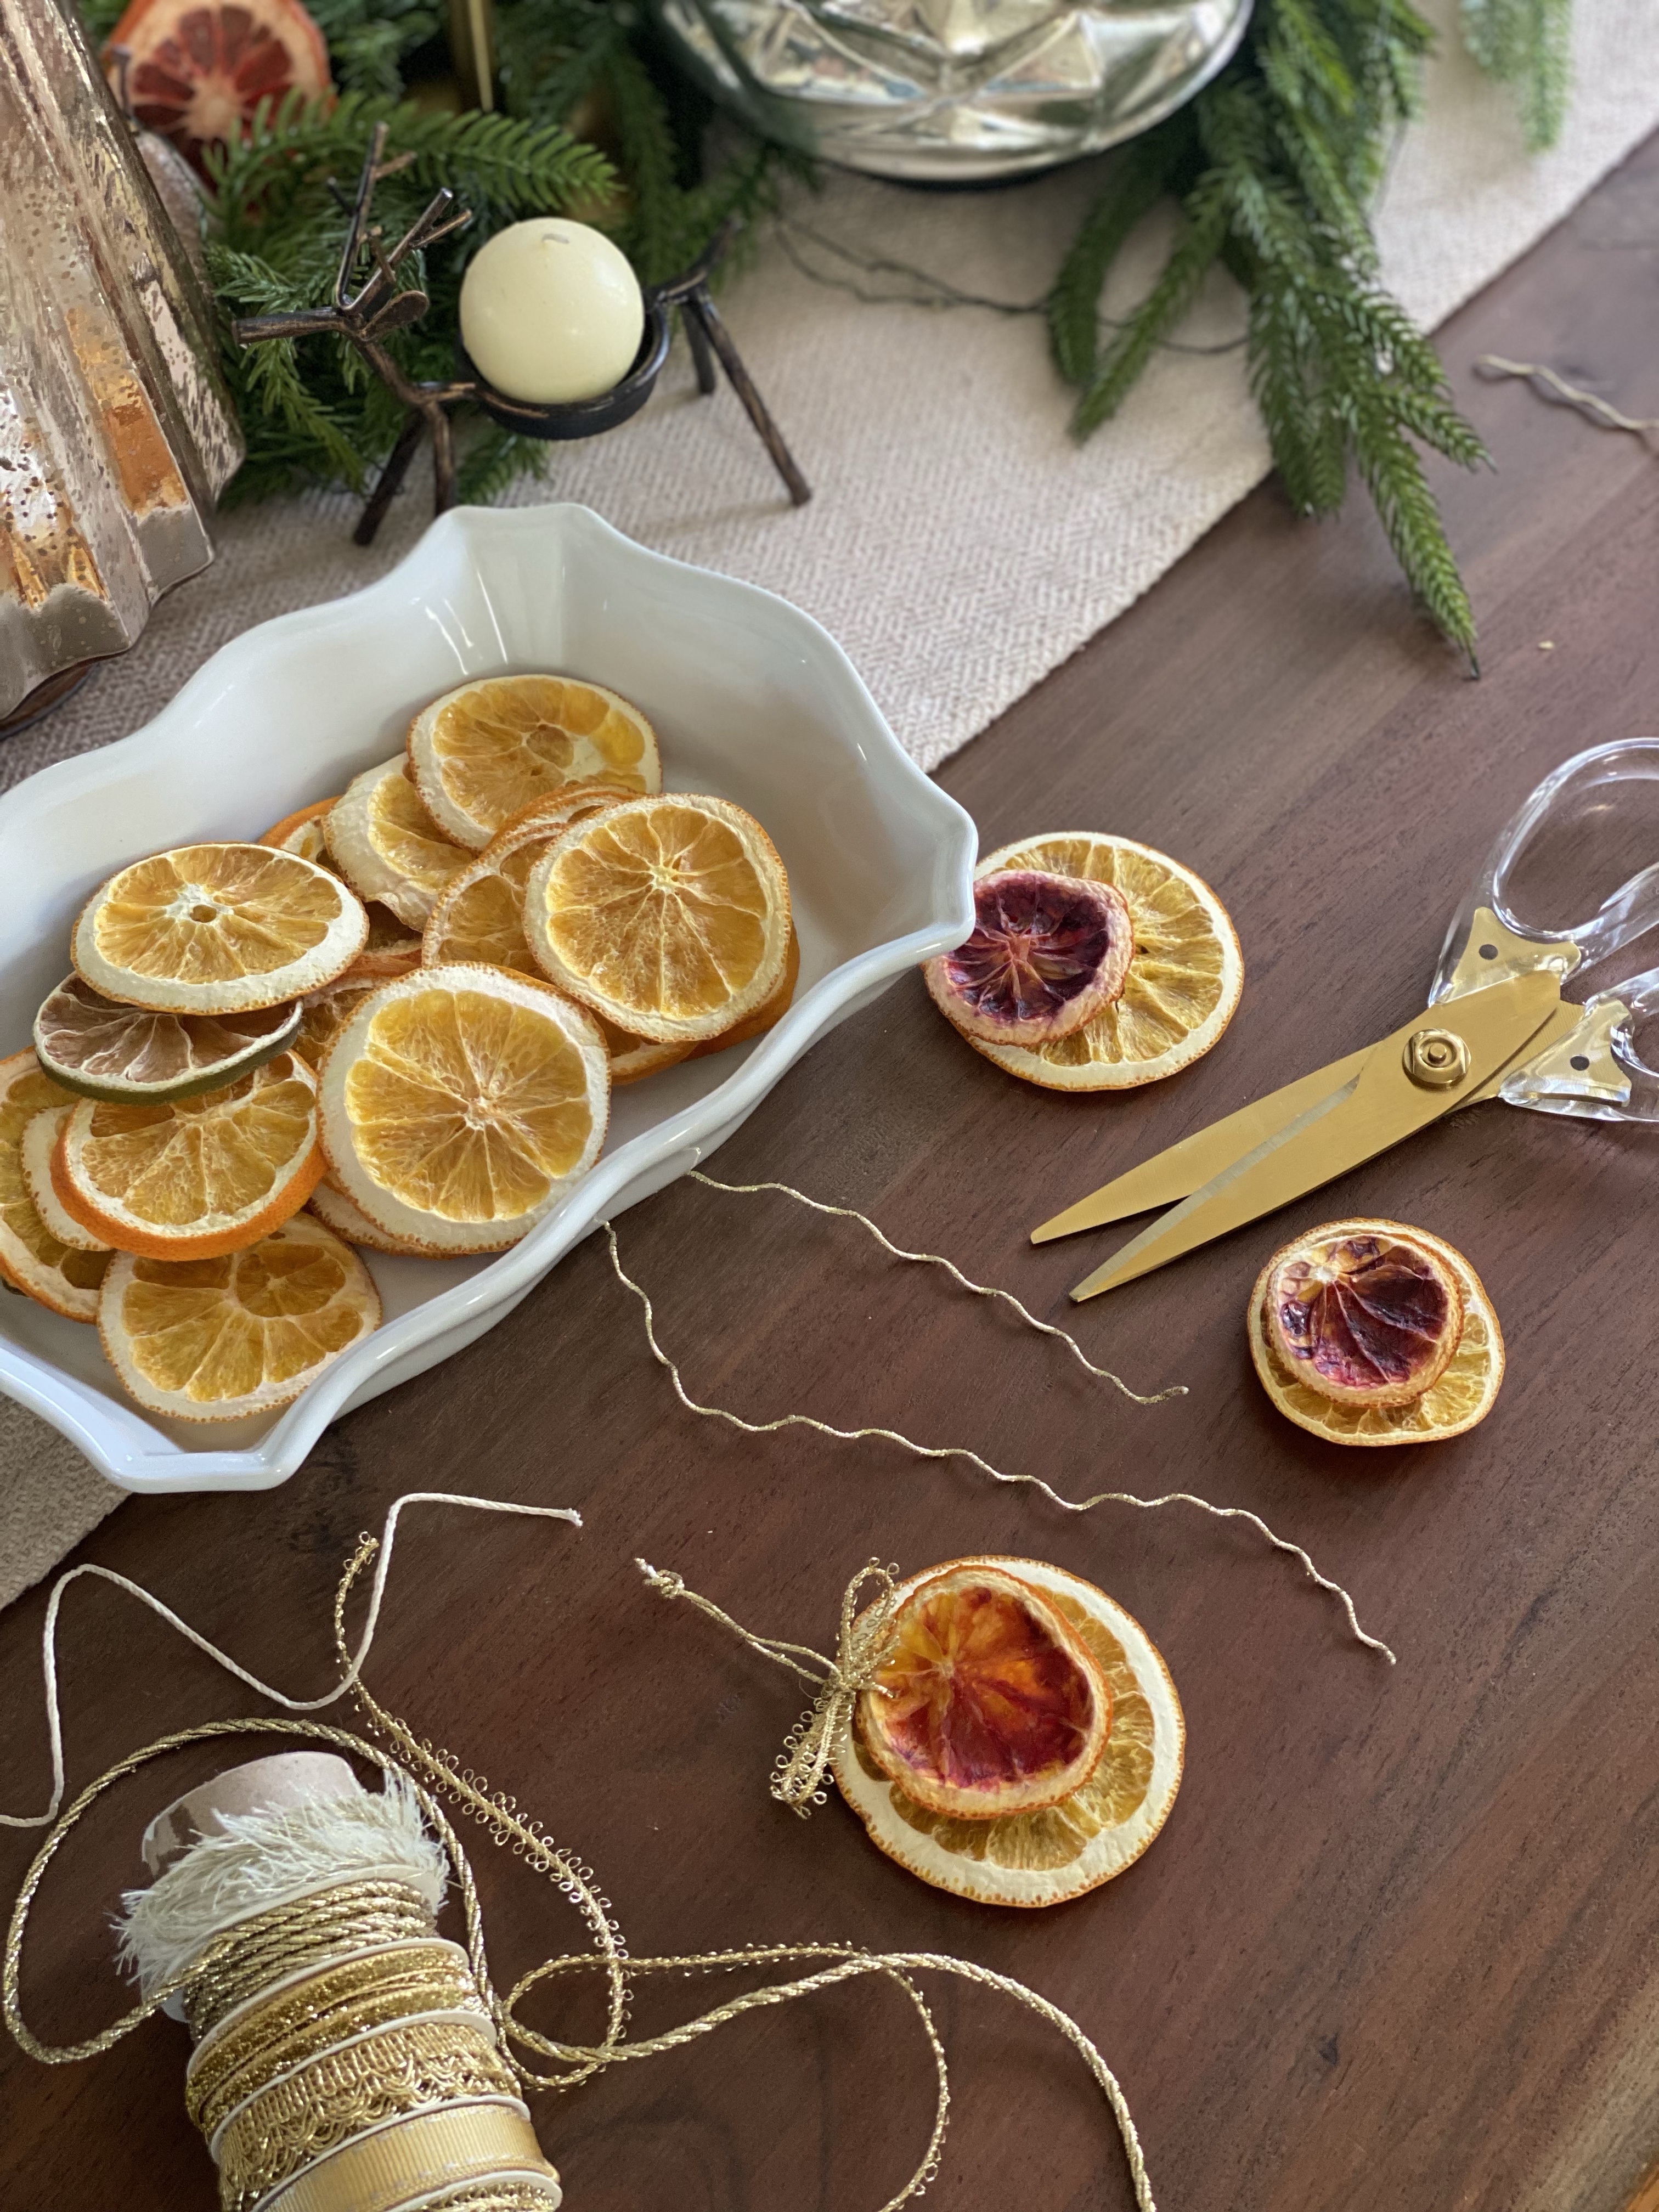
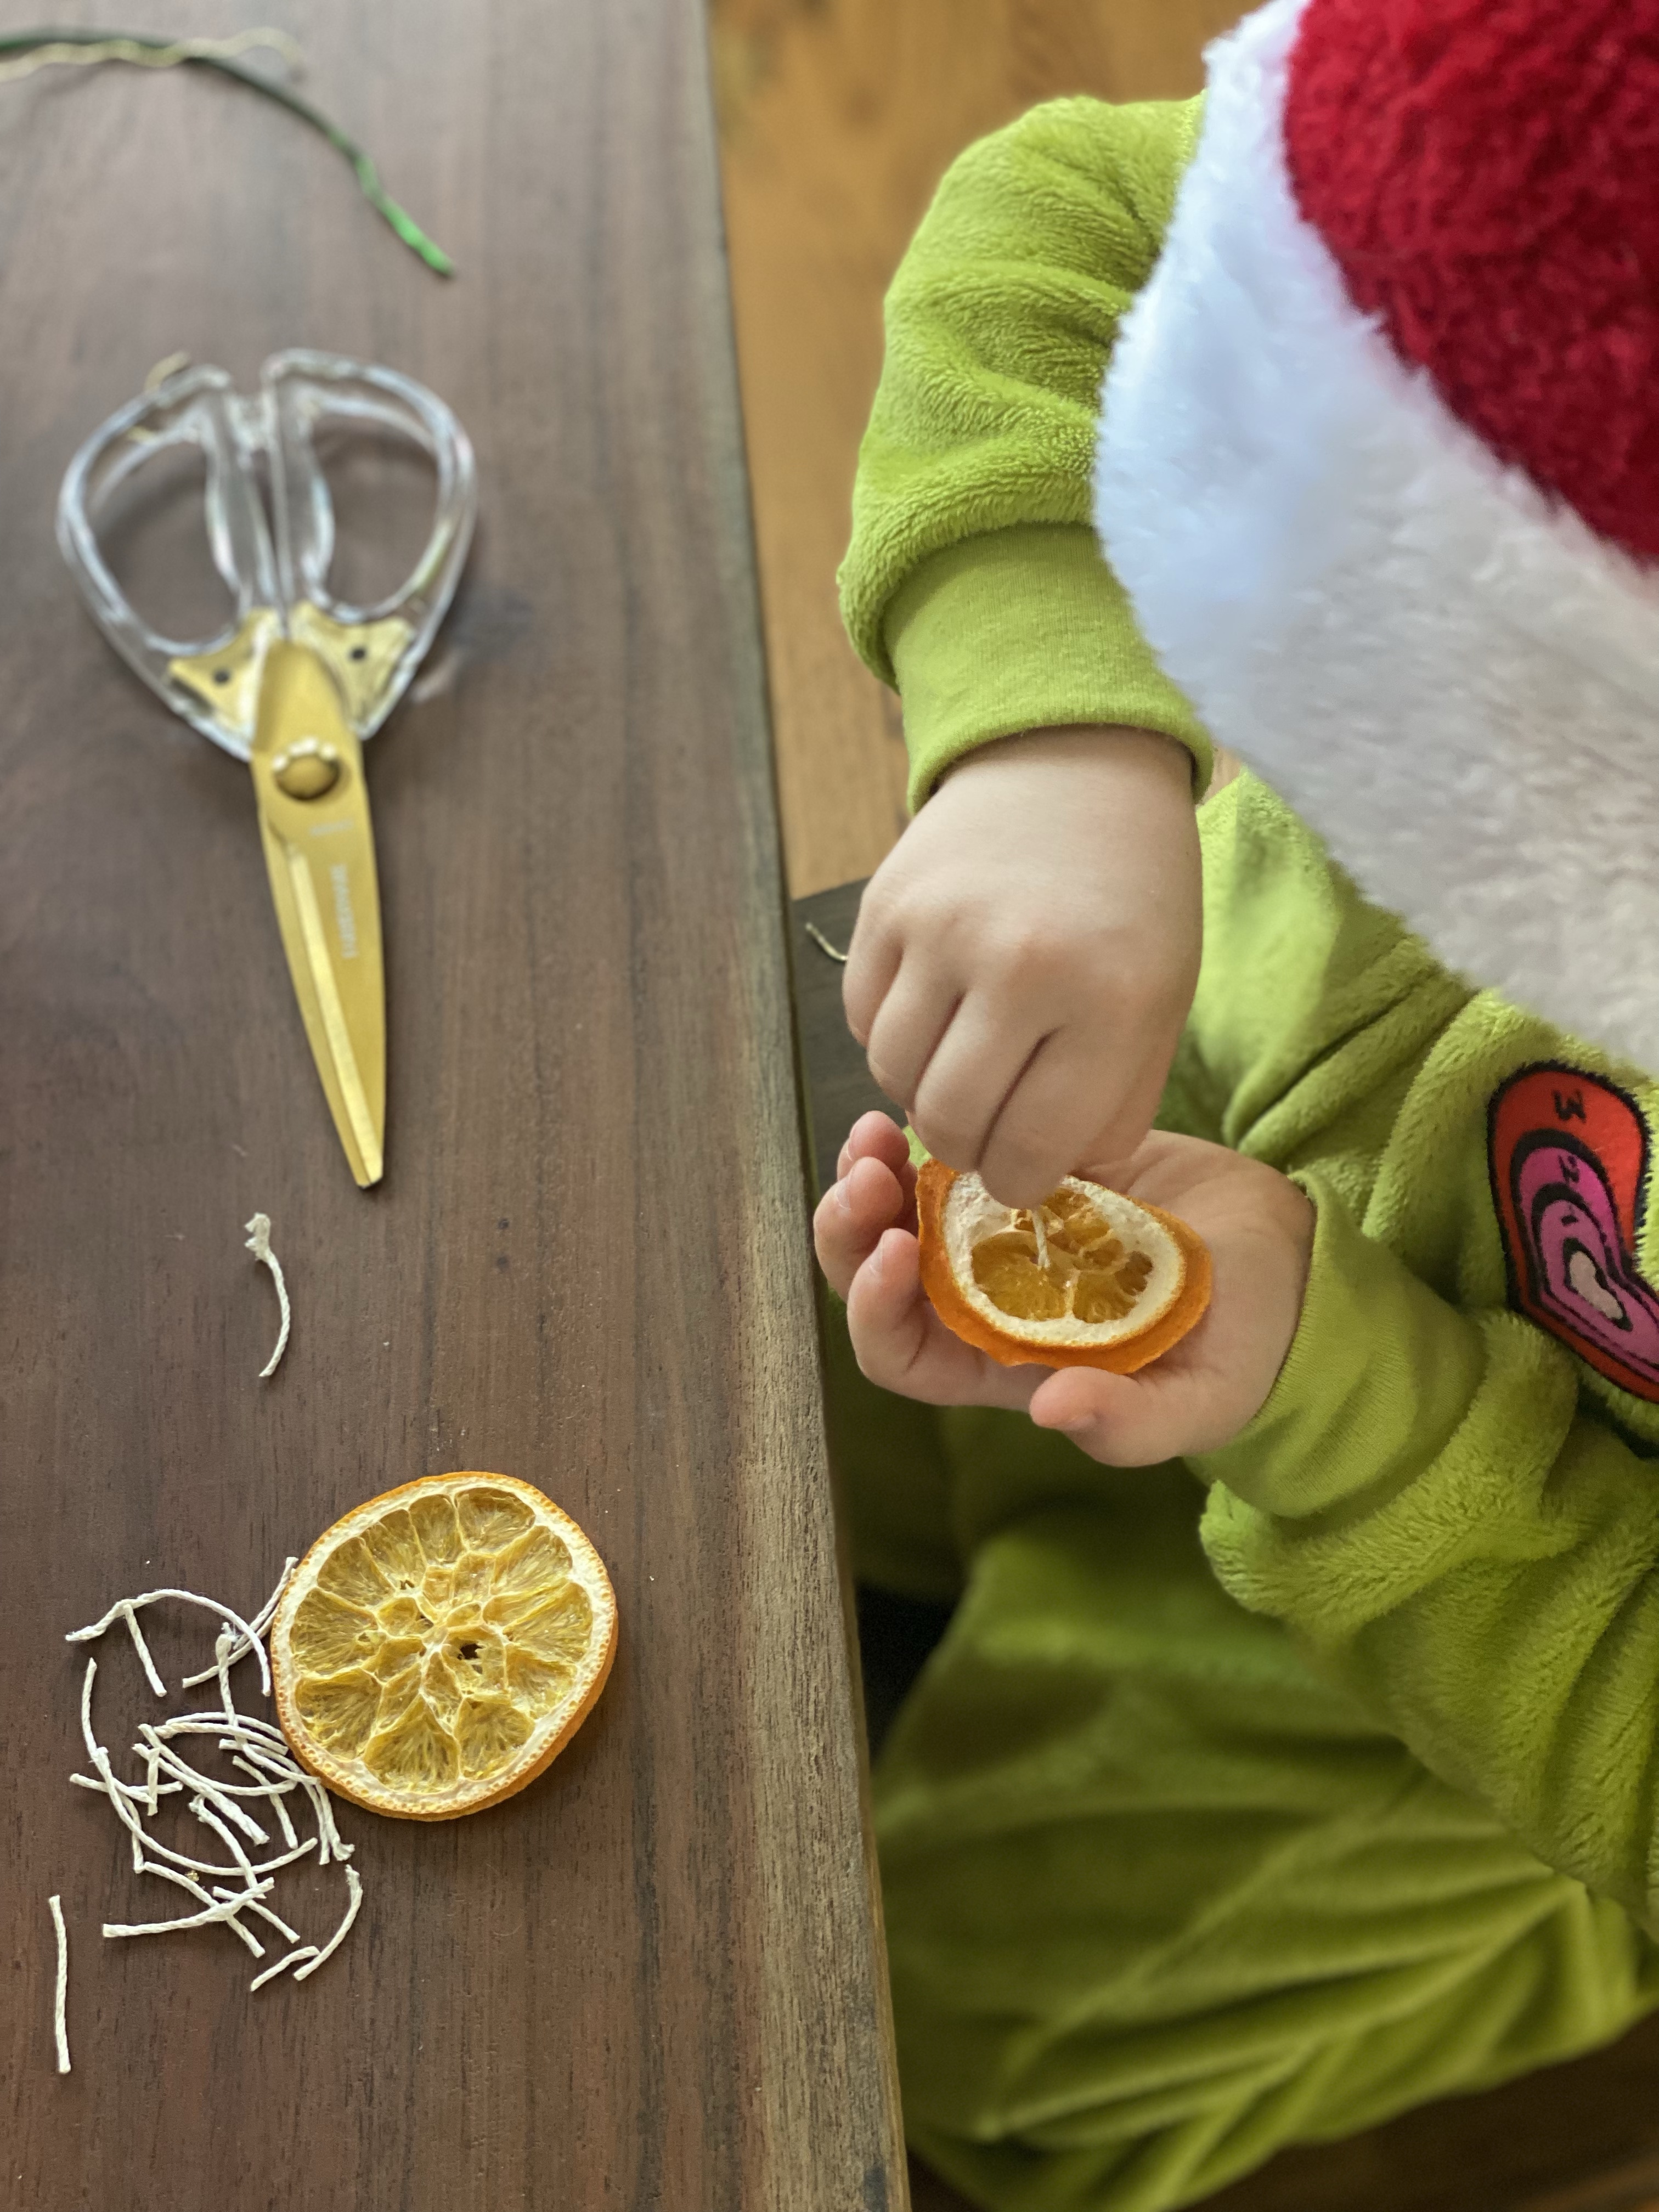
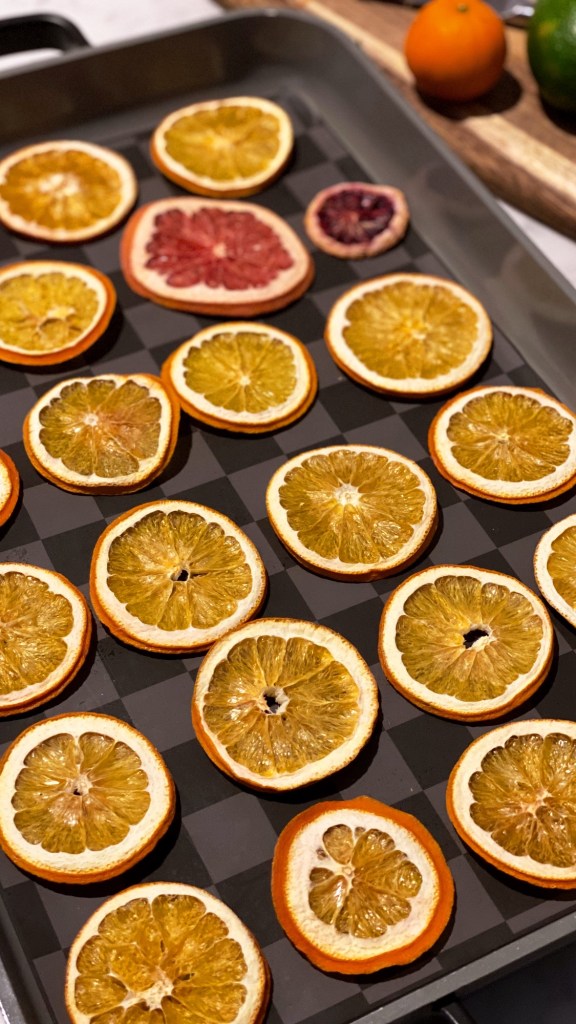
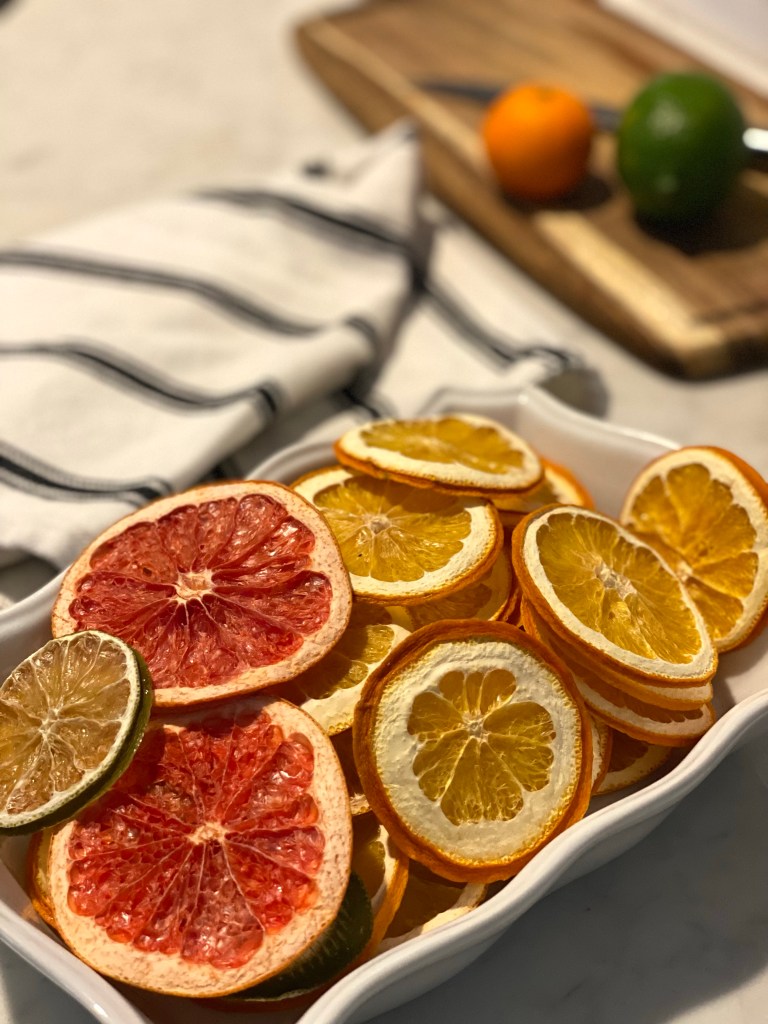
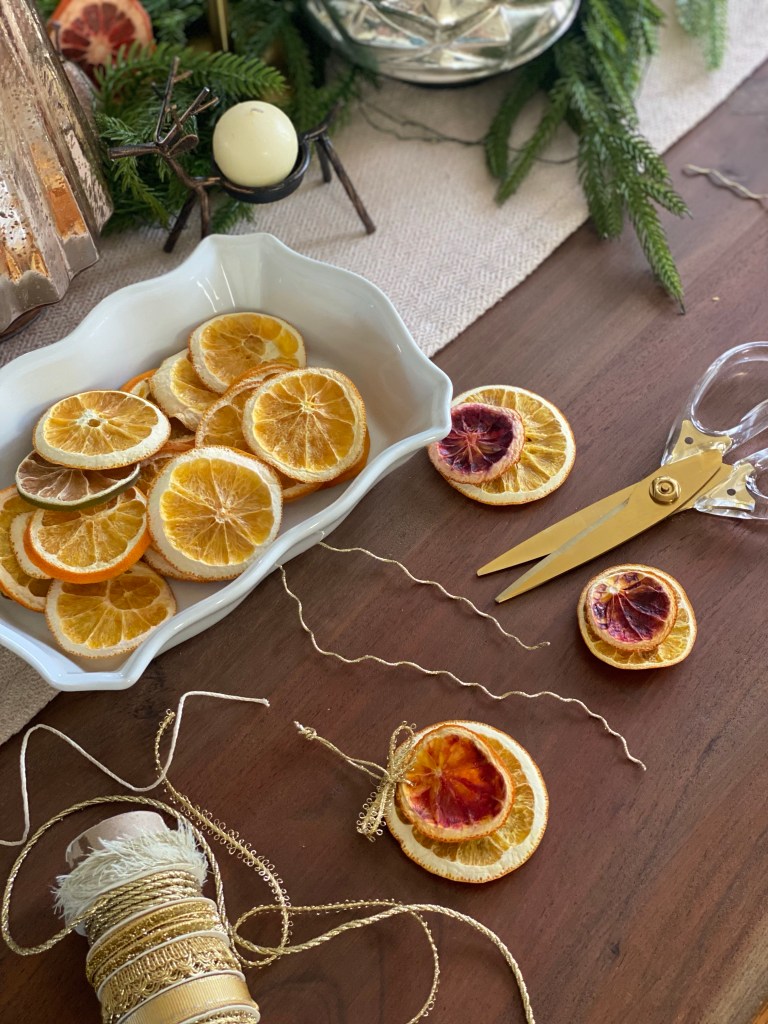
If you’d like to fill your home with scents of the holidays, give a holiday party host a small gift, or freshen your home after the holiday cleanup, here are the steps to dry out oranges and apple slices:
Preheat oven to 200°.
Slice oranges 1/4 of an inch thick
Lay on paper towels and blot excess citrus juice
Line a baking sheet with parchment paper and arrange citrus and apple slices (not overlapping)
Bake to dehydrate for 2-3 hours flipping fruit every 45 minutes.
Citrus is done when the center is no longer sticky to the touch.
These dried citruses will keep for months if stored properly. They would also make for a great garnish on cocktails/mocktails.
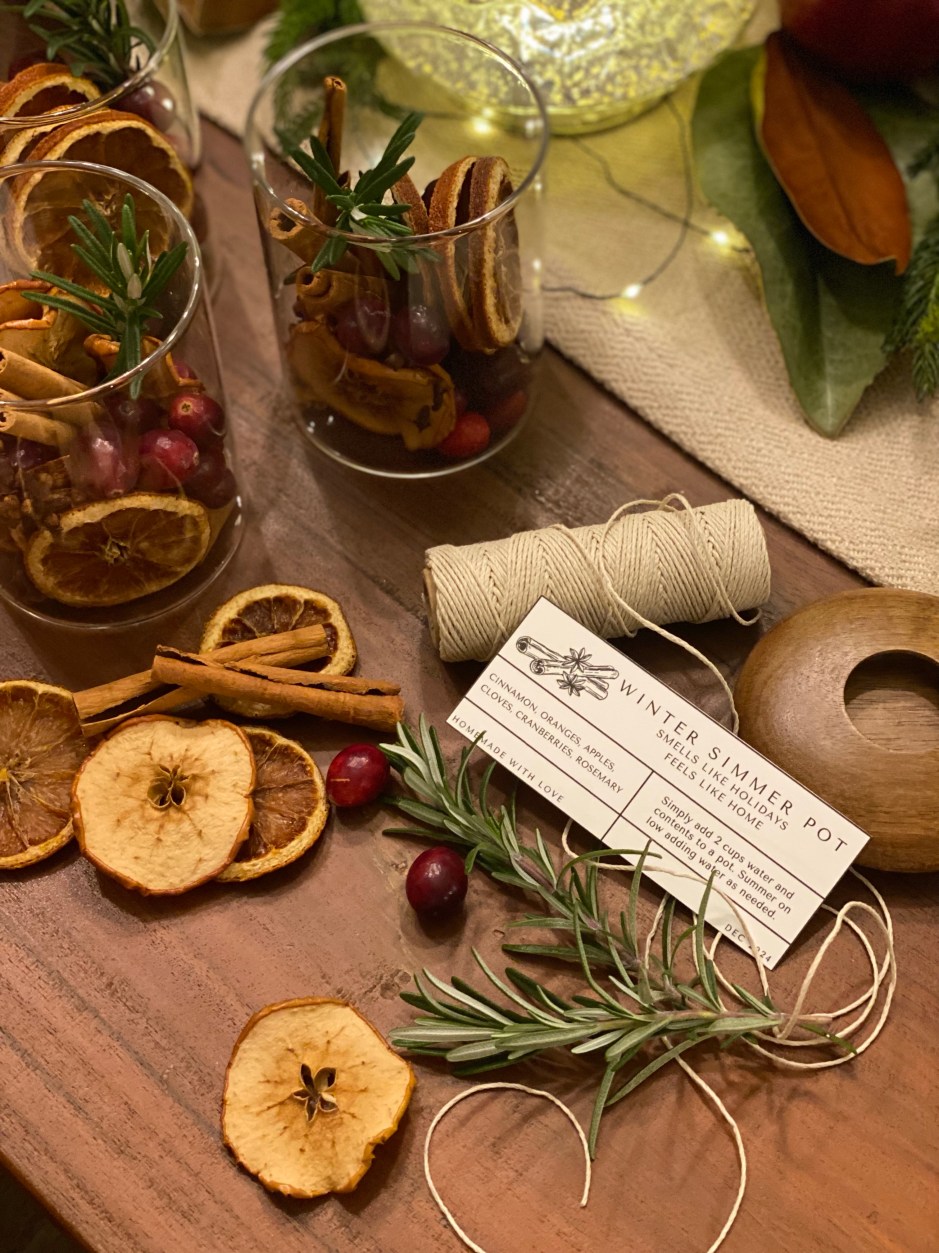
For the simmer pot:
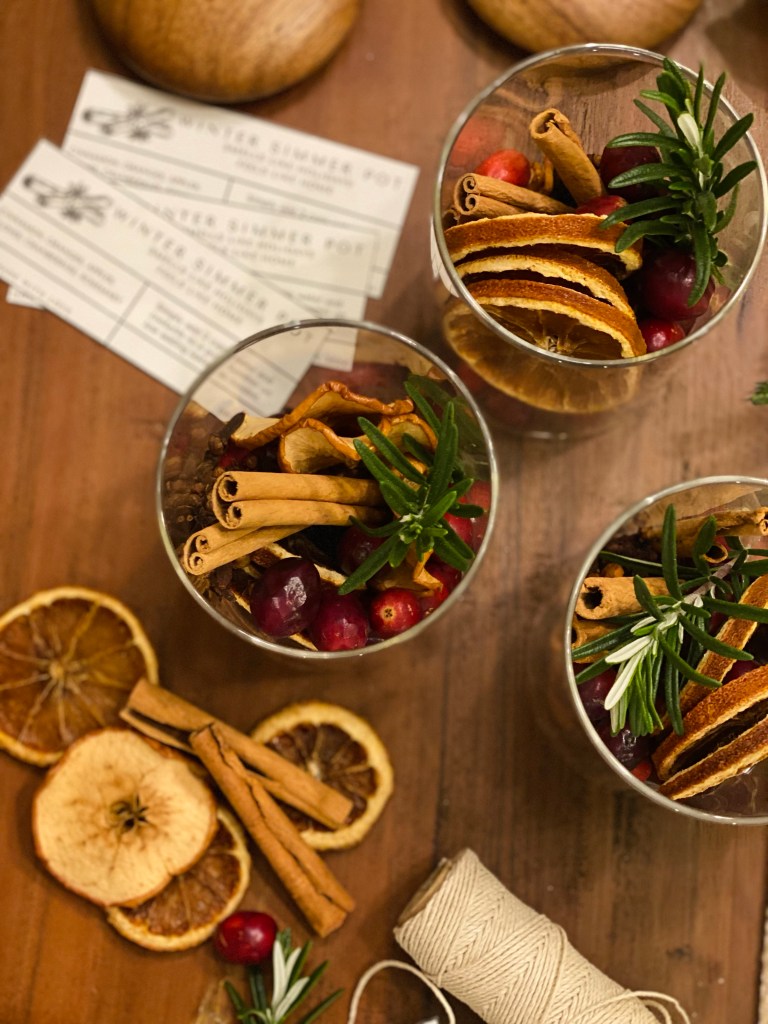
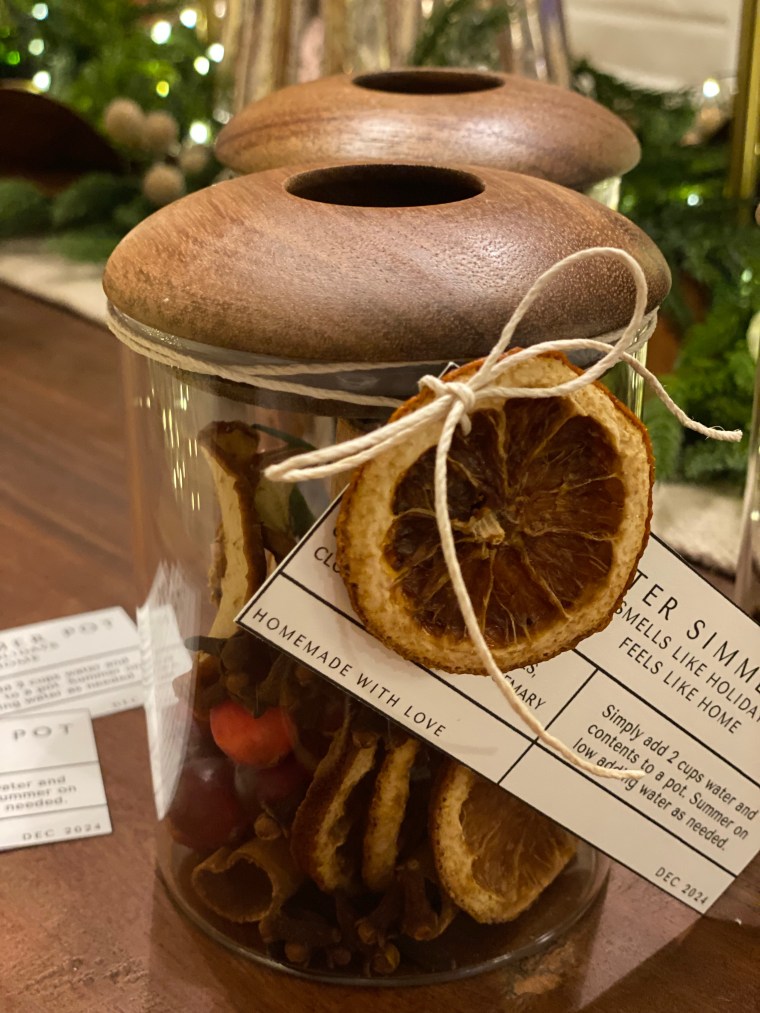
Include 3 orange slices, 2-3 dried apple slices, 1 tbsp of cloves, 3 cinnamon sticks, and 1/2 cup of cranberries. Rosemary or sage is optional.
Add to a pot with 2 cups of water and simmer on low adding water as needed.
If you’re gifting this simmer pot, add ingredients to a cute jar and attach the tag with instructions.
For a downloadable printable of the tags I made, click here.

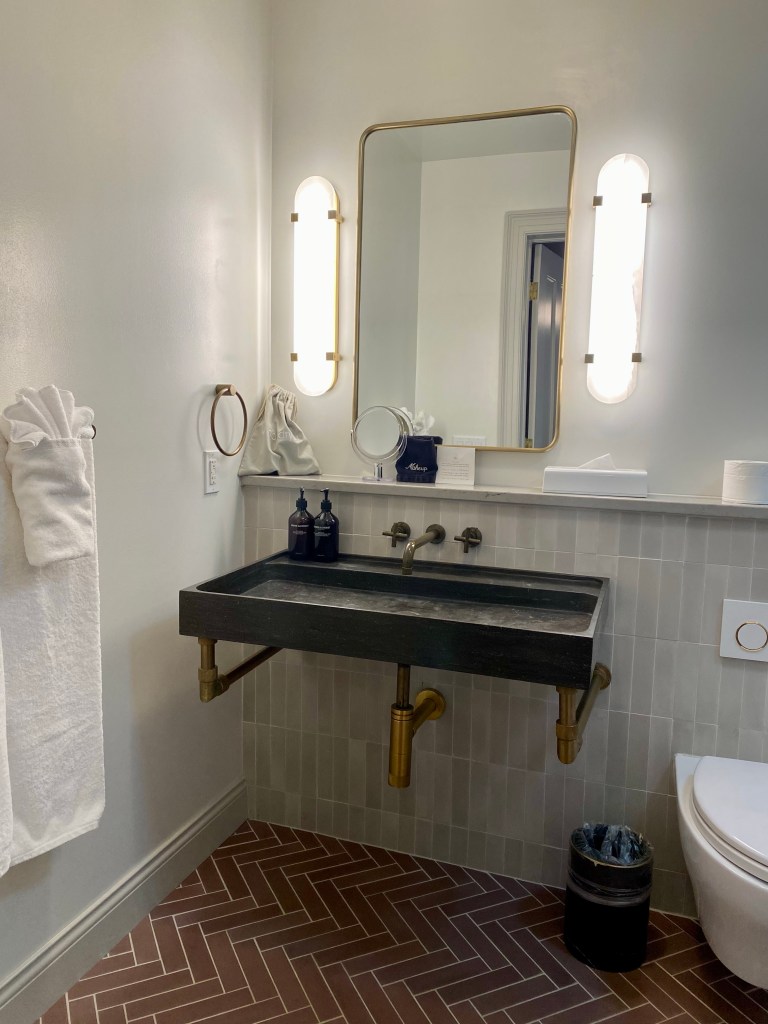
If you’re looking for a little getaway right in the heart of Raleigh, the Heights House offers a charming and cozy retreat with a touch of elegance. Whether you’re a local seeking a short break or a visitor wanting to explore the city’s vibrant culture, this staycation plan offers the perfect balance of relaxation, good food, and local adventure.
We recently planned our Raleigh staycation to celebrate our 14th anniversary that focused on exploring more of our area. We made reservations at the stunning Heights House, a place that has been on my bucket list forever and dinner reservations at one of our favorite local restaurants—one we don’t visit often enough due to its distance from home. The combination of a dreamy stay and an indulgent meal made for a perfect way to mark this special milestone and one that I hope you will consider planning if you are local or visiting the area. (Or perhaps you need a gift idea for that someone that is hard to buy for but loves experiences over things. This is it!)


Our check-in lead to a tour of the beautiful home, a brief history lesson and fun facts shared about the curated collection of furnishings within Heights House and how it came to be what it is today. Be sure to get a tour and history of the property when you check in.


Here is a suggested itinerary that is loosely based off of our experience.
Evening Kick-off: Cocktail Hour at Heights House
Start your evening with a drink in the beautifully restored parlor of Heights House. The intimate setting, paired with expertly crafted cocktails, sets the perfect tone for a relaxing night out. The mixologists here know their craft, and whether you’re in the mood for a classic or something a little more daring, you’ll be well taken care of.
The drink menu is set within vintage books. The attention to detail throughout the property was curated by the owners. Be sure to get a tour and history of the property when you check in.


After your cocktail, it’s time to head over to Brewery Bhavana. This award-winning restaurant combines craft beer, dim sum, and an elegant atmosphere to create a dining experience that’s both unique and satisfying. The food is creative and full of flavor, with dim sum options that are perfect for sharing.
For those who are gluten sensitive, there are numerous items that are gluten free. Make sure to try their bao buns and dumplings paired with a cold beer from their in-house brewery, my husbands go-to. I tend to stick to the wine. It’s a standout dining option for any Raleigh staycation.


Morning After: Breakfast and Coffee at Heights House
Start your next day with a delicious breakfast at Heights House. The inn offers a range of breakfast options, from fresh pastries to hearty favorites, all thoughtfully prepared to kickstart your day, all included in your stay. Enjoy it while relaxing in the peaceful surroundings of this beautifully restored home.


A Morning Stroll into Downtown Raleigh
After breakfast, head out for a leisure walk into downtown Raleigh. It’s a beautiful way to see the city and enjoy the fresh air before diving into the local scene.

Coffee at A Place at the Table
Your first stop? A Place at the Table, a nonprofit coffee shop that does more than just serve excellent coffee. This café’s mission is to provide a “pay what you can” model for its meals and drinks, meaning you can grab a coffee to go, and even purchase a meal for someone else. It’s a feel-good stop that supports the local community while also giving you that caffeine boost.
Explore Downtown Raleigh
From there, take a casual stroll along Fayetteville Street, stopping in local shops, boutiques, and art galleries. Raleigh is known for its mix of modern flair and historical charm, and this walk offers the perfect opportunity to explore.
One of my favorite finds on our recent staycation was Copperline Plant Co.. I’m growing my plant collection at home so it was nice to explore different varieties and chat with the shop owner to learn more.
Dinner Options for a Raleigh Date Night
If you’re looking for more date night ideas beyond a stay at Heights House, here are a few options that offer delicious food and drinks in different parts of the city:
Option 1: Drinks at Jolie, Dinner at Crawford and Sons
Start your evening with a drink at Jolie, a stylish spot offering craft cocktails in a chic atmosphere. Their rooftop is the perfect setting to catch a sunset. Be sure to make reservations. Once you’ve sipped your way through their menu, head to Crawford and Sons for dinner. Again, make reservations ahead of time. This upscale restaurant features modern American cuisine with an emphasis on fresh, local ingredients. The menu changes seasonally, but you can expect dishes that are both inventive and beautifully plated but most of all, delicious. I promise, you’ll talk about your meal for weeks to come.
Option 2: Whiskey Kitchen, City Market Sushi & Dessert at Bitter Sweet
For a more casual yet equally delightful evening, begin with drinks and apps at Whiskey Kitchen. This lively bar offers a fantastic selection of whiskey and craft cocktails, perfect for sipping before dinner. They also offer a creative menu that combines Southern-inspired dishes if you want to linger longer before dinner.
Then, make your way to City Market Sushi in Moore Square for fresh sushi and tasty rolls. To cap off your evening, walk over to Bitter Sweet for dessert. This local favorite serves decadent treats, from cakes to ice cream, all with a creative twist.


Whether you’re planning a full staycation or just looking for a fun date night, Raleigh offers a wealth of experiences that combine good food, great drinks, and plenty of local flavor. A night at Heights House or any of these recommended date-night spots will leave you feeling refreshed and ready to explore even more of what this vibrant city has to offer.
I hope you will feel inspired to plan a local staycation for your next special occasion. Too often we can feel pressured to travel far to have a magical experience but sometimes we just need to stay close to home and explore the wonderful options that are just outside our doorstep, or a short drive away.

As the air turns crisp and the world shifts to shades of amber and gold, there’s something undeniably special about autumn. It’s a season where our senses seem to heighten — the smell of spiced lattes, the crunch of fallen leaves underfoot, and, of course, the warm, comforting flavors that bring us together. This time of year, there’s nothing better than a dash of pumpkin in our favorite treats.
Today, I’m sharing some of my go-to pumpkin recipes that are perfect for savoring the best of fall. From a creamy pumpkin cold foam to sip on, to sweet pumpkin muffins and doughnuts, and even a hearty pumpkin chili to cozy up with, these recipes are a little bit of autumn bliss for every tastebud. Whether you’re a seasoned pumpkin lover or just diving into these flavors, I hope these recipes make it into your home and become a repeat tradition.
Click on the recipe doc to download and print.


These recipes are easy to make at the same time as they all require some of the canned pumpkin puree.
Happy Fall!


When I look back on my most cherished memories, from childhood to adulthood, so many of them were spent outside, immersed in nature. Adam and I have always loved to get out and explore new places, both locally and in our travels.
Our family dynamic has evolved with the addition of our three sons, who are now 10, 8, and 4 years old. What hasn’t changed is our love to get outside in nature and explore.
Bringing kids along can sometimes feel overwhelming, but I assure you, with patience and persistence, they’ll develop a love for the outdoors and enjoy exploring new trails with you.
Hiking, biking, scootering (this is a word, right?), and running different trails local to our area has lead us to find our favorite places that we frequently visit.
Here are our top 5 family-friendly trails that you should definitely add to your adventure list! Along with each trail, I’ve included a guide to help you determine if it’s ideal for walking, running, biking, or scootering—so you can pick the perfect path for your next outing.
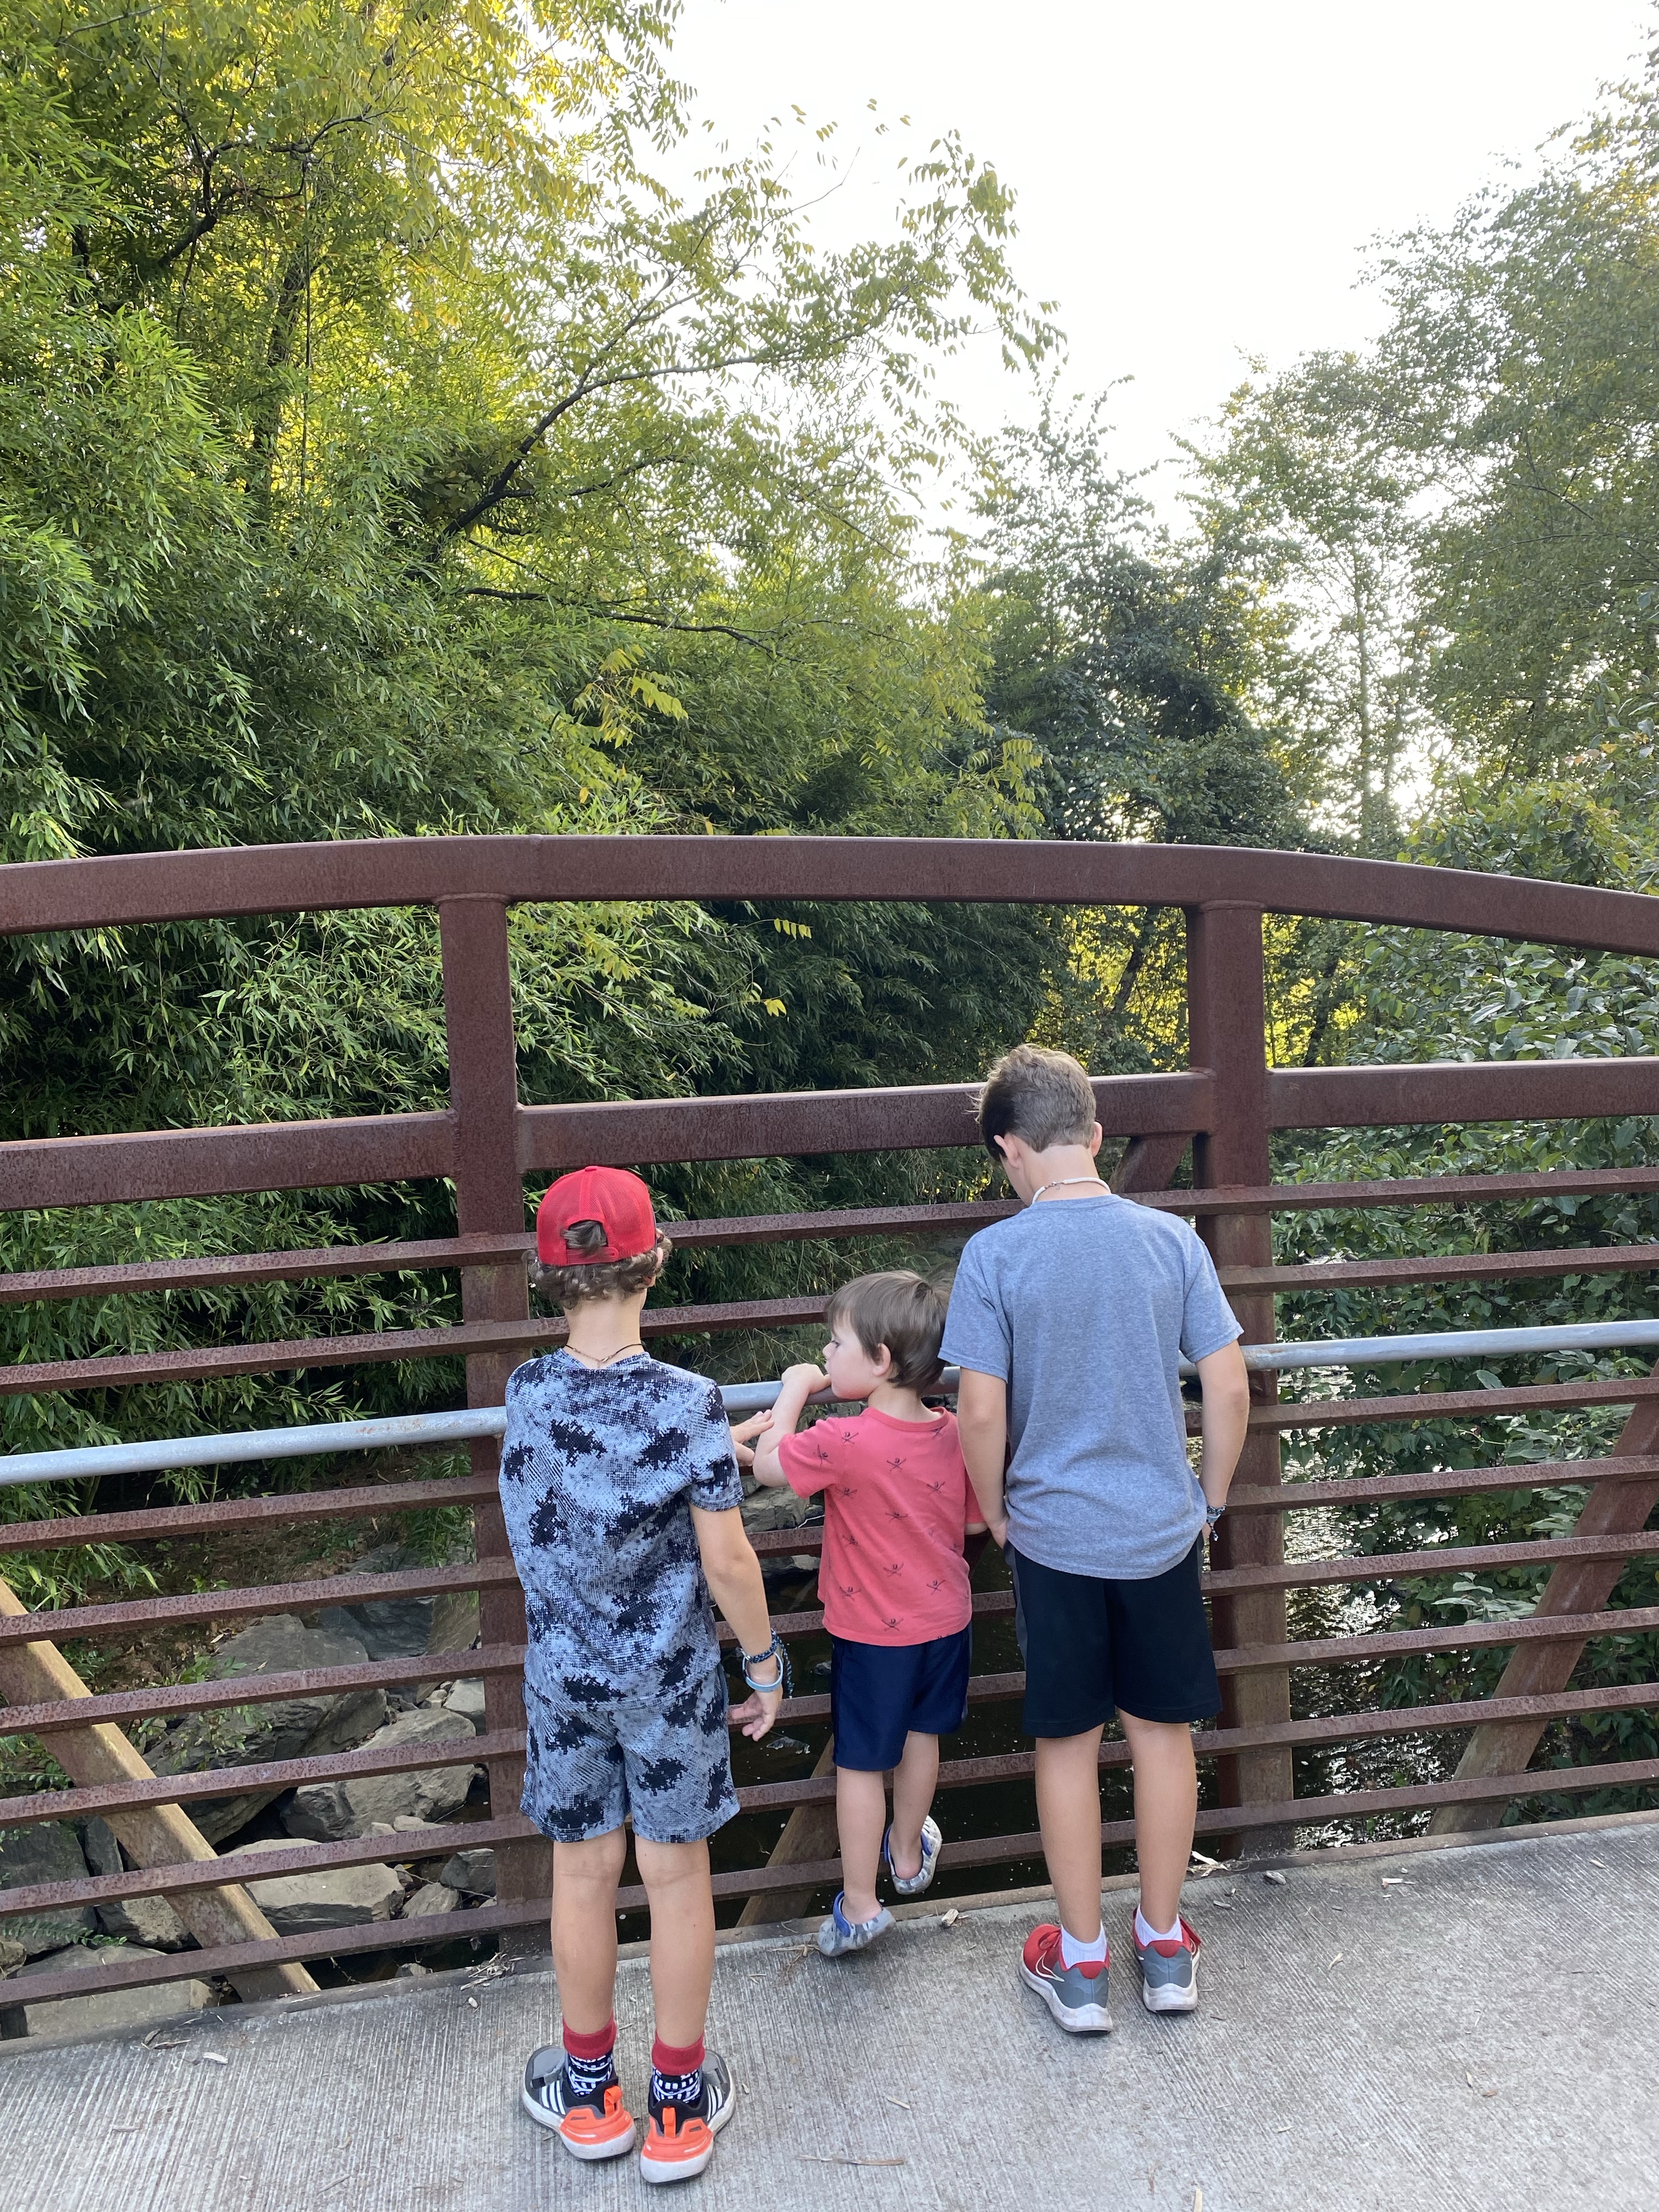
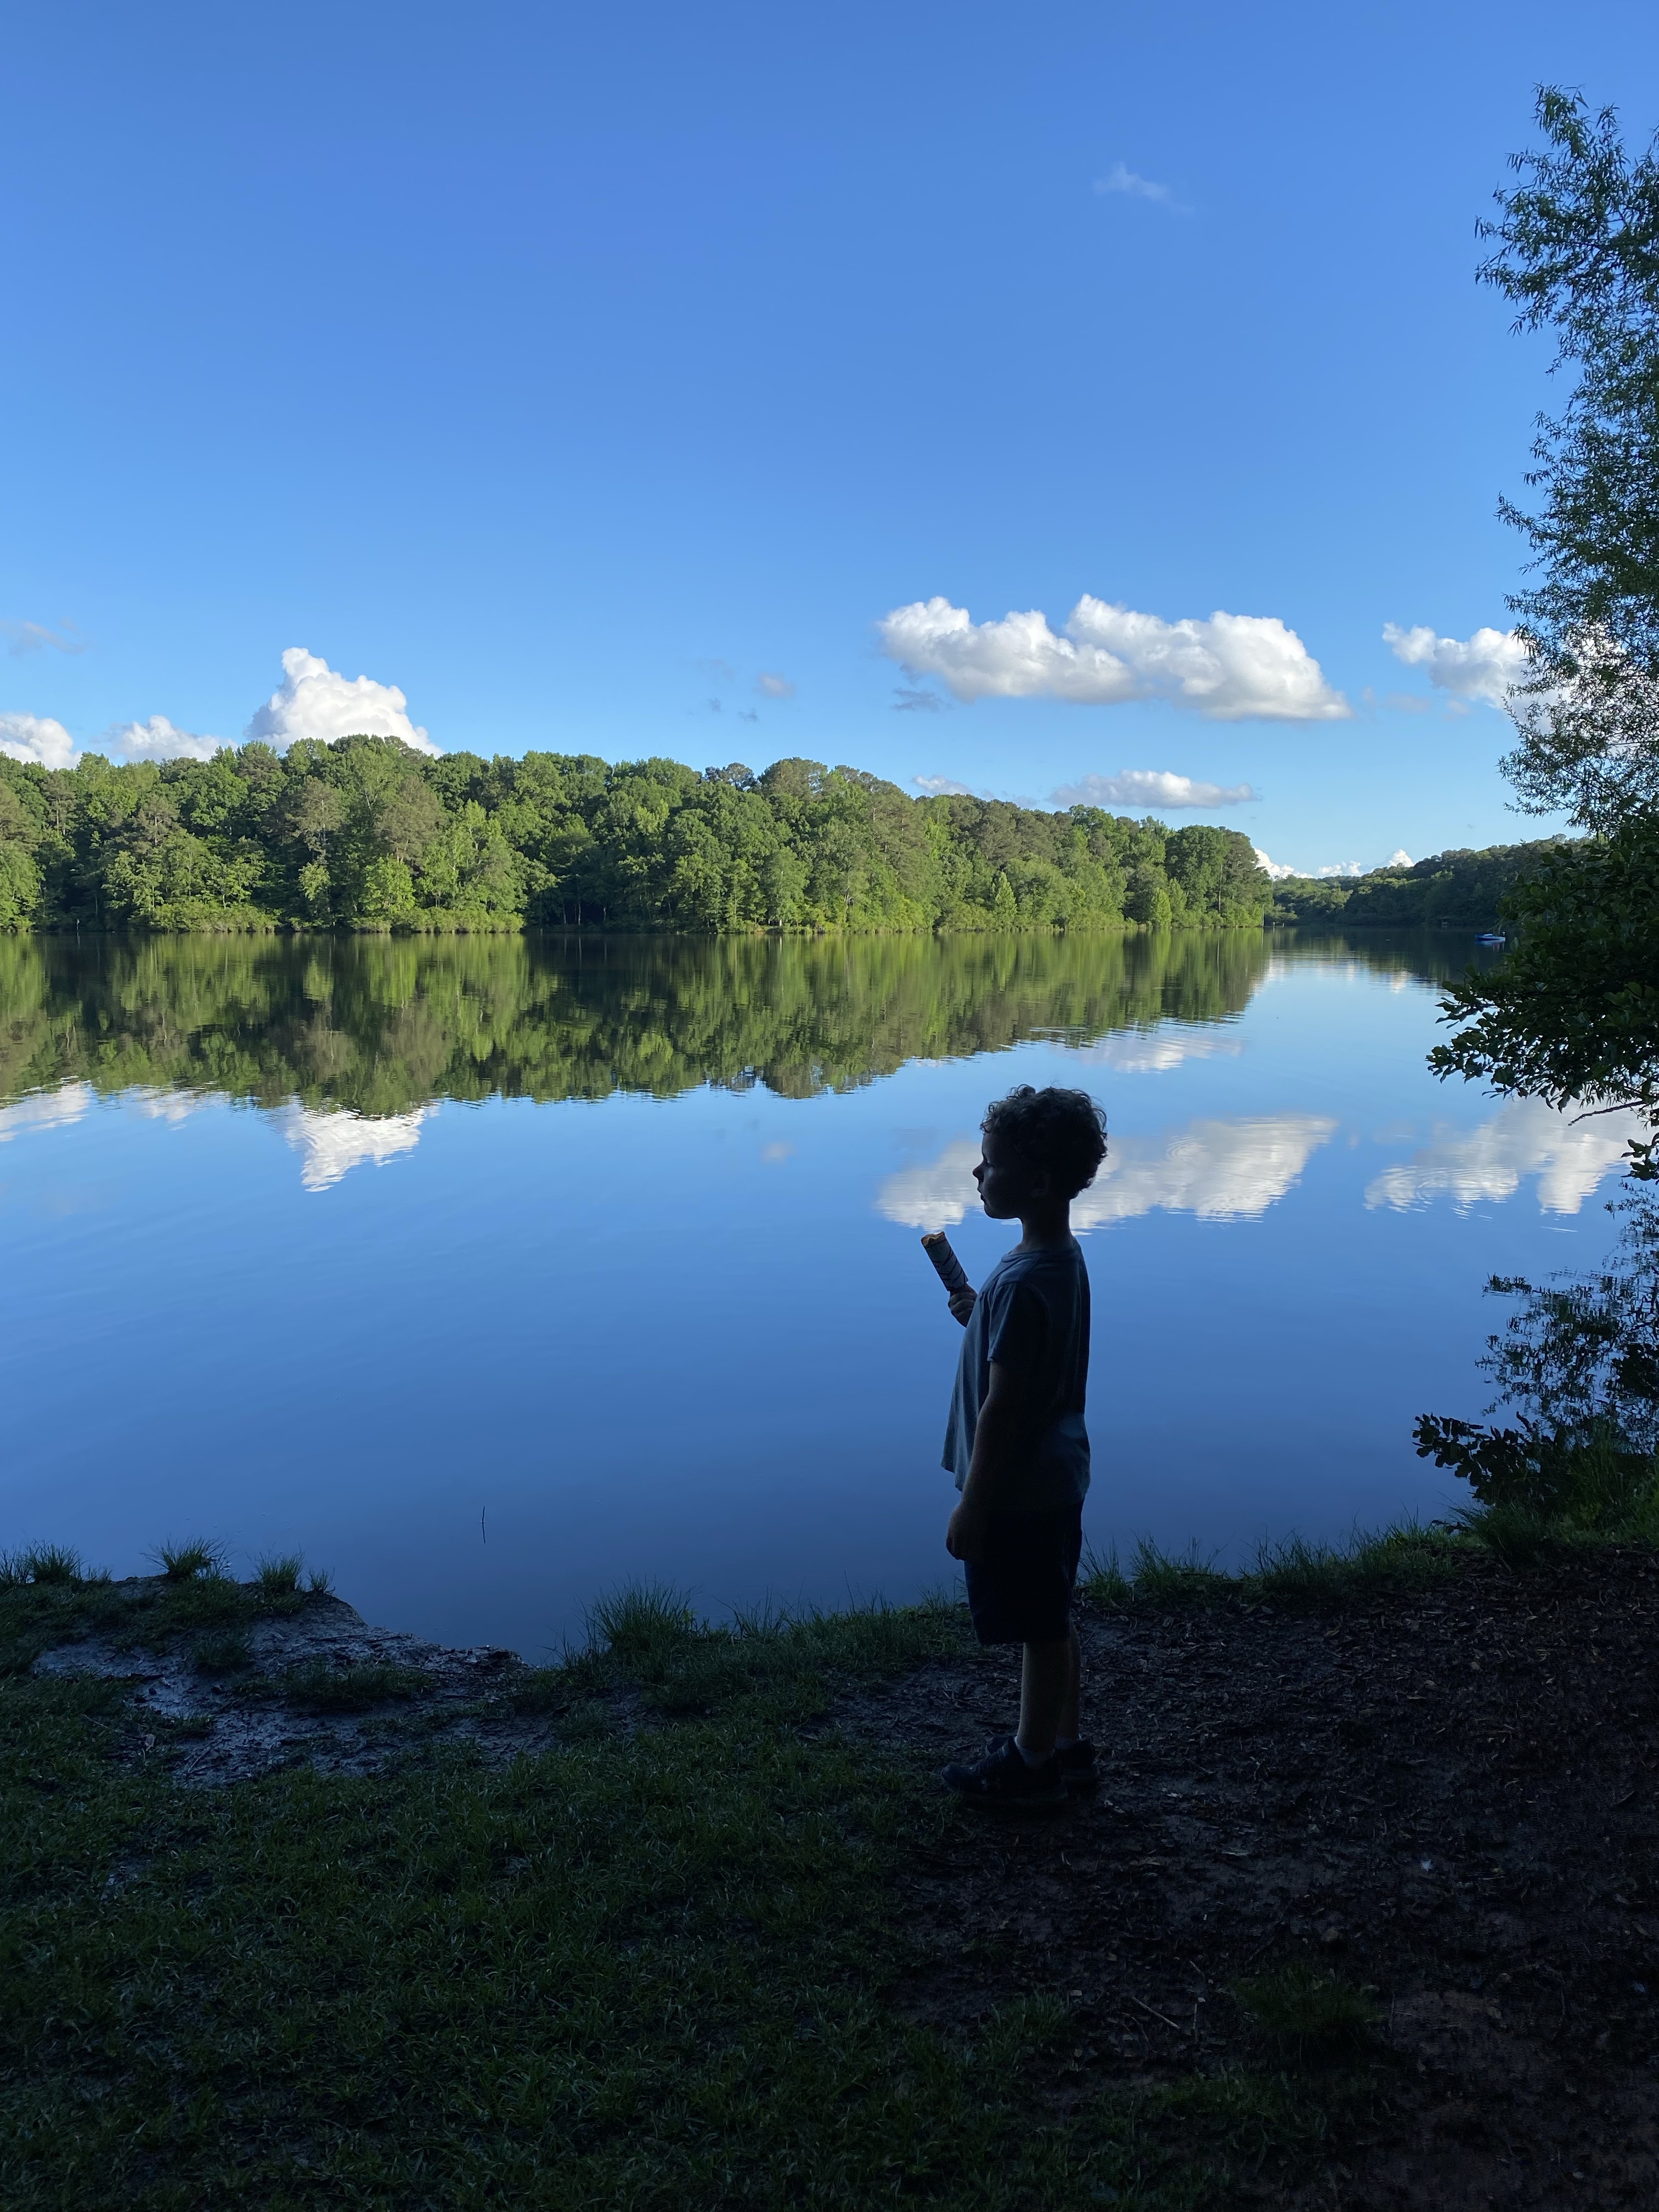
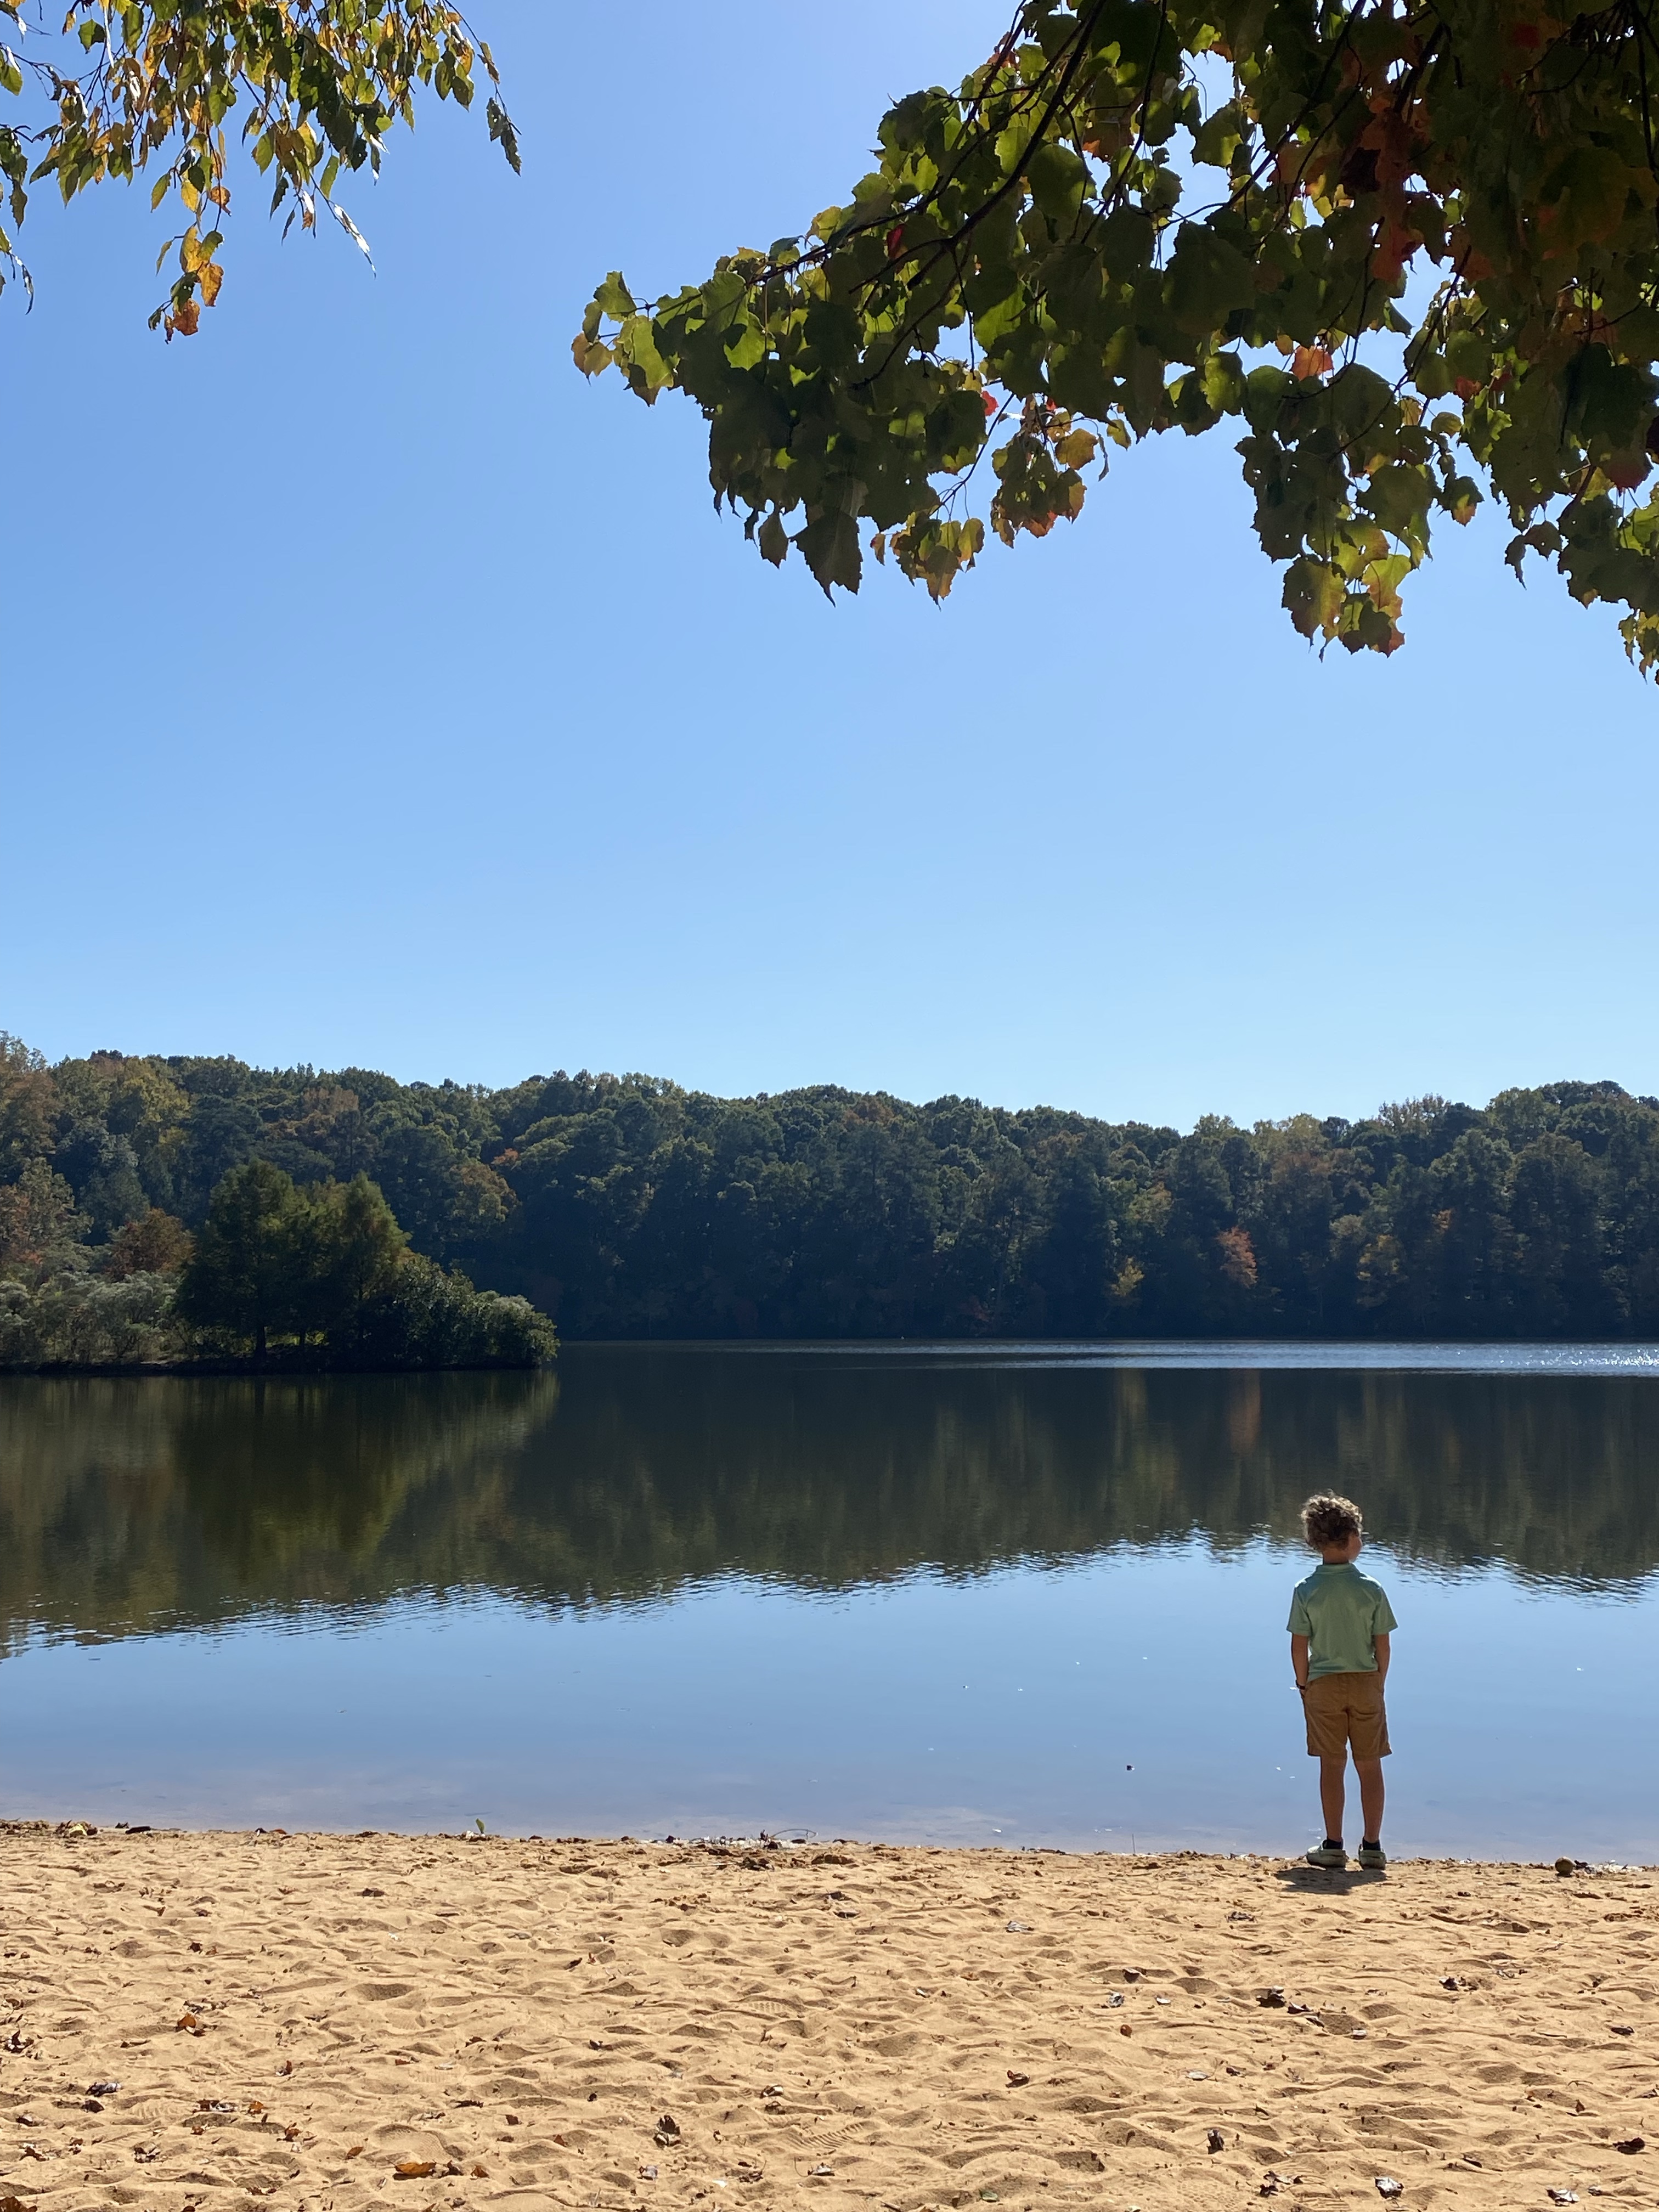
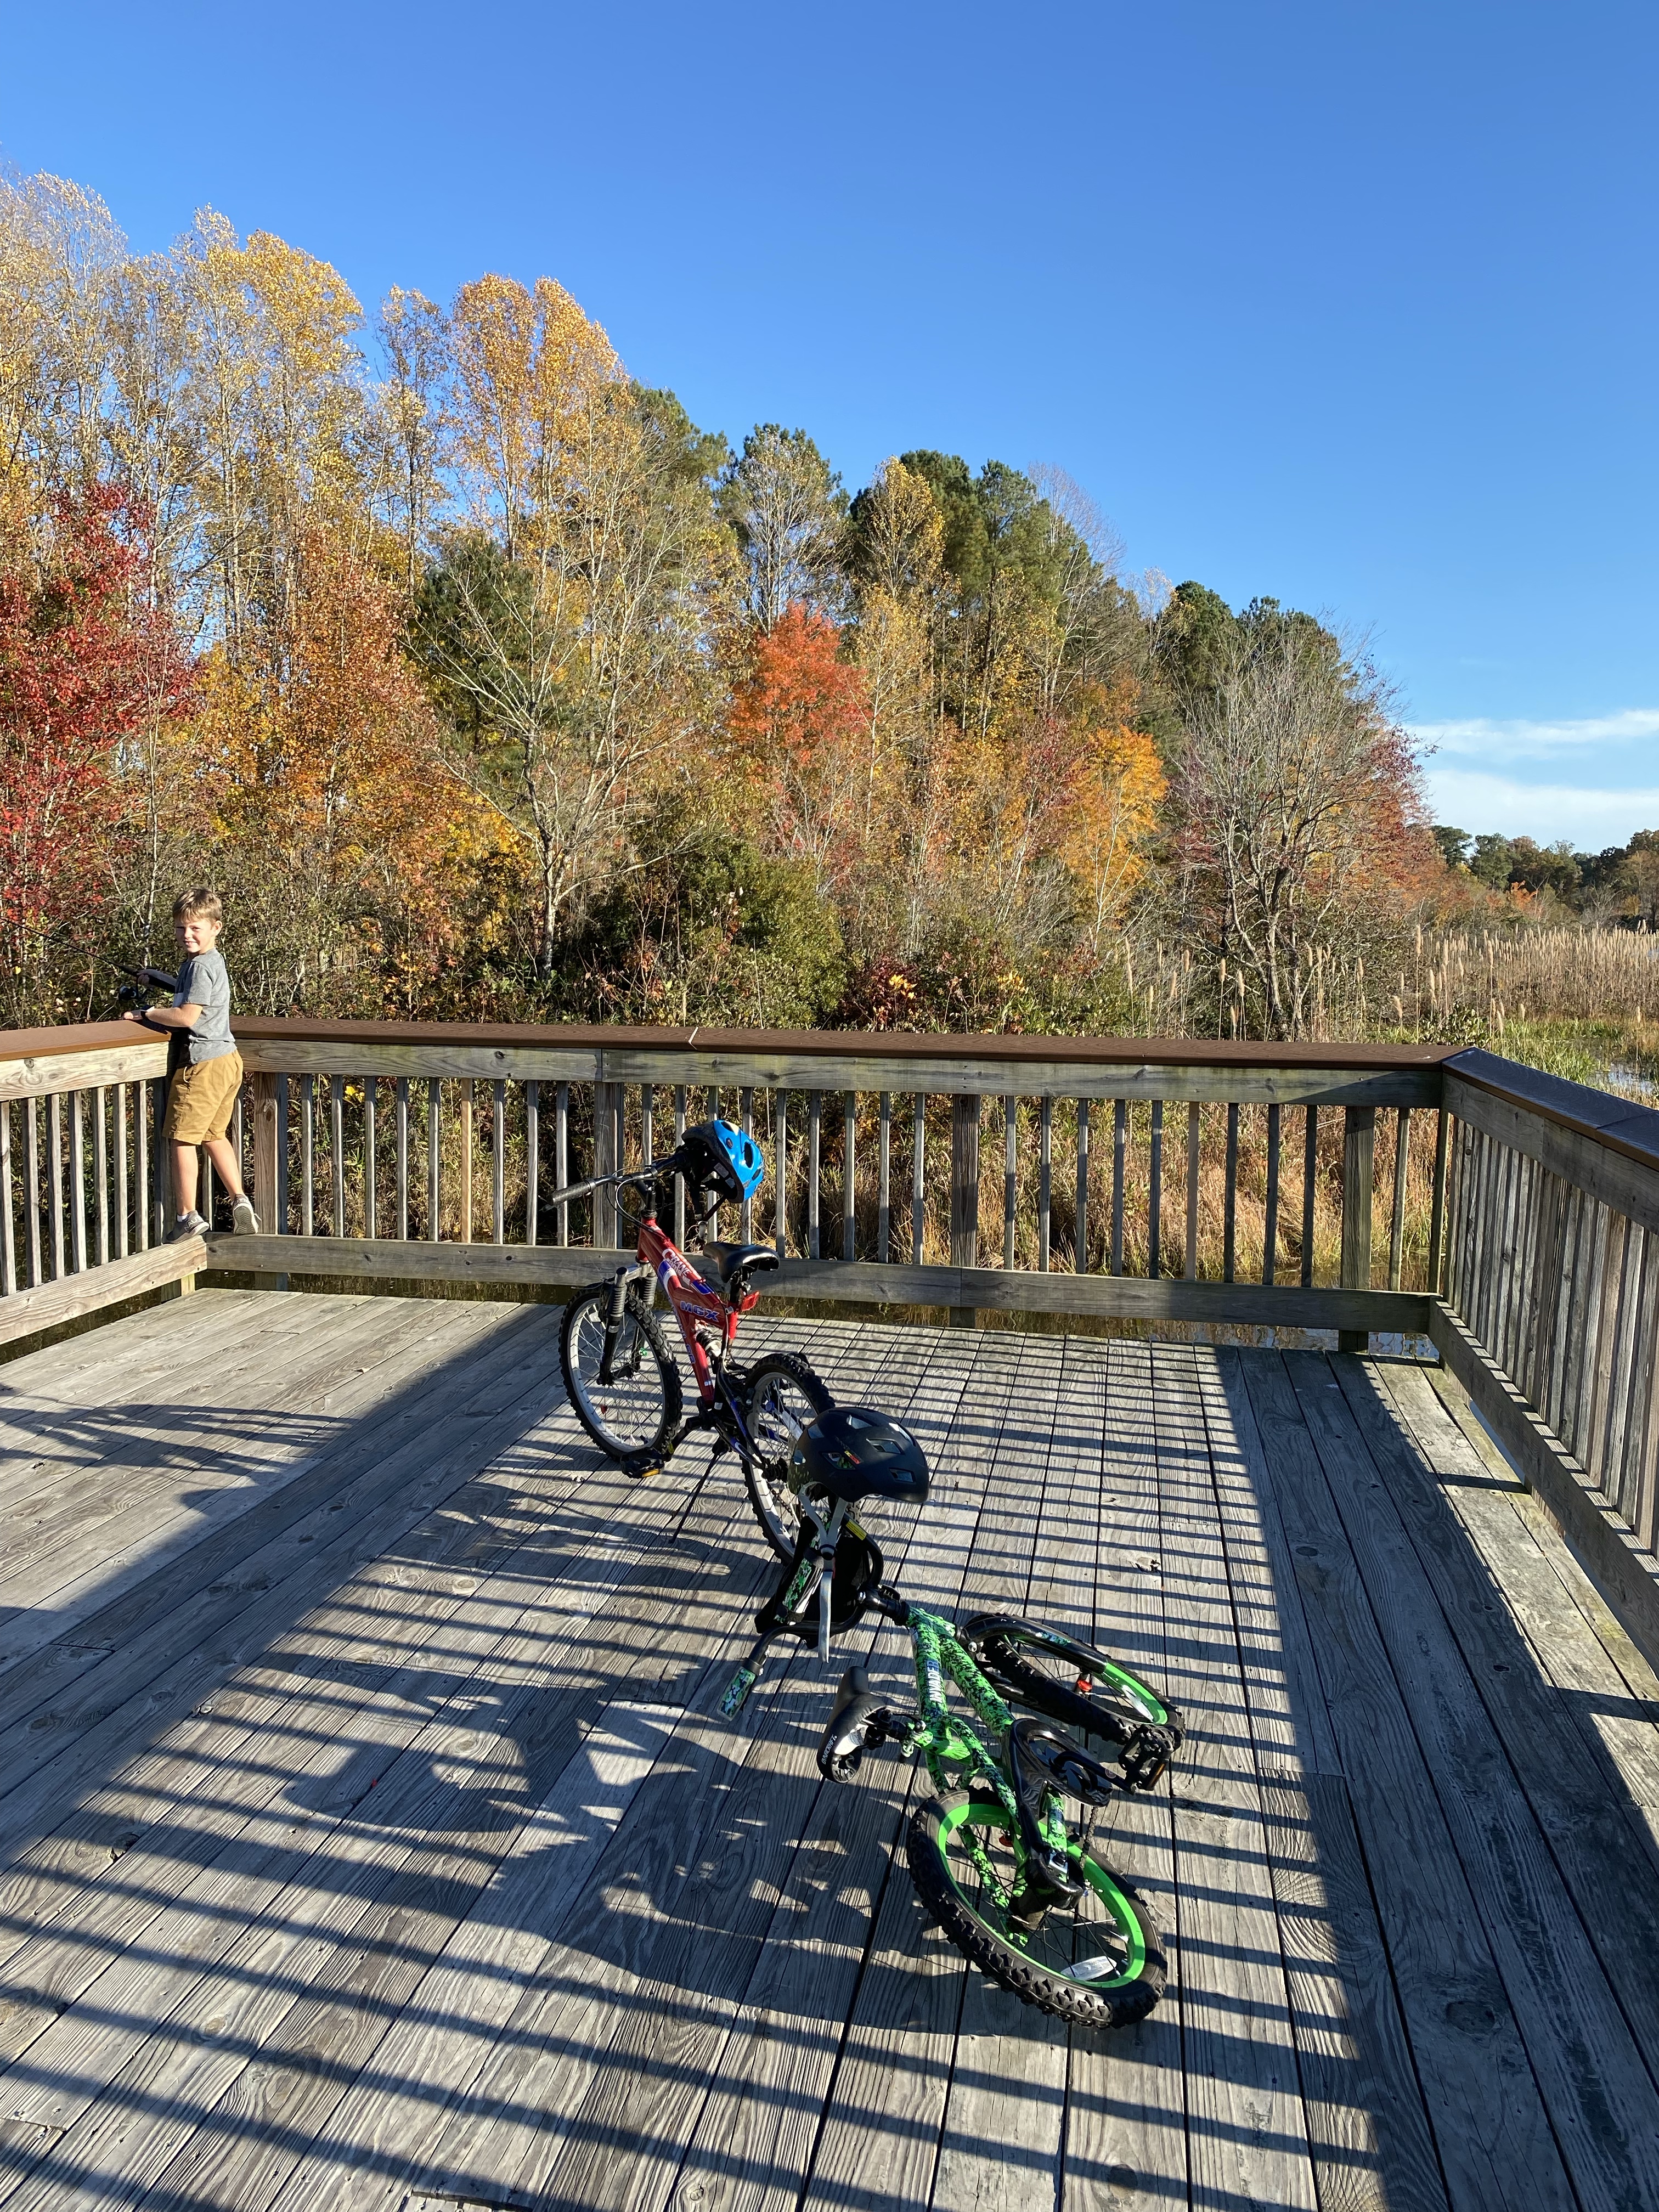
Bass Lake Park – 🚶♀️ 🏃♀️ 🚴♀️ 🛴 (Greenway Path only)
This is a 2.02 mile loop, mostly mulched, that also has connecting access to the Carl Dean Greenway and Sugg Farm.
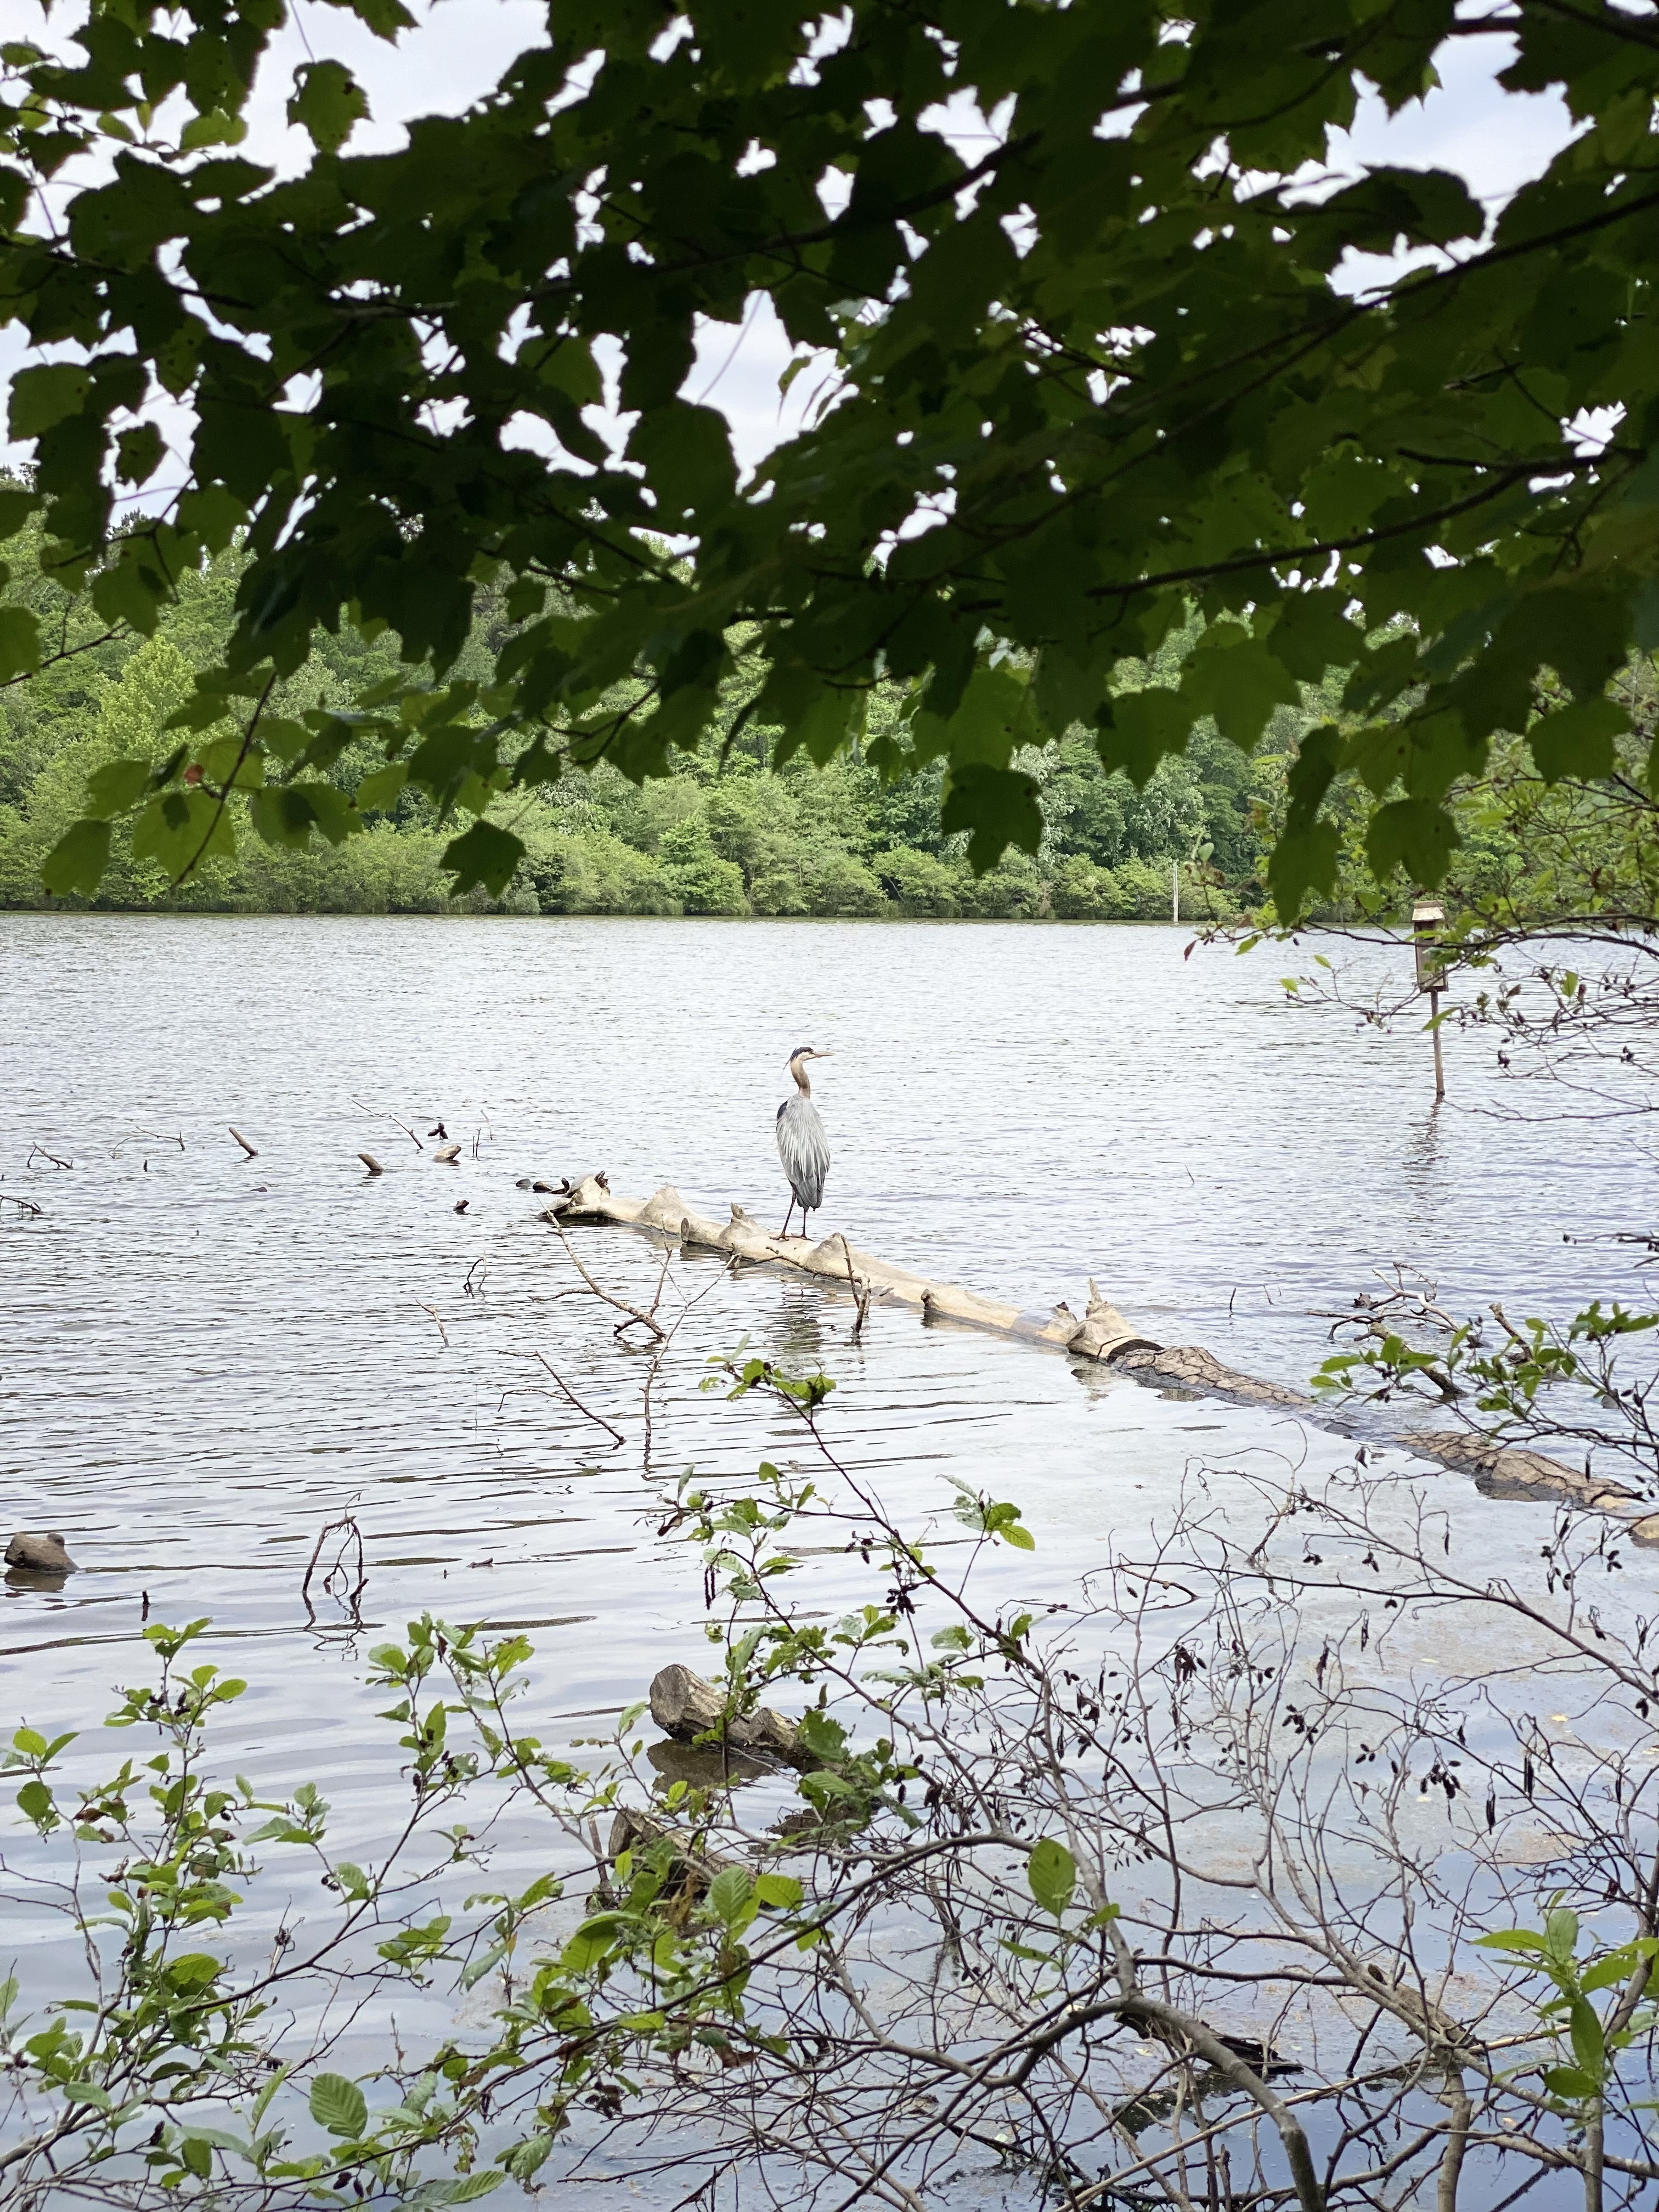
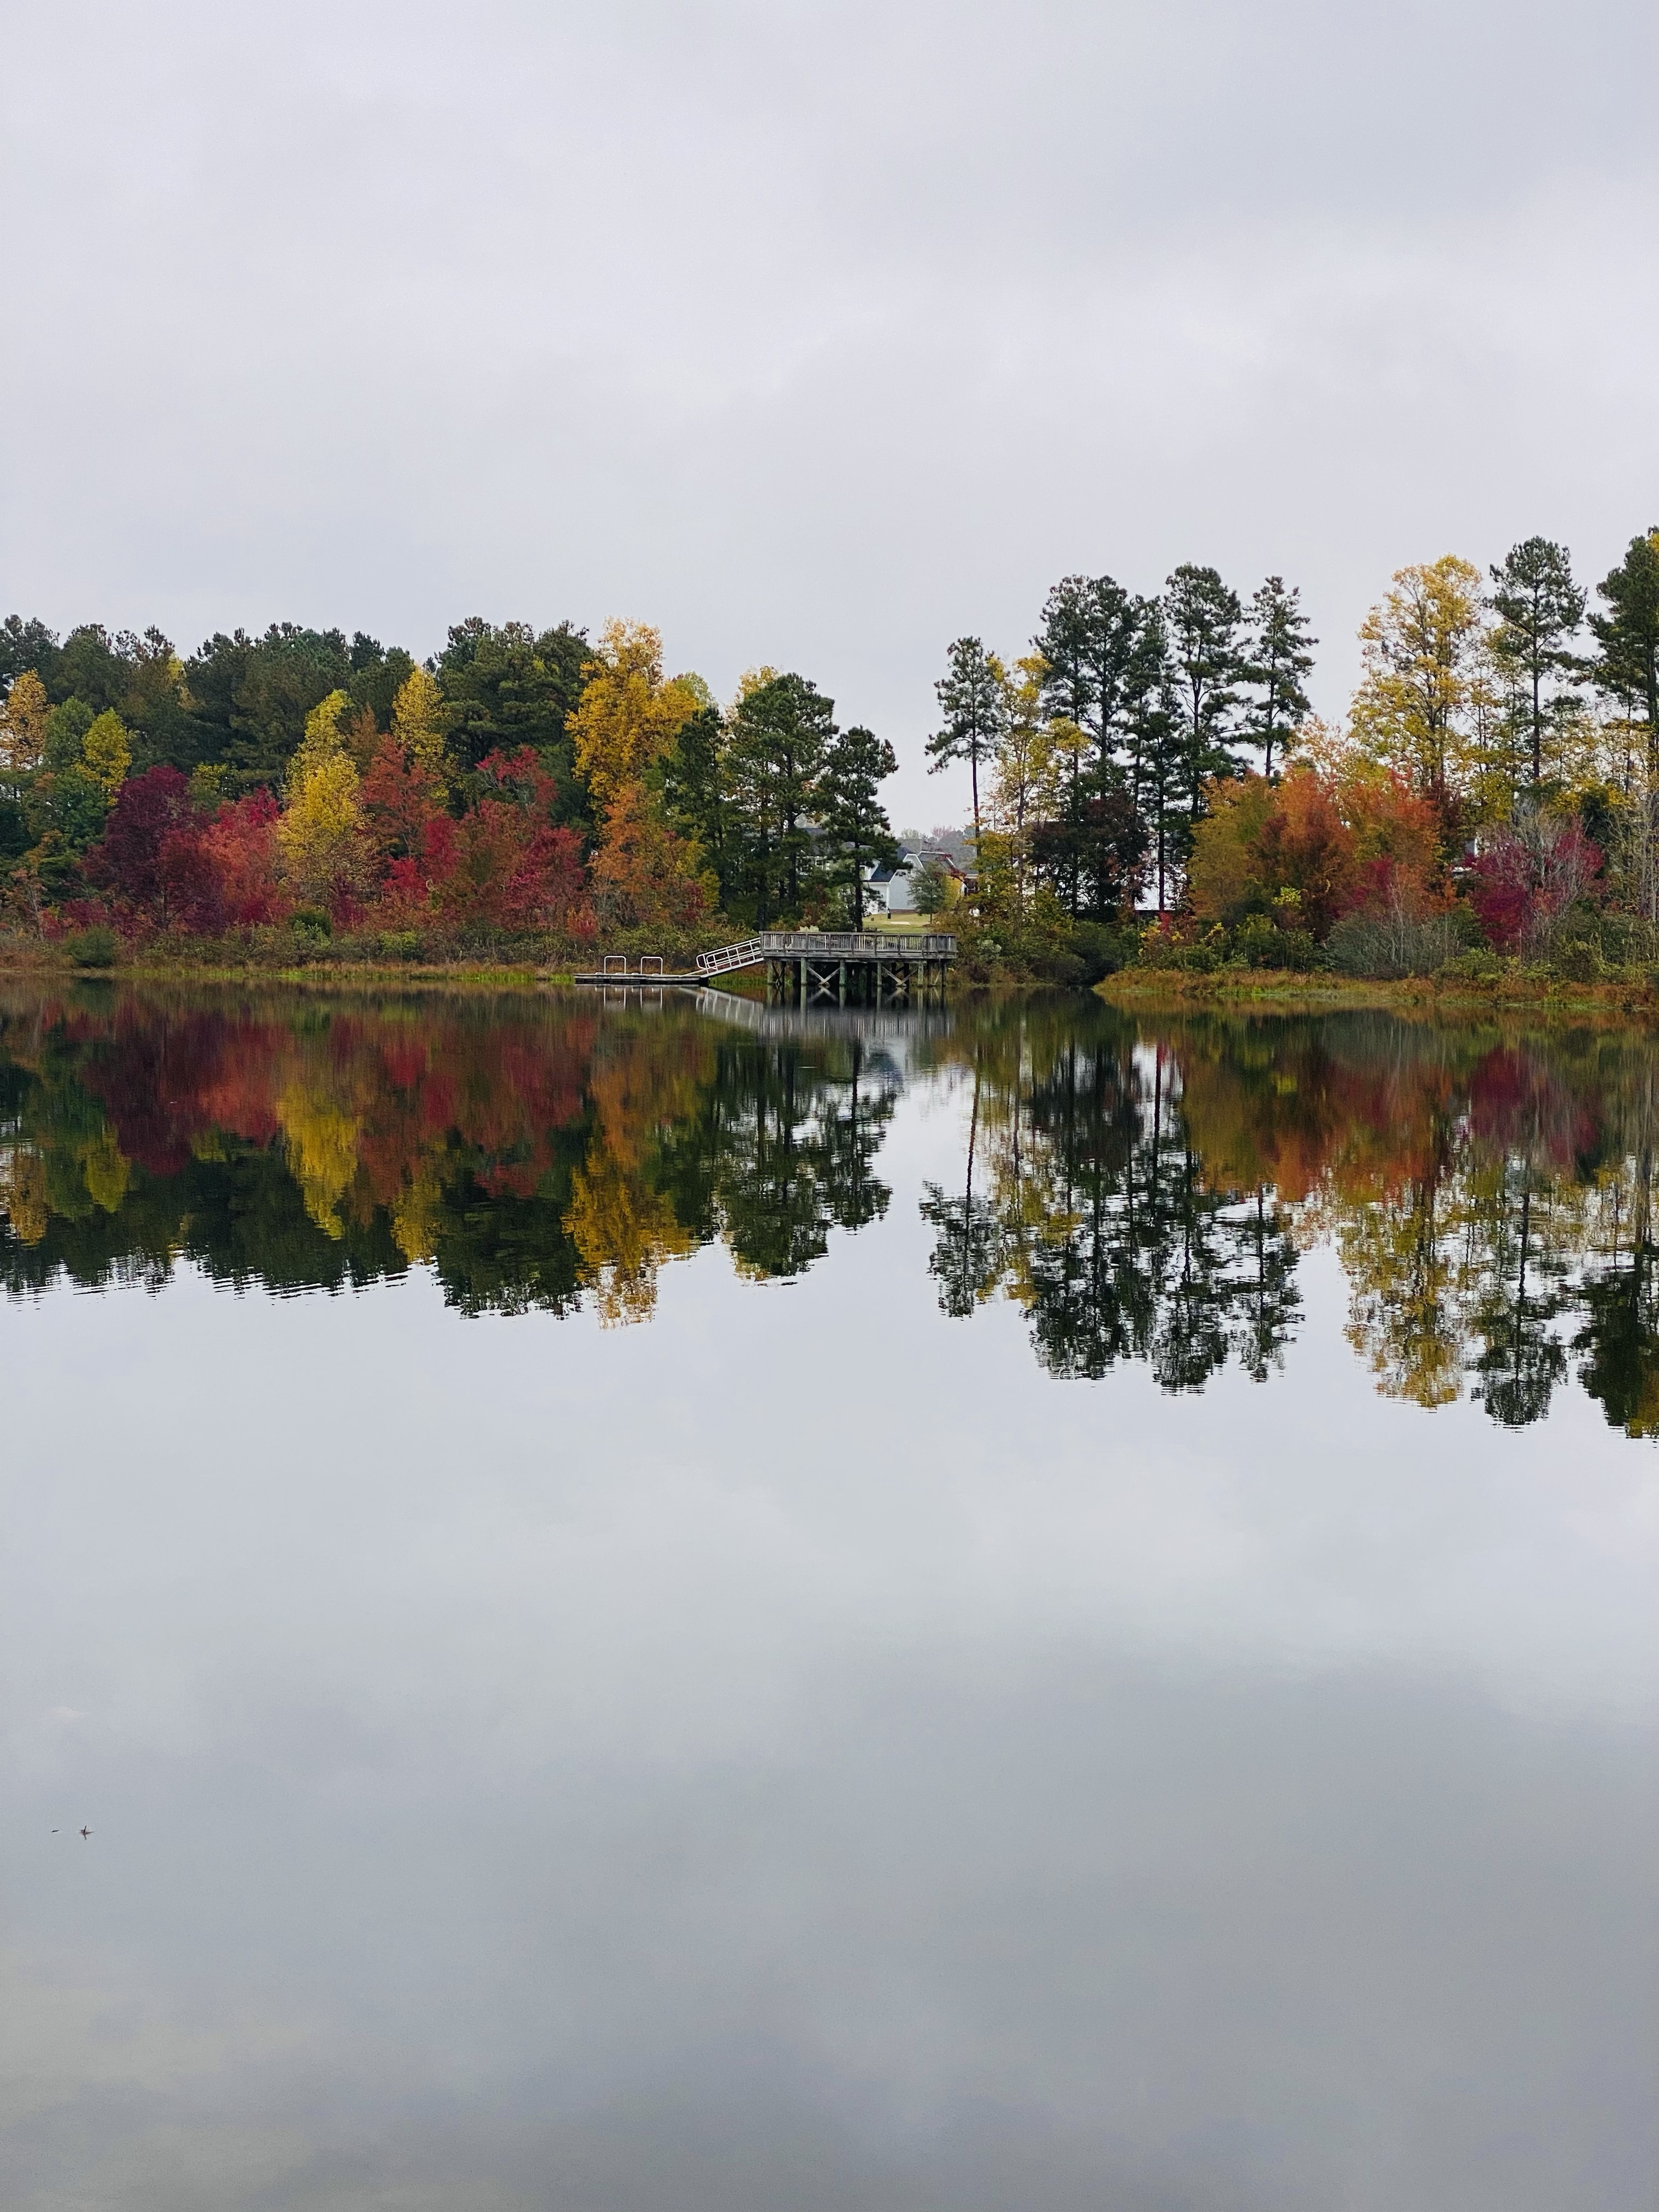
This is a beautiful trail year-round. In the summer and spring, everything is lush and green. In the Fall, the foliage is vibrant. Be on the lookout for wildlife year-round. We almost always see deer in the woods. We have also seen river otters, cormorants, and snakes in the summer but this is rare.
The main club house also has concessions available for purchase like various chips, cracker packs, ice creams, water and sports drinks. (Very inexpensive too) This is a fun fact you can keep in your back pocket if you need to encourage little ones to make it around the lake.
The kids will also love viewing the various reptiles and small animals they have inside the clubhouse.
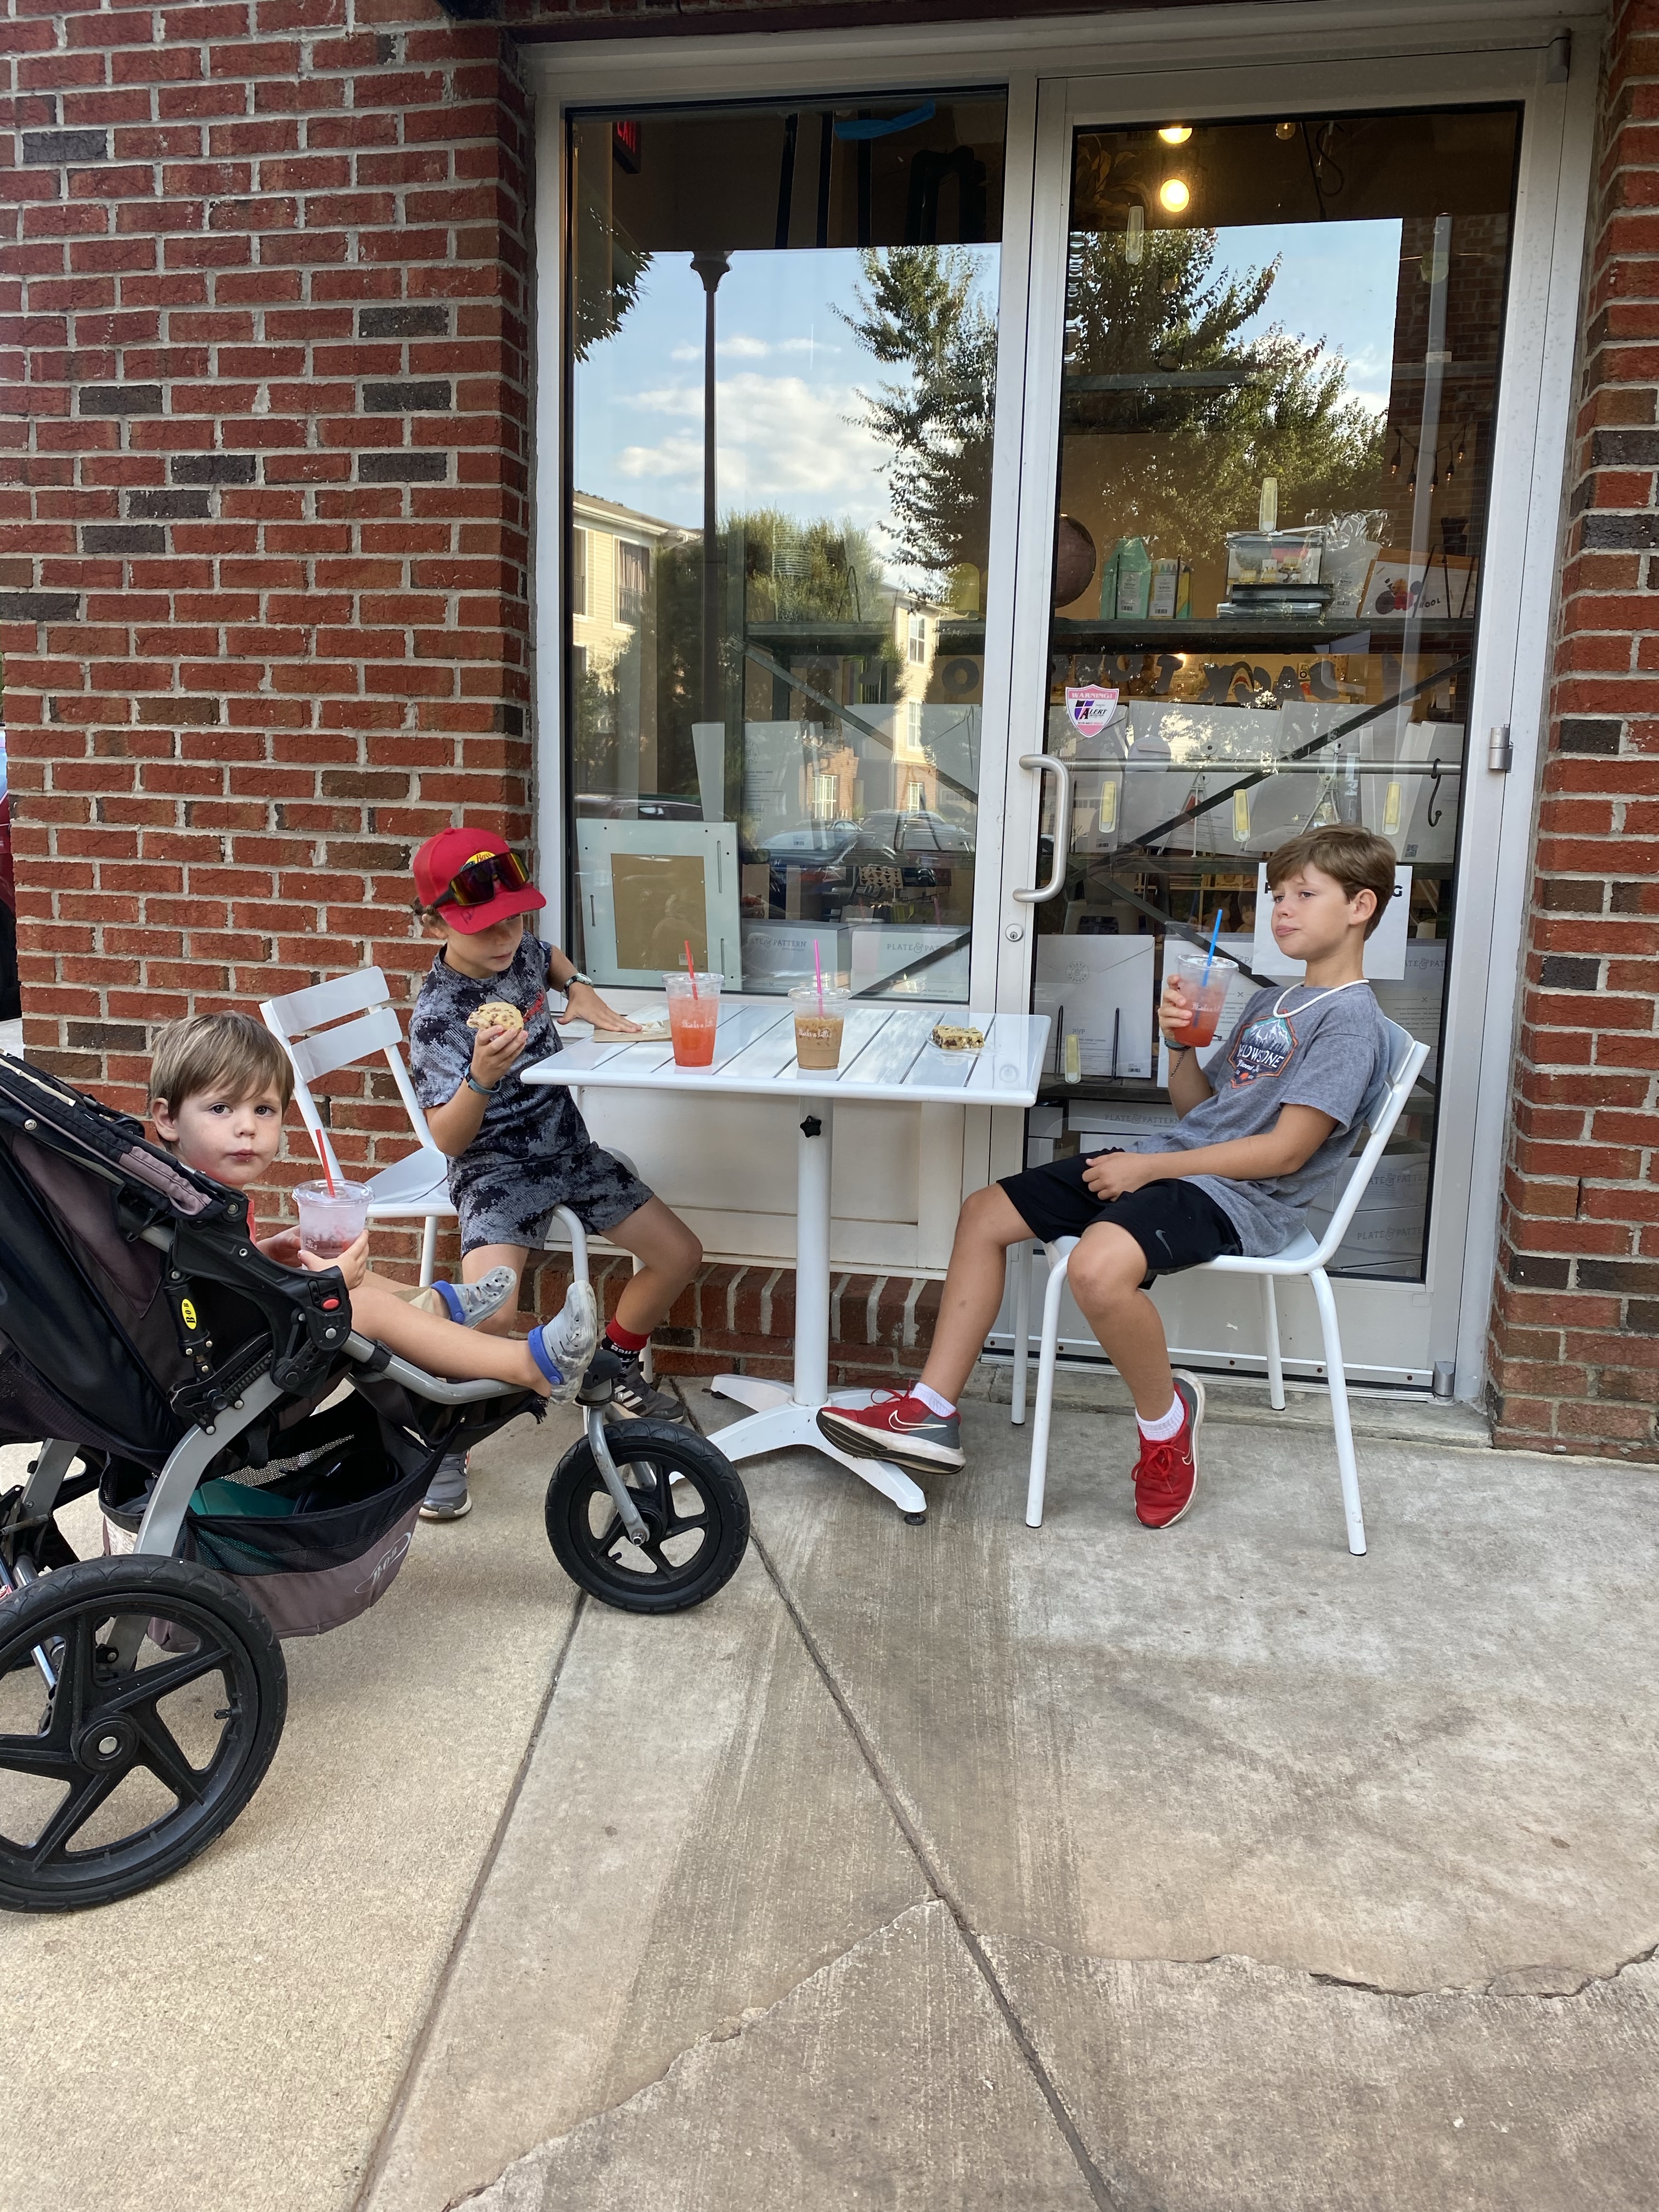
If you are up for a longer distance, 4 miles out and back from the main parking lot, I highly recommend getting on the connecting greenway path. The kids take their scooters or bikes when this is our planned adventure. We often take the greenway all the way to Main Street Square where you’ll find a few shops but our favorite stop is Thanks A Latte. I can get a little pick-me-up and the kids share a baked good.
The greenway also connects to Womble Park in Holly Springs which is a great park for kids of all ages.

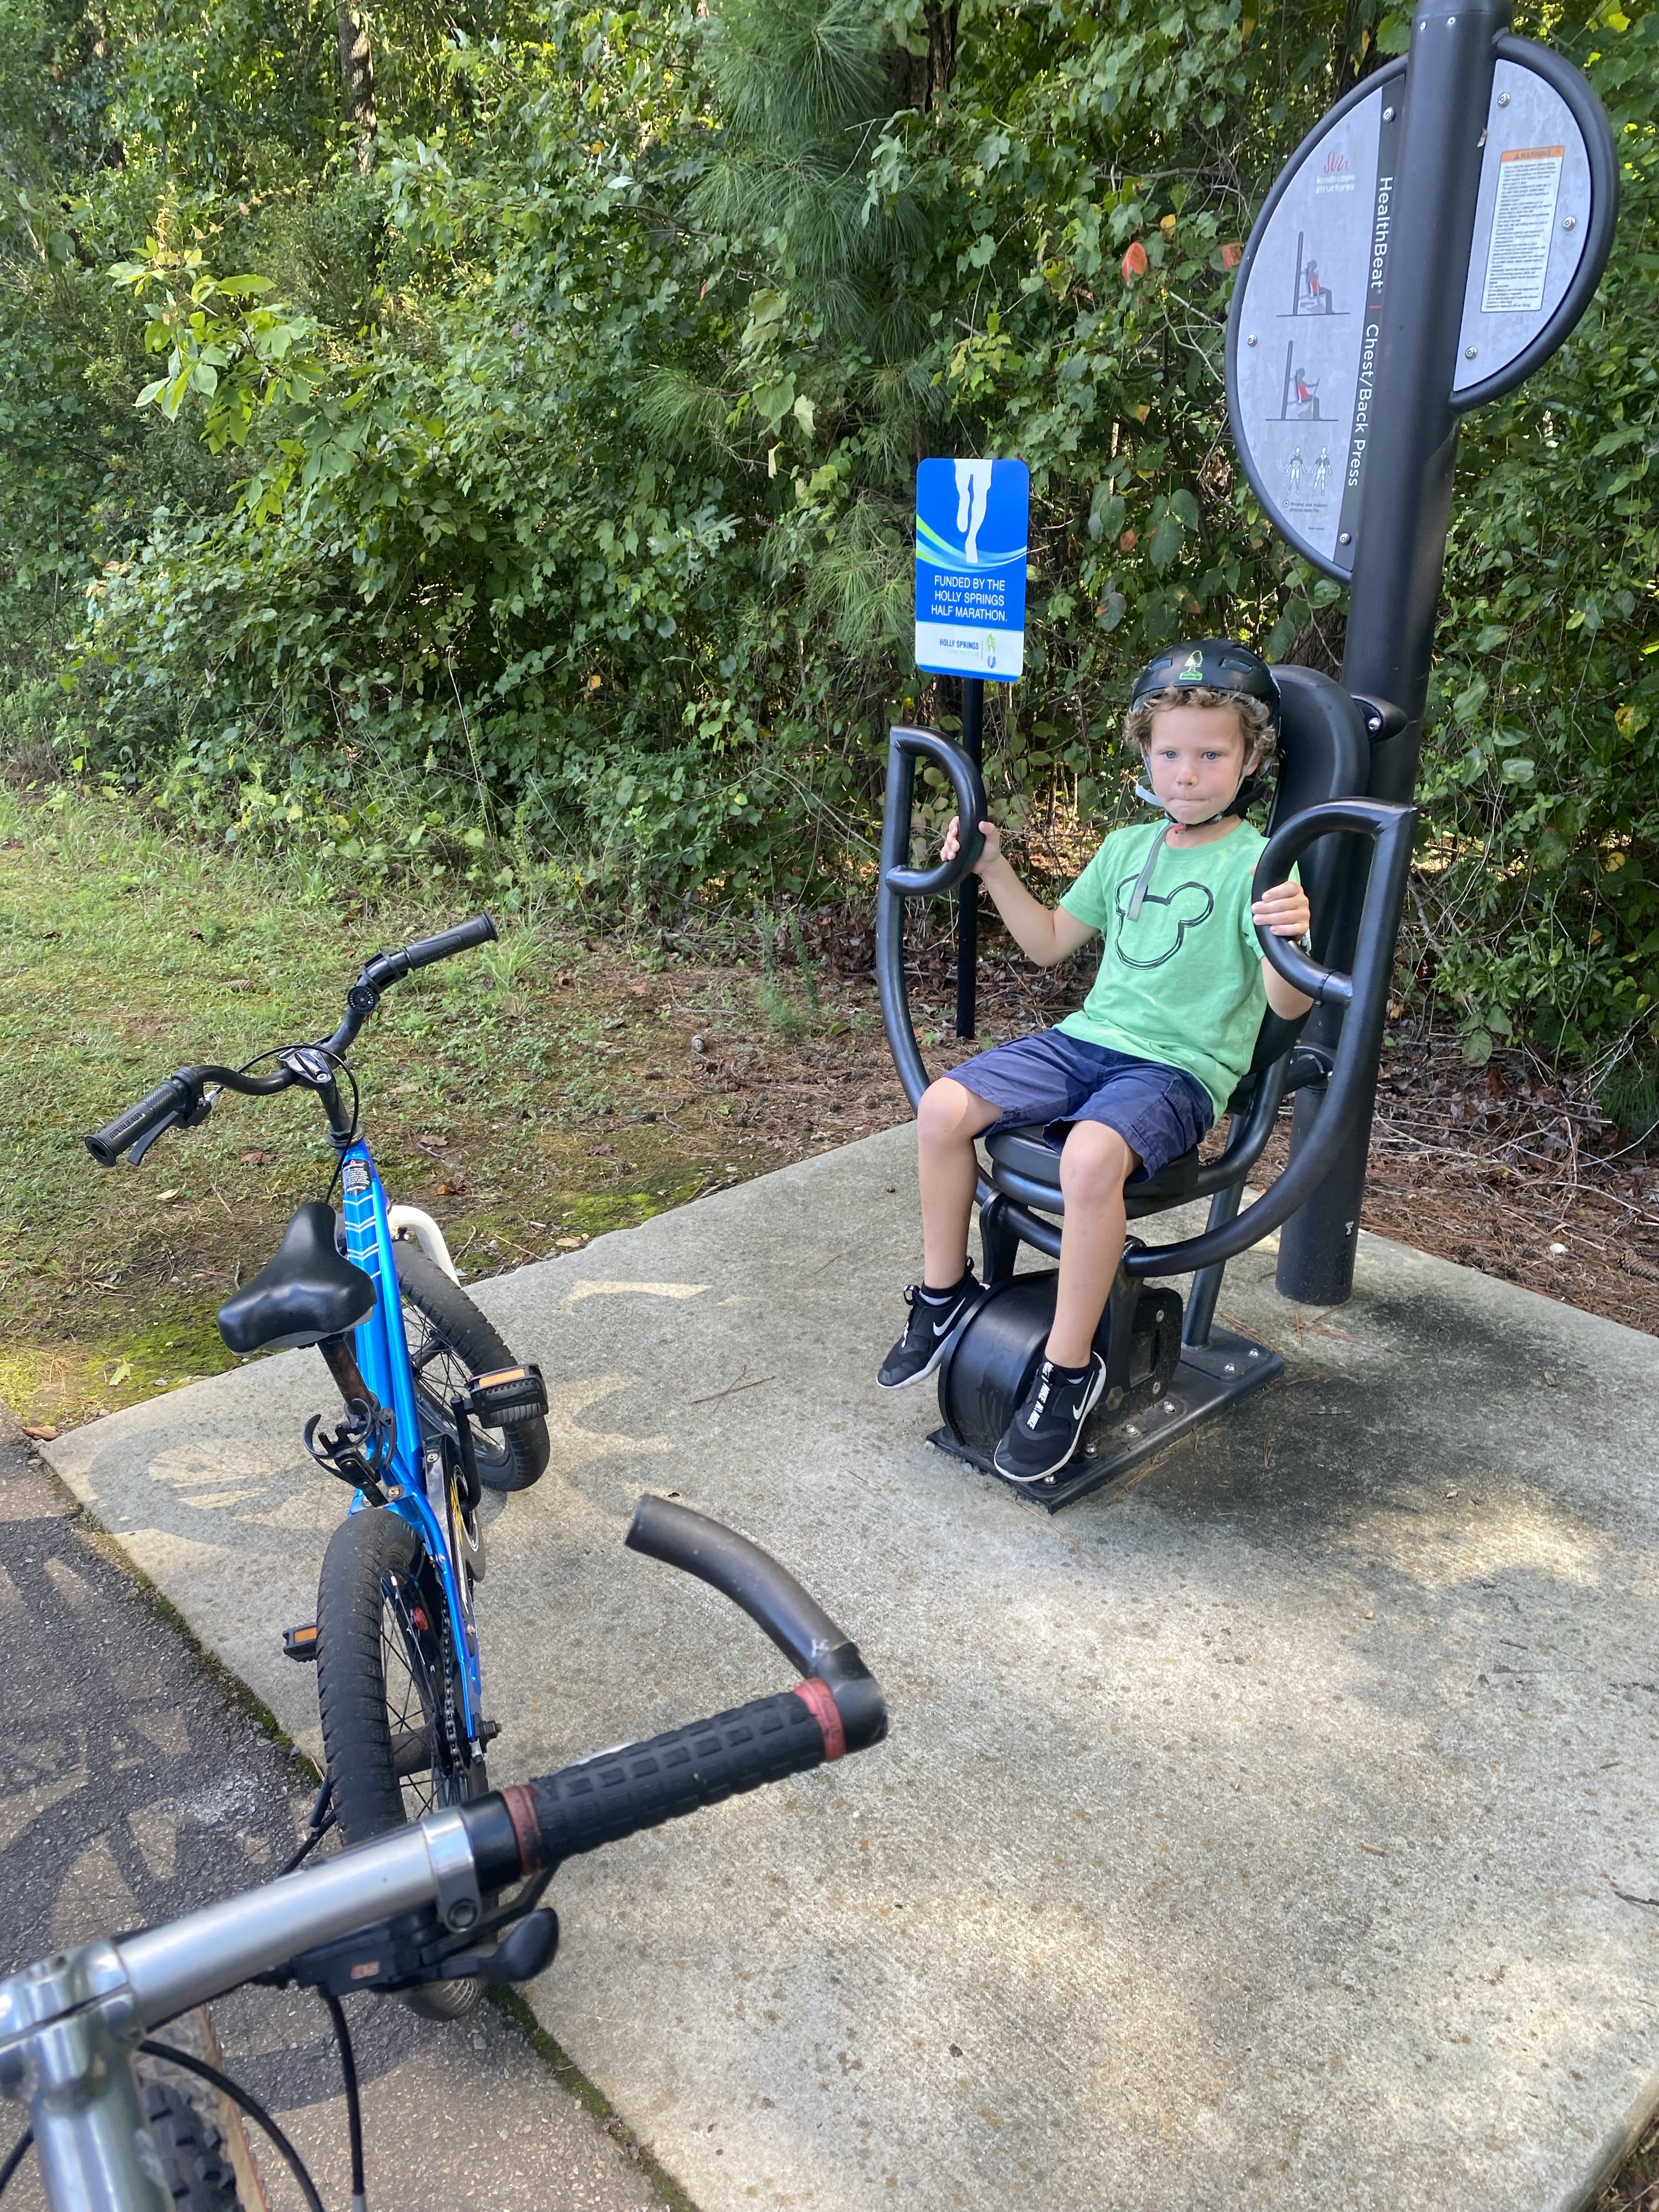
There are various workout stations along the greenway path that the boys love to rush ahead to find and try out. (Pull up bars, core bench, step-up boxes, ect.)


If you’re feeling really adventurous and are biking the greenway path, you can continue past Main Street Square and follow the sidewalk into downtown Holly Springs for shopping, lunch, and ice cream. I did this with all 3 of our sons one Saturday when daddy was out of town on a guys trip. We had the best day and felt like we were exploring somewhere far away from our home. We parked at Bass Lake, biked to Main Street Square (had a snack), biked to Smash Burger, biked to Fresh Homemade Ice cream, biked to Womble Park and played, then biked back on the greenway path to the car. Total mileage was around 8-9 miles. The older two did it with ease while the littlest was along for the ride in the carrier attached to my bike.


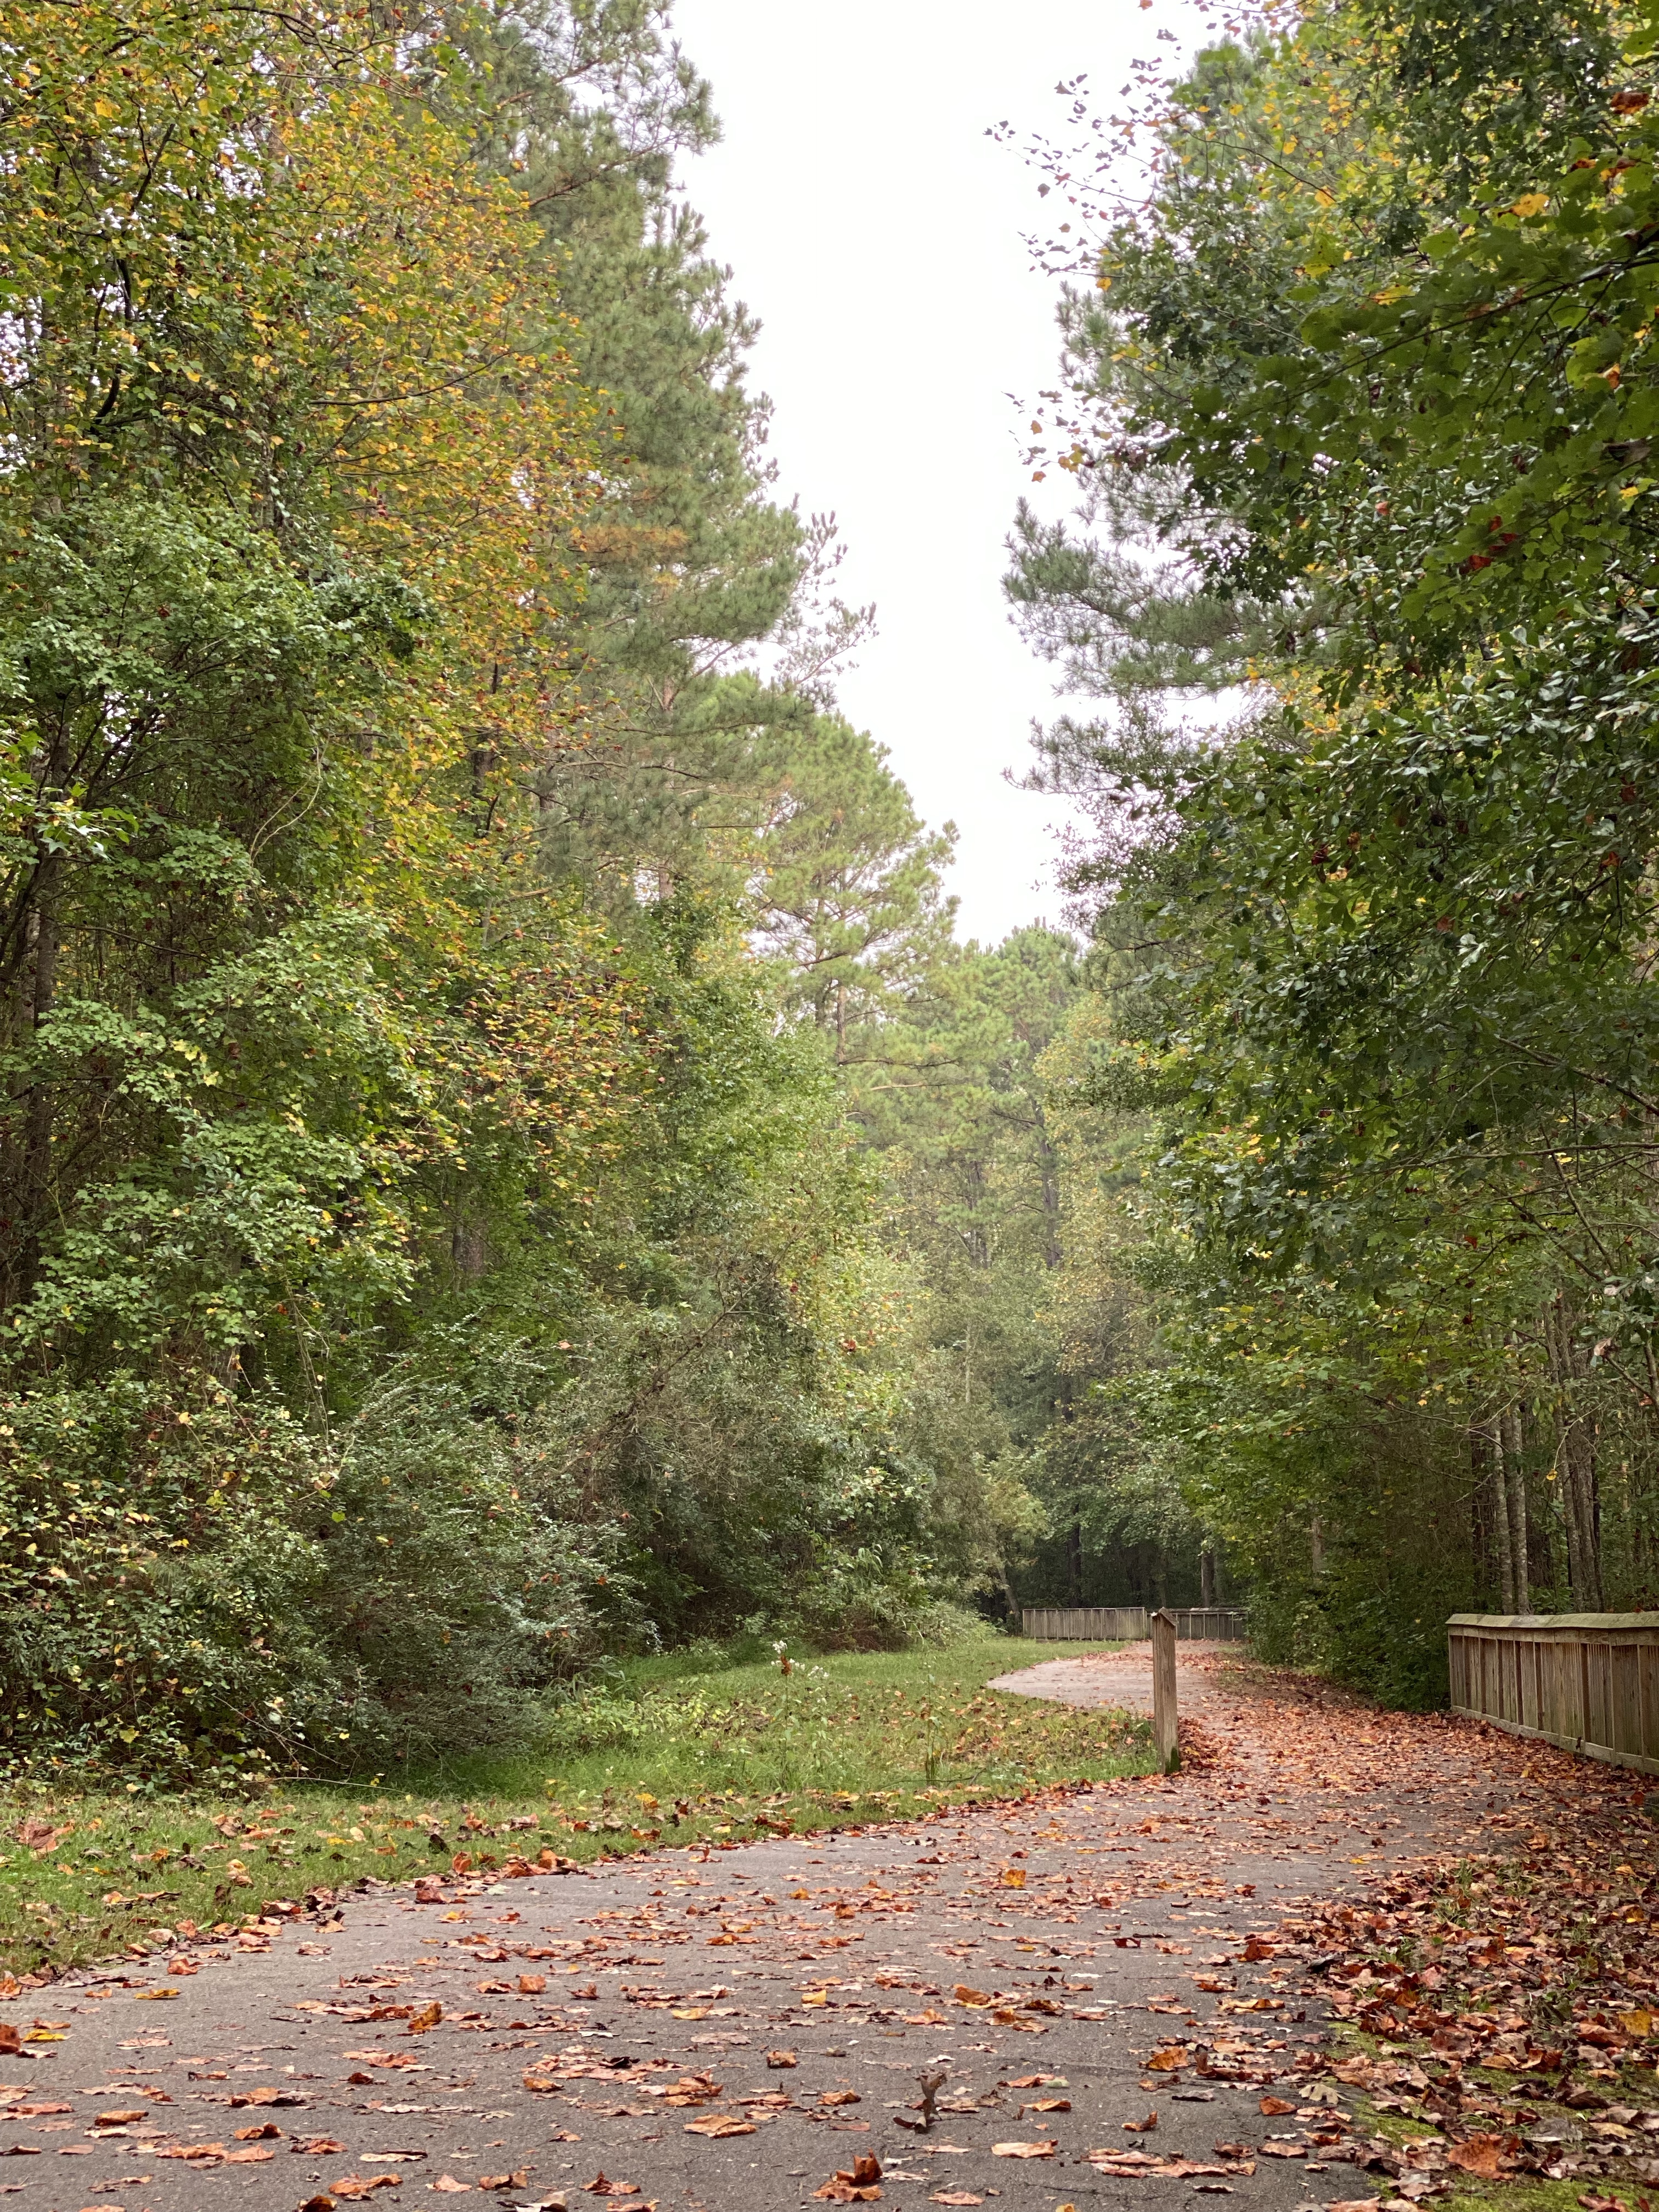
Fuquay Varina Greenway – 🚶♀️ 🏃♀️ 🚴♀️ 🛴
2-6 Miles
This is a mostly flat and paved path with a few gentle hills. Since it’s an out-and-back trail, you can easily adjust the distance depending on where you park and how far you choose to go along the greenway.
If you are to park in the main lot off of Hwy 55 in Fuquay Varina, you can follow the path all the way to the main lake which is 1 mile. There are benches and two swings at this point. If you continue past the lake and follow the pathway to the right, you will reach the High School. Continue around the school to the connecting sidewalk. Circling back around the school to the greenway path is 4 miles back to the parking lot. You can also park at the lot by ClubWorx gym but it will require you to cross Hwy 55 via the crosswalk. Parking here and following the path all the way around the high school will be 6 miles in distance.


Our boys love to take their scooters or bikes for this outing. Our youngest will often ride his balance bike but I still bring the stroller from time to time if I know he will teeter out and need to rest. Isn’t this how most walks go with toddlers? You end up carrying the gear of the tired little ones.
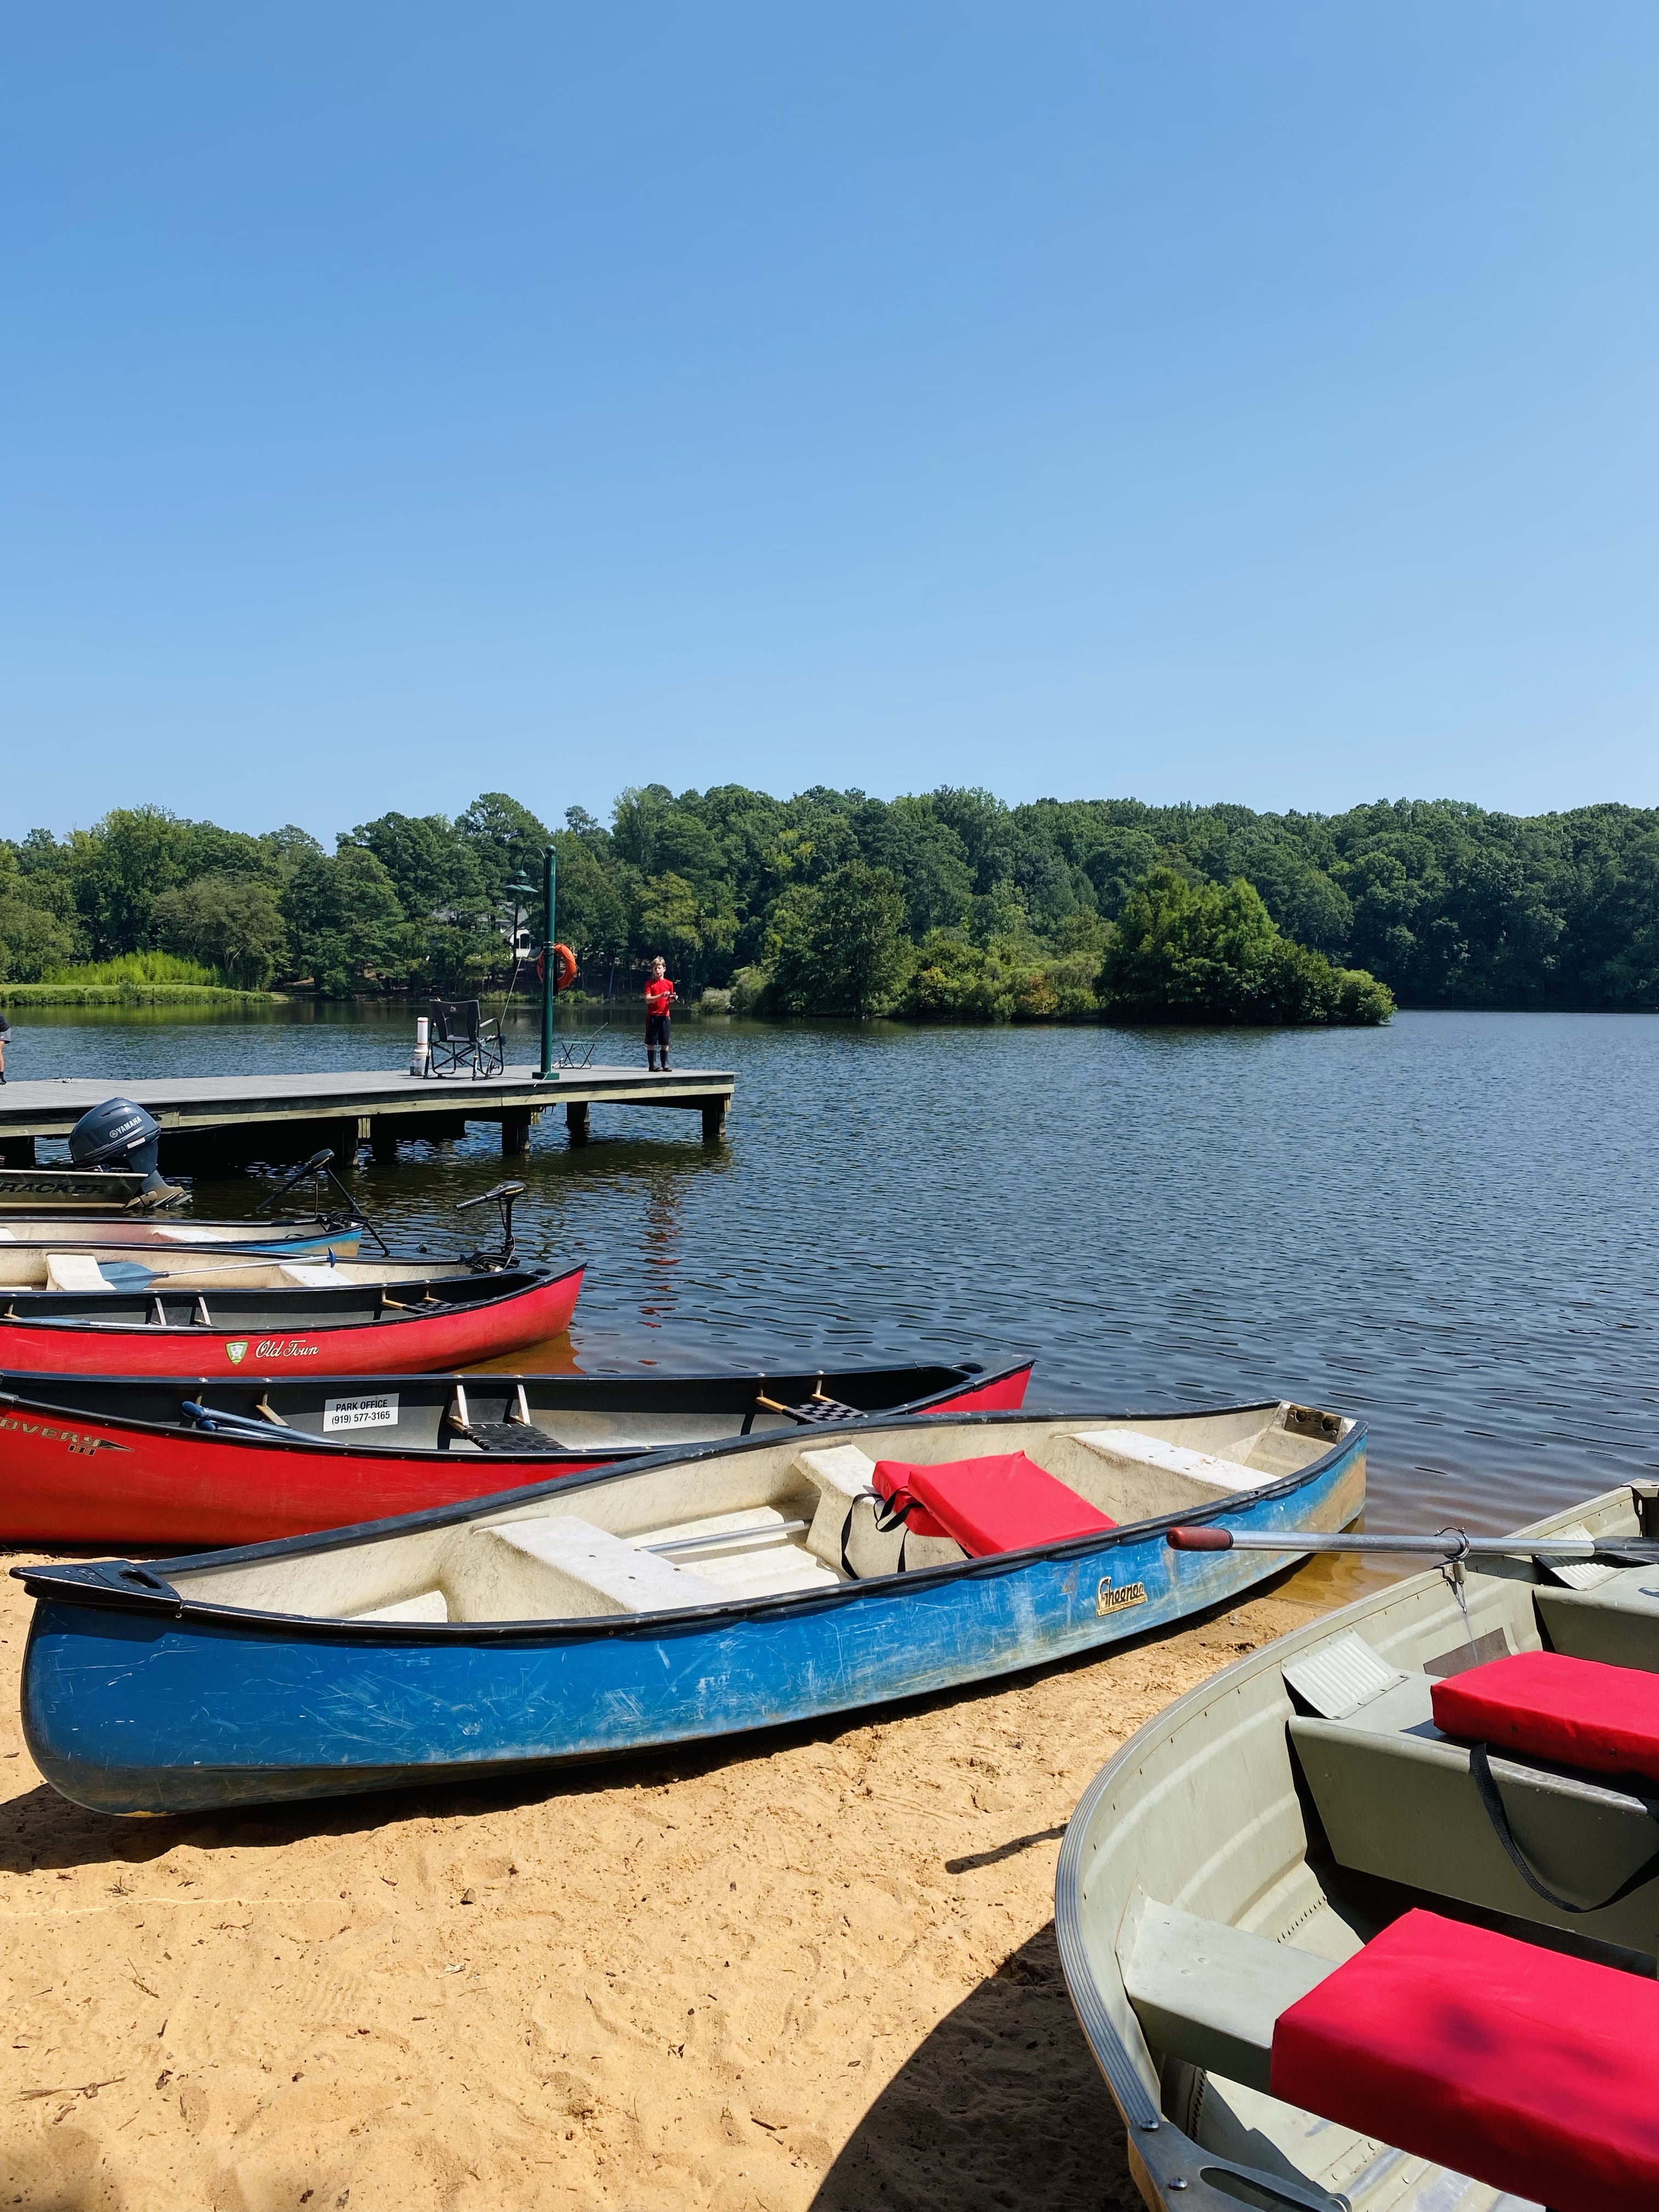
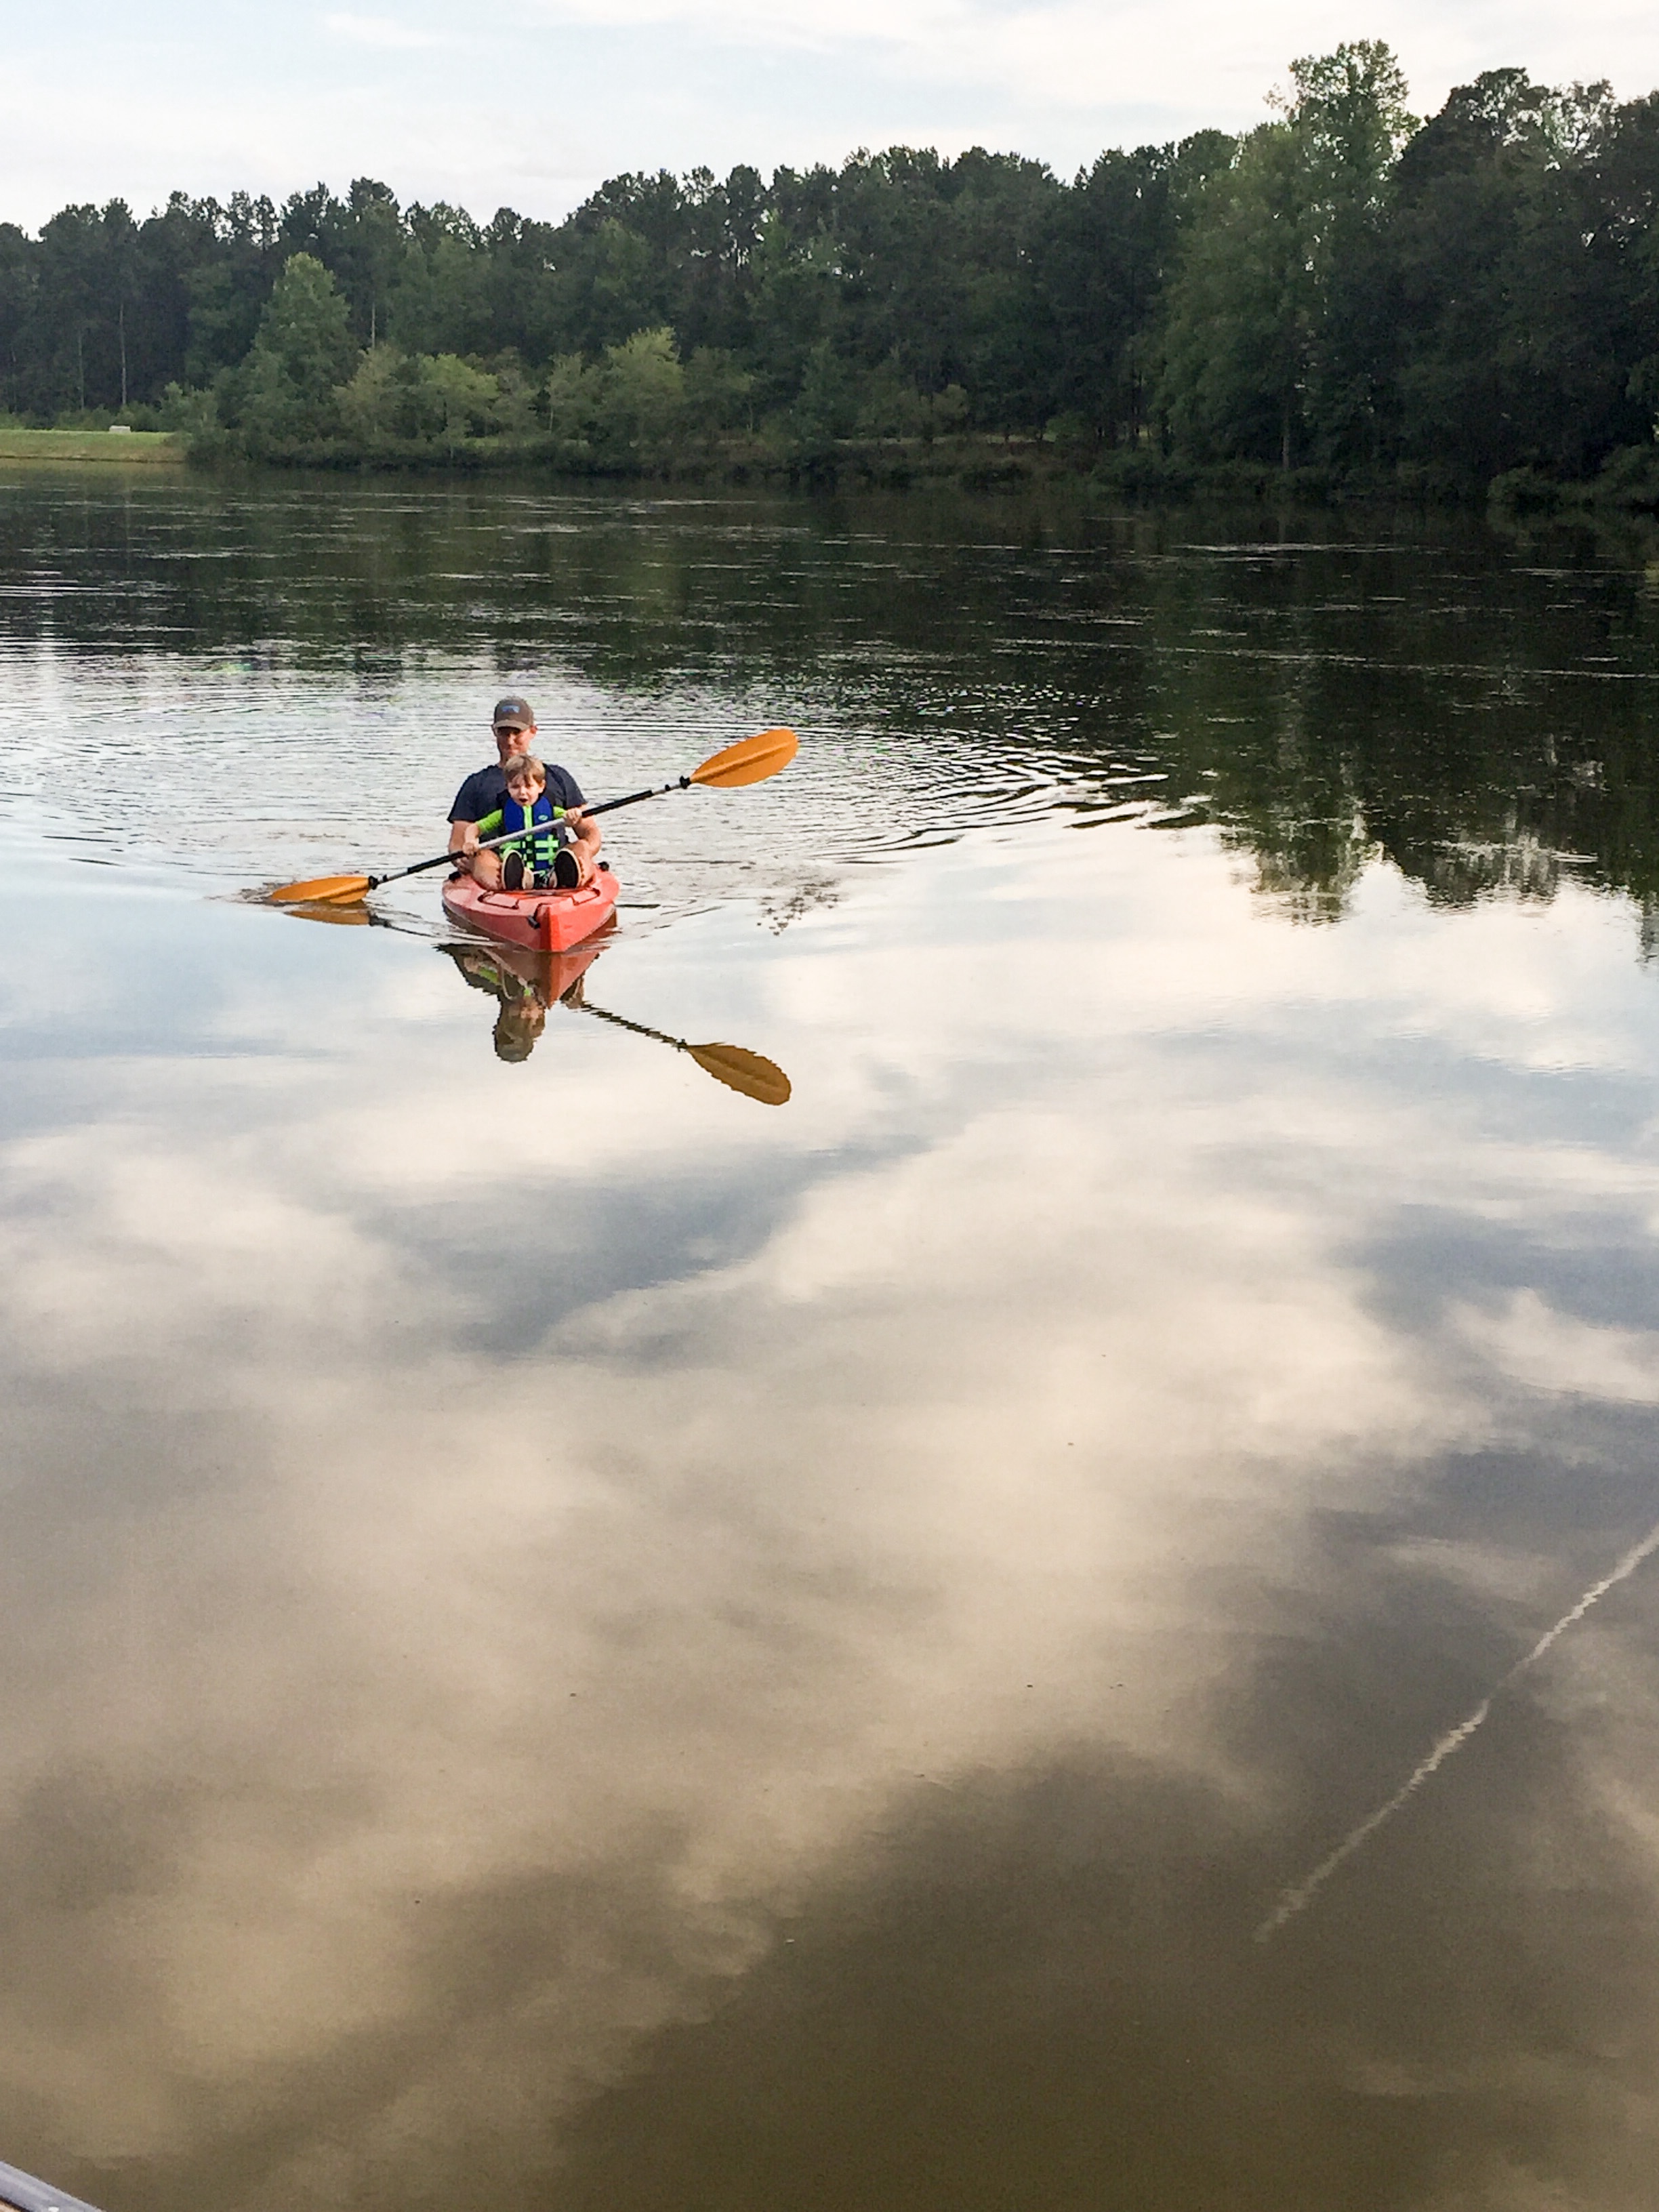
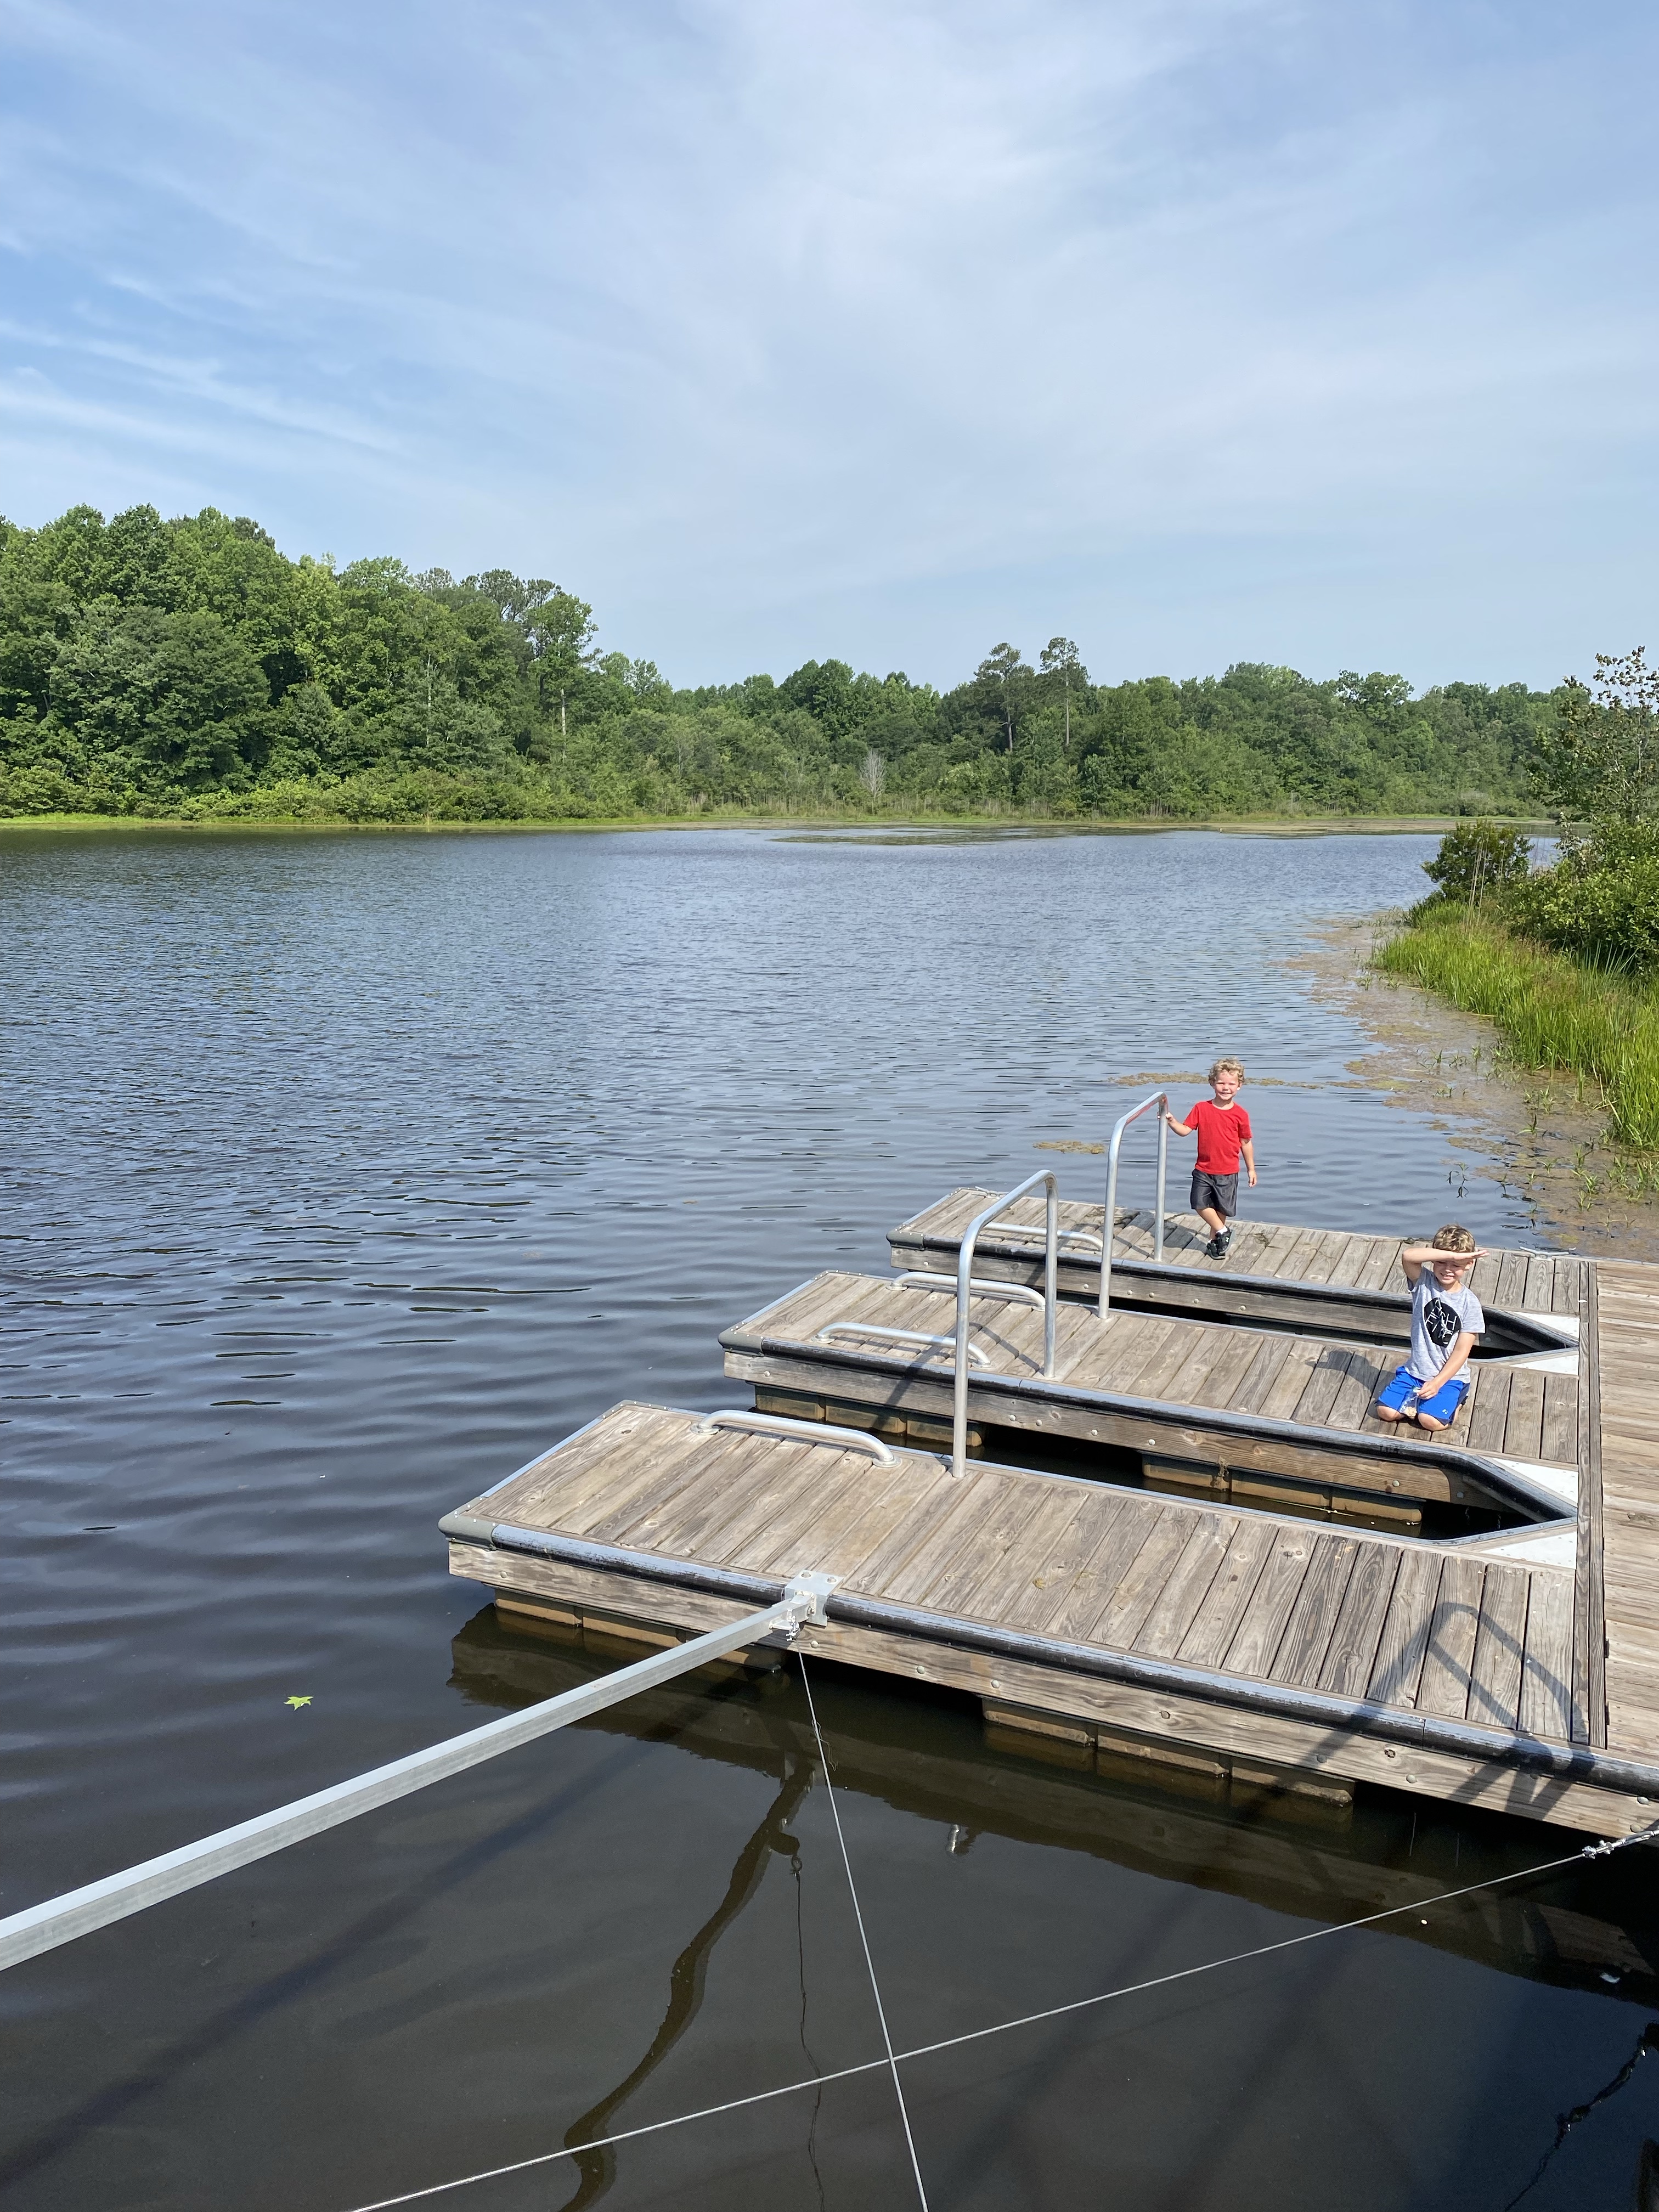
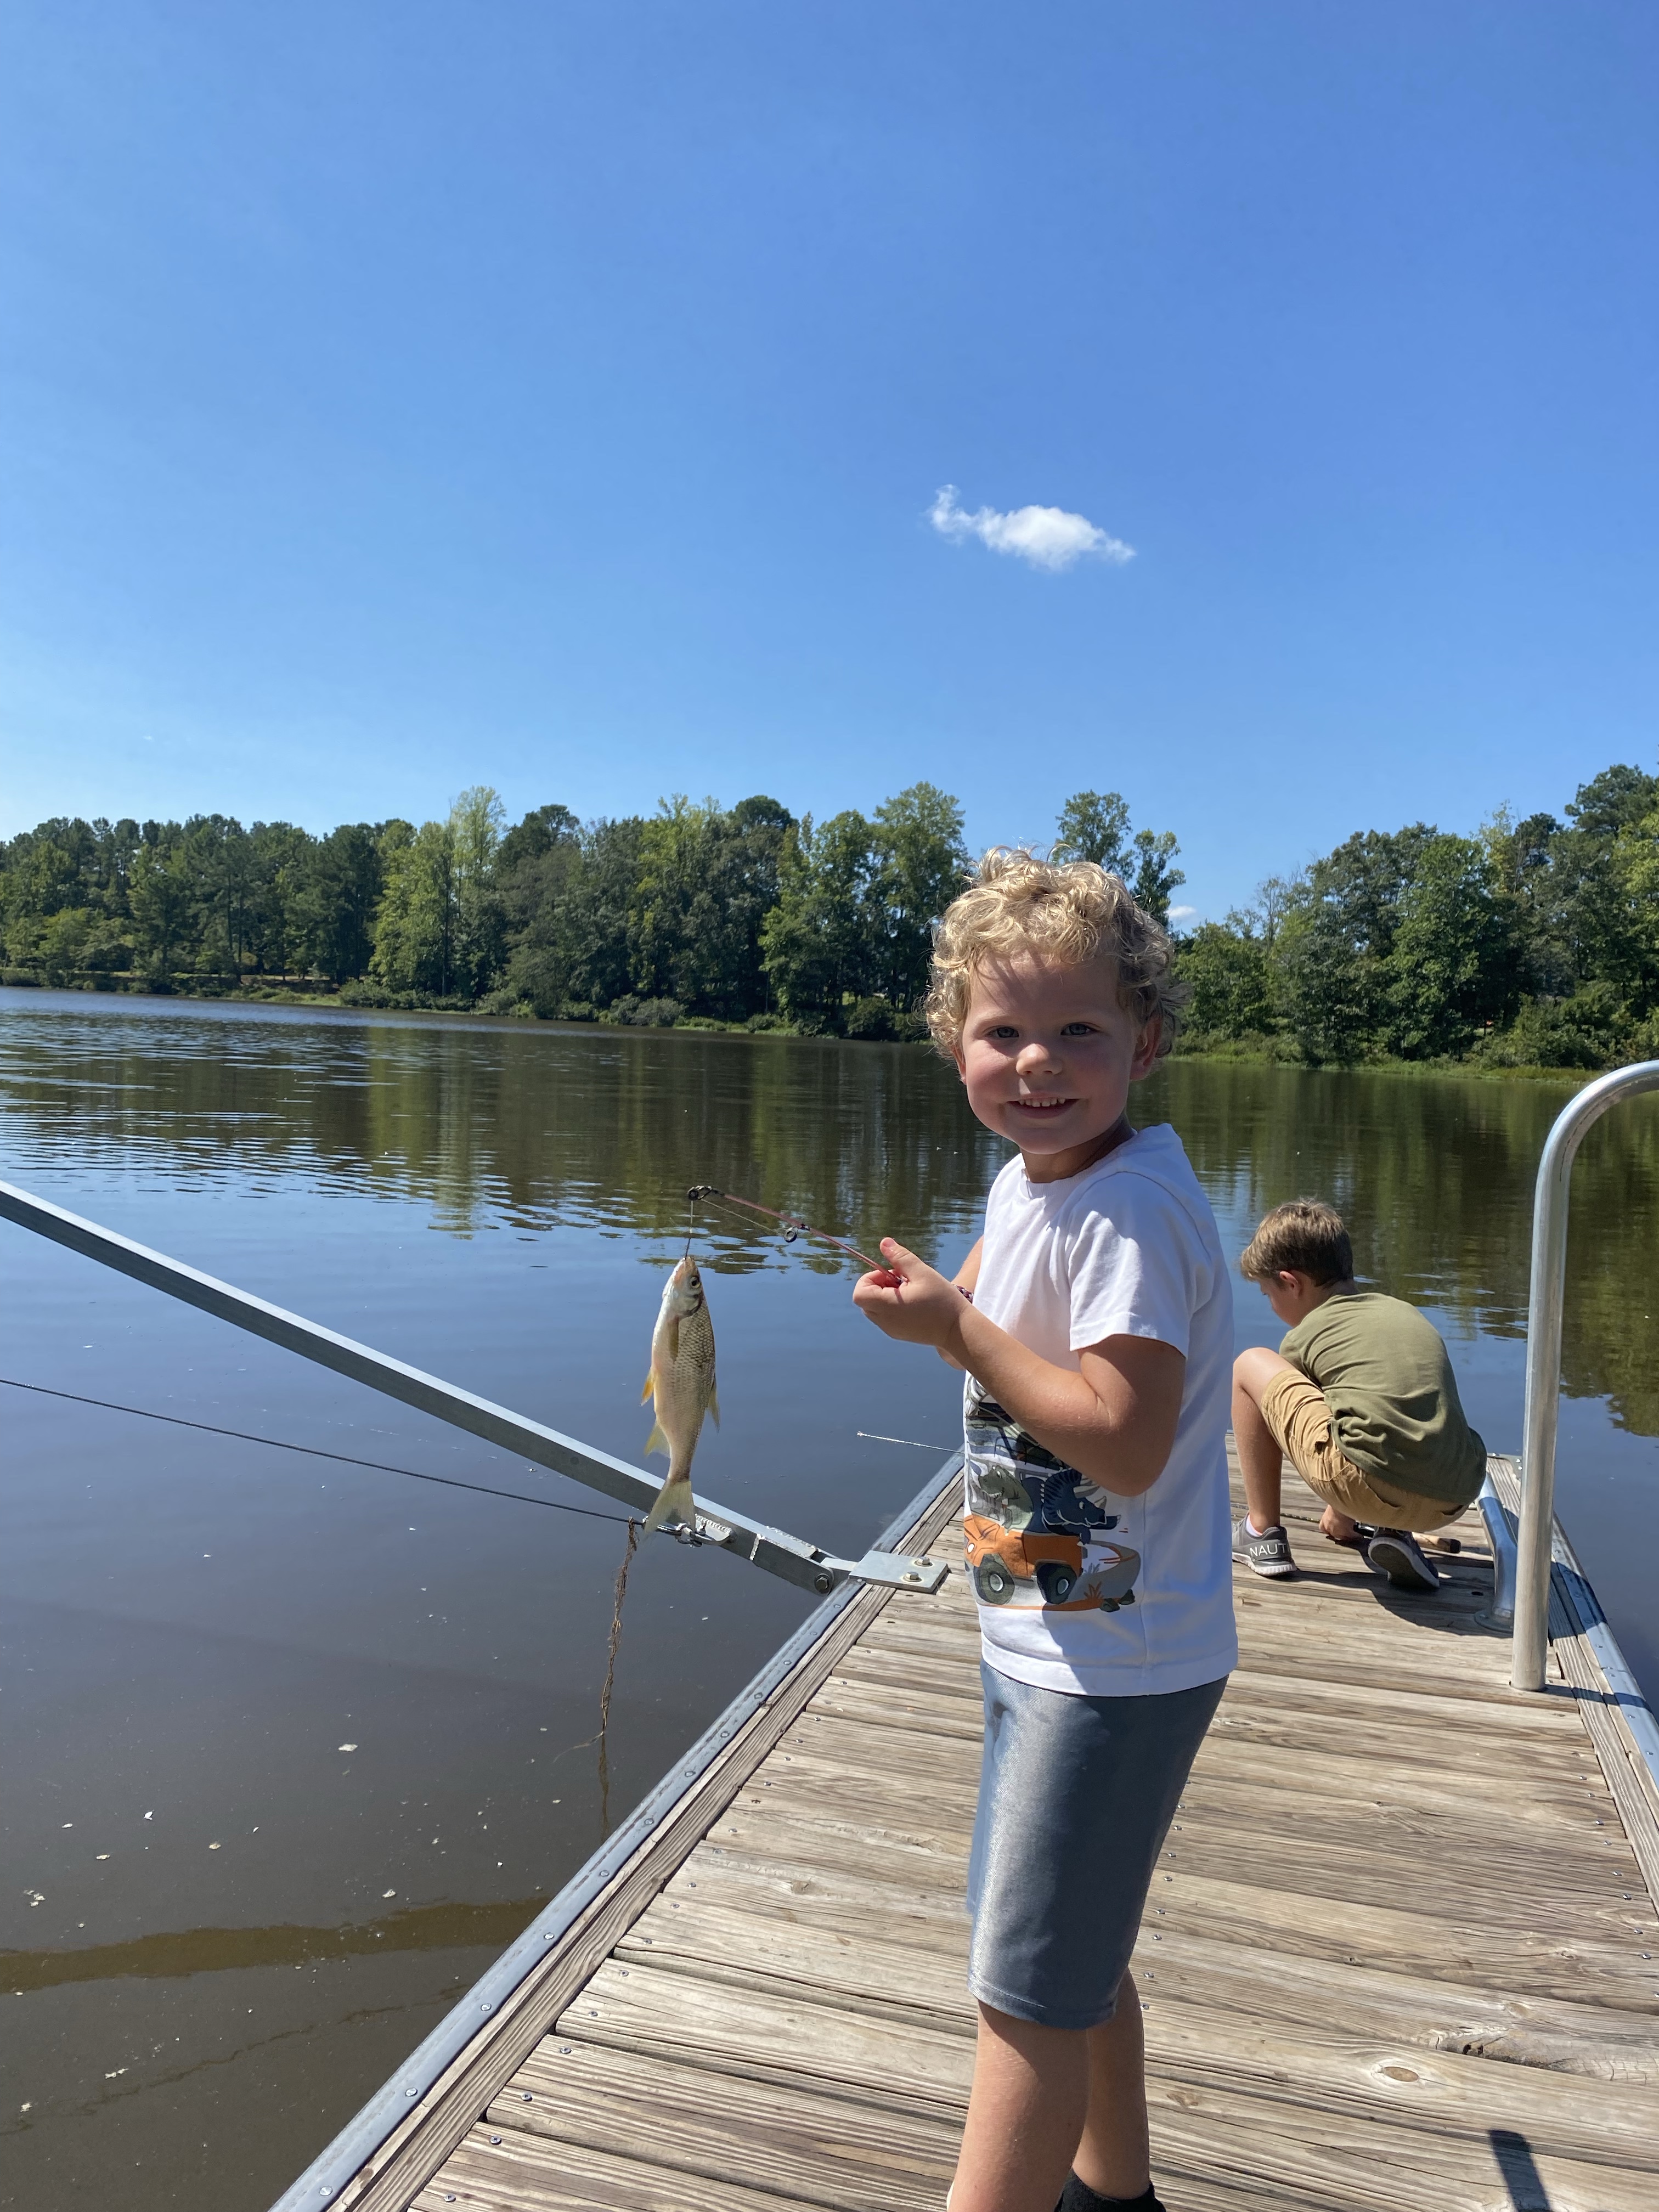
The boys sometimes fish at the kayak launch that is located on the lake.
Raven Rock State Park – 🚶♀️ 🏃♀️
You can choose trails of varying lengths, depending on how far you’d like to hike. Our favorites, which are probably the most popular, offer scenic views and unique rest spots along the way. We usually stick to the Little Creek Loop Trail and Raven Rock Loop Trail, which conveniently connect for a seamless hike.
To access the trailhead for Little Creek Loop Trail, park at the first lot on the right after you enter the park entrance. There, you will see an oversized picnic shelter. The trailhead is just to the right of it.
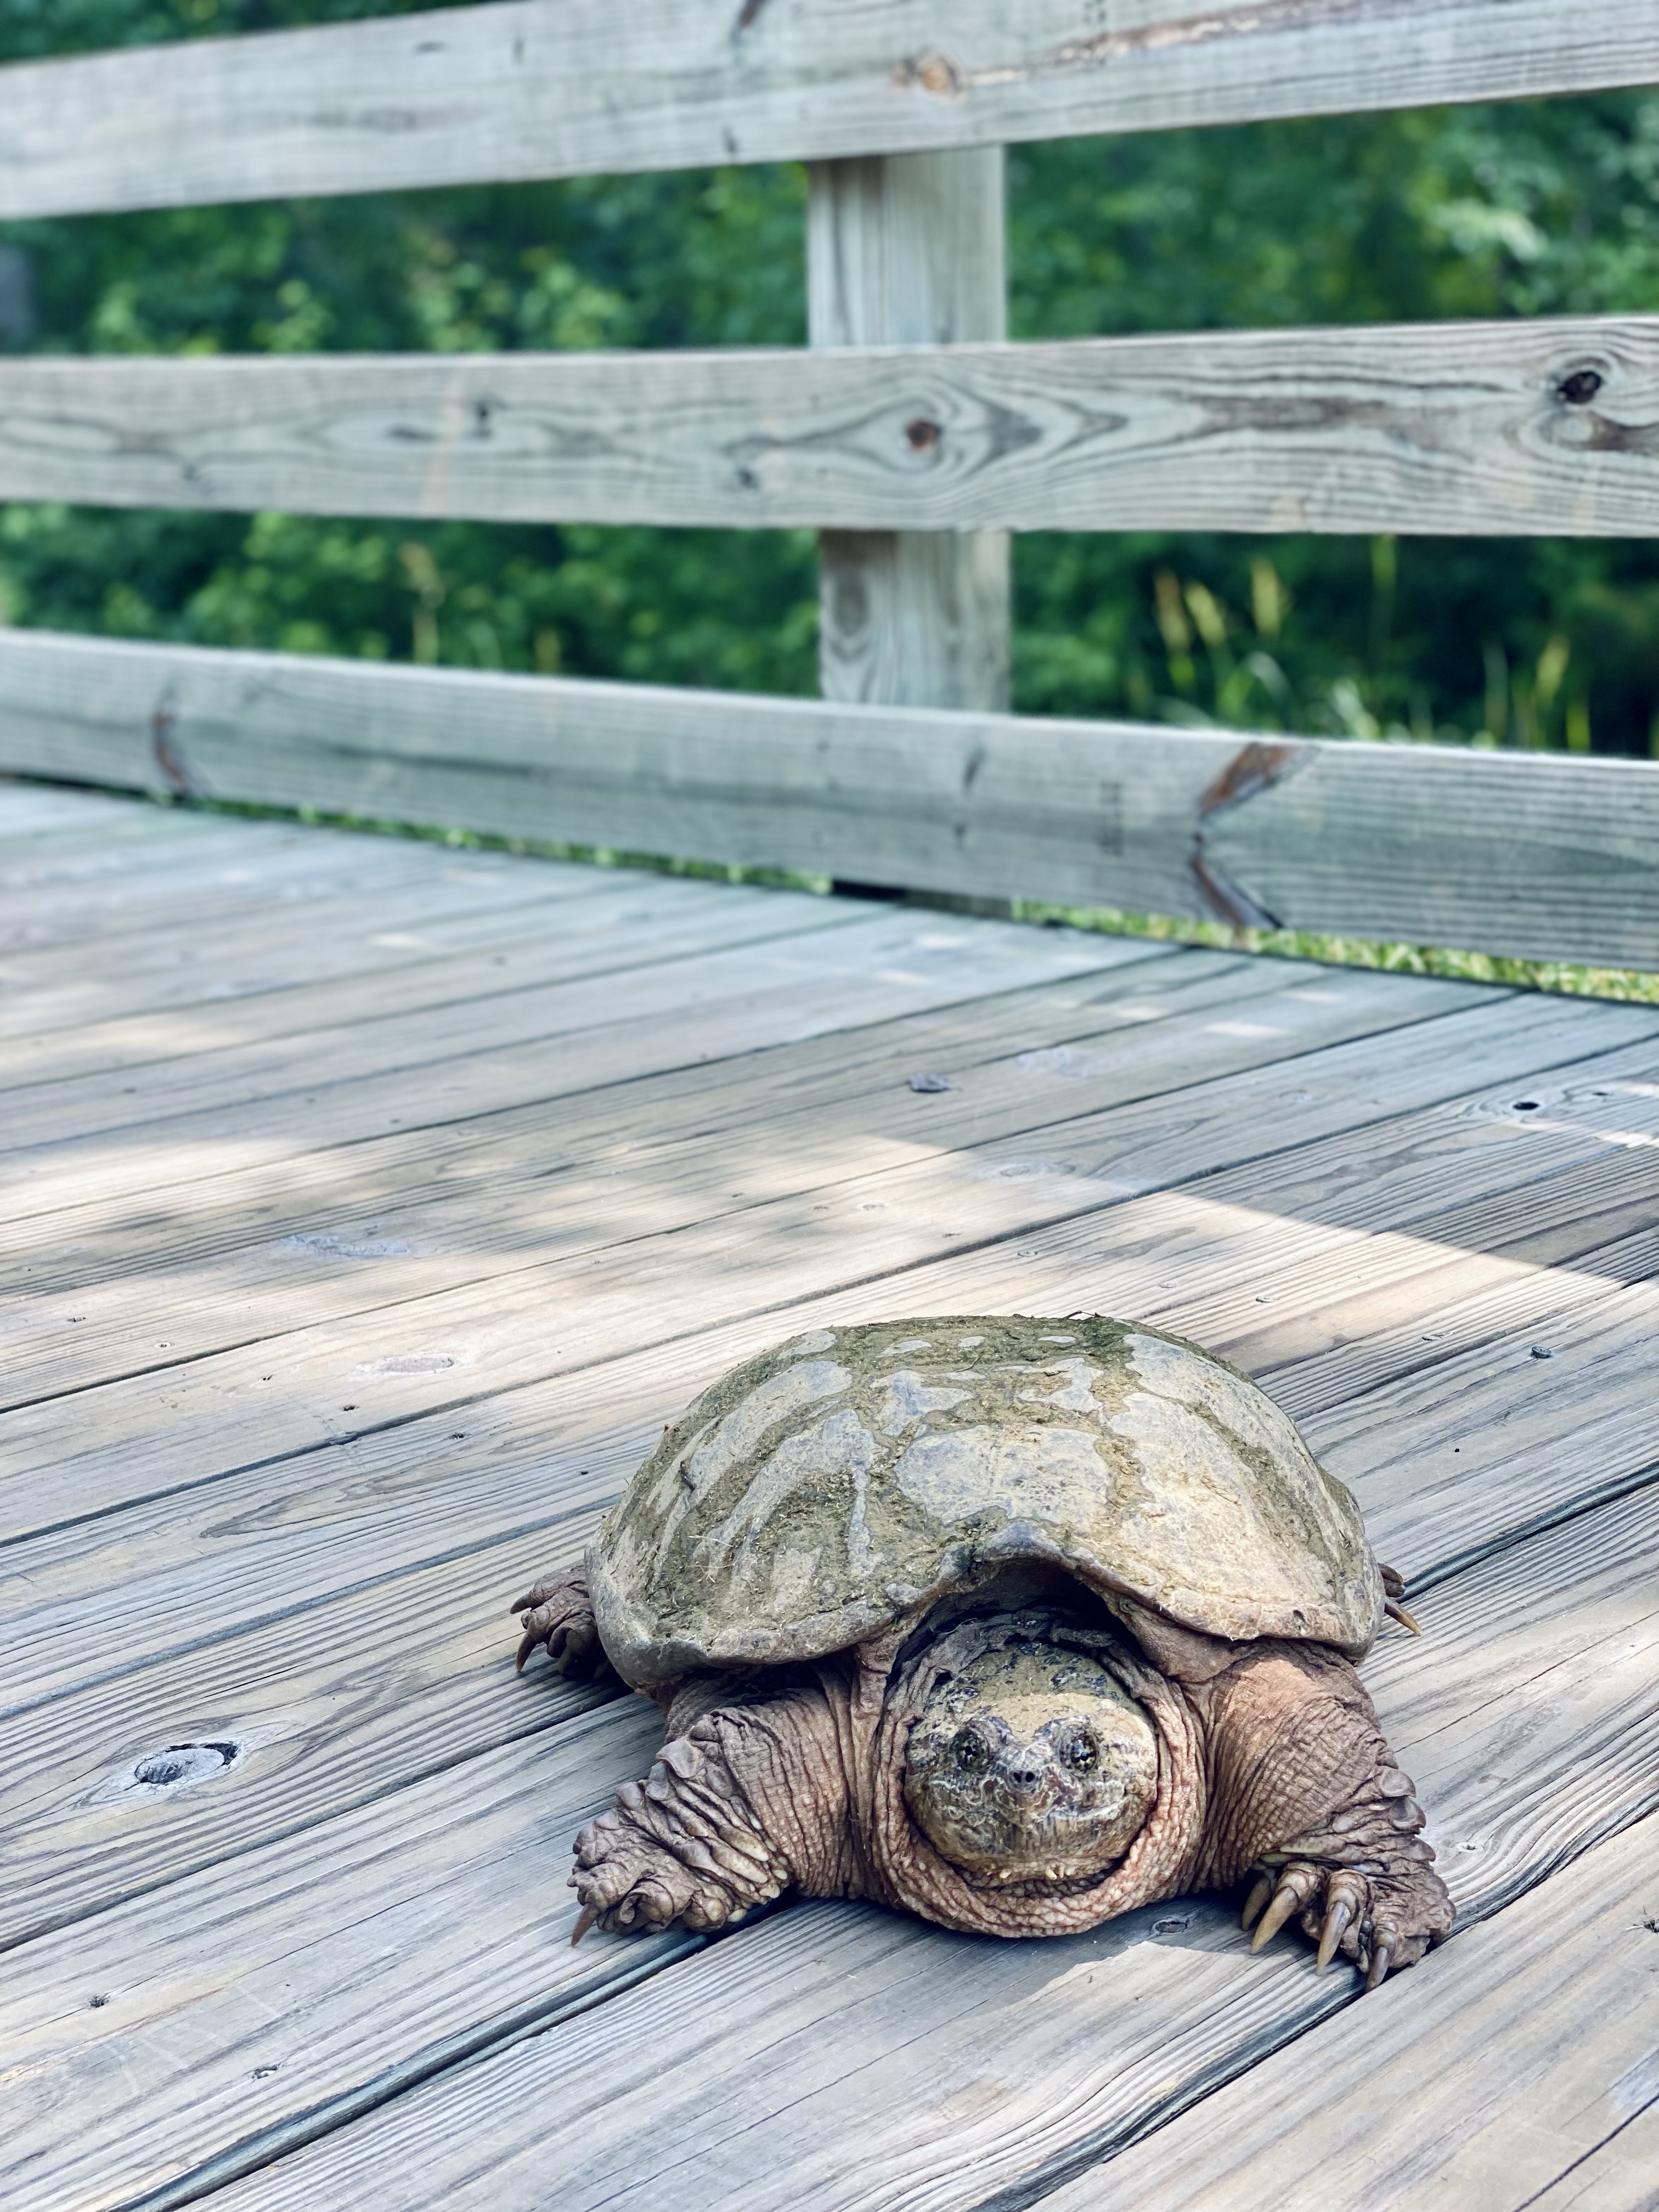
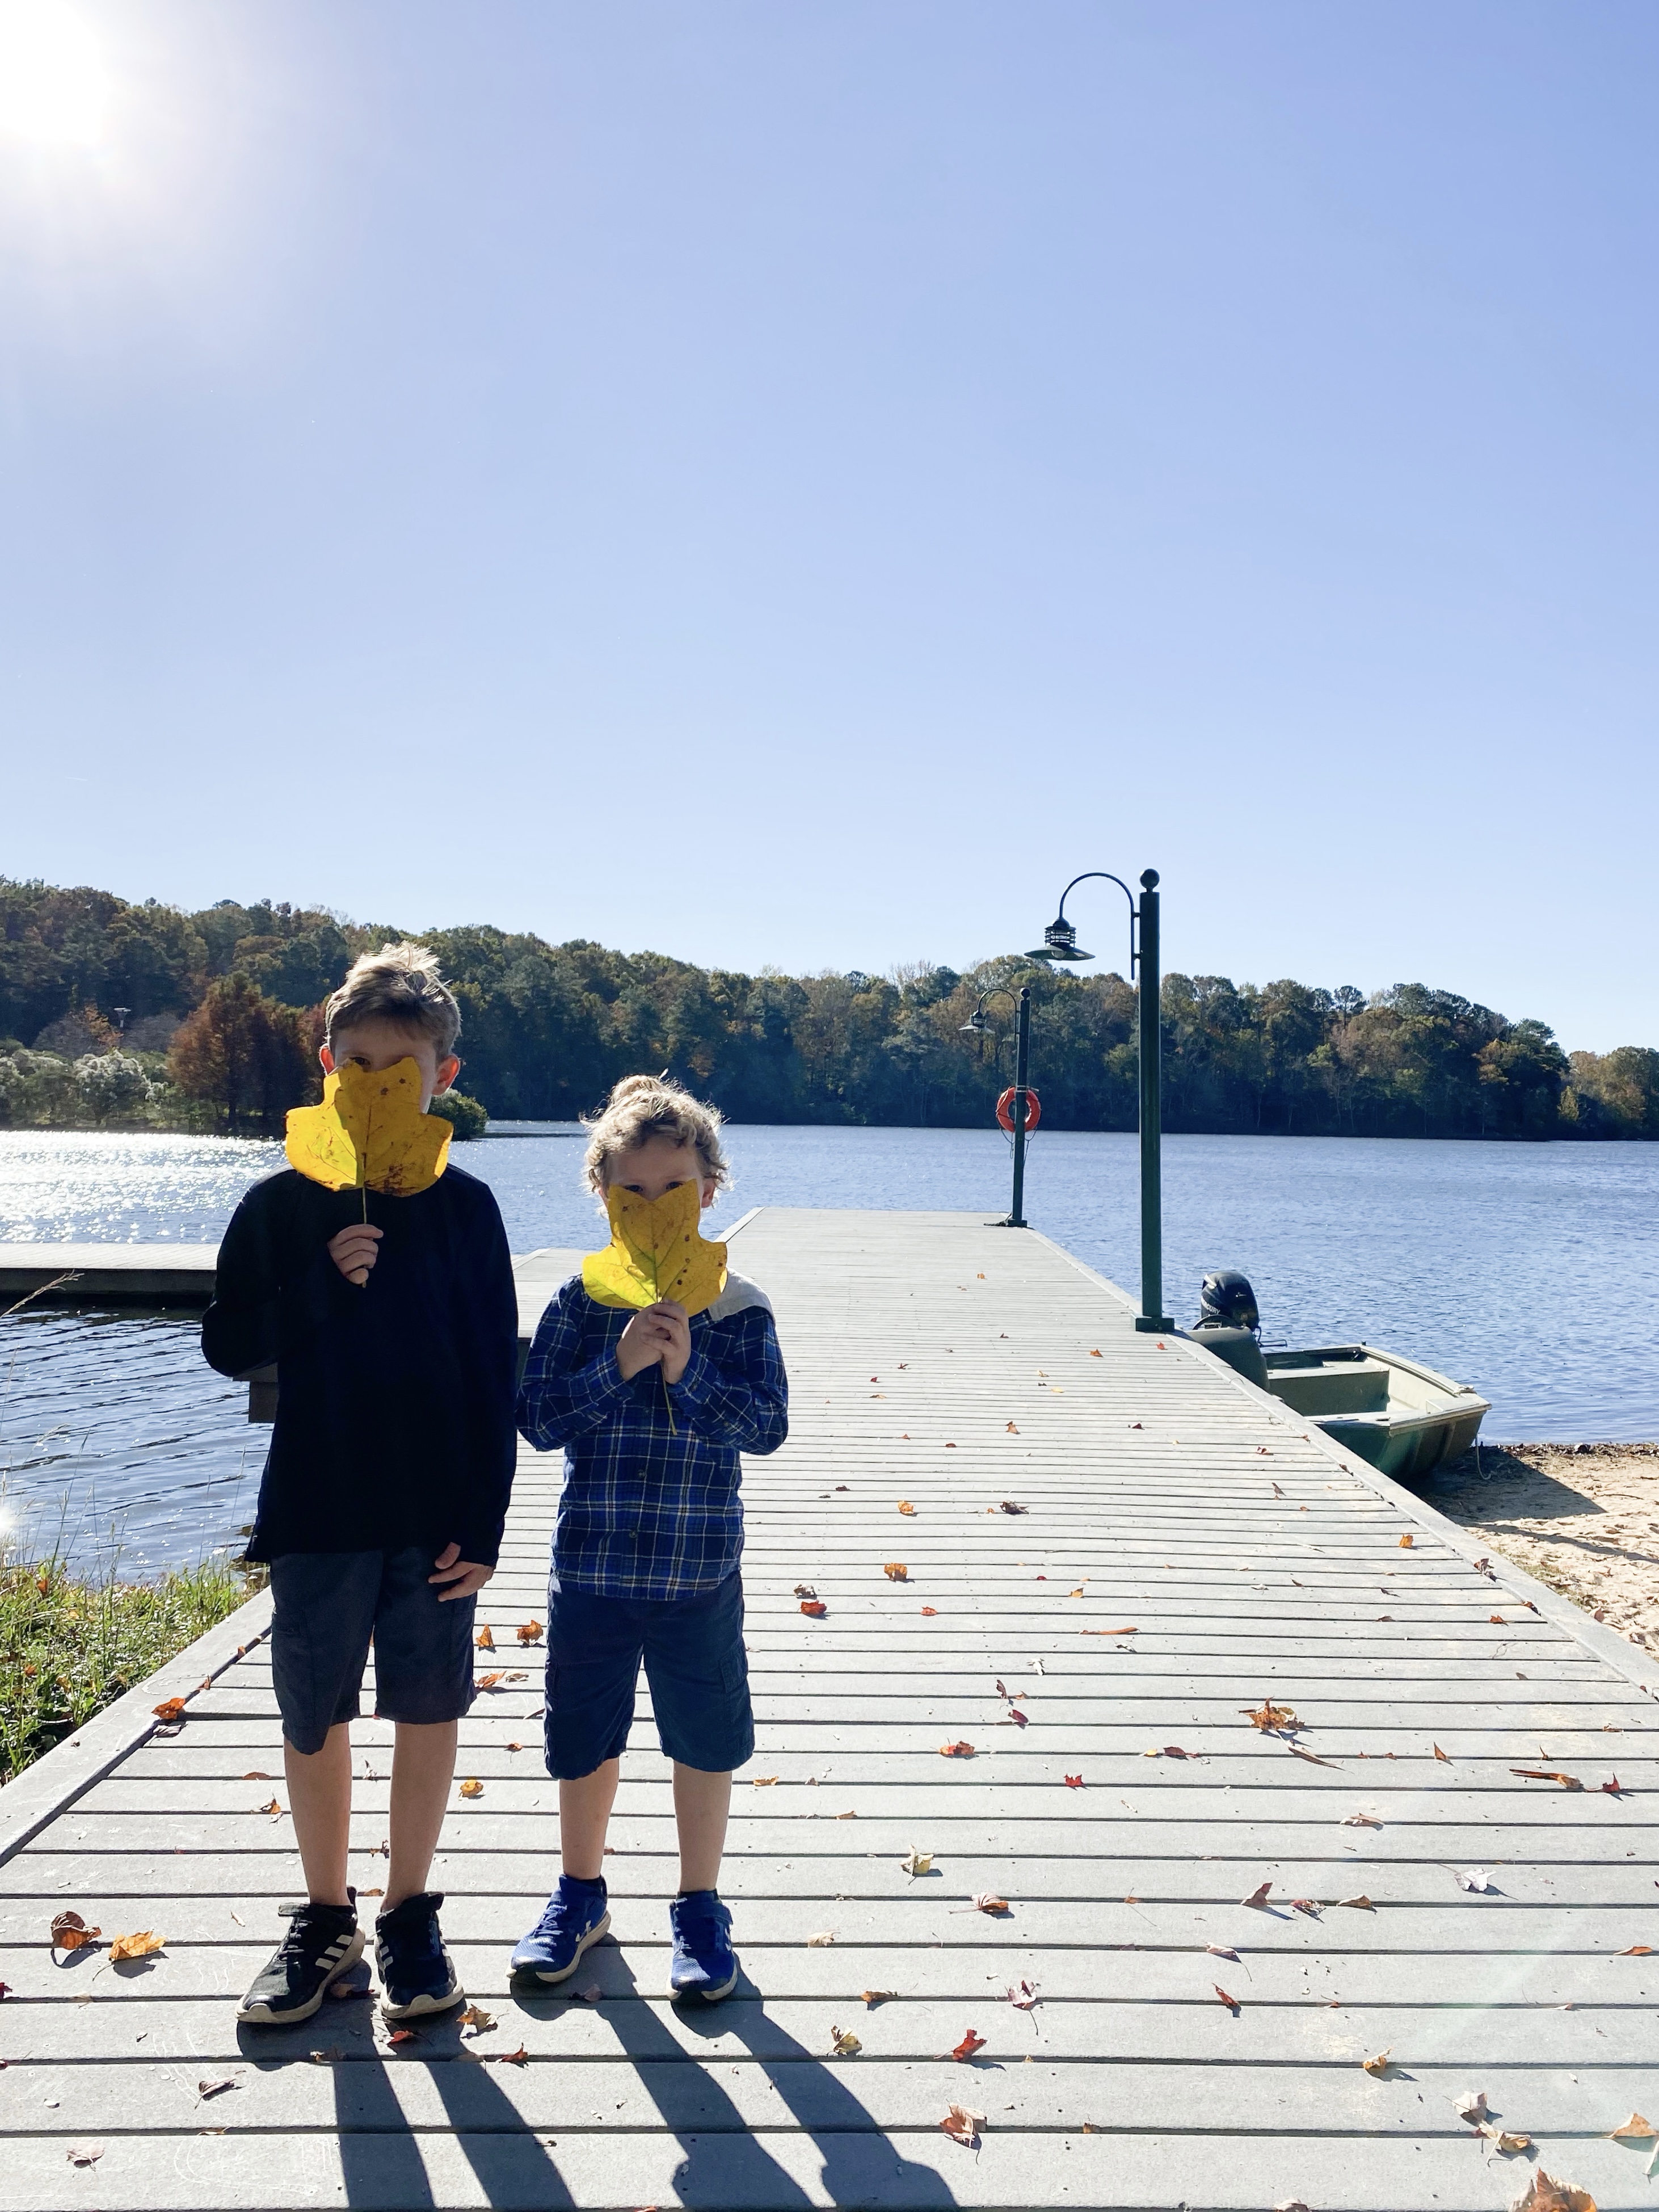
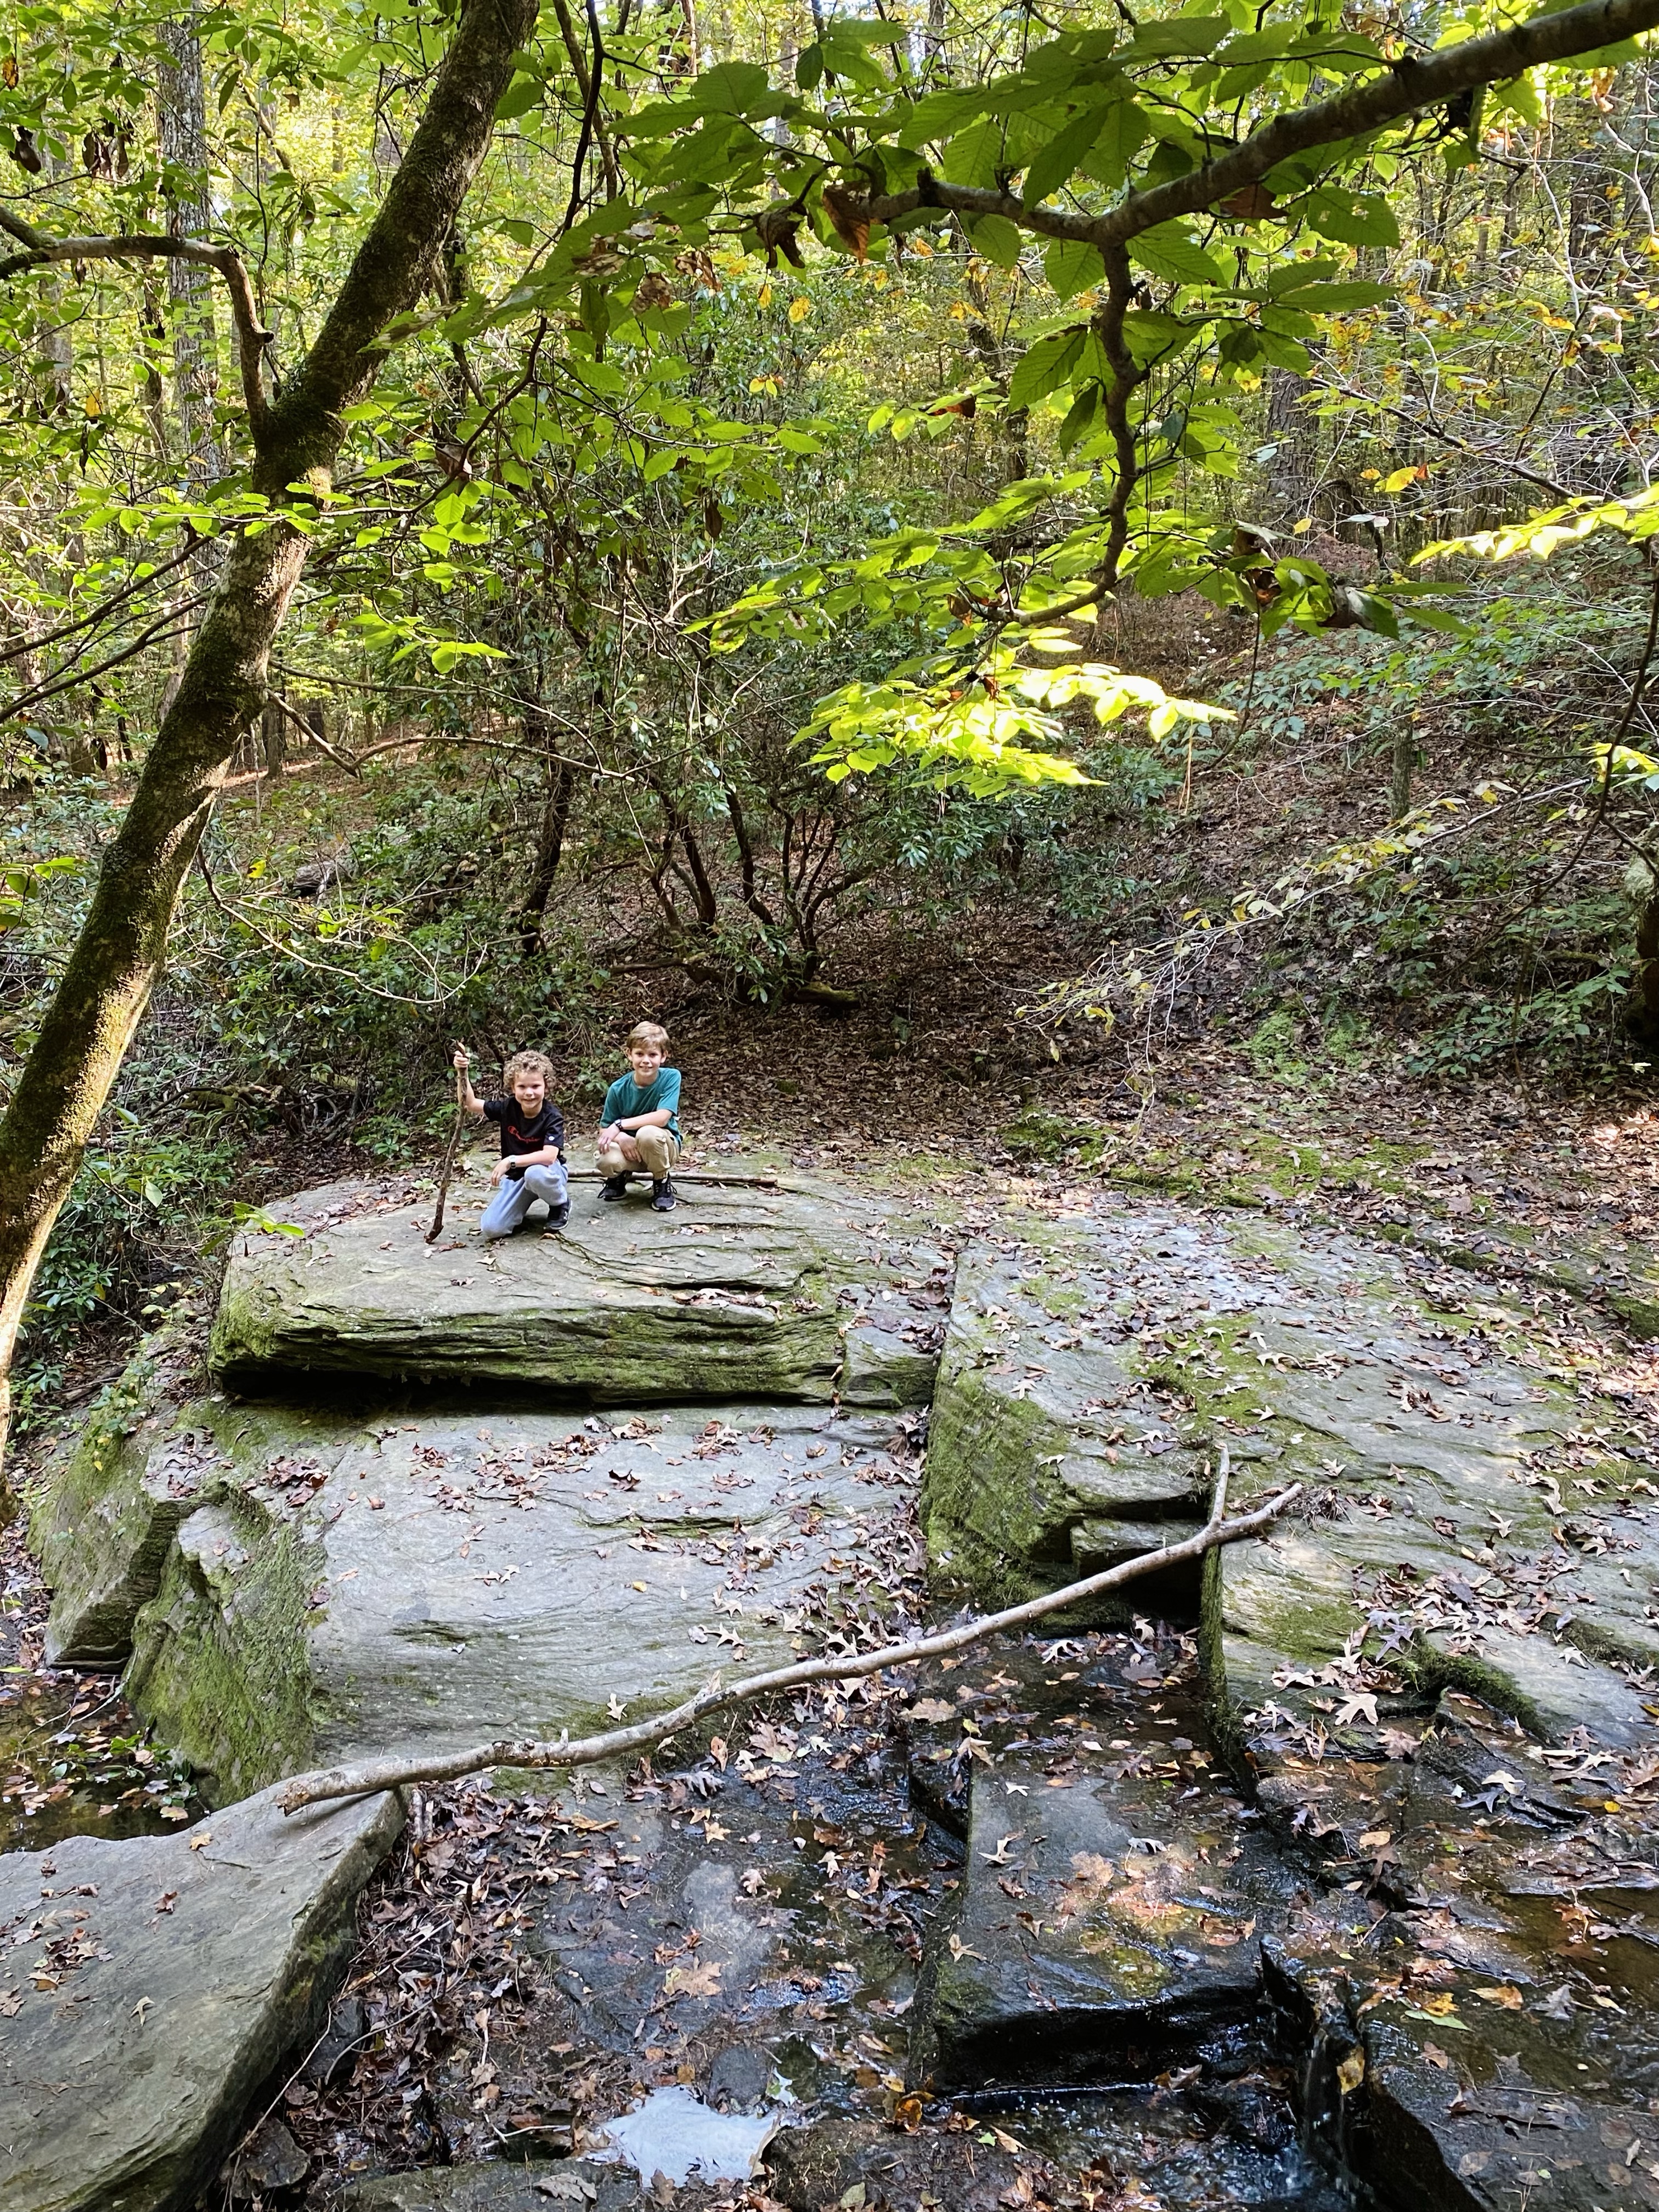
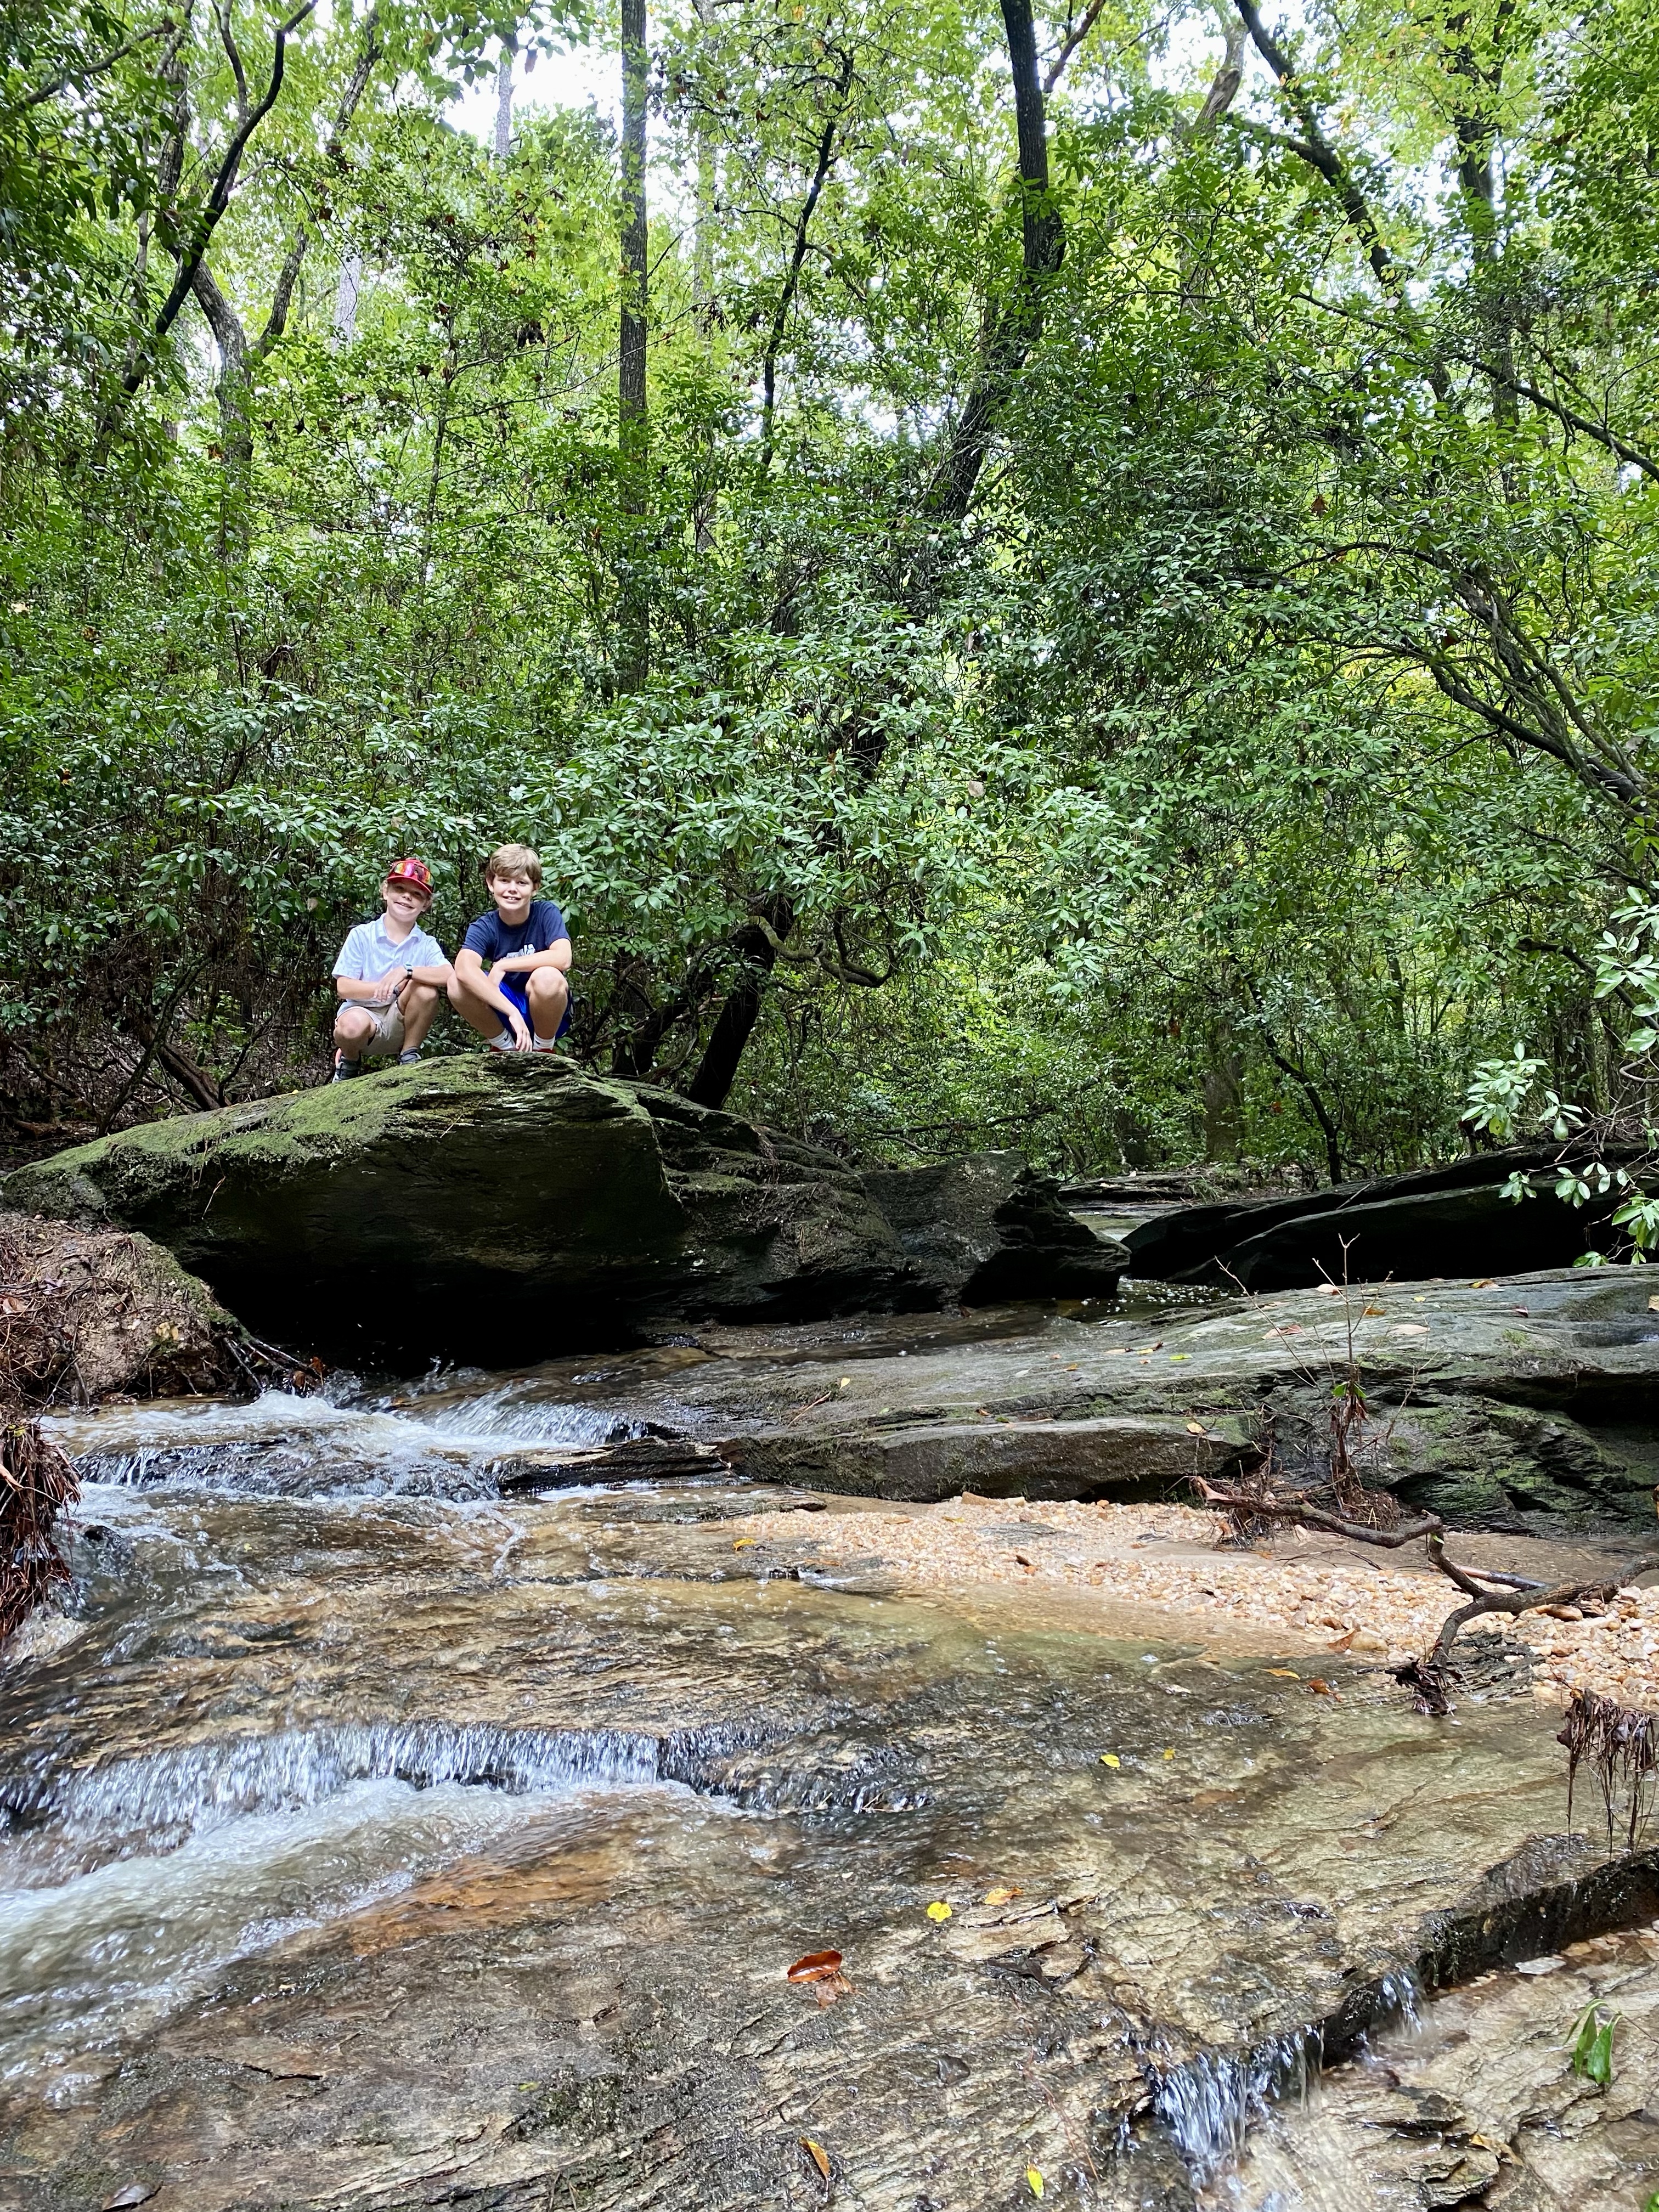
The boys love Little Creek Loop as it follows alongside the creek with several pathways that run off the main trail that connect to the creek which they explore. They enjoy jumping onto the larger boulders that are in some areas, skipping rocks, and looking for crayfish.
(Insert picture of boys on the rocks at the creek)
Don’t miss out on the stairs that lead down to the banks of the Cape Fear River. The rock walls and exposed roots of the trees are worth exploring.
Explore the various trails at Raven Rock here.


Hilltop Needmore Town Park – 🚶♀️ 🏃♀️ 🚴♀️ 🛴
This was a former golf course within a neighborhood community. The trails are paved and were once the pathway for golf carts. There are some steeper hills which can pose to be more challenging for the littles on wheels. It’s never stopped our boys from trying to make it to the top peddeling. Going downhill is no issue apart from my own anxiety as they fly down.

There are 5 miles of paved trails with varying elevations on each. Due to some construction of a new community center and elementary school, there is one trail section that is closed to pedestrian traffic. Stay current with closures on their website, here.
This is a beautiful park year-round. The large oak trees, rolling hills and ponds throughout provide for many scenic spots for picnics, leisurely walks, and wildlife watching. Whether you’re exploring the trails or simply enjoying the peaceful atmosphere, it’s a perfect place to connect with nature.
Lake Benson + White Deer Parks – 🚶♀️ 🏃♀️ 🚴♀️ 🛴
2-4 Miles
Lake Benson Park and White Deer Park in Garner, NC, offer a perfect family-friendly outdoor escape. The trails at Lake Benson wind along the shores of the scenic lake, providing peaceful views and ample opportunities for spotting local wildlife. We have seen several deer on our visits. The wide, mostly flat trails are ideal for leisurely walks, jogs, or bike rides with kids.
There is one gravel section that goes into the woods that I’d recommend doing if you are on foot.


You can also explore shaded picnic areas and enjoy any three of the playgrounds making it a fun outing for all ages.
While you’re in the area, be sure to stop by Holl & Stone. It’s located between Lake Benson and White Deer park. There, you can feed the llama, alpacas and other farm animals, shop fresh produce and plants then get a ice cream from their food truck.

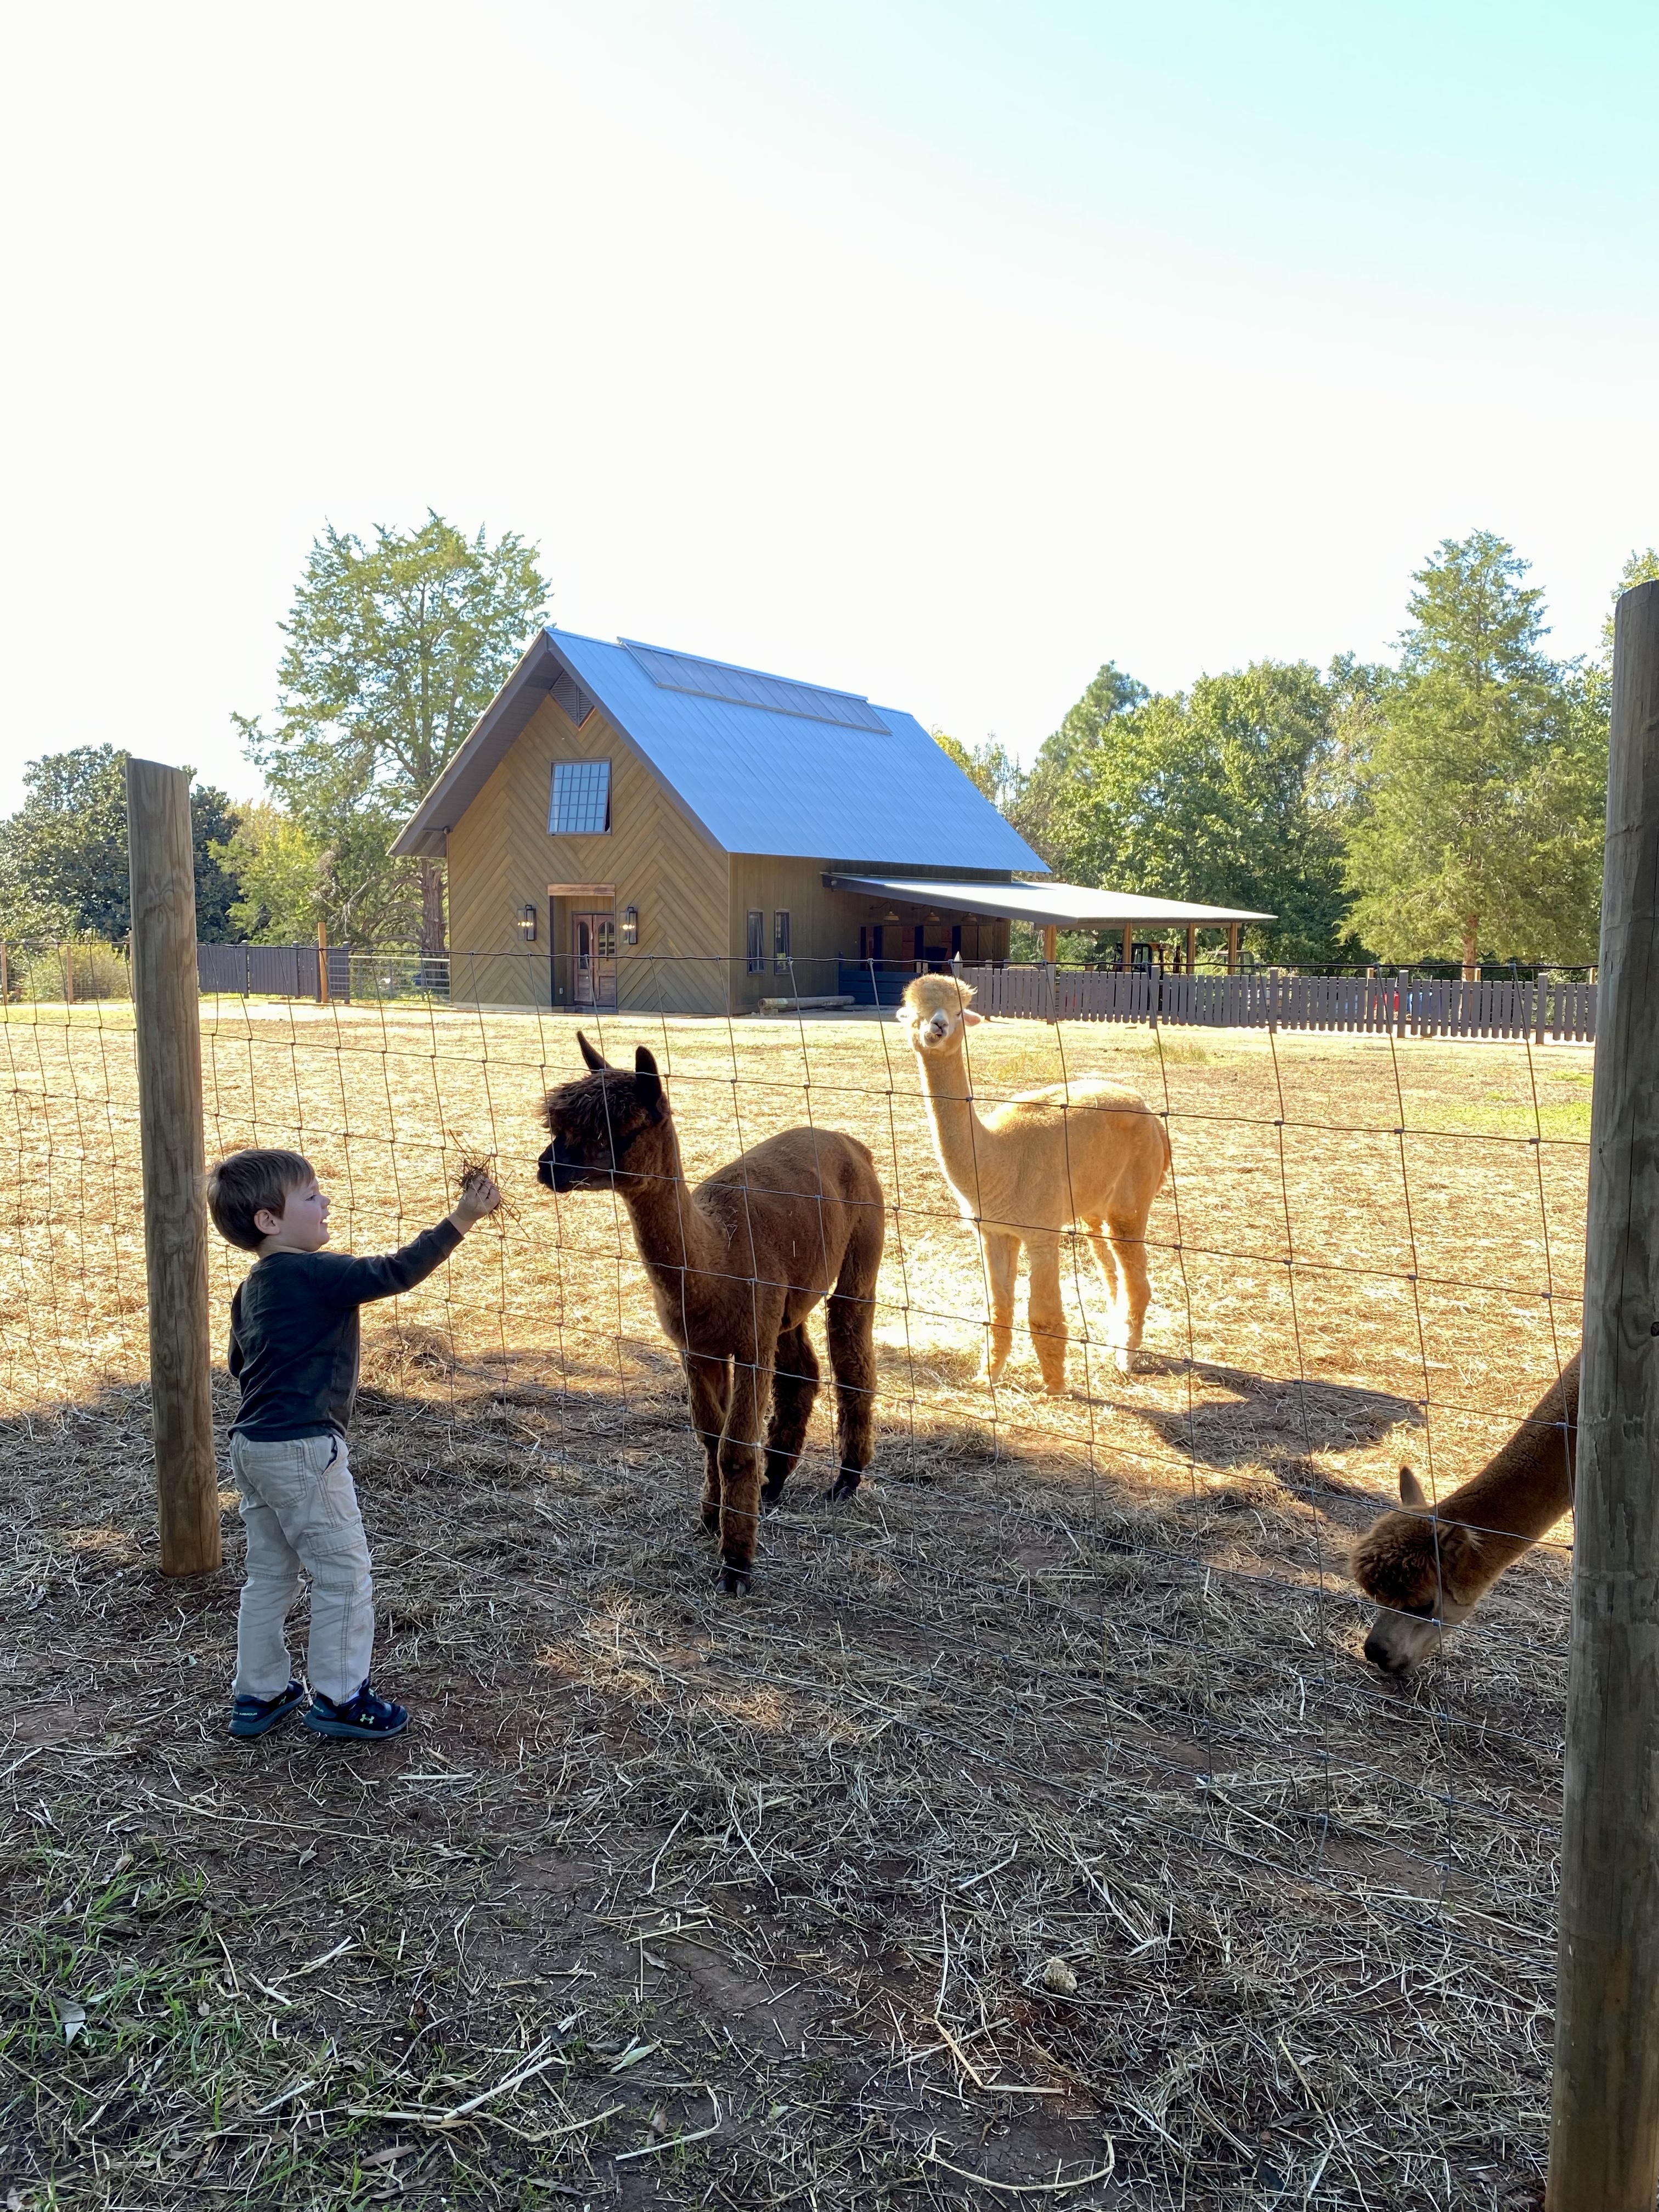
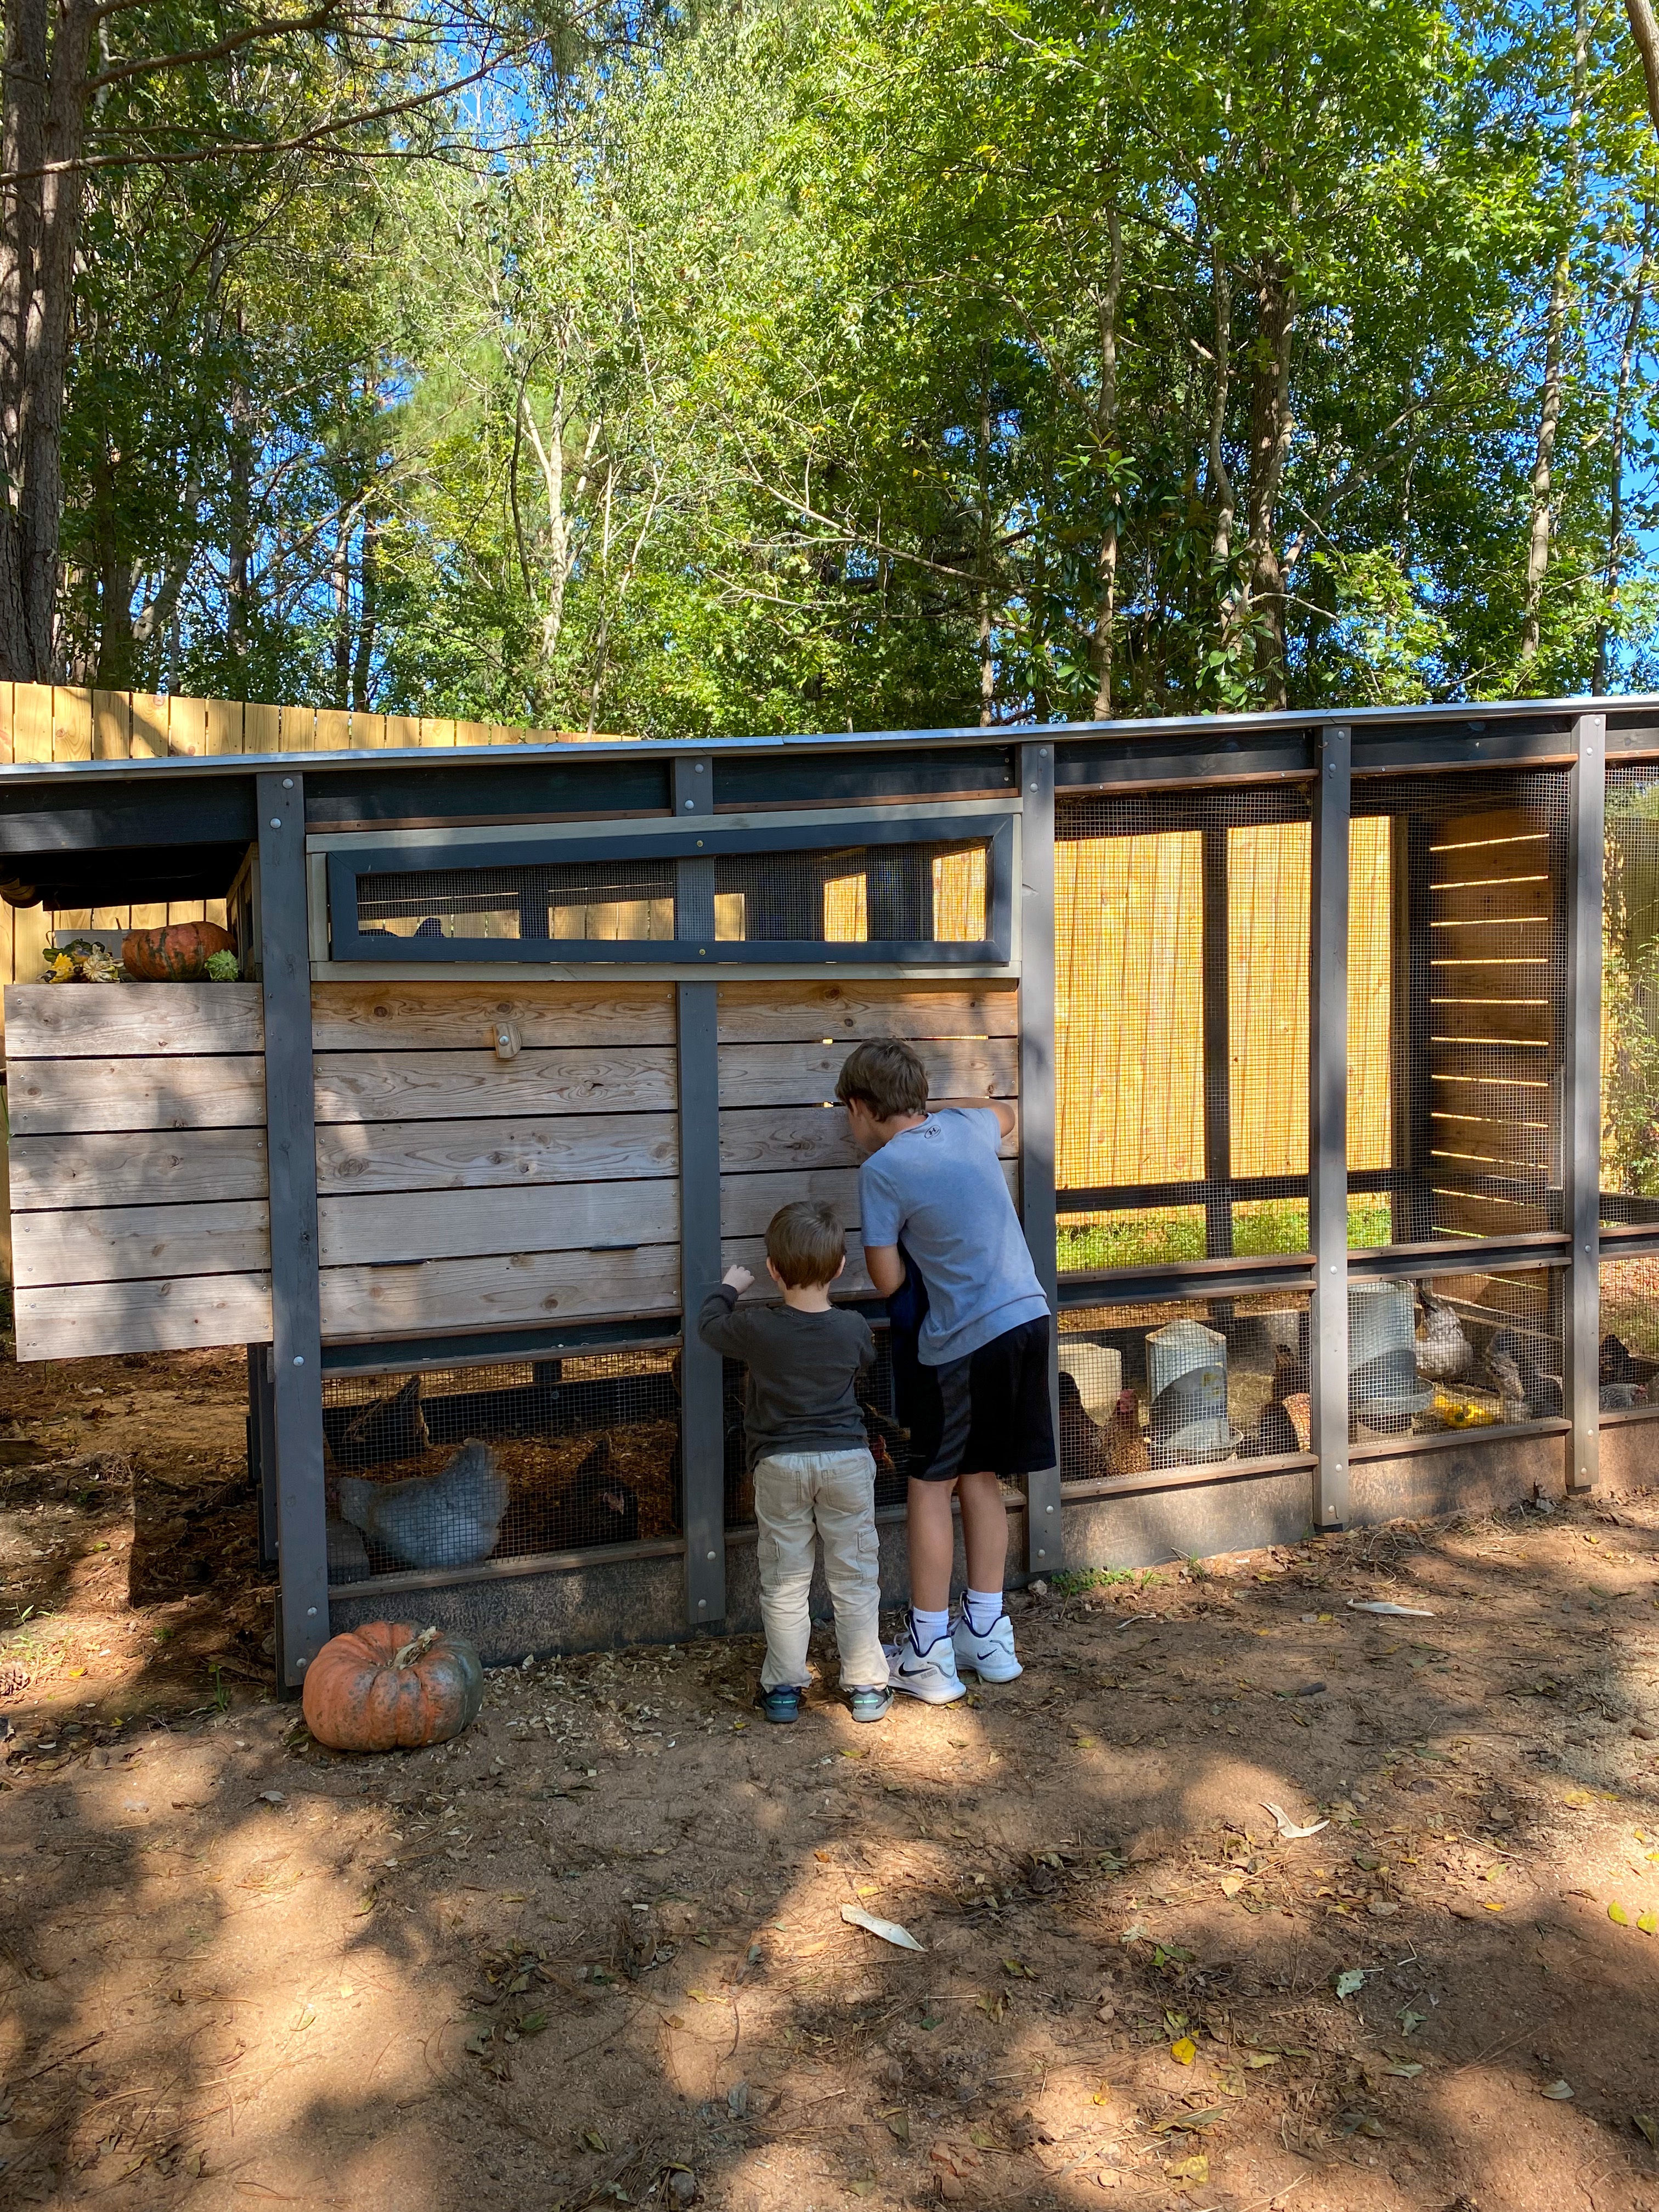
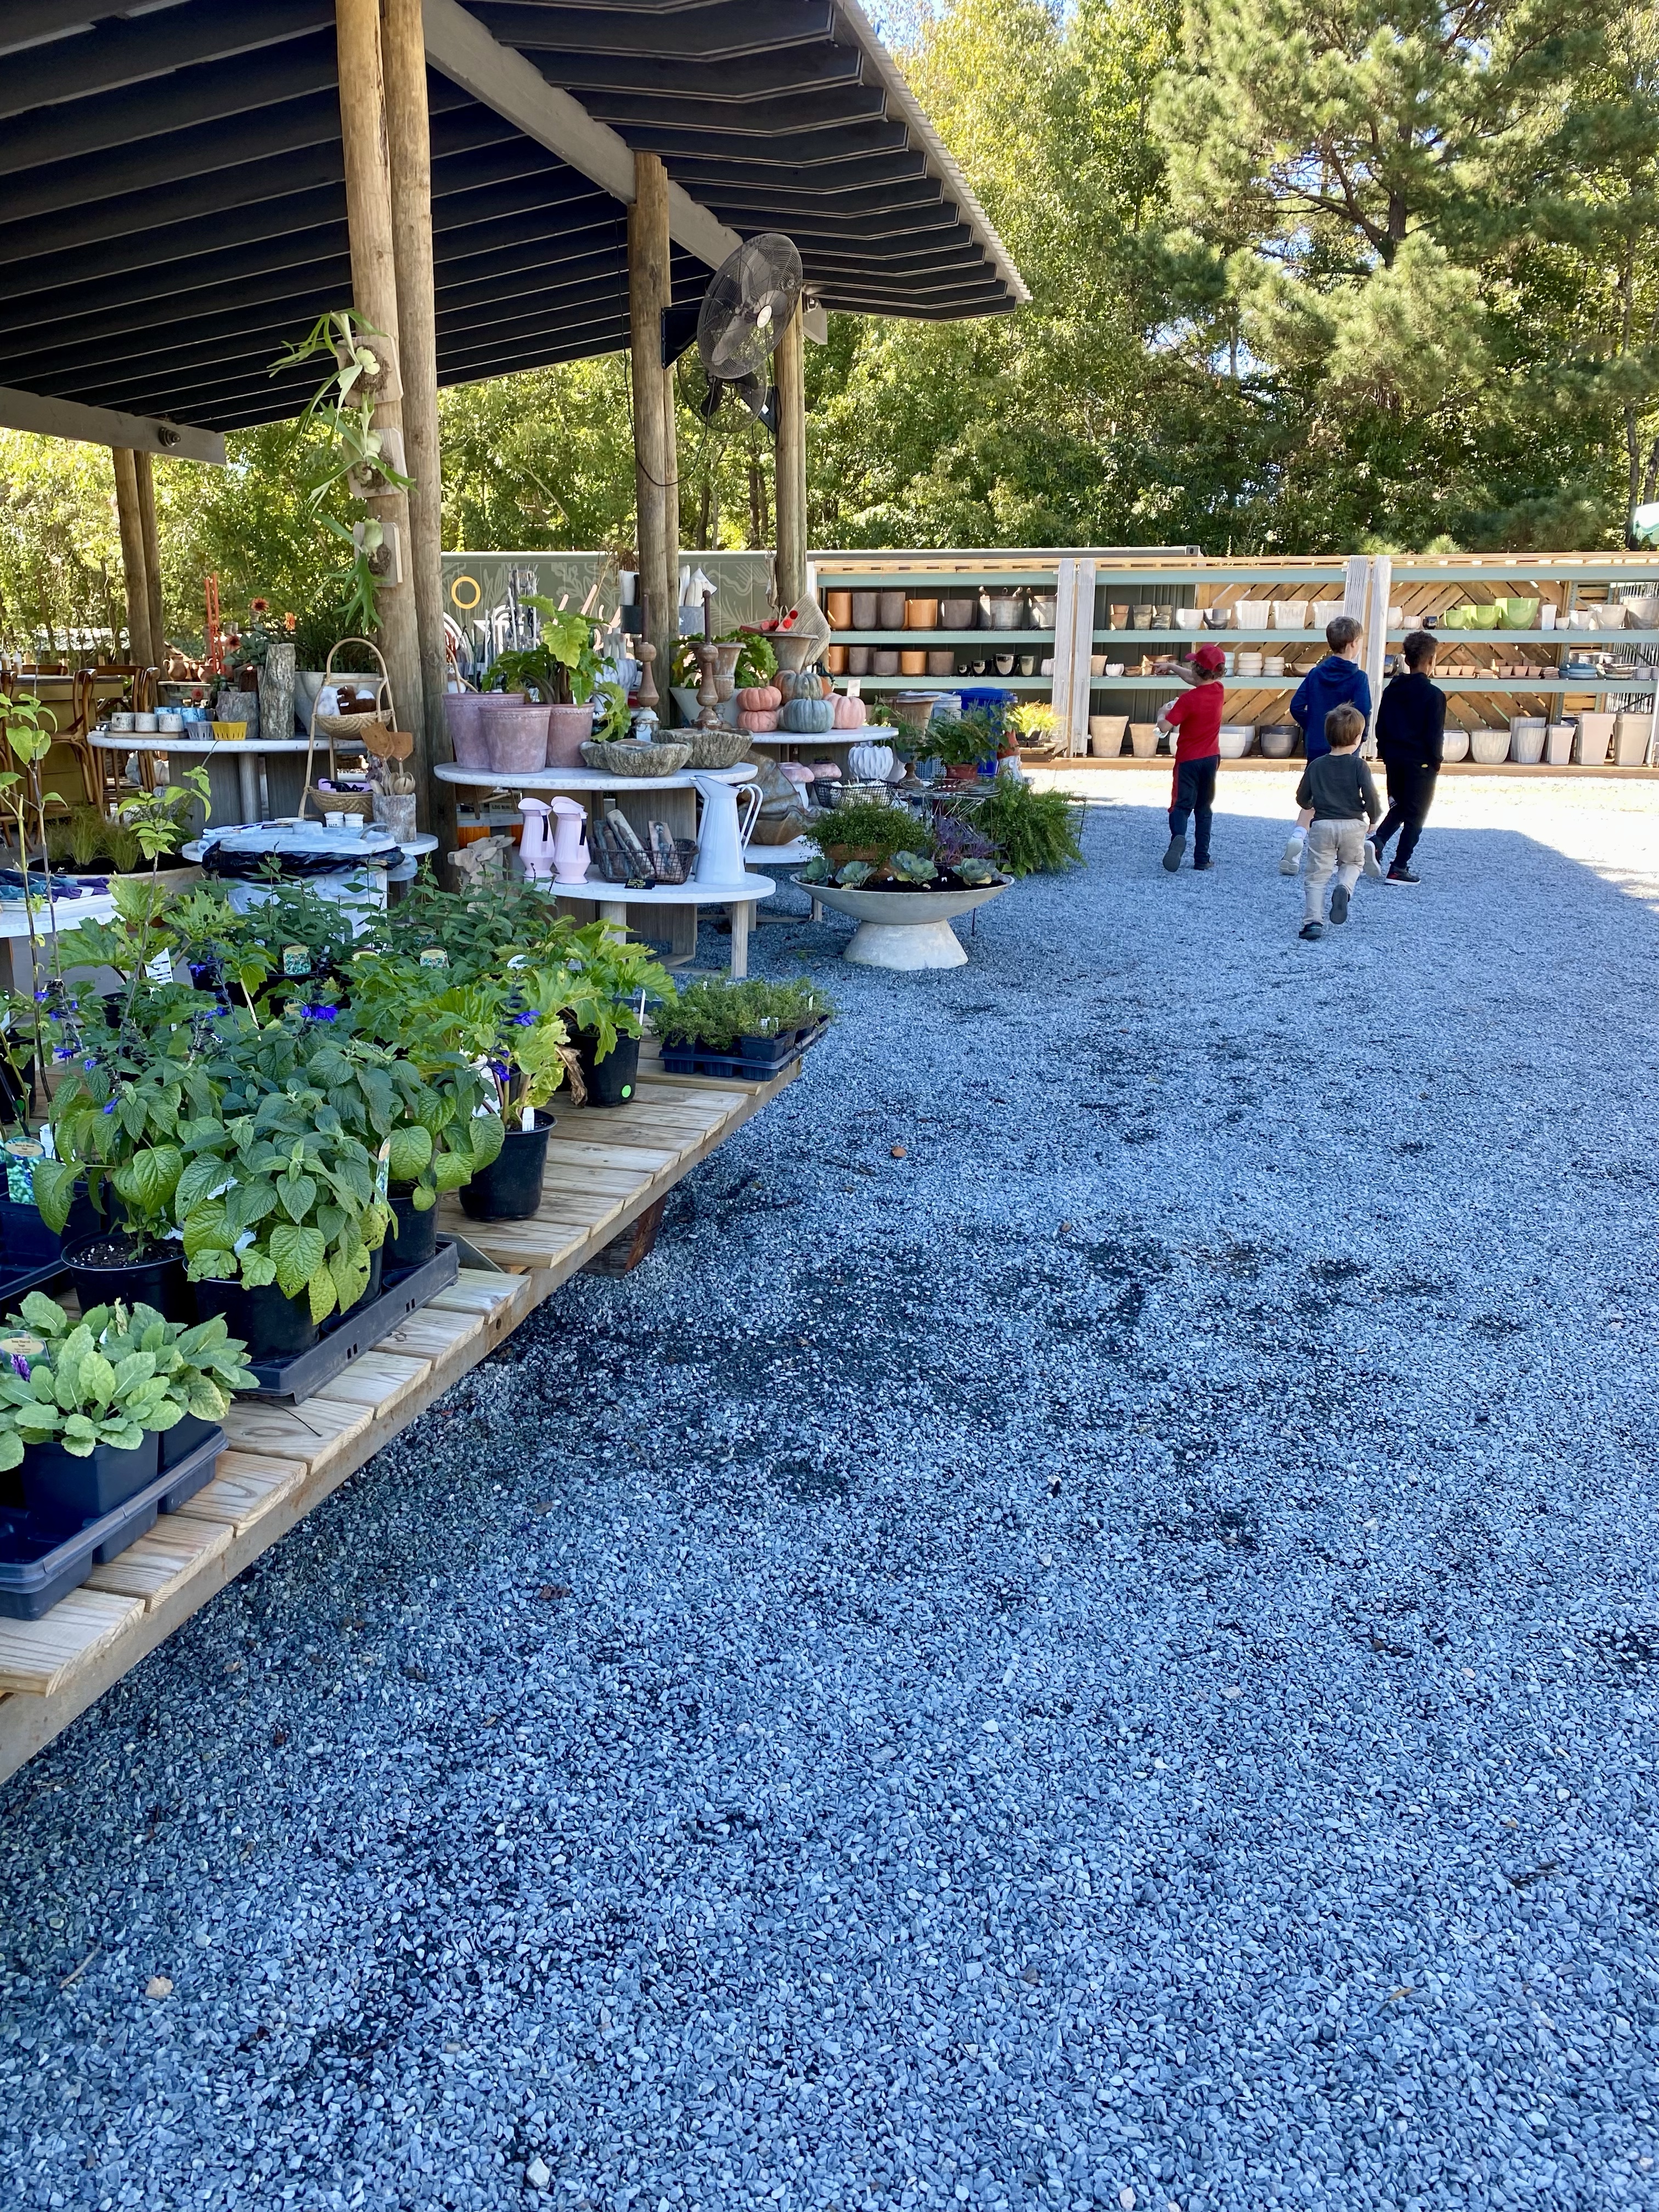

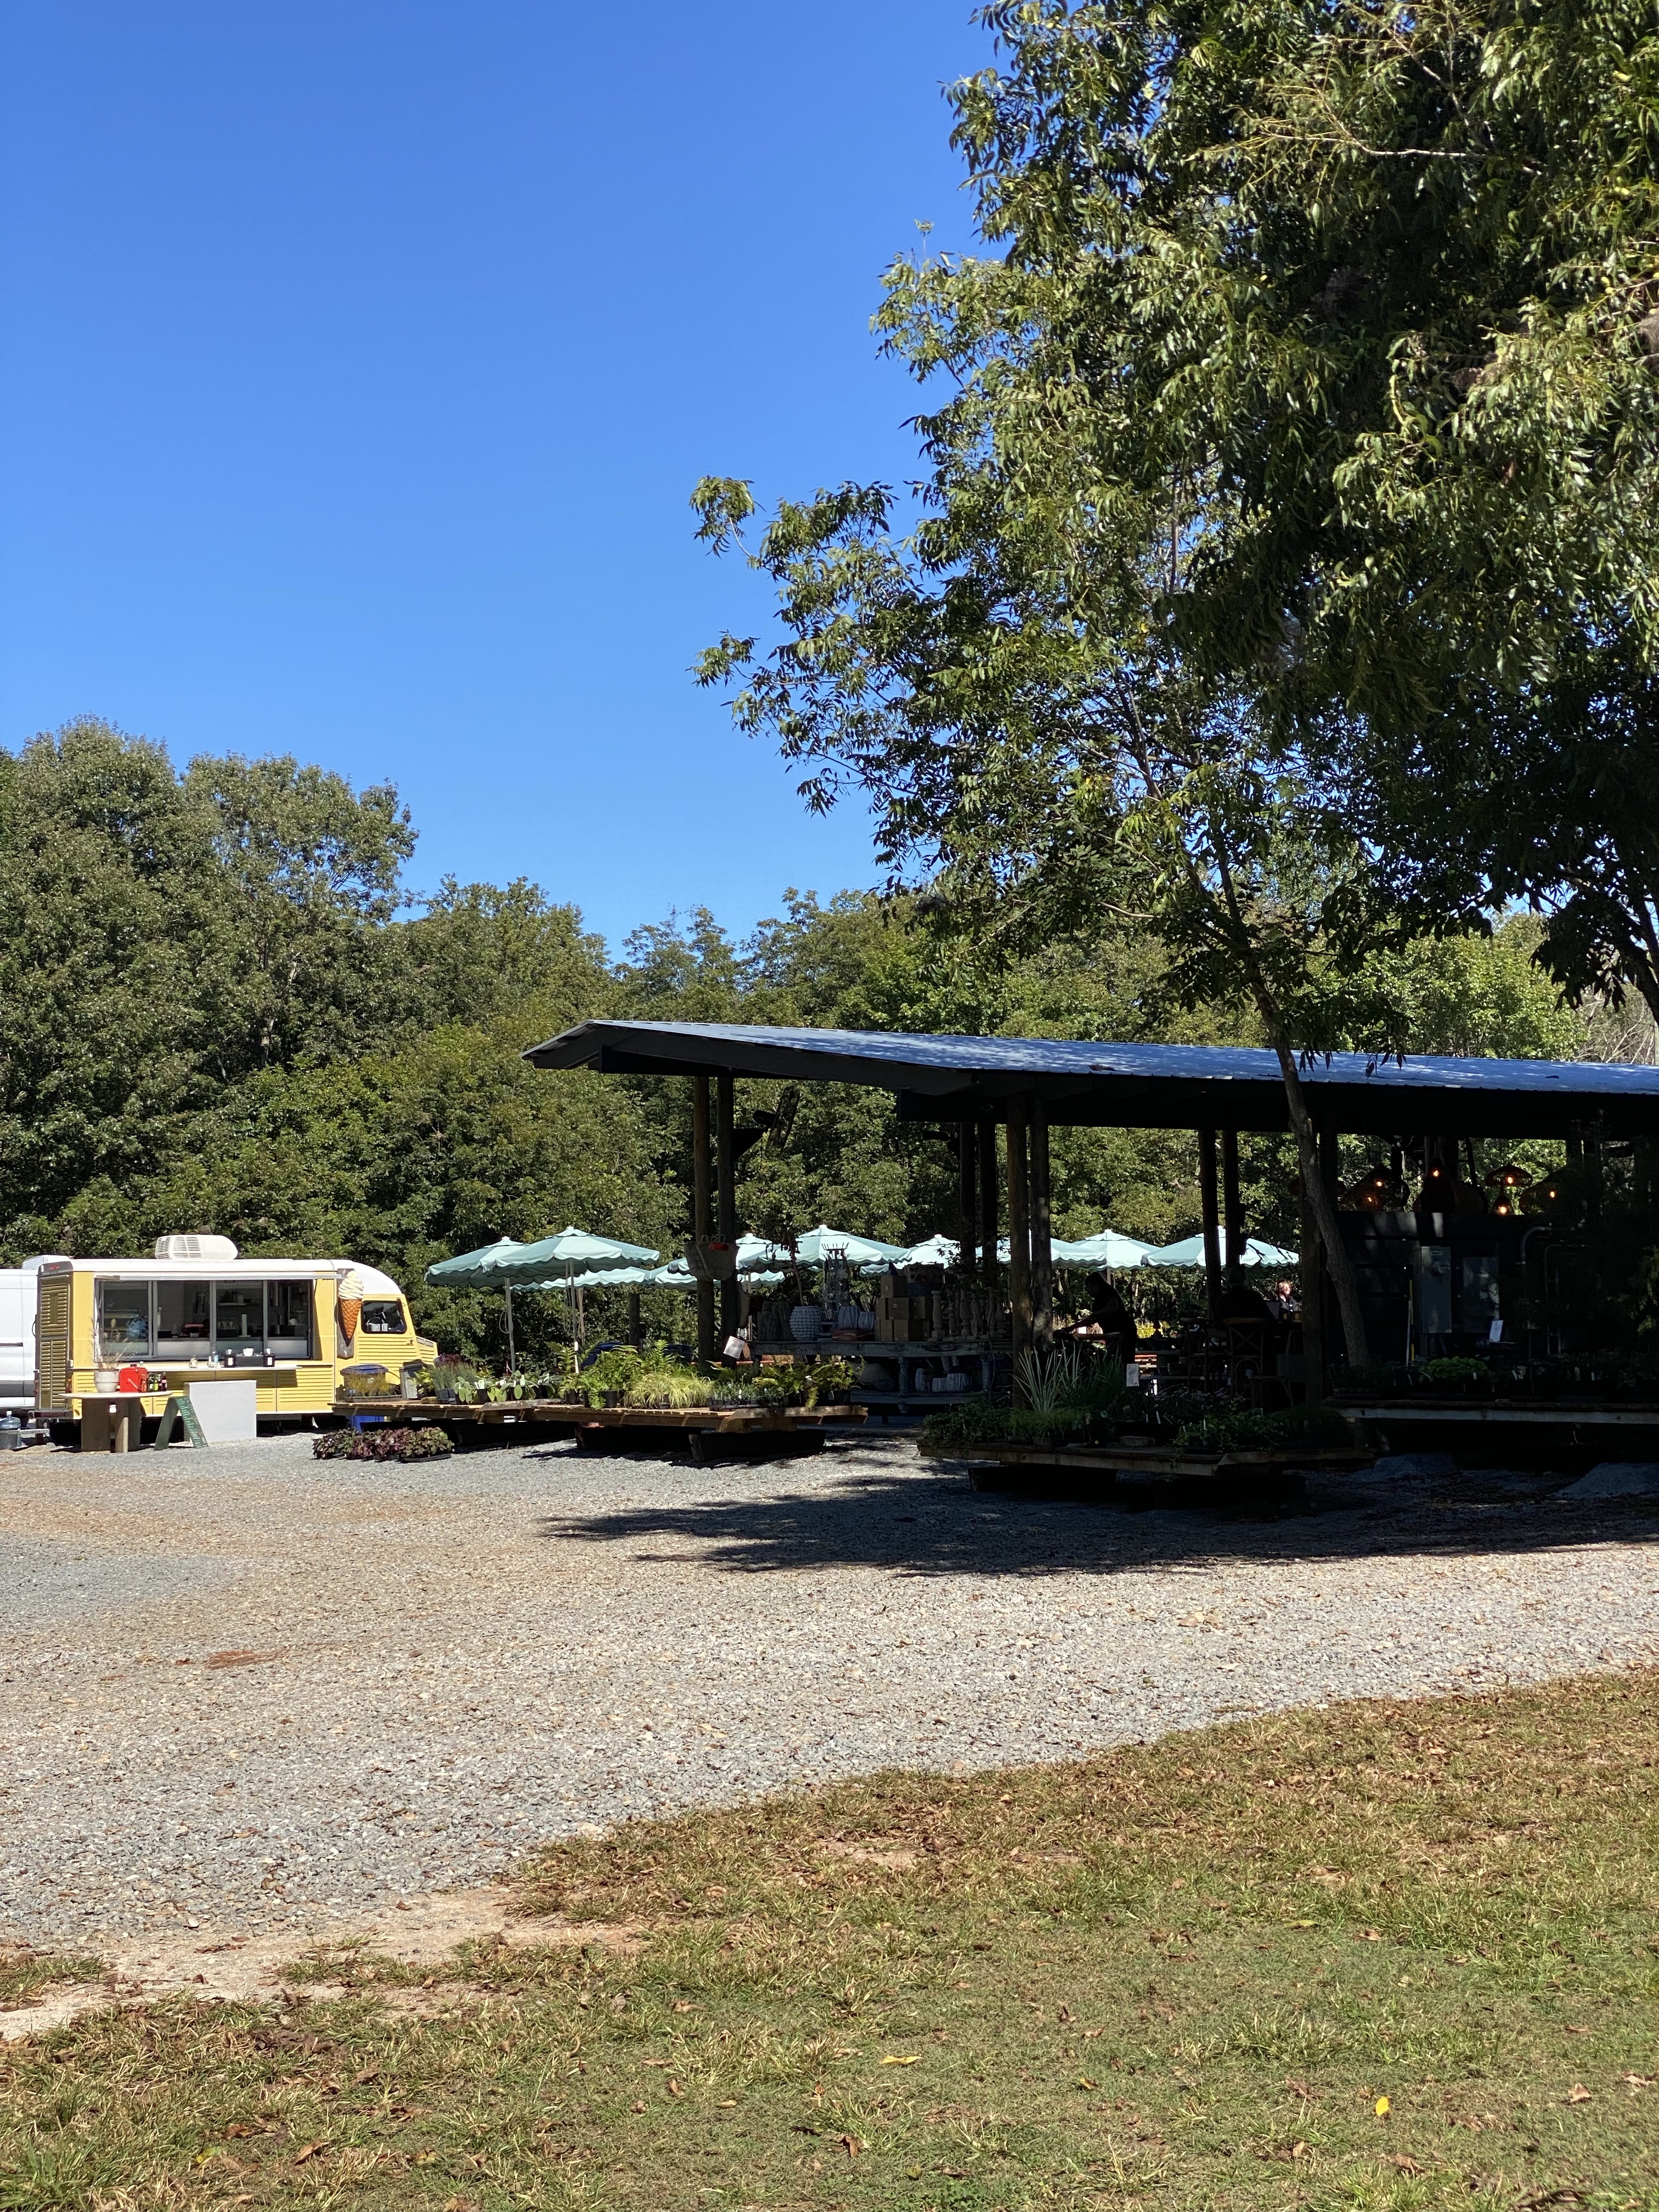


As a family, we’ve found that these hikes not only help us get outside and move but also create opportunities for bonding, problem-solving, and even a little adventure. Whether it’s a peaceful stroll or a more challenging trek, there’s something for every energy level. I hope you’re inspired to lace up your shoes and hit the trails with your family.
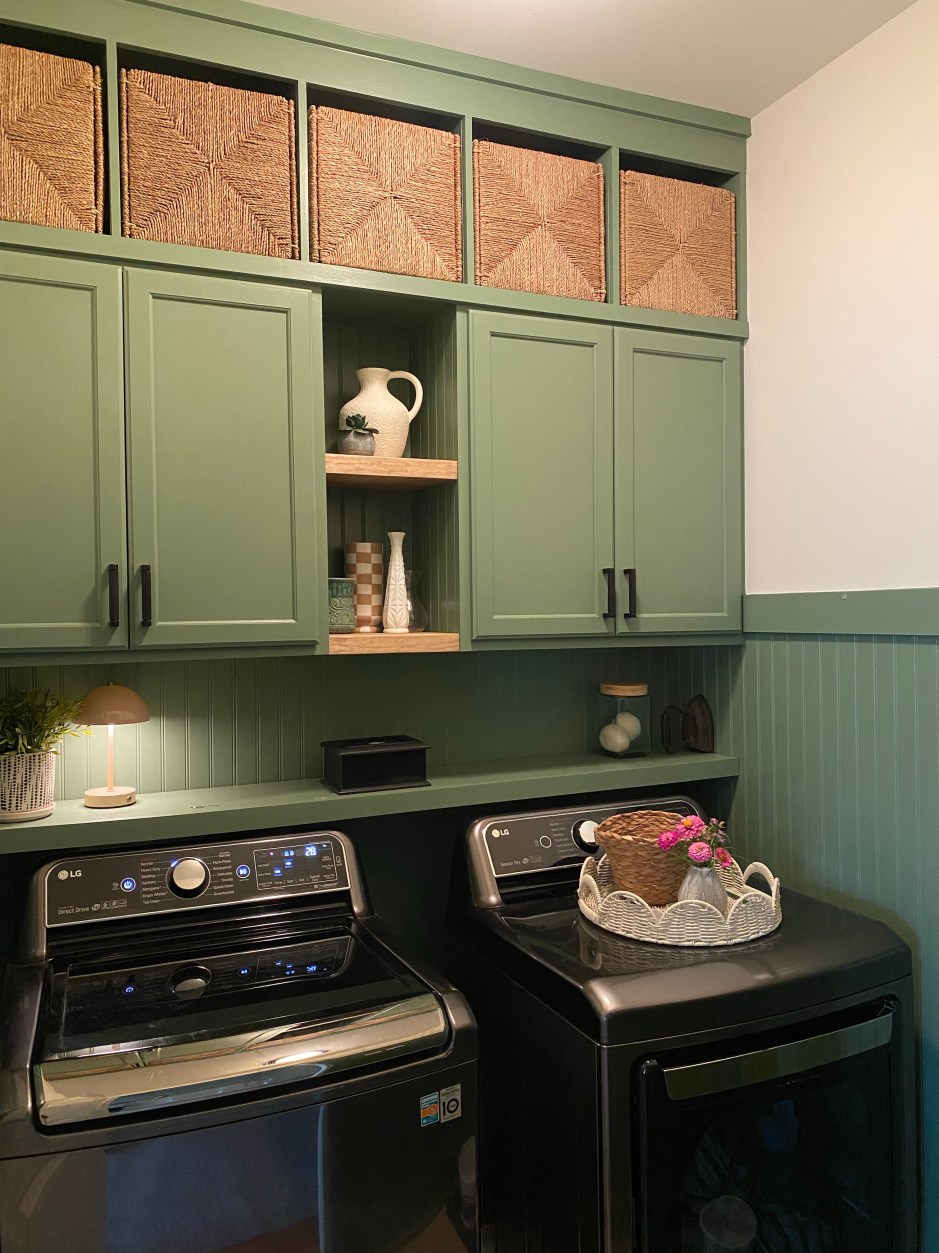
House projects are funny. You make a list of things you want to do, both big and small and either check them off little by little or stare at the same list for years. We’ve been in our home for 8+ years and have really only scratched the surface on projects we want to tackle and yet at the same time, we have done so much.
This particular project recently became a priority as I have found I need to hide the clutter and for everything to have a designated space. The clutter started to feel heavy in my mind and that was something I needed to offload.
Our laundry room always has the door open as our dog’s food and water bowls are in this space. Additionally, it had open shelving so it always looked messy.
The hallway where the laundry room is has also become the point of entry we use most. Guests often come in this door instead of the front door as well. While we can’t change the footprint of this area, I could control the appearance and functionality of this space.
Control the controllables.
Before: (YIKES)
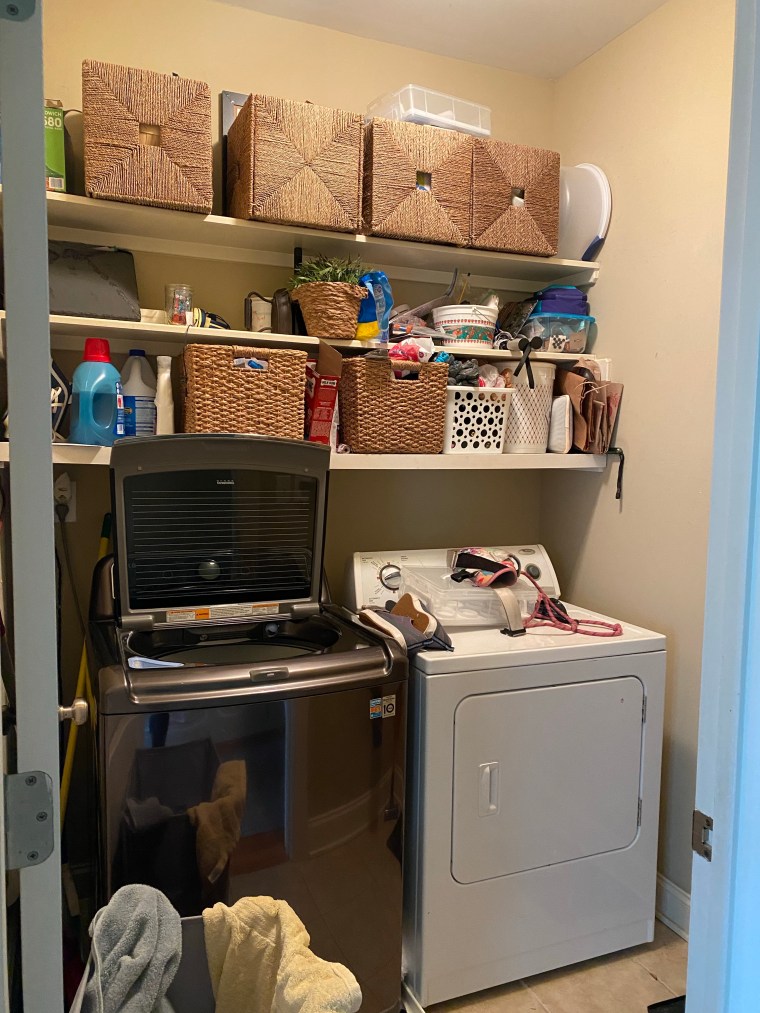
Do you understand why I needed to clear this clutter by physically and mentally?
I knew I wanted cabinets with doors for storage and open cubbies to fit baskets above them.
My plan:
But first, demo and prep the walls for all the mentioned items above.
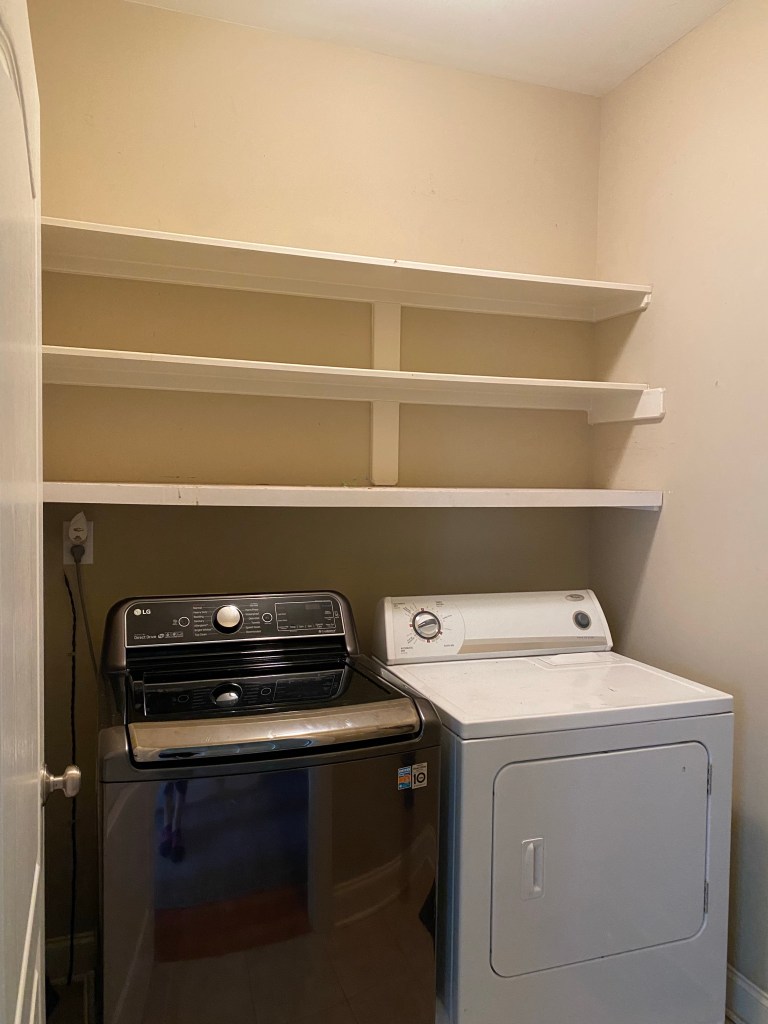


I kept the shelving boards to repurpose in one of the boy’s closets. I’ll share more on this in another post soon.
The sheetrock was damaged in areas but knowing cabinetry and wall treatments would hide the majority of it, I focused my attention on the remaining walls.
We decided to go with a dark green paint that we had on hand from a previous project, Dried Thyme.
One thing I’d like to note when you’re selecting paint colors and are tackling a project little by little, remember the big picture of the finished space. Think ahead to the final details you want, the flooring you will eventually add, ect. In this instance, I knew we had future plans to change out the flooring to a 12″ black hex tile.
I first painted the walls green, Dried Thyme, to the height I wanted to add beadboard and trim cap. For visual confirmation on the height I wanted for the trim, I painted a horizontal line of the green paint and measured to make sure that height worked well with the height we would be hanging the cabinets.
It was time to buy the cabinets. I recommend you search online before you visit the hardware store. I have found that not all stores carry the same products and in our case, the closest Home Depot doesn’t stock prefab cabinetry but the next town over does.


Prepping the cabinets is important.
Basic process included:
I knew there was no way I was going to hang these cabinets by myself. Could it be done? Yes. Did I want to avoid getting injured or damaging the washer and dryers? 100% yes.
With the help of my husband, we added a temporary bracket for the cabinets to rest on while we anchored them into studs in the wall. This actually proved to be very difficult as the studs were not exactly located at the 4 corners of the cabinets on the walls.
We made it work and added extra screws for safe measure.
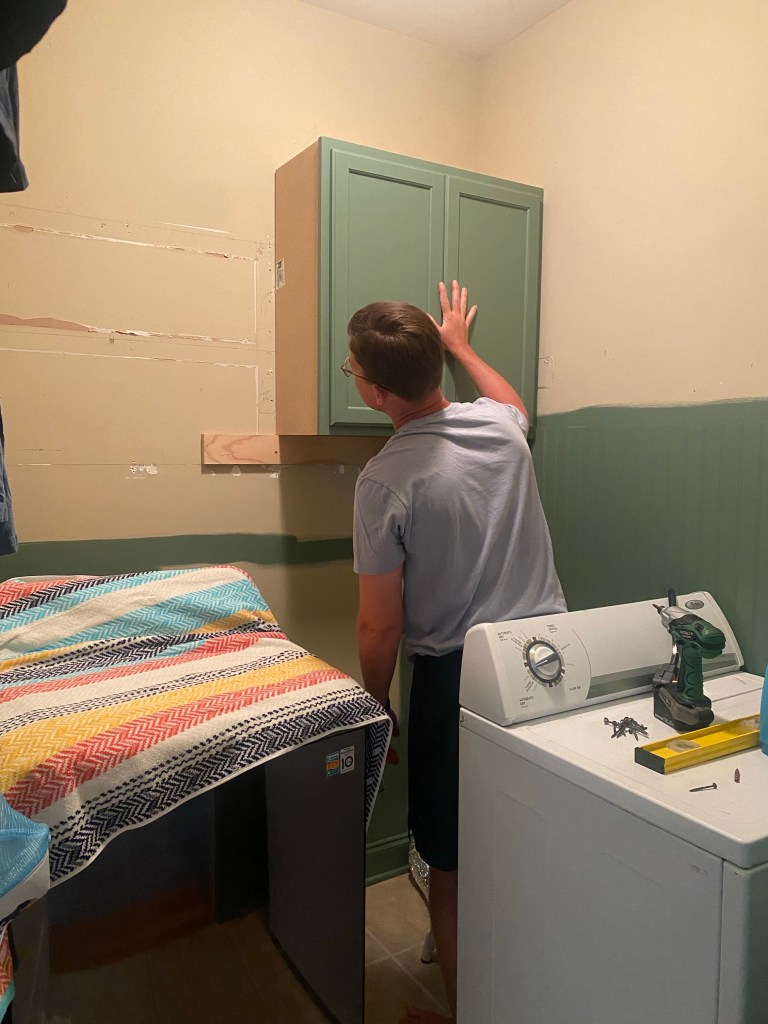
Next up, making the cubbies to fit above the cabinets. This is a smaller space and I knew I wanted it to feel larger than it is which I could accomplish by making the cubbies reach the ceiling height.
I measured A LOT and made my next trip back to Home Depot. I had them rip down the 3/4 plywood sheet into the depth of the boxes needed.
Let’s be honest, using a table saw is not something I’m comfortable doing alone and I was tackling this project on another week that my husband was traveling for work.
I loaded up the strips of plywood and beadboard for the remains walls and ventured back home where I would cut them down to length.
I am not going to provide a step by step tutorial of how I built these boxes for multiple reasons:
I do recommend having your baskets before determining the size cubbies you’re going to make. This will ensure it looks intentional and was made custom for the space.

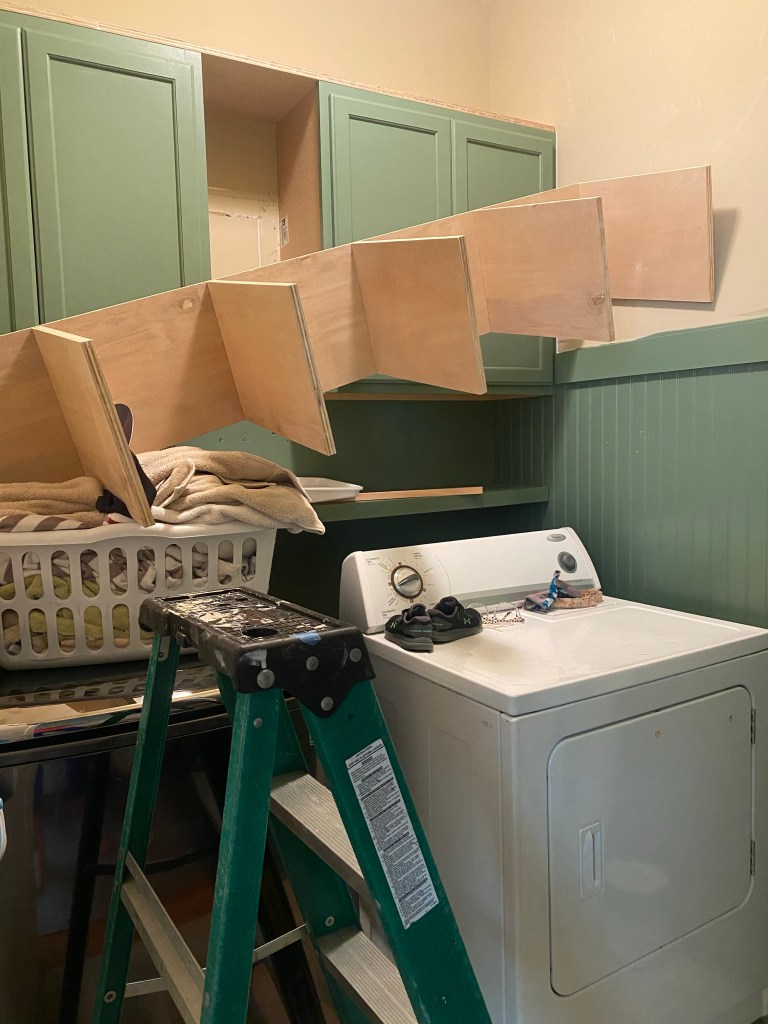
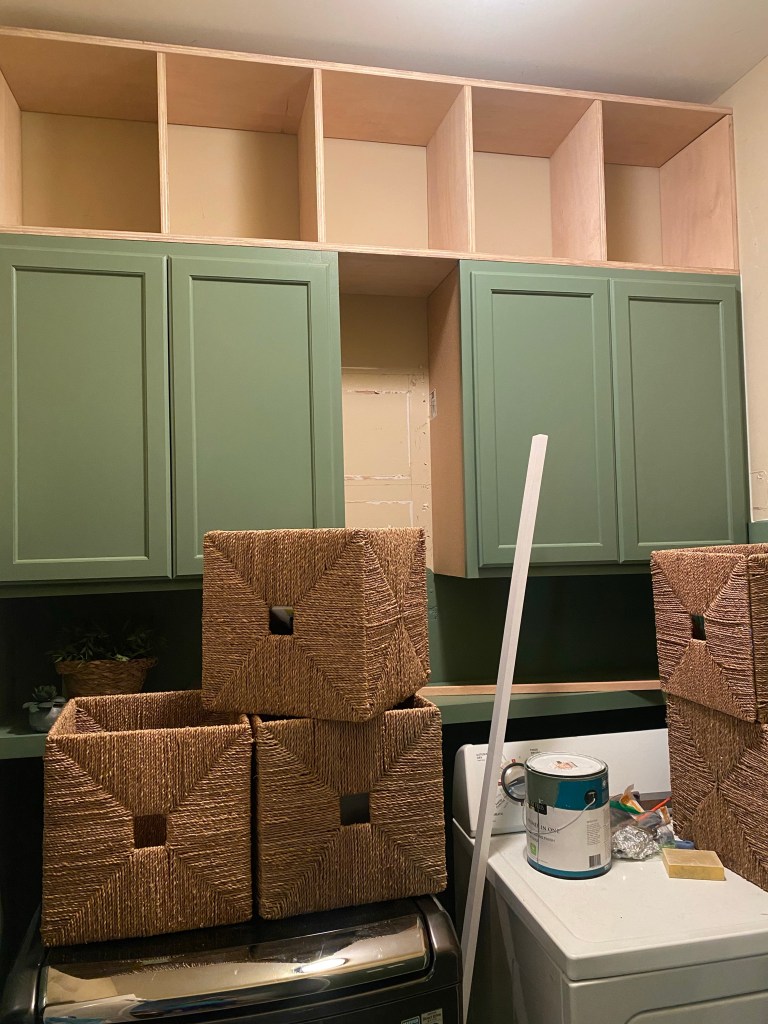
The walls in this space are not square and caused the issue of us not being able to install the build easily. While the measurements fit the intended space, it didn’t fit in the middle of the room where it needed to start for us to shimmy it into place.
It was a disaster. Our marriage survived the struggle but it was questionable for a moment. (I’m totally kidding but in full transparency, our patience was put to the test.)
After disassembling the majority of the cubby and putting it back up, we anchored it in place and I got to work prepping for paint.
Next up, determining trim for the top of the cubby.
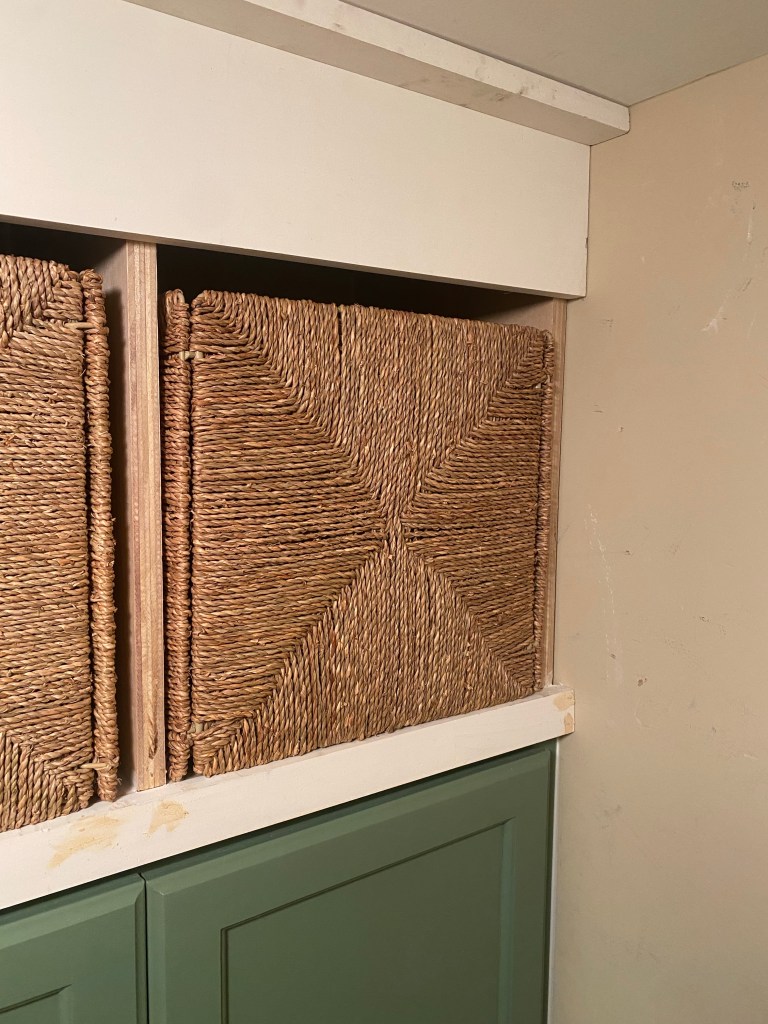
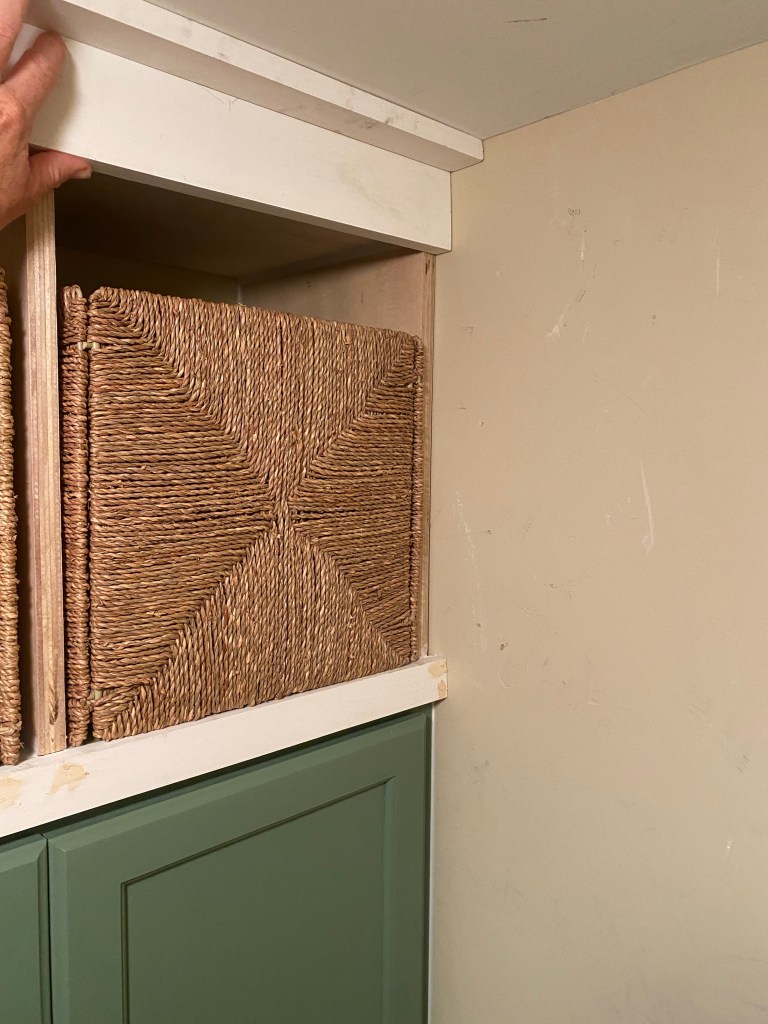
I ended up going with a height that was between the two options pictured above and am very happy with it.
After more caulk and paint, this unit was complete.
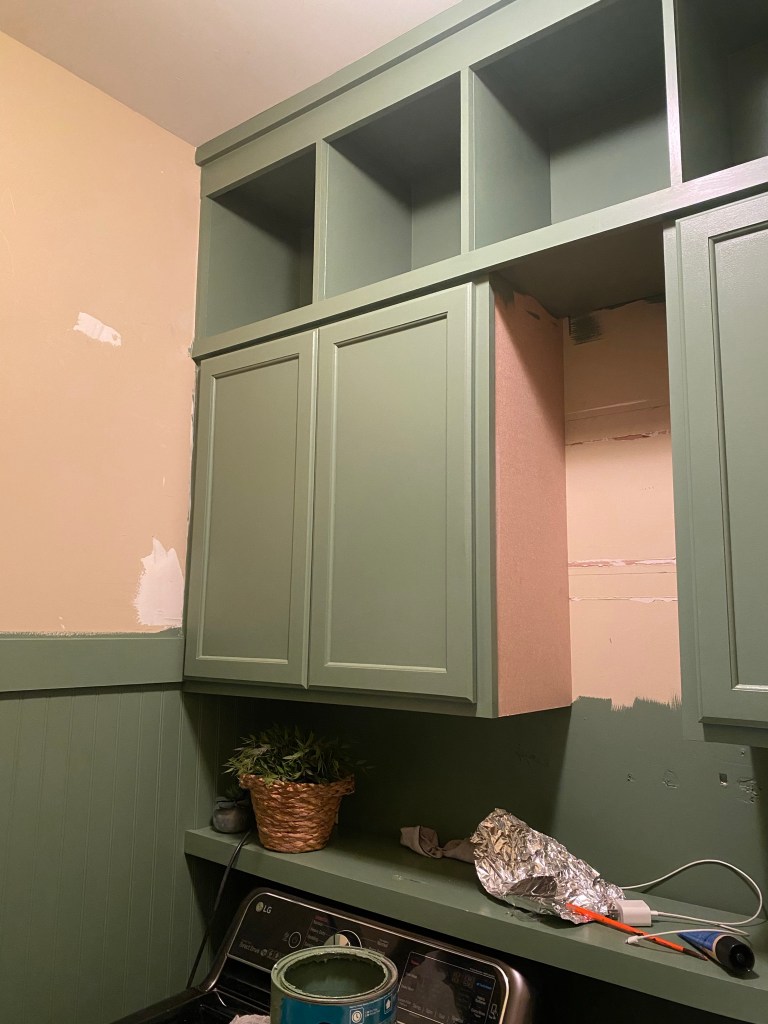
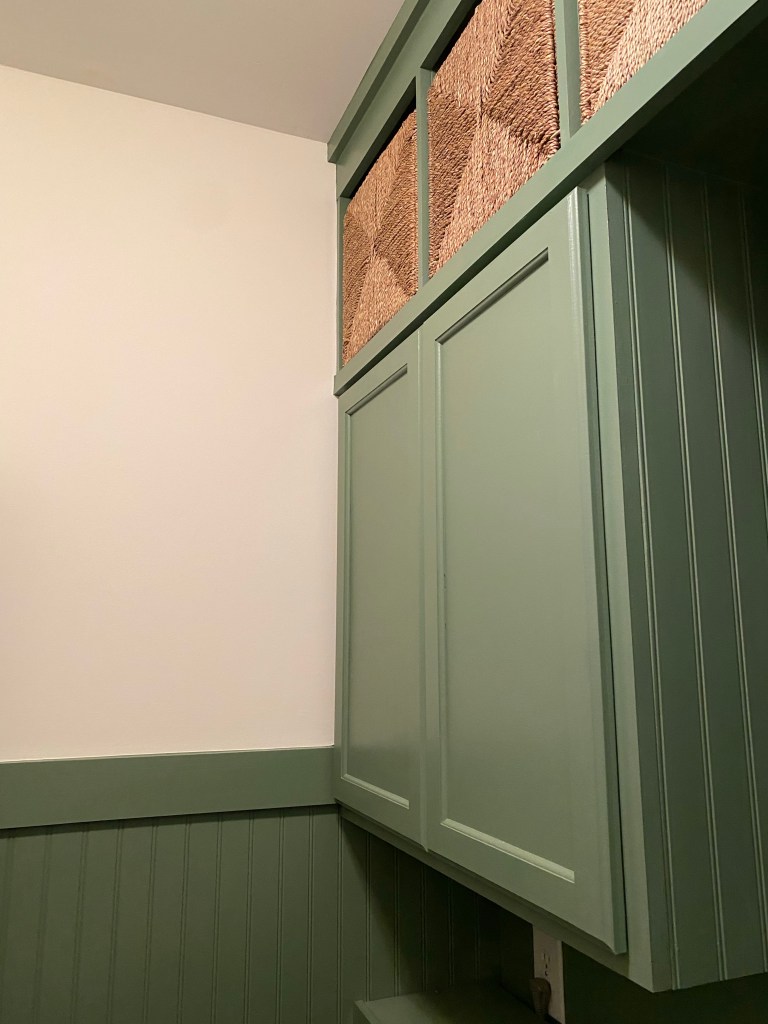
While this space is small, it was packed with so many steps to get to the finish line. There was also a long wait time between steps due to busy schedules, waiting for paint to dry, hardware to arrive, and more. I tried to multi-task when possible. When the paint was drying on the cubby boxes, I was outside cutting the beadboard and nailing it in place.
Continuing the beadboard was not part of the original plan. I had been given thin brick tile that I was planning to use as the backspace but with the height of the beadboard, the matching green shelf and cabinets, the best option for this space was to continue with the beadboard. It looks seamless and intentional.
The seam wasn’t an issue as I placed it where there would be one floating shelf.

After the final touchup of paint was done, I was nearing the finish line.
The finishing touch needed was to add floating shelving between the two cabinets.
We took a family outing one weekend to find supplies and ended up having to DIY this to get the look I wanted. We purchased 2 project boards from Lowe’s. I glued and clamped them together while allowing it to cure more than the recommended time.

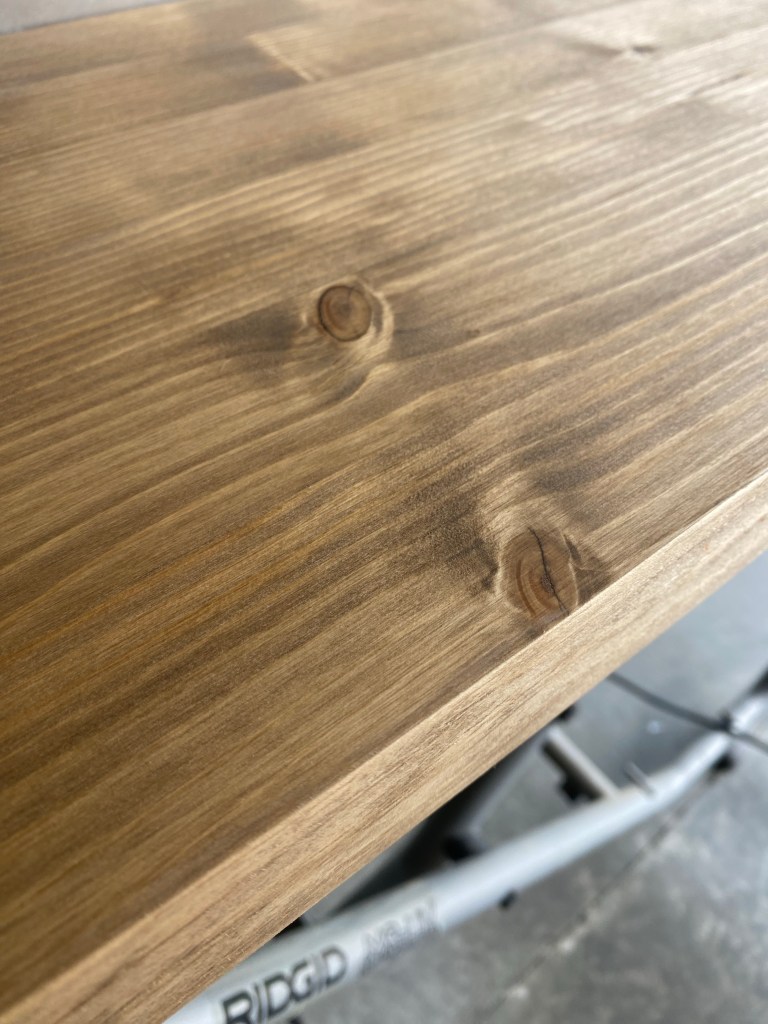
Next up, cut them down to size to fit. I then filled the seam with a mixture of sawdust and wood glue in an attempt to make this thicker board appear to be one. Unfortunately after sanding and staining them, it was visible which you can see from the first picture above.
My backup plan was to add edge banding and stain it to match. This worked out perfectly!
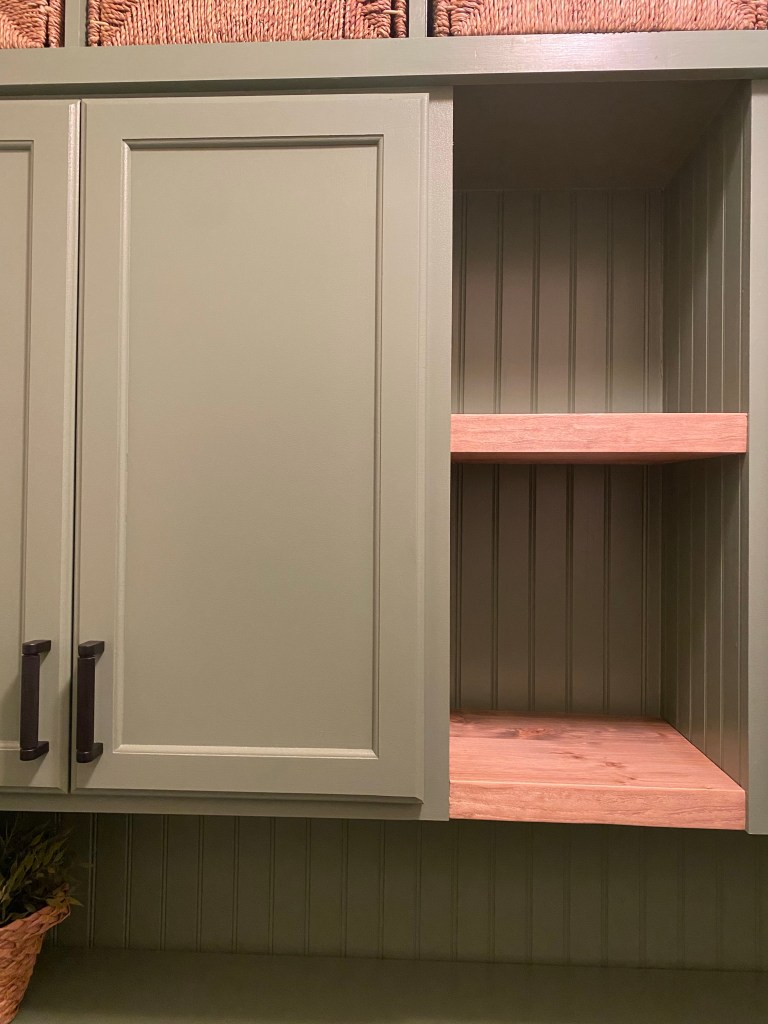

If you’re in a season of feeling like you’re not making much progress on you home project list, let this be a note of encouragement for you to take a moment to look back at what you have accomplished. You may find you’ve come further along than you realize and are well on your way to creating your Haven and a home that works for you and your family.

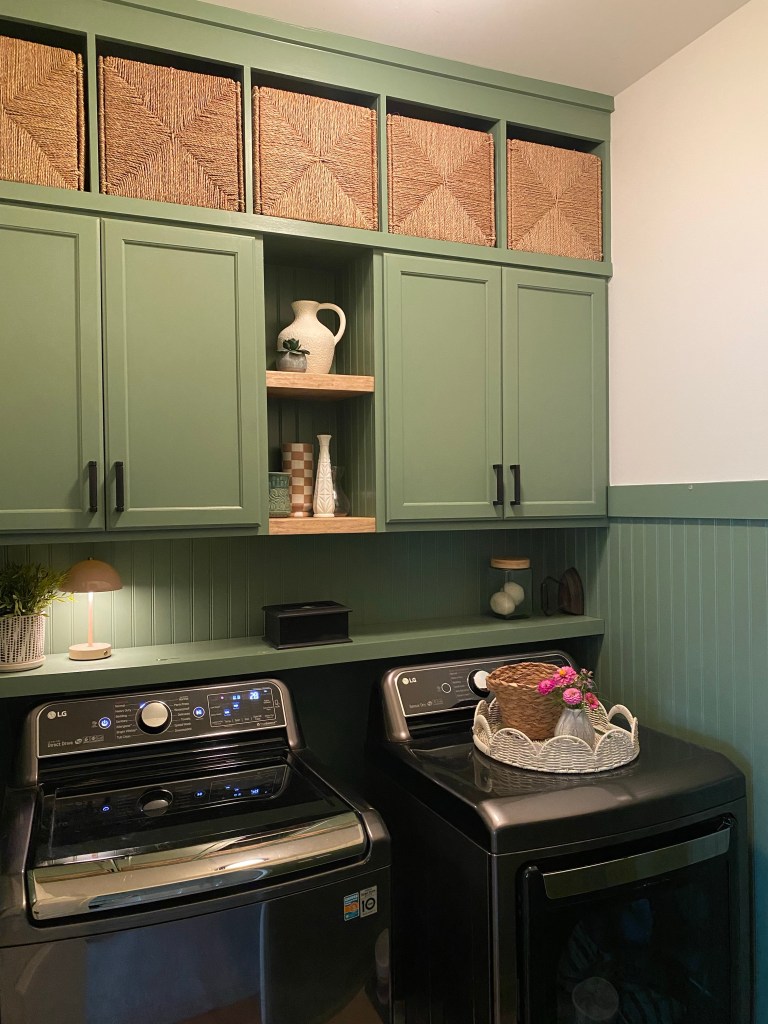
If you want to see the behind the scene failures and successes, please follow along on Instagram @4havenssake.
