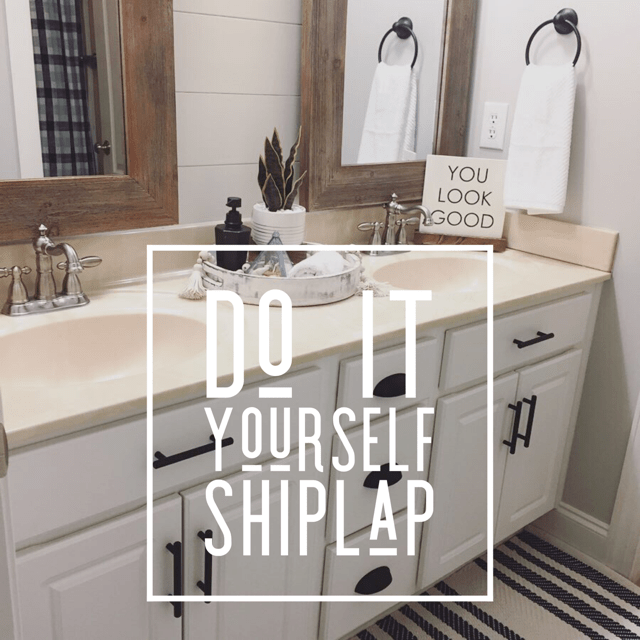
If you’re looking to add shiplap to a wall or room in your home on a budget, this post is for you. I’m sharing how you can update a standard builder grade bathroom into a modern farmhouse design.
We transformed this space:

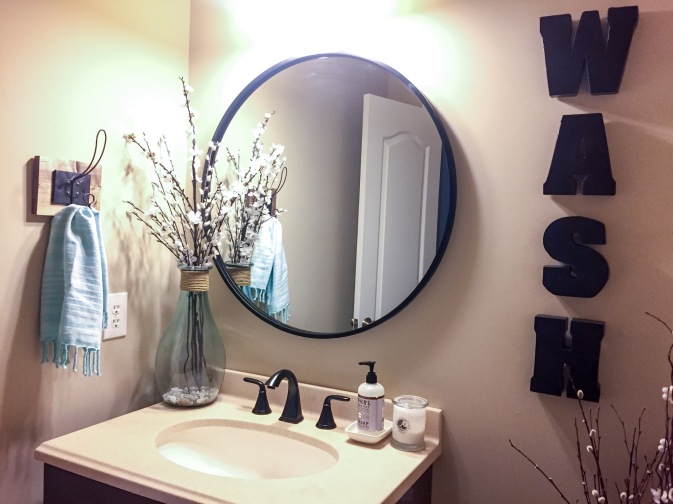
Into this newly designed space for a total of $315. The shiplap wall only cost a little over $15.


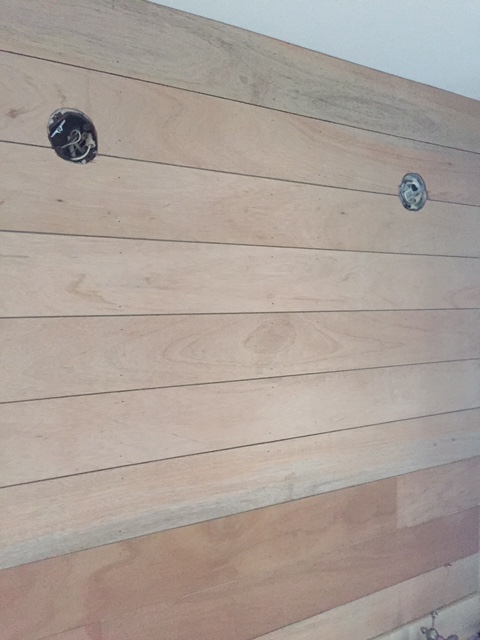
Start by measuring your walls. In this case, we were only doing the mirrored wall which made for simple math when deciding how much 1/4 inch plywood we needed.
For ease, we had Home Depot rip down 2 sheets of 1/4 inch plywood into 6 inch planks. (we did have some scrap that we measured out to smaller planks that we knew we could use where some boards needed to be ripped down to less than 6 inches.) We also knew we wanted to continue the shiplap in the shower/toilet room and would use the extra planks in there.
Simple steps to hang the planks:
- Sand down all edges of the planks with an electric sander as there will be rough areas. This goes quickly. *Wear a ventilation mask, it’s not healthy to breath in the dust from the wood.
- Remove old light fixtures
- Measure the length of your wall and trim the board accordingly. Our wall was mostly to scale so we went ahead and trimmed all needed boards to the length of wall. Where there were slight discrepancies, I was able to use an electric sander to take off a small amount for a perfect fit.
- Using a stud finder, mark out the studs in the wall drawing a line all the way down. This is where you will nail your planks.
- In this case, we started adding our planks at the ceiling because we wanted a full 6 inch board at the top. When planking a full wall, it’s sometimes easier to start from the bottom and work you way up.
- Ensure the board is level & using a nail gun (with 1 1/4 nails), nail one end of the board. It’s easier when you have an extra set of hands to hold the board in place but if you are doing the job solo, double check that your board stayed level and nail the opposite end to the wall. Then nail along the board where you marked the stud locations.
- Use nickels for your spacers and put up the next board in place.
- Continue step 5 until you have to make cuts for outlets or light boxes.
- In this case, we had to trim the bottom of one board and the top of the next to accomodate for the lighting. We put the boards in place and traced out where we needed to cut.
- Use a jigsaw to make these cuts. You can always trim off more if your first cut isn’t perfect. (Continue nailing boards after these cuts are made).
- I recommend painting the edges of each board and the wall as you put up each one. This makes the painting process much easier as you don’t have to squeeze a brush into the cracks. We had to get this job done quickly with two toddlers running around so we opted to just get the boards up and I’d paint later.
- Paint the sides and cracks of the boards first.
- Roll the boards second. I needed 3 coats total when rolling because it went on much thinner compared to the brush.
- Caulk the seam where the boards meet the wall and the top of the vanity.
- Hang new light fixtures and mirrors and you can call it a completed project!
Our new lights against the freshly painted white shiplap.

I wanted to further update the space and bought these handles for our existing cabinet doors and drawers.
I also really like these handles but admittedly, I didn’t price around for hardware for the best deal like I normally do and just made a decision at Home Depot.
I also spray painted our existing towel rings to match. (This cost nothing as I already had flat black spray paint for metal.)
When deciding on mirrors, you do need to measure out what range in size you can shop for. I knew what my maximum height and width could be above each sink and searched online first.
Hobby Lobby frequently has a 50% off sale on their mirrors. Luckily for me, the sale was going on when I was shopping so I made a quick run to the store and snagged the last two. These mirrors had the perfect amount of coastal farmhouse vibe we were going for.
Here is a little video highlight featuring a trick for hanging hardware on cabinet doors and drawers. Click Here
A quick trip to Marshalls for accessories – rug, vanity decor, and fresh linens, I snagged YOU LOOK GOOD sign from the inventory of The Homestead Haven (my side gig with my bestie), and then shopped our home for the rest to complete this room design.
You can shop this sign and others in our Etsy shop, here. By the way, this sign is interchangeable. The wooden insert comes out of the base and can be changed seasonally or with other design offerings in our shop. I’m forever changing decor in our home and love this creation of ours making it easy to do so inexpensively.


The best part about the room design, our two boys (ages 5 and almost 3) complimenting each individual new detail in the room. They seemed to really appreciate the hard work and love that went into freshening up this space. Mission accomplished.
Please comment with any questions you may have and follow along via Instagram for our next project.


![beary special]](https://forhavenssake.family.blog/wp-content/uploads/2019/02/beary-special.jpg?w=472&h=355)