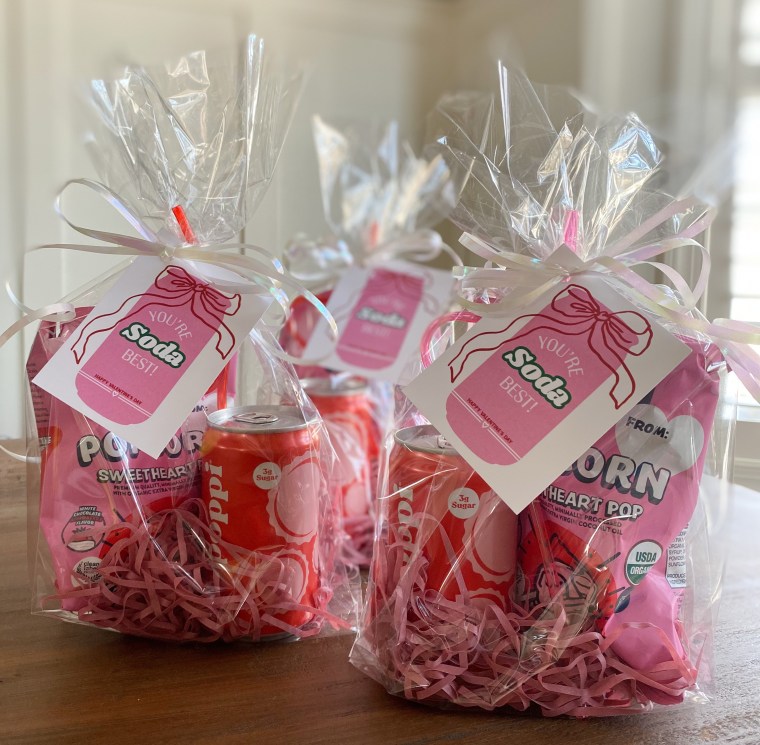
Sweet gestures and gifts that are simple can be just as meaningful. When planning out this year’s teacher gifts, I ended up paring it down from my original thought and I think it’s cute and didn’t require much.
Straws and Pink filler – Dollar Store and Pop Shelf
I ordered the popcorn and Poppi soda’s online for a Target curbside pickup. Then I created the printable in Canva.
You can print it for FREE HERE. There are 6 tags per page.
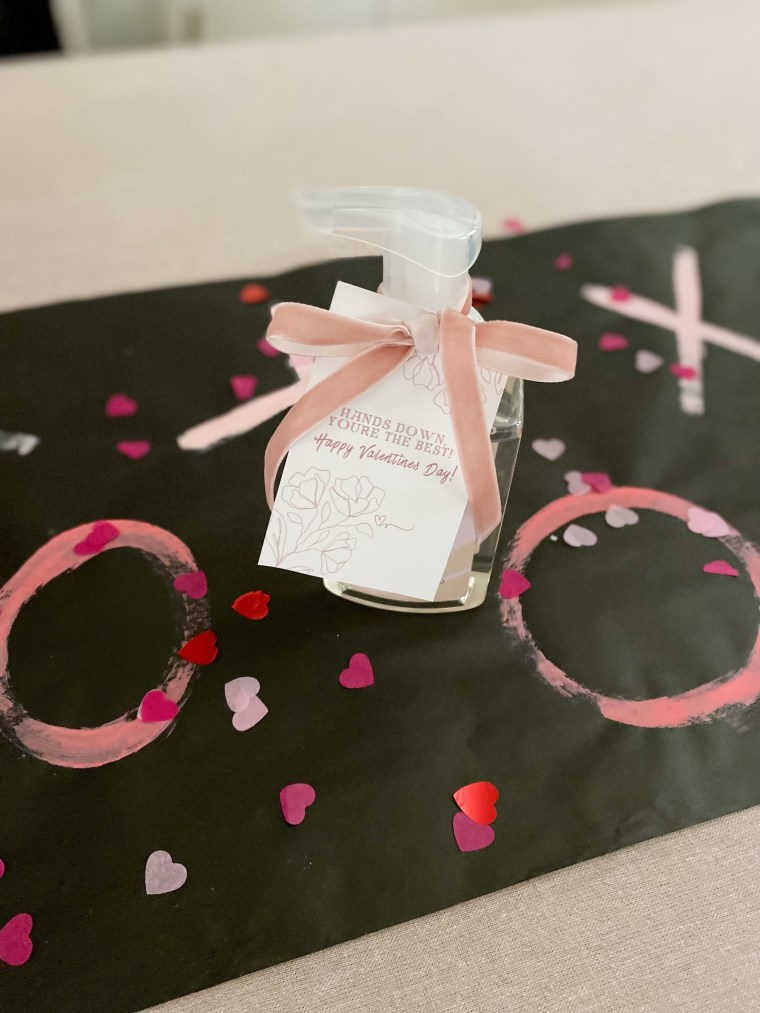
Last year’s practical gift idea featured a handsoap from Trader Joe’s and a cute tag that was a play on the gift itself, “Hand’s Down, You’re The Best.”
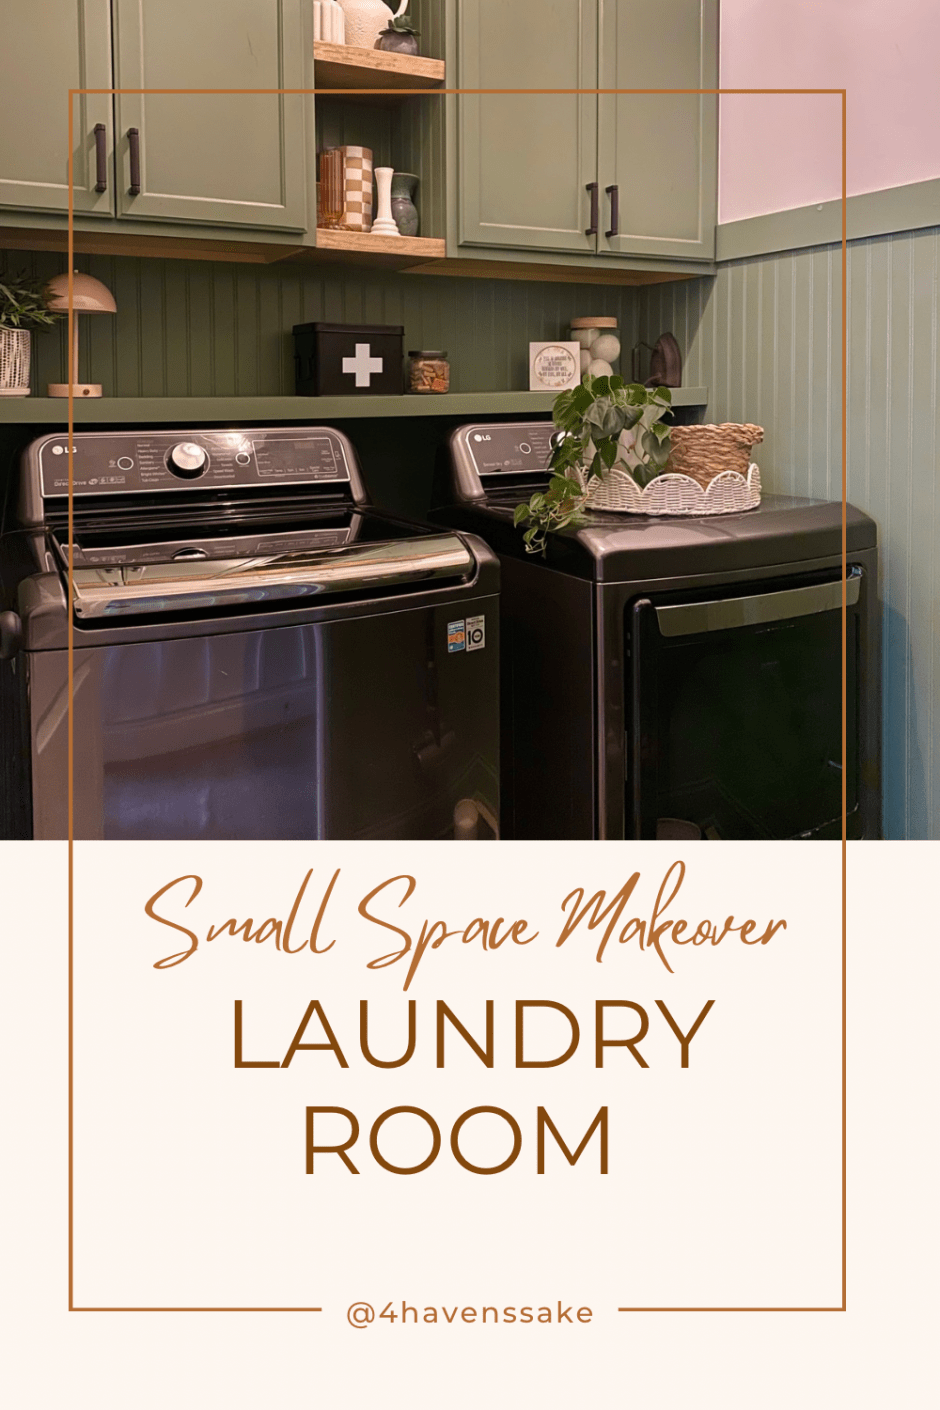
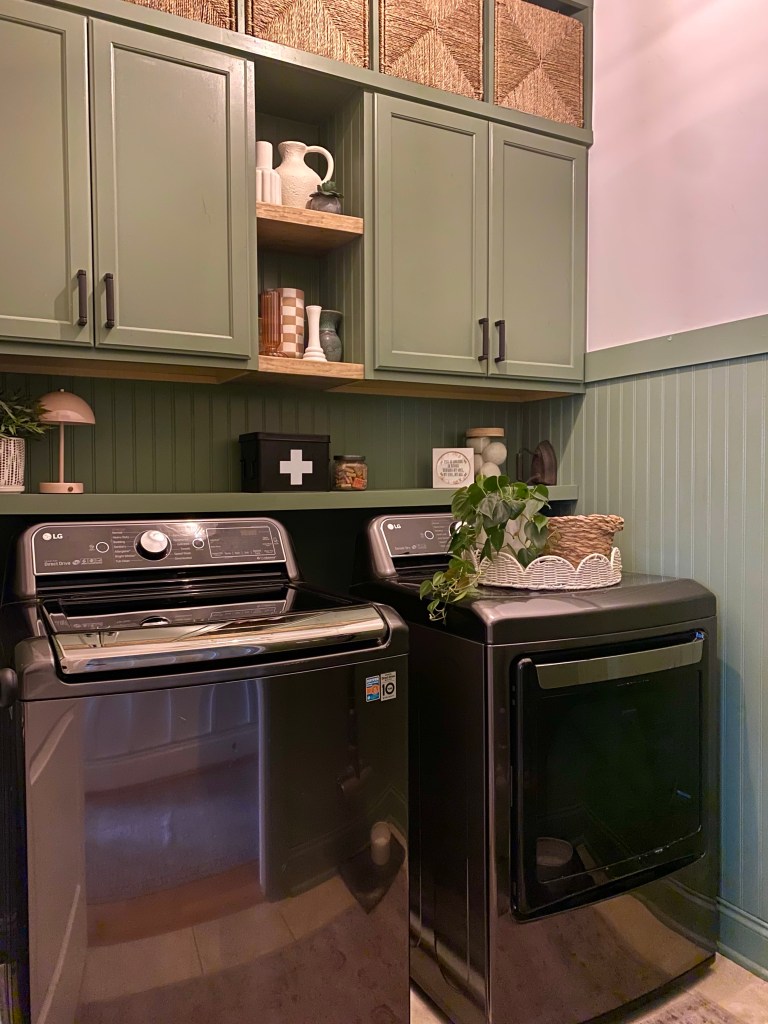
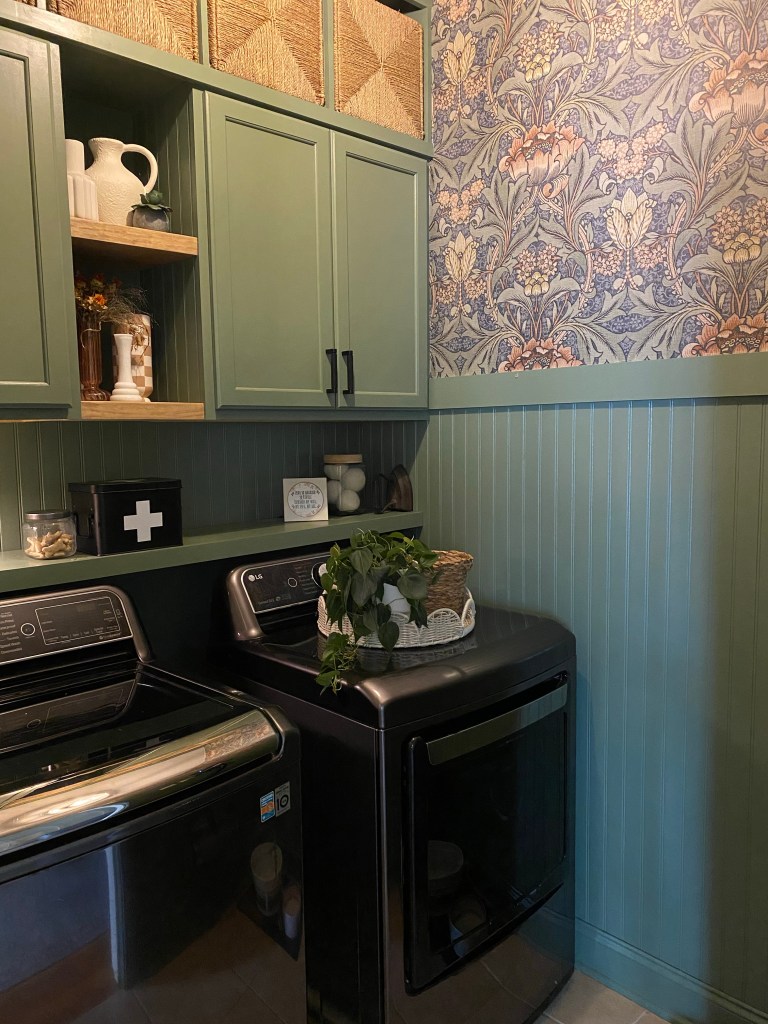
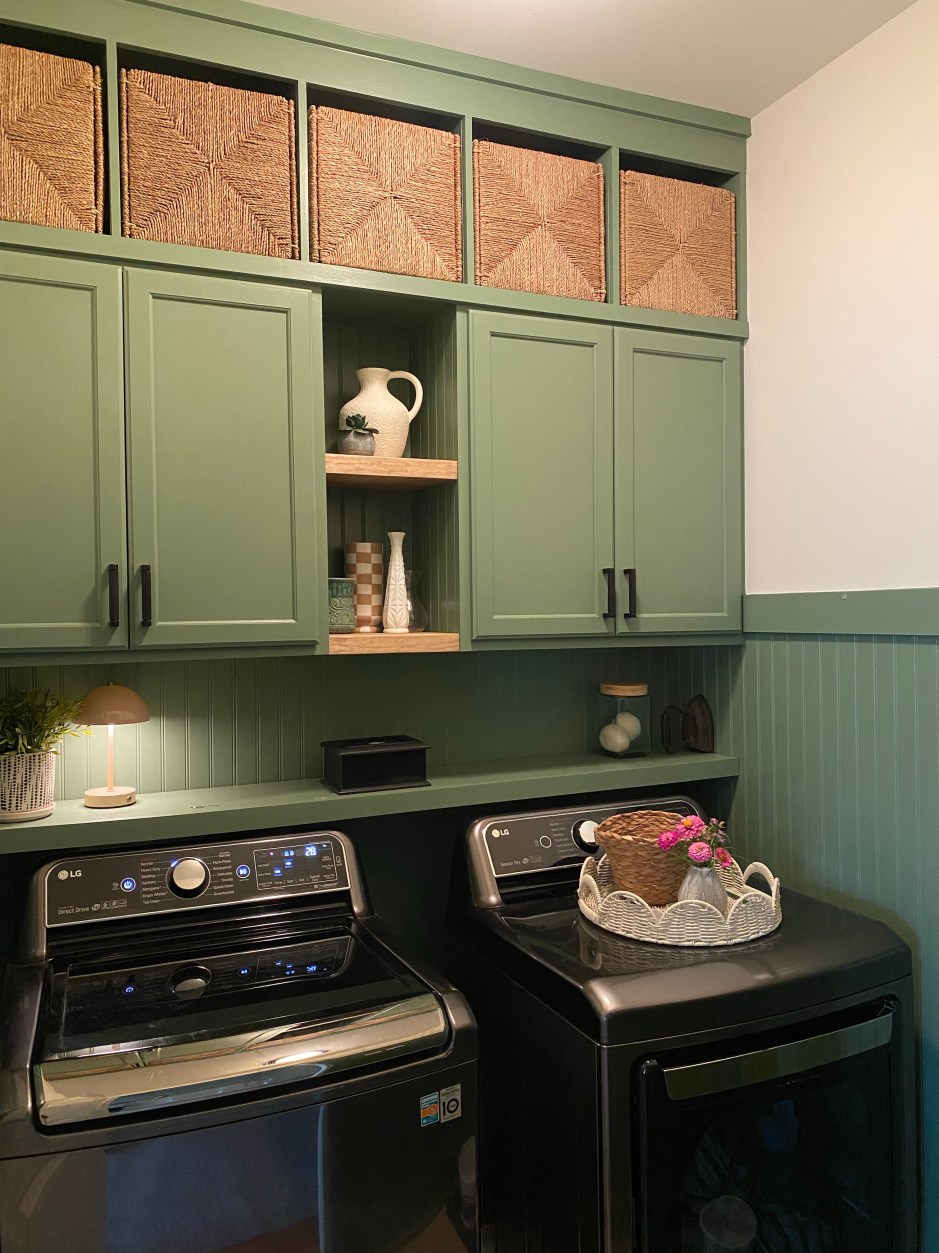
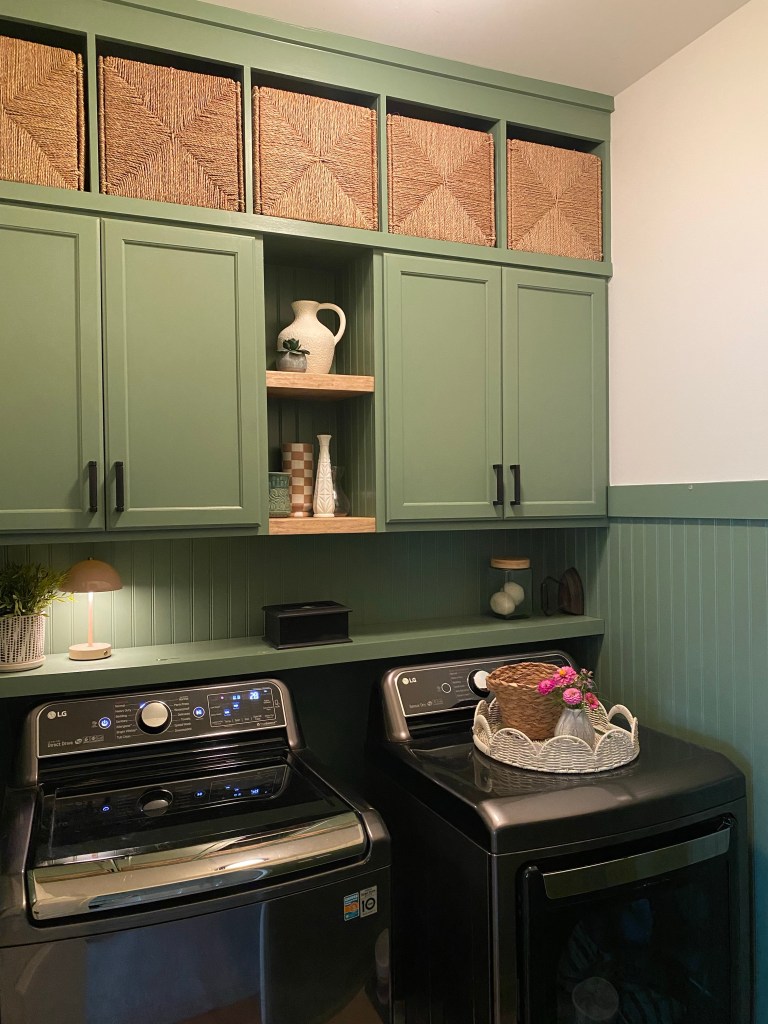
From a cluttered corner to a cozy clean zone, our small laundry room glow-up is complete after I finished my first successful wallpapering project in our home.
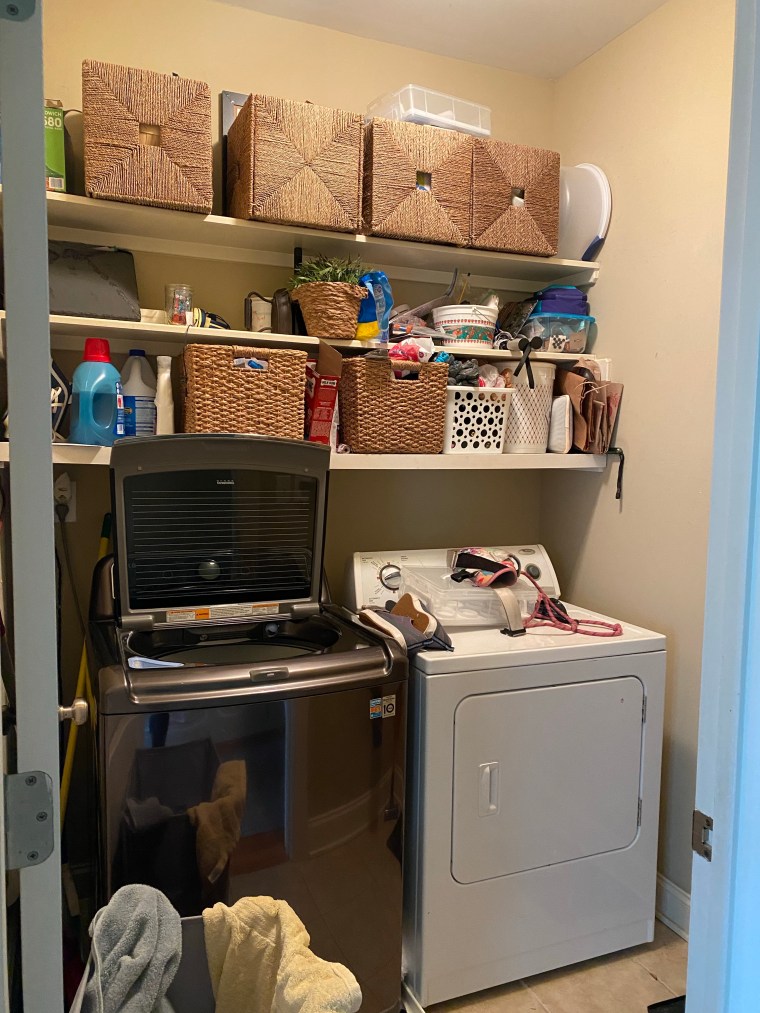
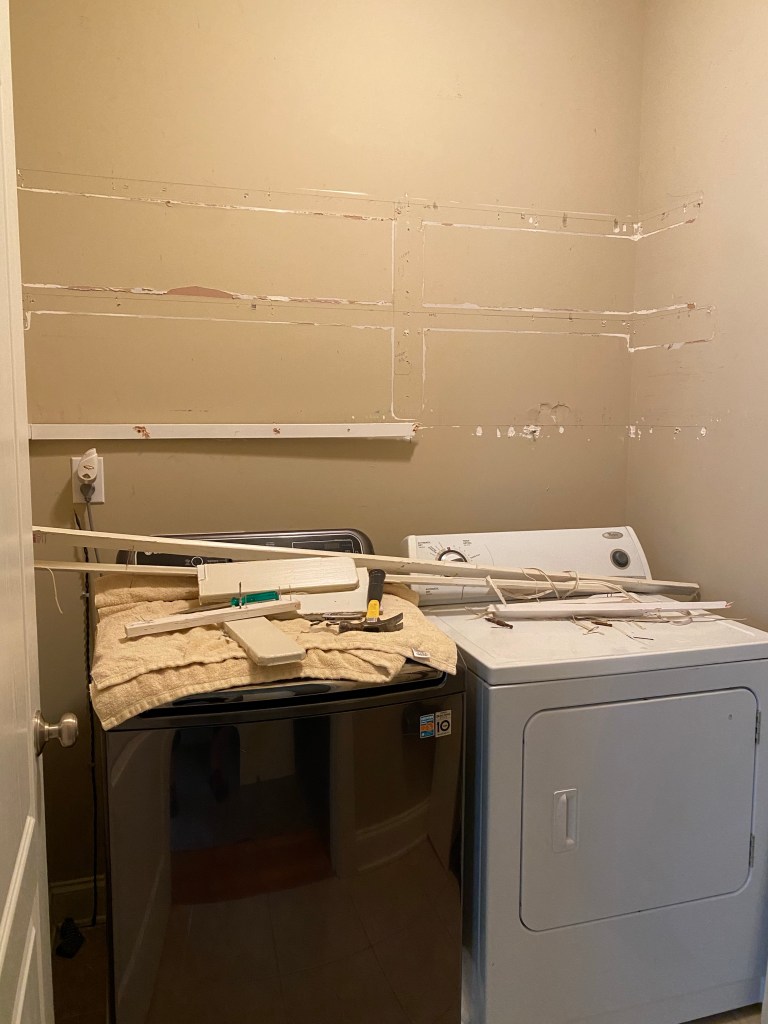
Let’s talk about one of the most-used, least-loved spaces in our home: the laundry room. For a long time, ours was more of a “dumping ground” than functional zone—open shelves full of visible clutter, a constant eyesore for guests who entered through our garage door or used the nearby guest bathroom.
After living with a half-updated version of the room for over a year, I finally decided it was time to really finish it—and that meant trying something totally new: wallpaper.
Spoiler alert: it totally transformed the space. And yes, I smile every time I walk past it.
Let’s take a quick trip down memory lane and revisit how much we had done in this space prior to wallpaper.
Before: The Struggle Was Real
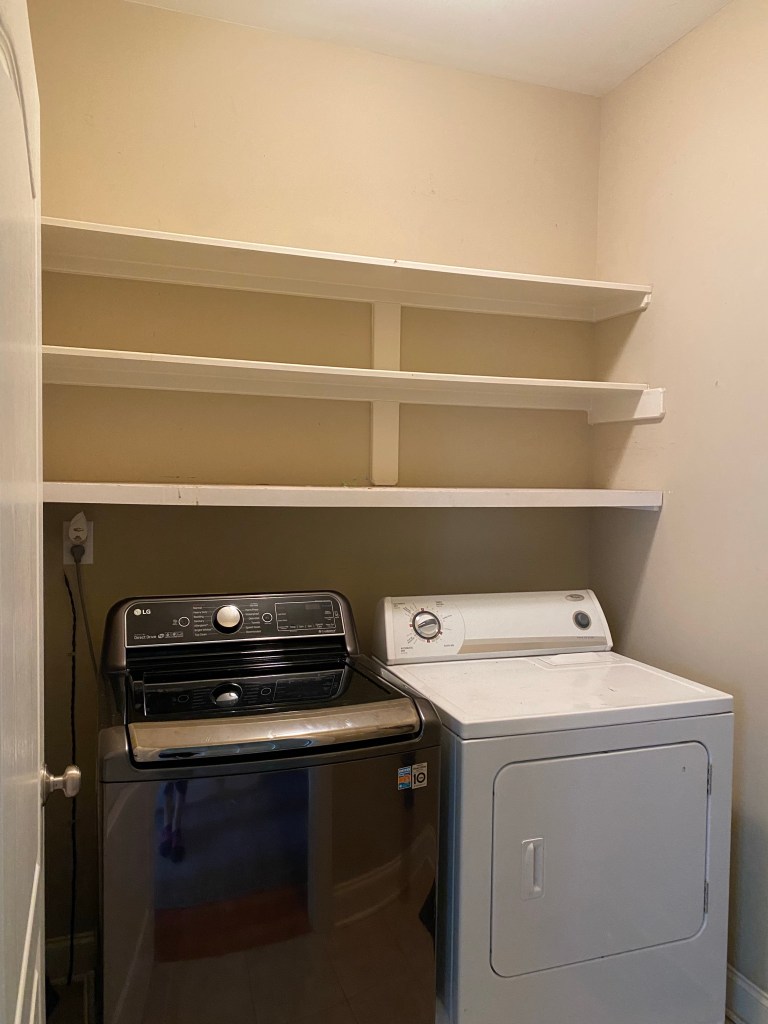
When we moved in, this small laundry room had basic open shelving, which seemed helpful at first—but quickly turned into a visual mess. Everything we needed was accessible, but also on full display. Not ideal, especially since this hallway sees so much guest traffic.
I knew the room had potential, but I needed a plan that was budget-friendly and achievable without a full remodel.
The Big Changes (One Step at a Time):
This wasn’t an overnight transformation—it came together piece by piece. If you want to read all about the steps listed below, I wrote about them in detail in this post.
• Ripped out the open shelving (good riddance!)
• Patched and prepped the walls where the new setup wouldn’t cover
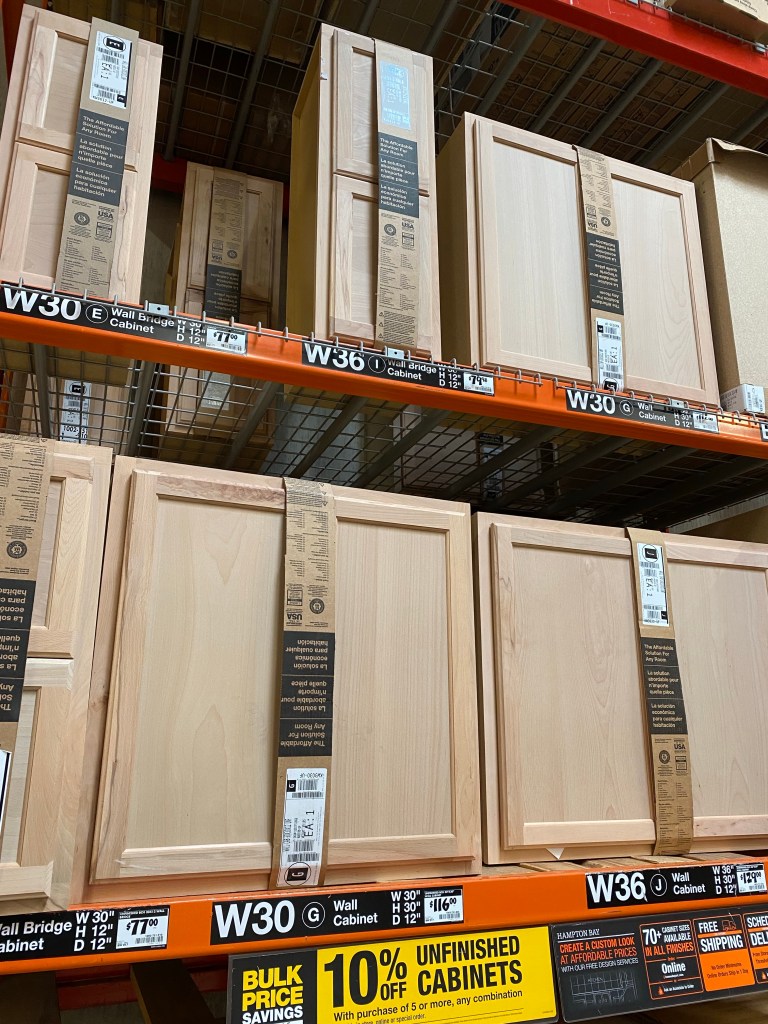
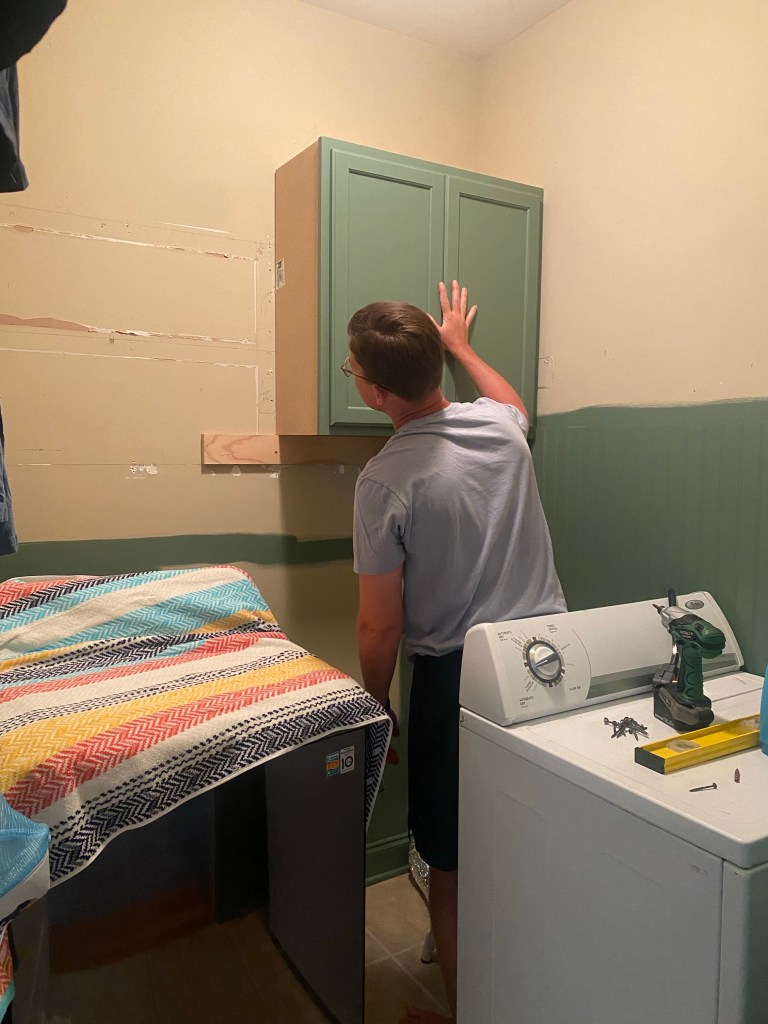
• Installed stock cabinets from Lowe’s (I primed, painted, and we installed them ourselves—teamwork win!)
• Built custom cubbies above the cabinets to perfectly fit baskets we already had
• Added beadboard and trim to bring in some texture and charm
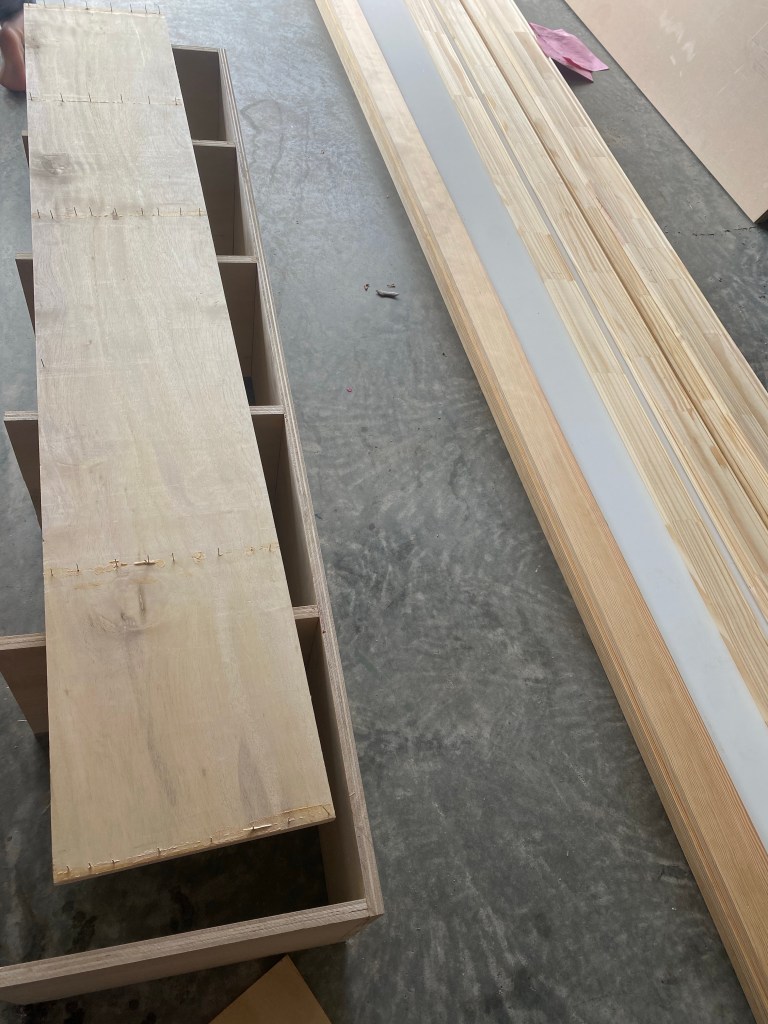
• Built custom shelves to go between cabinets (this was also a first). I accomplished making thick shelves by gluing together two pieces of wood then using edge banding to hide the seams. All was sanded and stained to match. They look like one thick shelf.
• Painted, caulked, filled nail holes—all the behind-the-scenes details that make the finish feel clean and professional
For about a year, we lived with those upgrades while I debated how to add that “something special.” I didn’t want it to just feel done—I wanted it to feel designed.
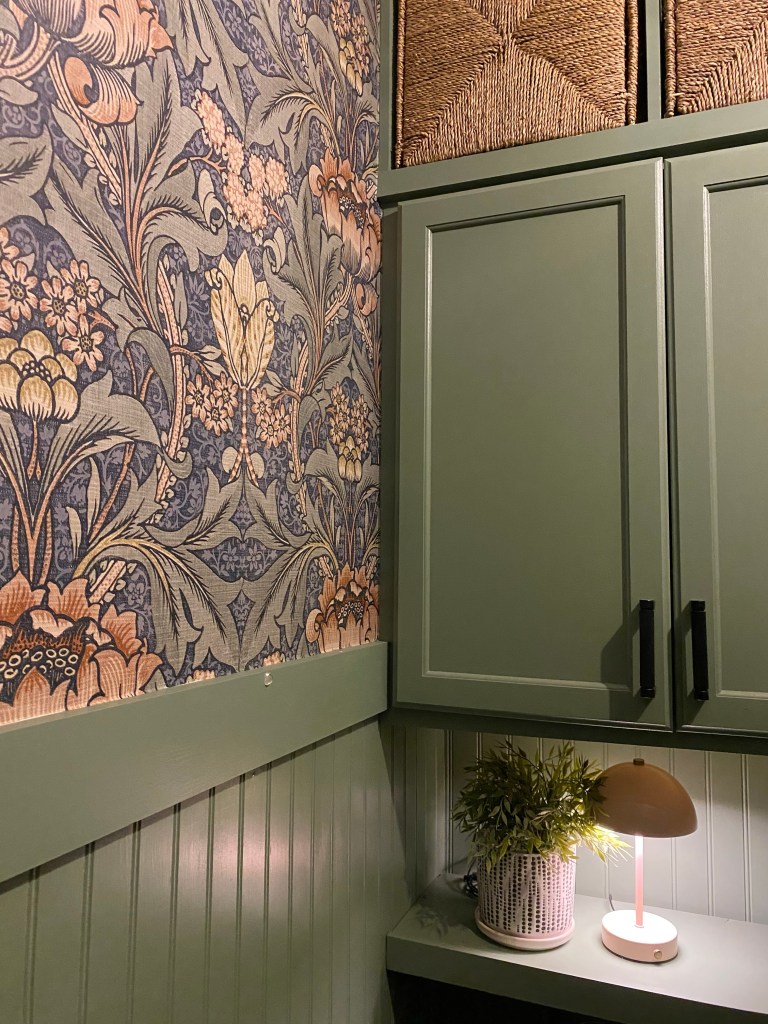
The Finishing Touch: My First Wallpapering Project
Enter: Bold Wallpaper
I’d never wallpapered anything before except for an attempt at a friends home in their powder bath. We were successful until we reached a corner and then we struggled. Enough time had passed after that attempt so I finally decided to go for it in our home—and I’m so glad I did. I chose a bold pattern that felt cheerful and cozy (and a little unexpected for a laundry space).
To make things easier, I used a spray adhesive in addition to the peel-and-stick wallpaper. I WISH we had known about this product when I tried helping my friend! Total game changer. It allowed the paper to stay more movable while applying, so I could reposition it without having to fully peel and restick it.
You’ll also need a wallpaper kit, likethis one I used.
Also recommended, a laser level. This helps to keep your design straight as you apply each piece.
The After: A Space That Makes Me Smile
Now, this little laundry room feels like it belongs in our home. It’s functional, organized, and—dare I say—pretty!
What used to be a space I tried to hide is now one I’m proud to show off. Proof that even the smallest, most utilitarian spaces deserve a little love (and sometimes, a bold wallpaper moment).
What I Learned (and Would Totally Do Again):
• Don’t underestimate what a few stock cabinets and some custom touches can do.
• If you’ve never wallpapered before, don’t be scared! Spray adhesive was key with peel and stick wallpaper.
• Letting a space evolve over time can help you land on the right final vision.
• Small spaces deserve design, too!
Before & After Photos
If you’re sitting on a half-finished space and waiting for the “right time” to complete it—consider this your sign. The little details (like wallpaper) might be just what it needs.
Have questions about how we did something? Drop them in the comments—I’m happy to share more!
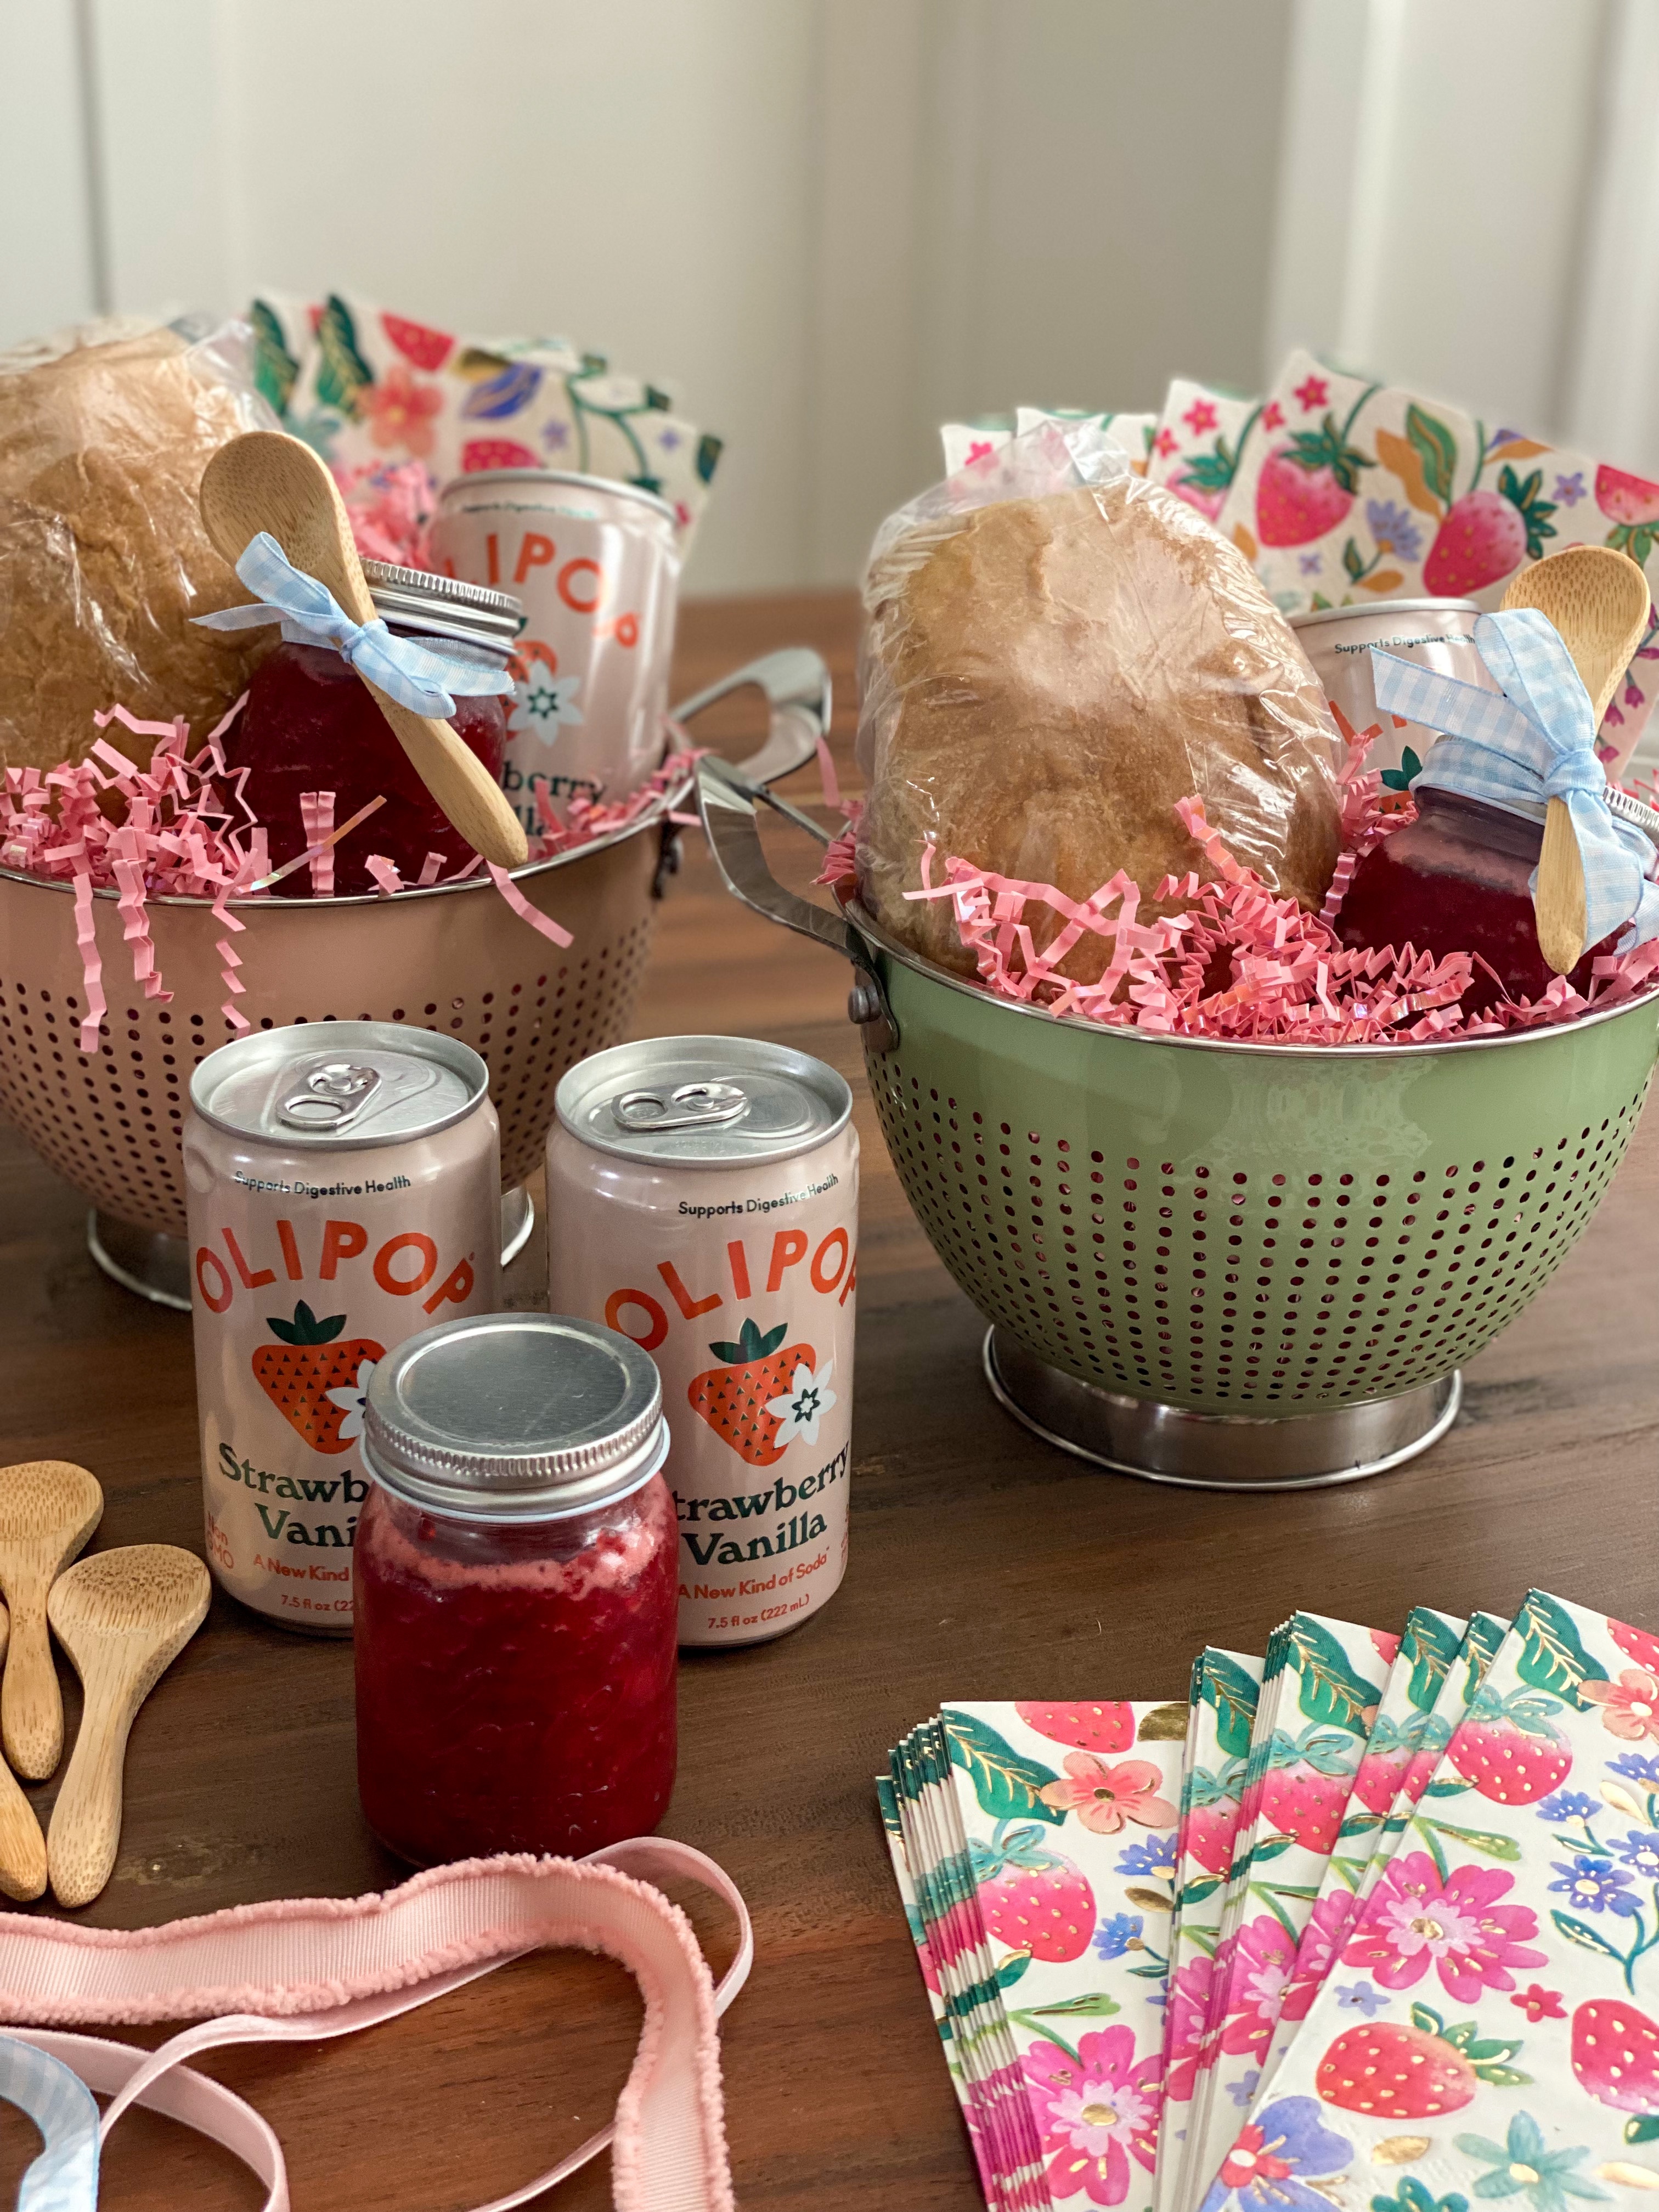
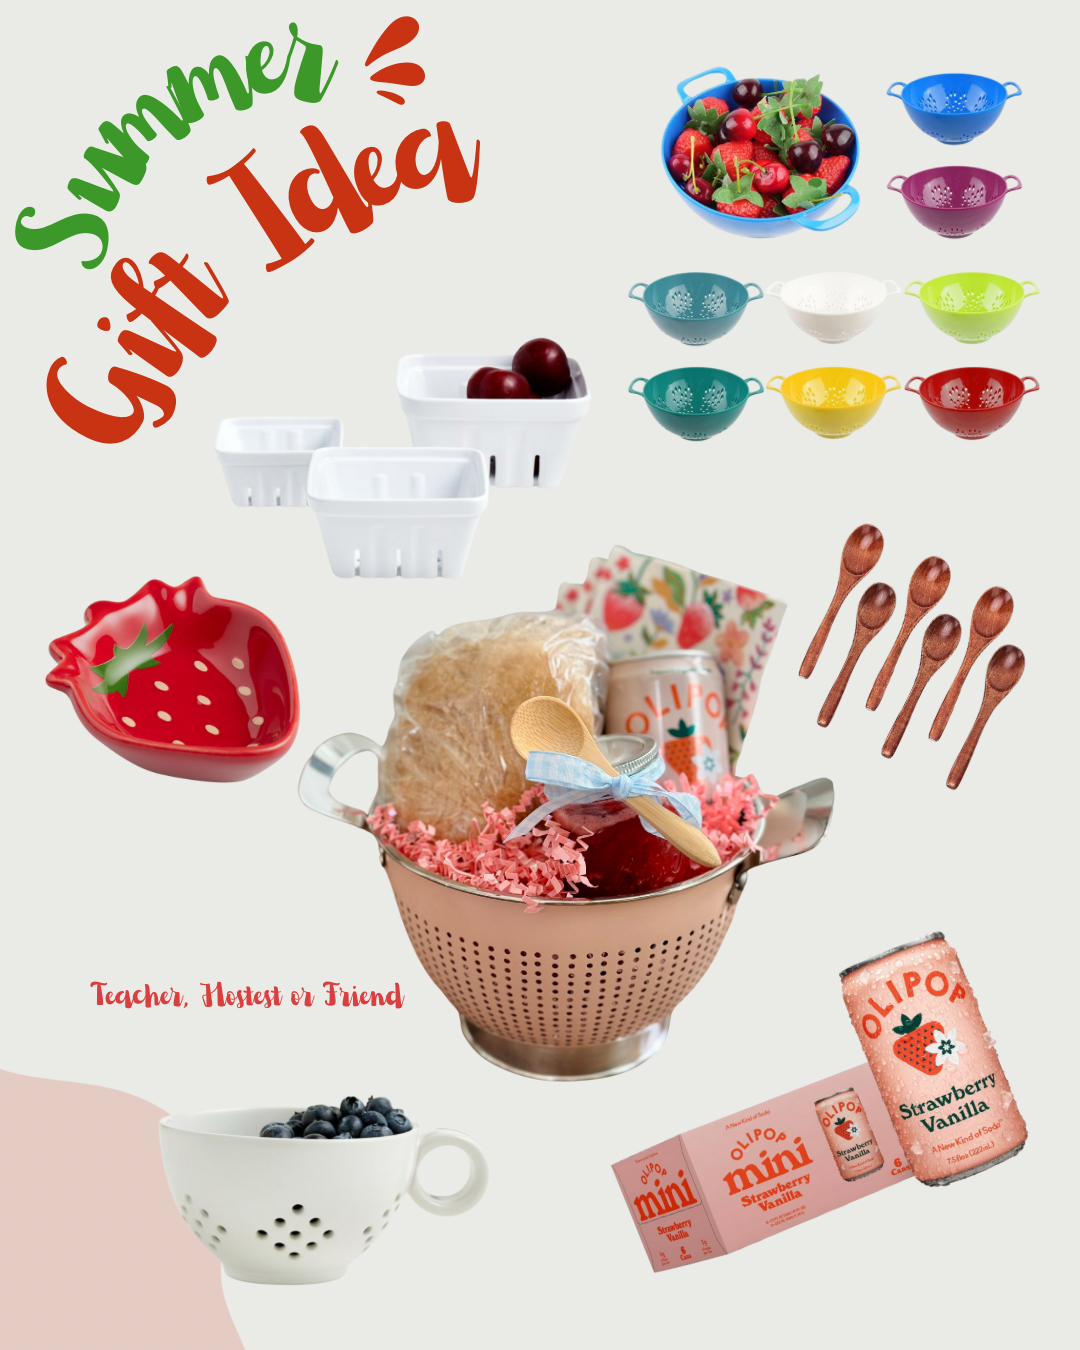
With strawberry season in full swing, I wanted to put together a thoughtful, seasonal gift to say thank you to the incredible teachers who’ve poured into my kids all year long. There’s something extra special about a homemade gift, and I loved the idea of celebrating the sweetness of spring with a “berry sweet” theme!
This little bundle includes a few of my favorite things—simple, homemade touches and a few seasonal finds that pair beautifully together. Whether you’re making something similar for teachers, neighbors, or friends, this combo is sweet, personal, and easy to pull together!
What’s Inside:
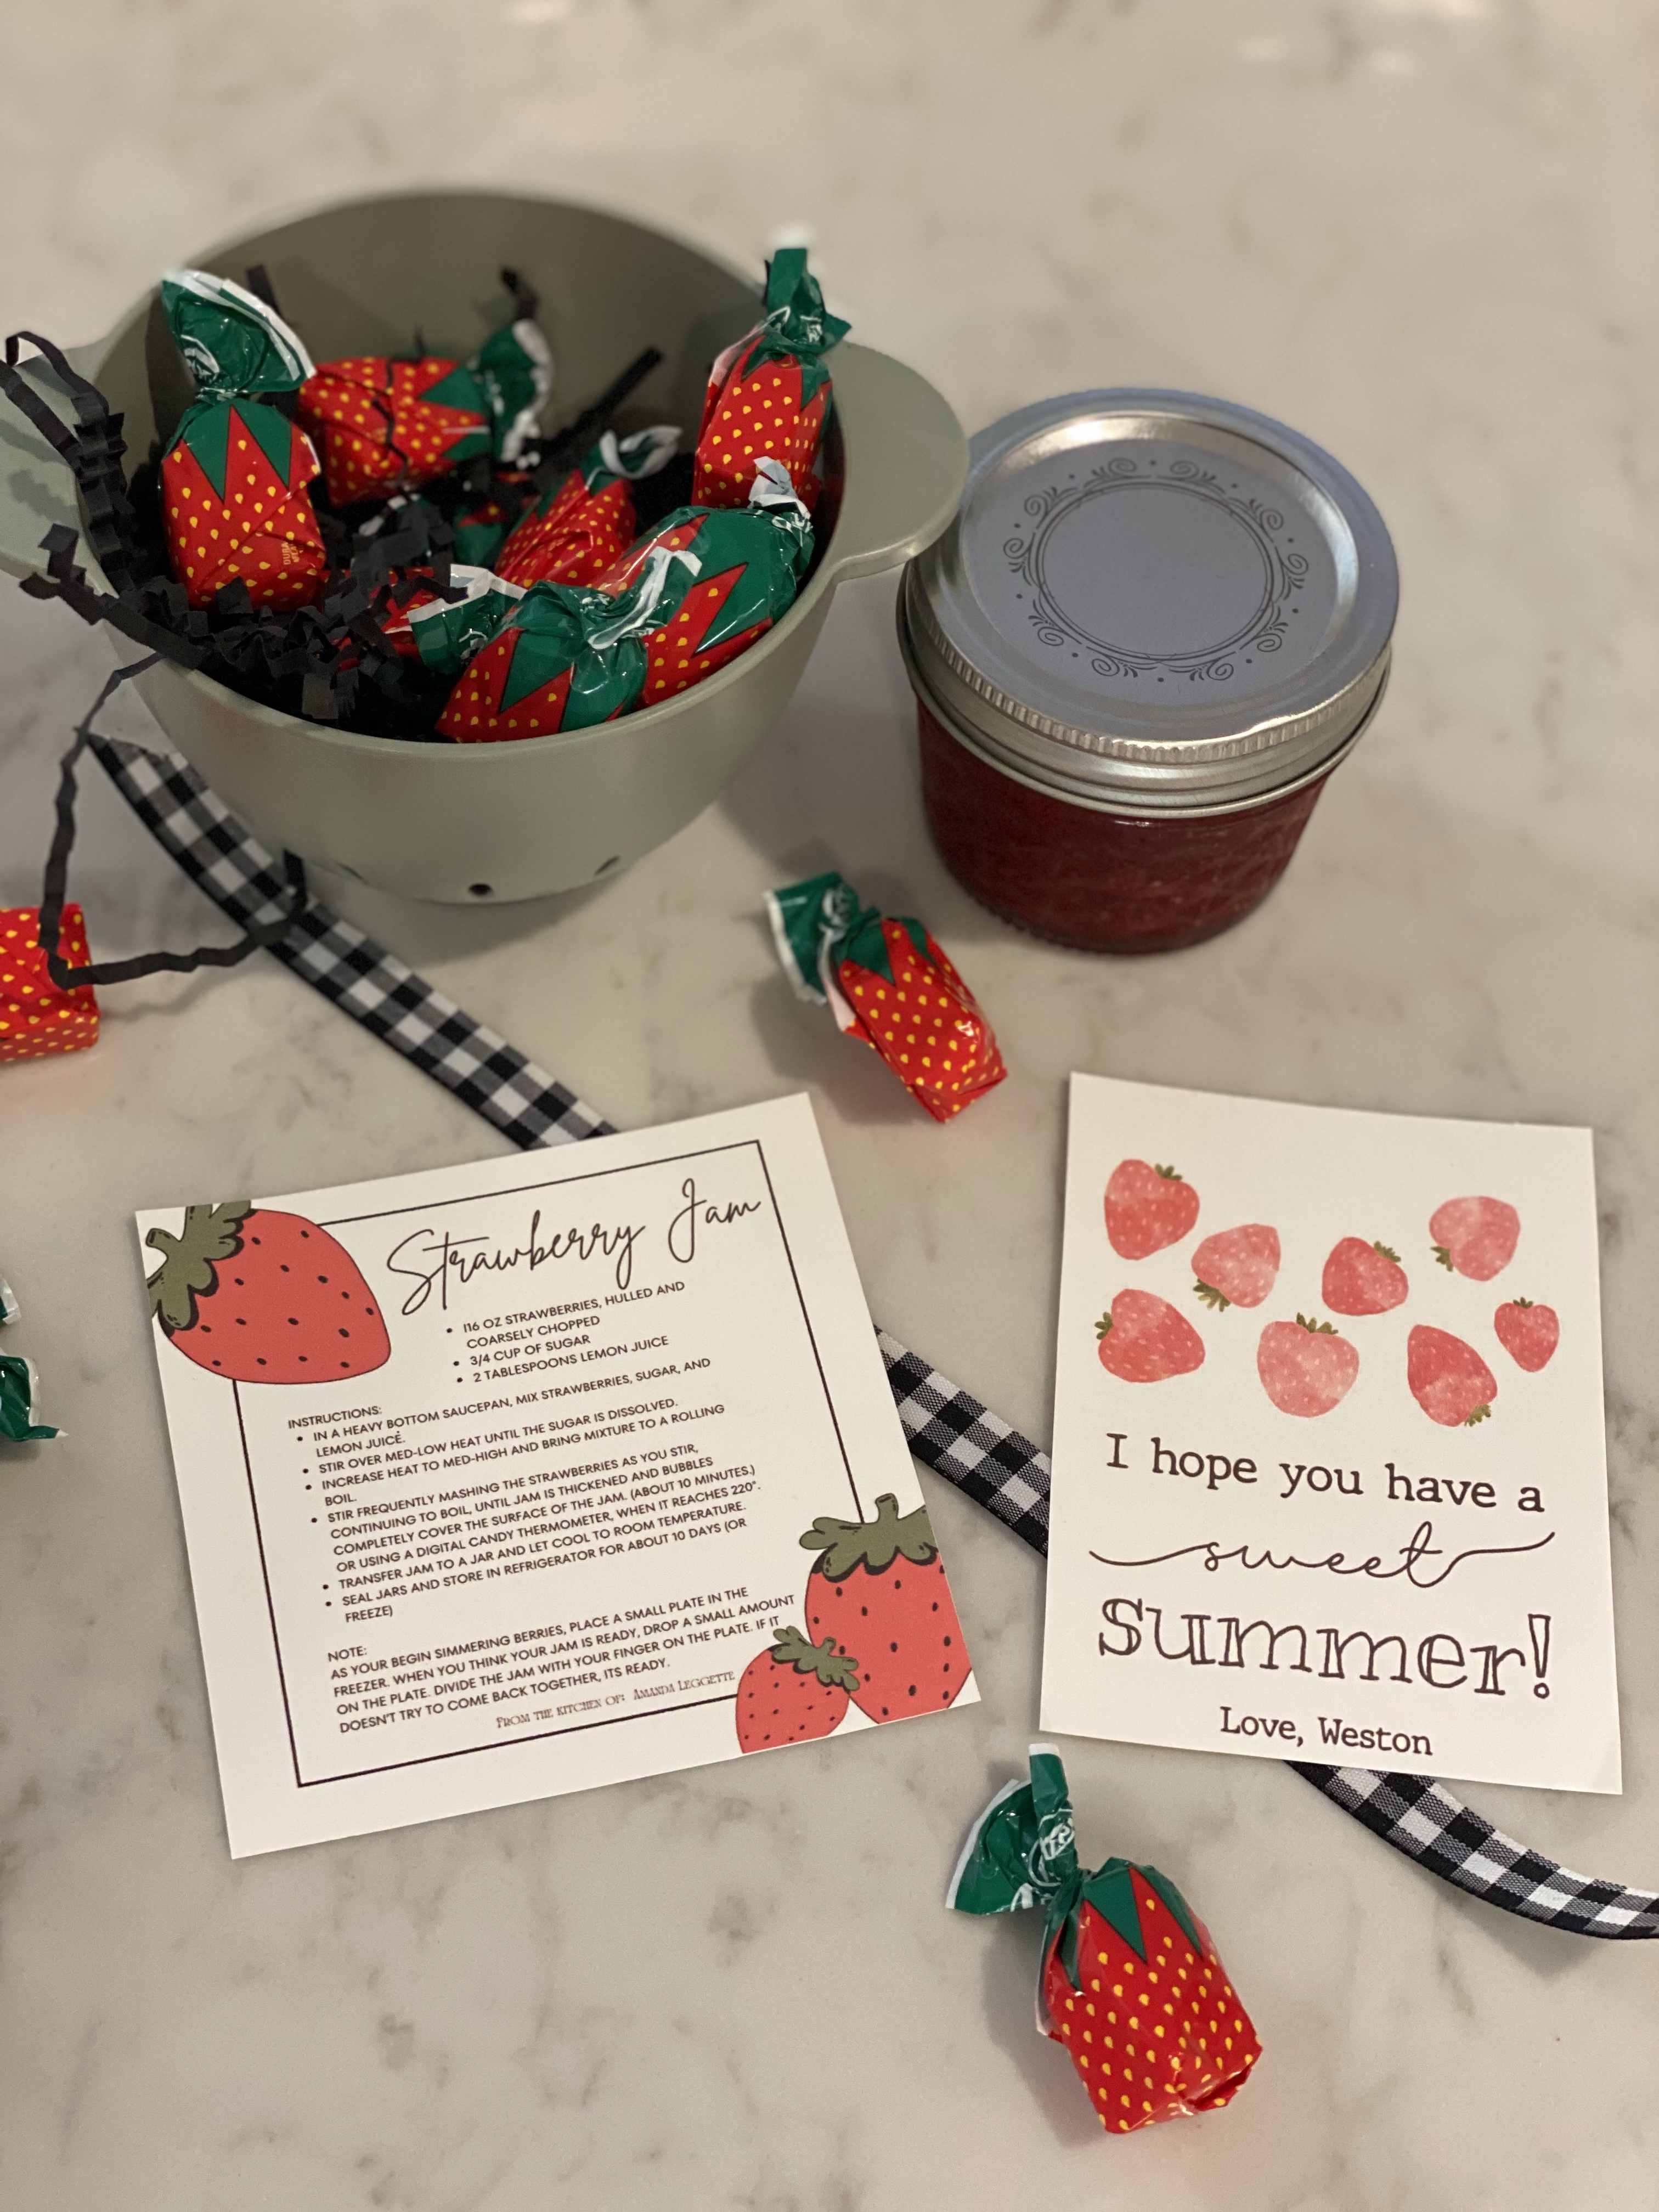
Homemade Strawberry Jam – I’m sharing my go-to recipe below. It’s quick, delicious, and the perfect way to make the most of fresh strawberries.
Mini Sourdough Loaf – Made with love. There’s nothing better than fresh jam on warm bread, so I included a small loaf of my homemade sourdough. You can support a local bakery and buy scones or fresh baked bread.
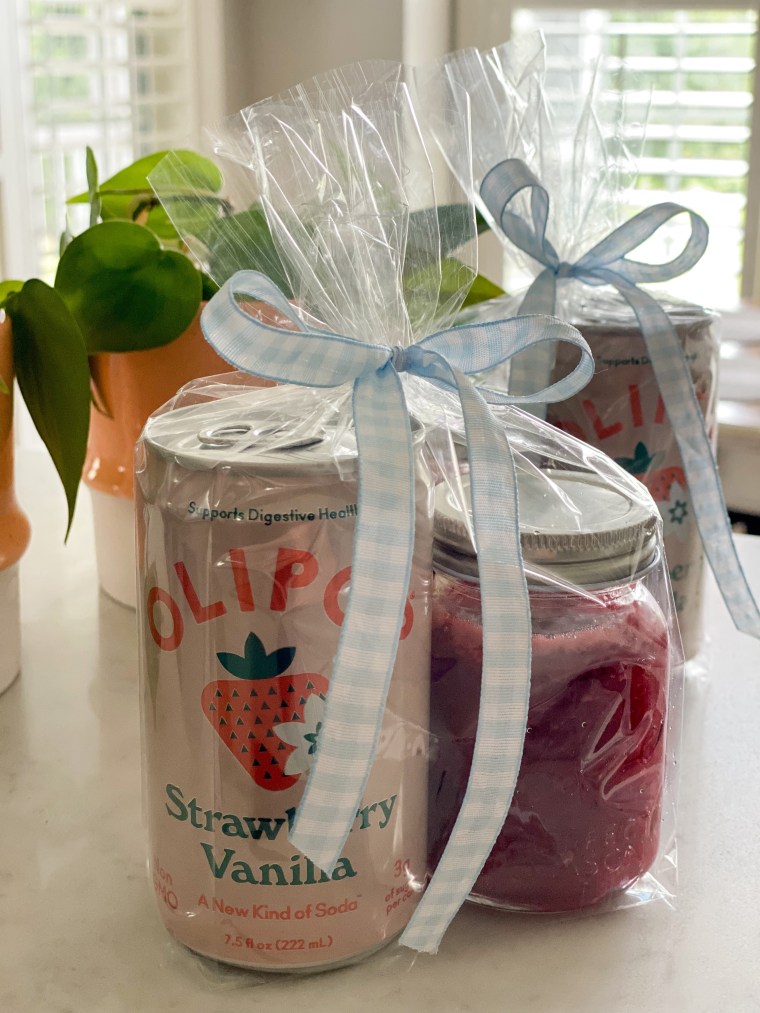
Strawberry Soda – This adds a little fun and sparkle to the gift. I picked up mine from Target – Mini Olipop Cans
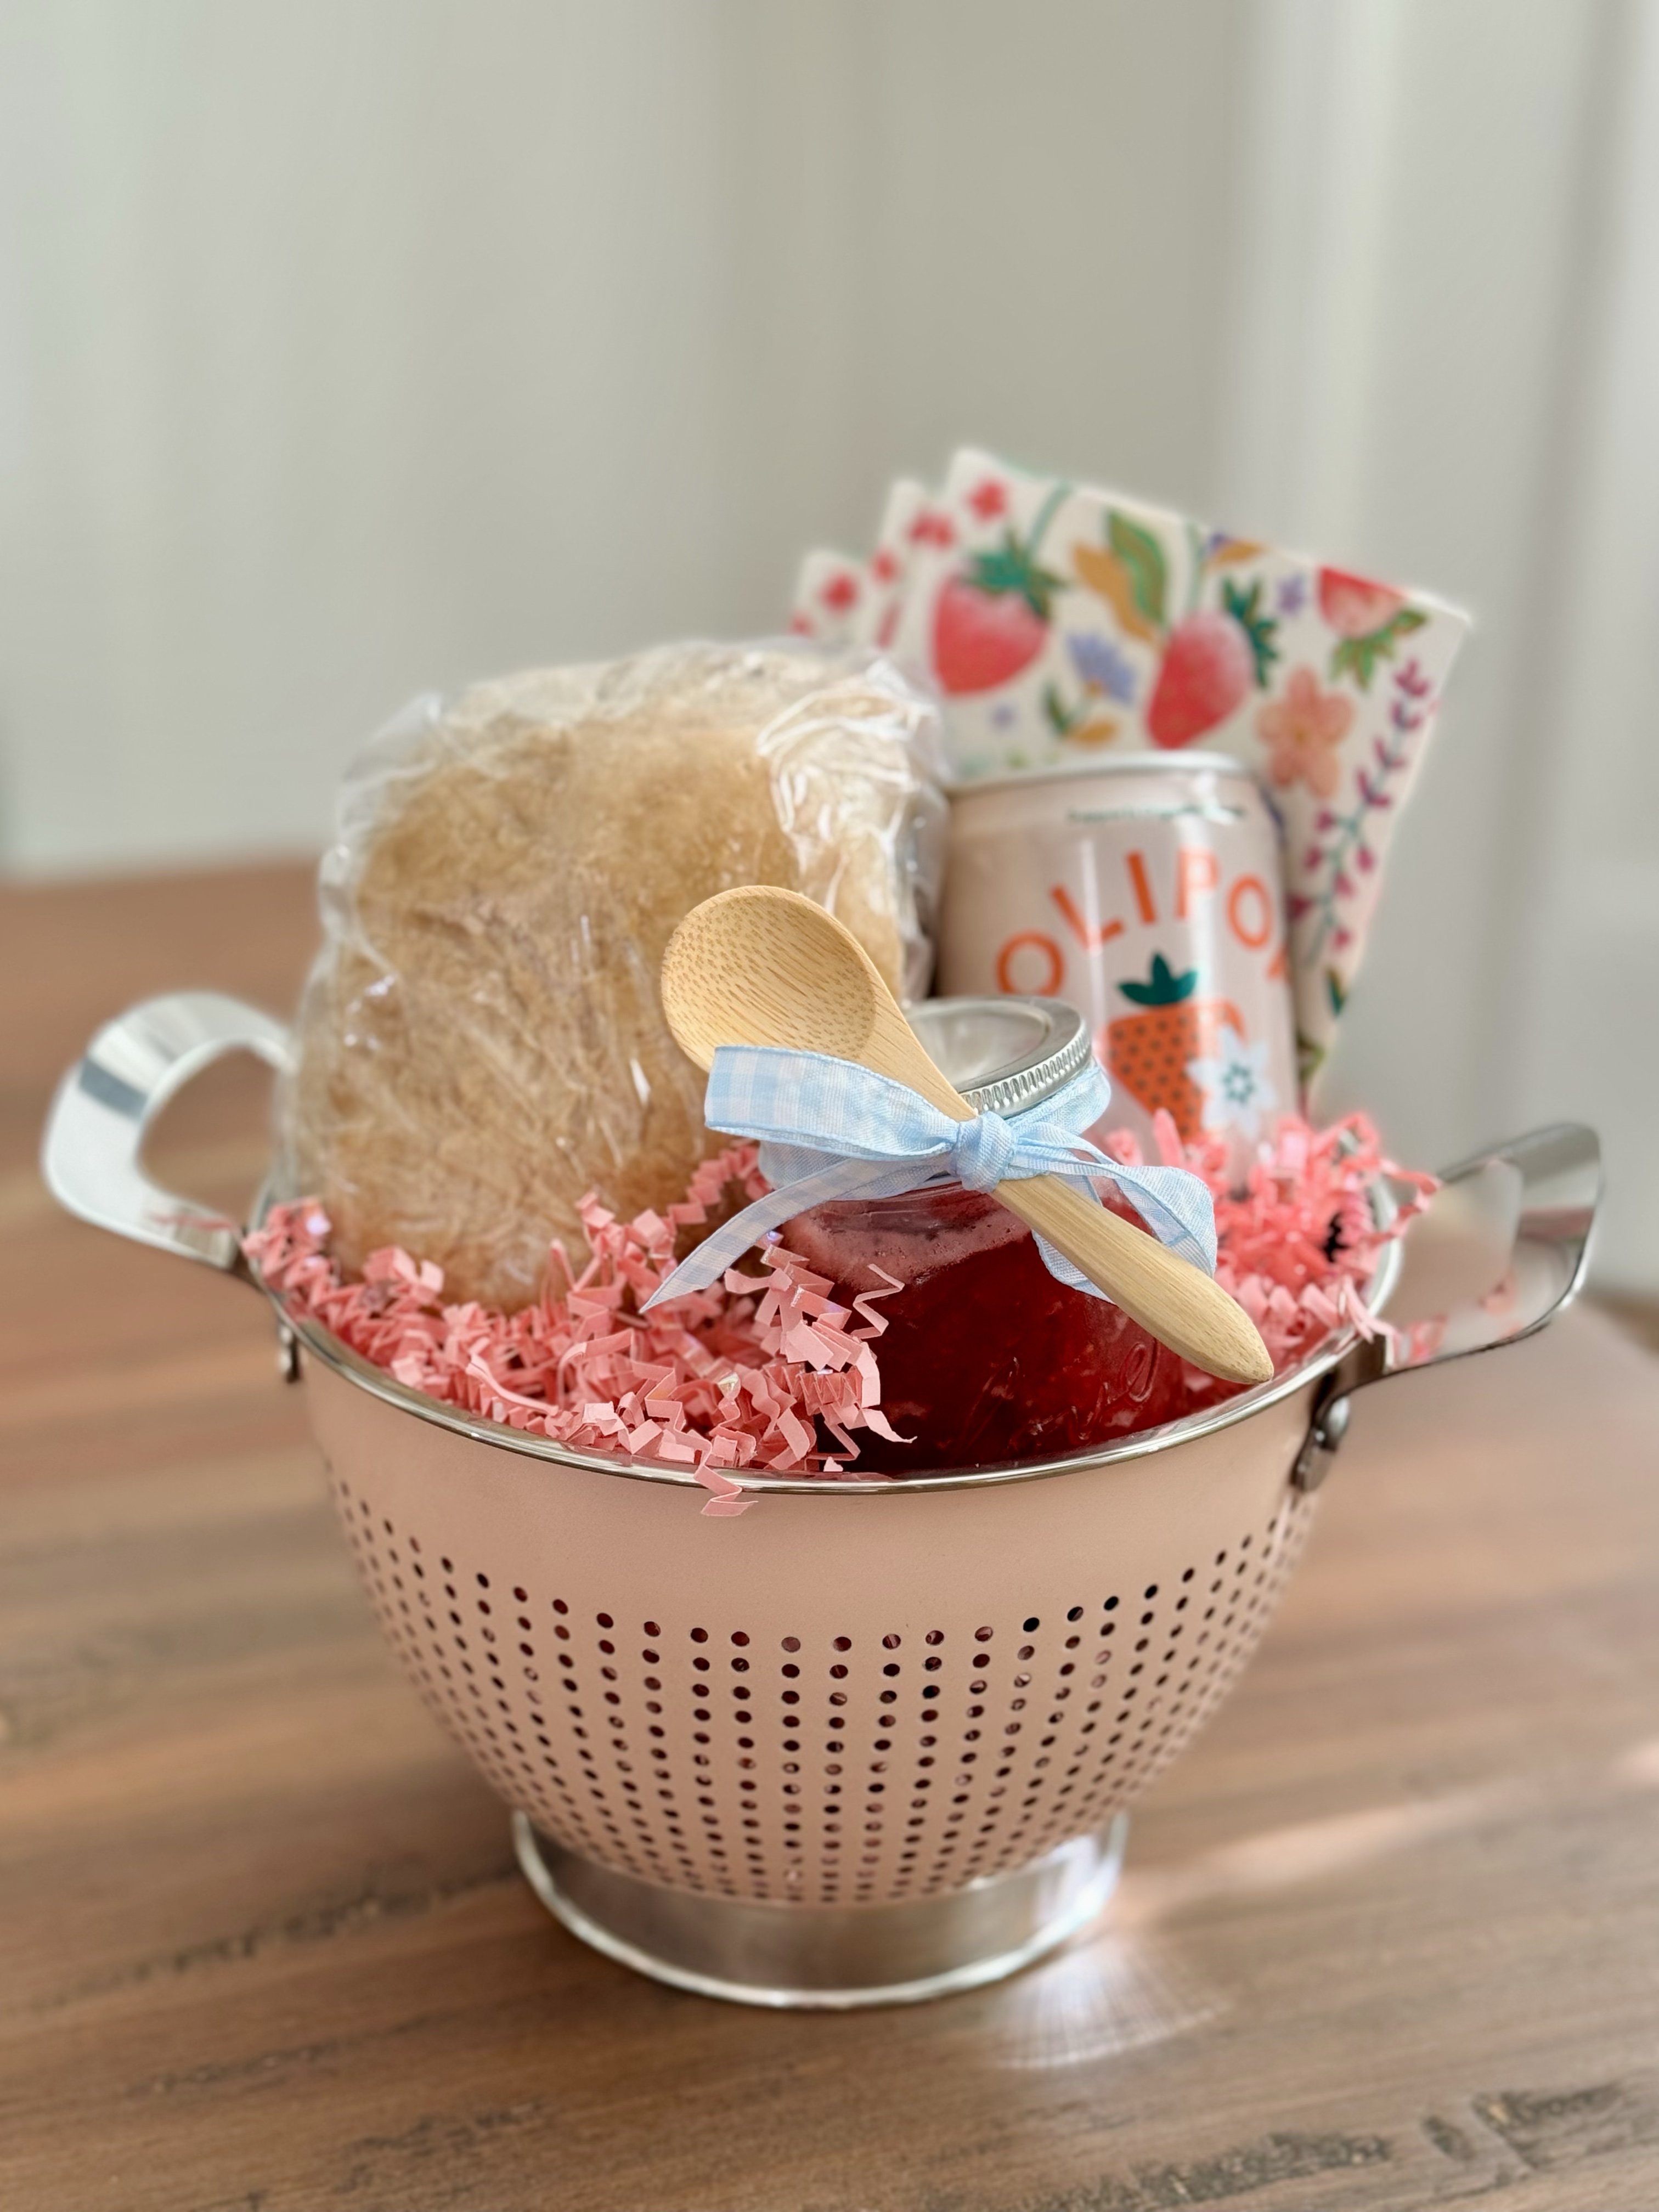
Mini Berry Colander – I tucked everything inside this adorable berry strainer that they can reuse all season long. It adds charm and makes the whole gift feel like a curated farmers market basket. I found these at TJ Maxx but have sourced similar options for you here.
The Presentation:
I used some pink kraft paper shreds in the bottom of the colander to nestle everything inside, then wrapped it up in a clear cellophane bag and tied it with pretty ribbon and a card. I’ve included a printable of the tags I designed which you can customize and add your name.
Print these on cardstock, punch a hole and tie the ribbon.
Homemade Strawberry Jam Recipe:
This is a small batch jam with no pectin—just a few ingredients and lots of flavor. Perfect for gifting!
You can double or triple the batch if you’re making these gifts for multiple teachers. I used 4 oz. jars, which are the perfect size for gifting.
For a smaller themed gift idea, you can pair a small jam jar with a mini Olipop Soda, tie it in a small clear bag and include a plant or giftcard.
Linked Favorites:
If you’d like to recreate this gift, I’ve rounded up a few similar or exact items for easy shopping:
Whether you’re wrapping up the school year or just want to share a little springtime joy, this is a sweet, simple way to show someone they’re appreciated and loved.
Have you ever made a seasonal-themed gift? I’d love to hear your ideas—and if you try this one, tag me so I can see your berry sweet creations!
House projects are funny. You make a list of things you want to do, both big and small and either check them off little by little or stare at the same list for years. We’ve been in our home for 8+ years and have really only scratched the surface on projects we want to tackle and yet at the same time, we have done so much.
This particular project recently became a priority as I have found I need to hide the clutter and for everything to have a designated space. The clutter started to feel heavy in my mind and that was something I needed to offload.
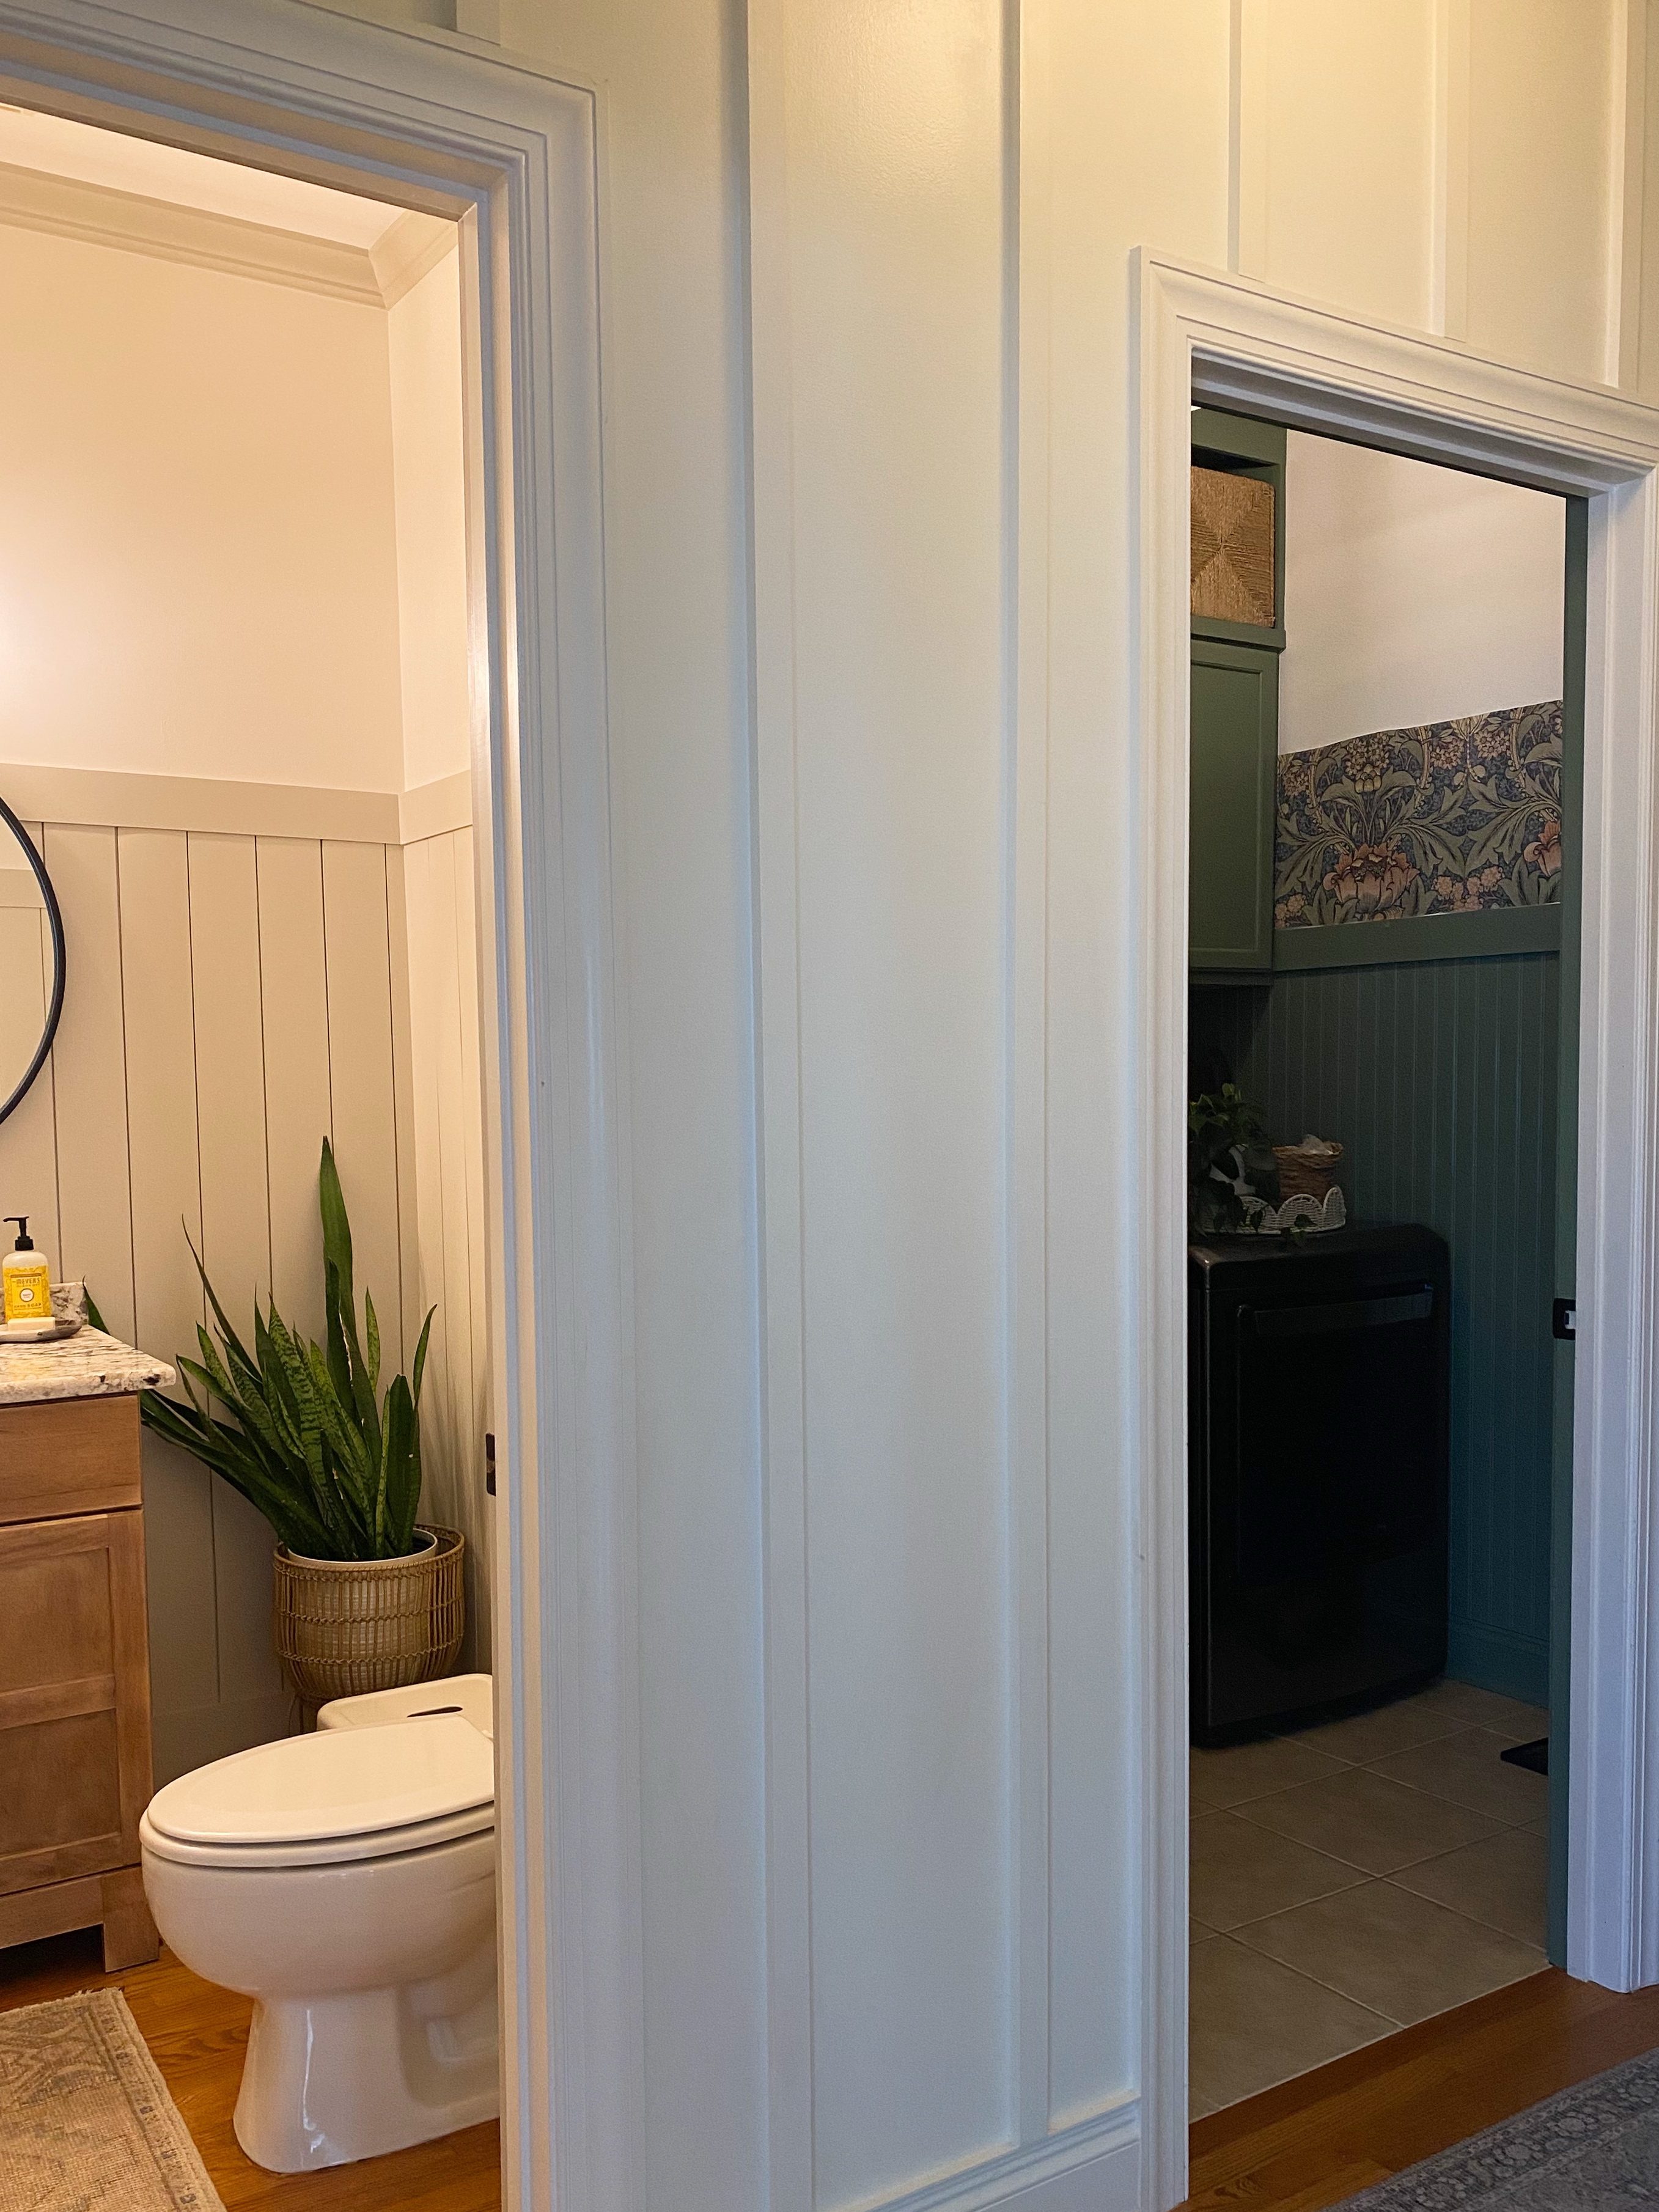
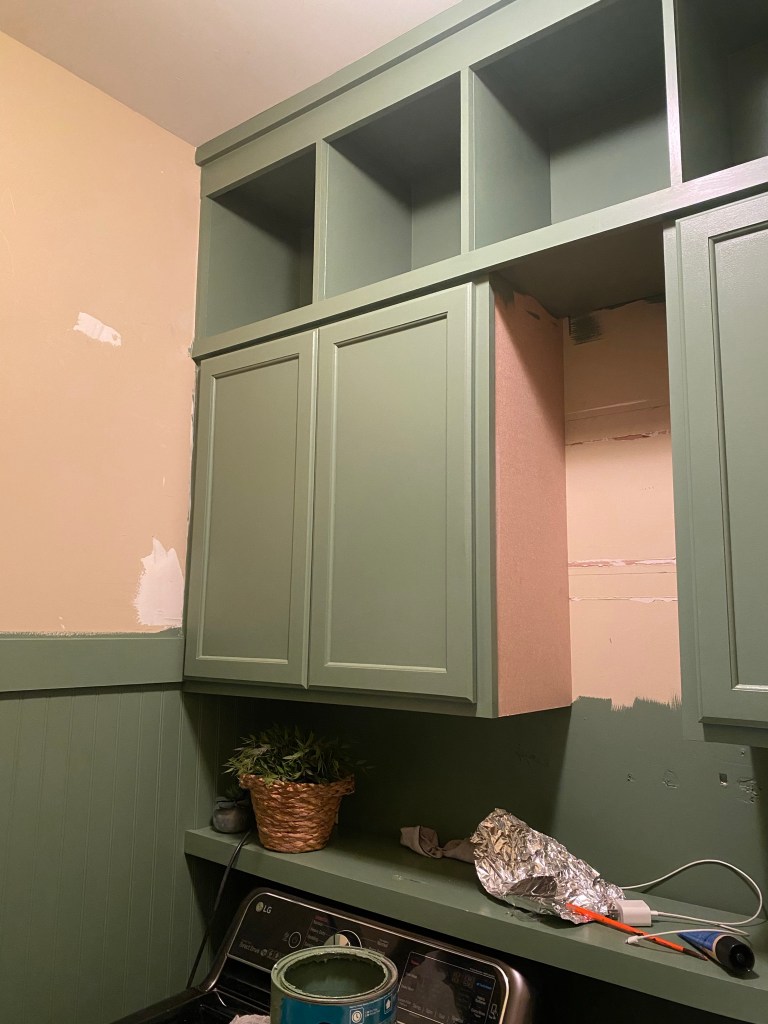
Our laundry room always has the door open as our dog’s food and water bowls are in this space. Additionally, it had open shelving so it always looked messy.
The hallway where the laundry room is has also become the point of entry we use most. Guests often come in this door instead of the front door as well. While we can’t change the footprint of this area, I could control the appearance and functionality of this space.
Control the controllables.
Before: (YIKES)
Do you understand why I needed to clear this clutter by physically and mentally?
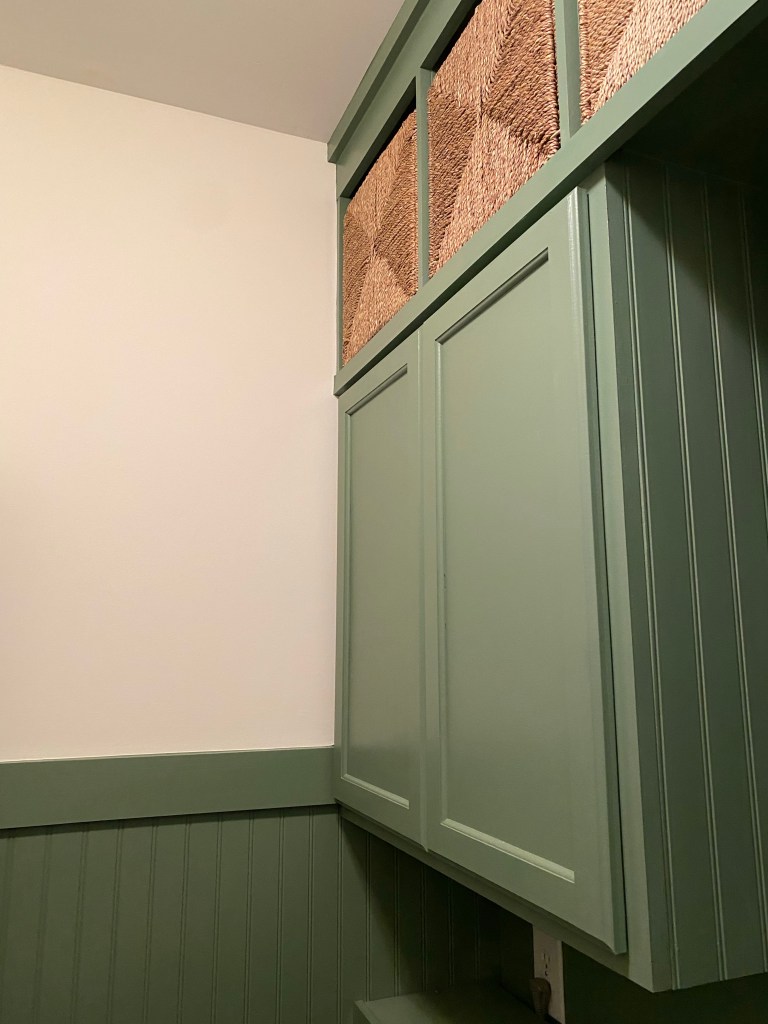
I knew I wanted cabinets with doors for storage and open cubbies to fit baskets above them.
My plan:
Buy unfinished stock cabinets that fit in the space
Prime and paint cabinets
Add hardware
Build cubbies to fit above then paint to match
Add trim at the ceiling
New light fixture
Add beadboard on the walls and eventually add a fun wallpaper
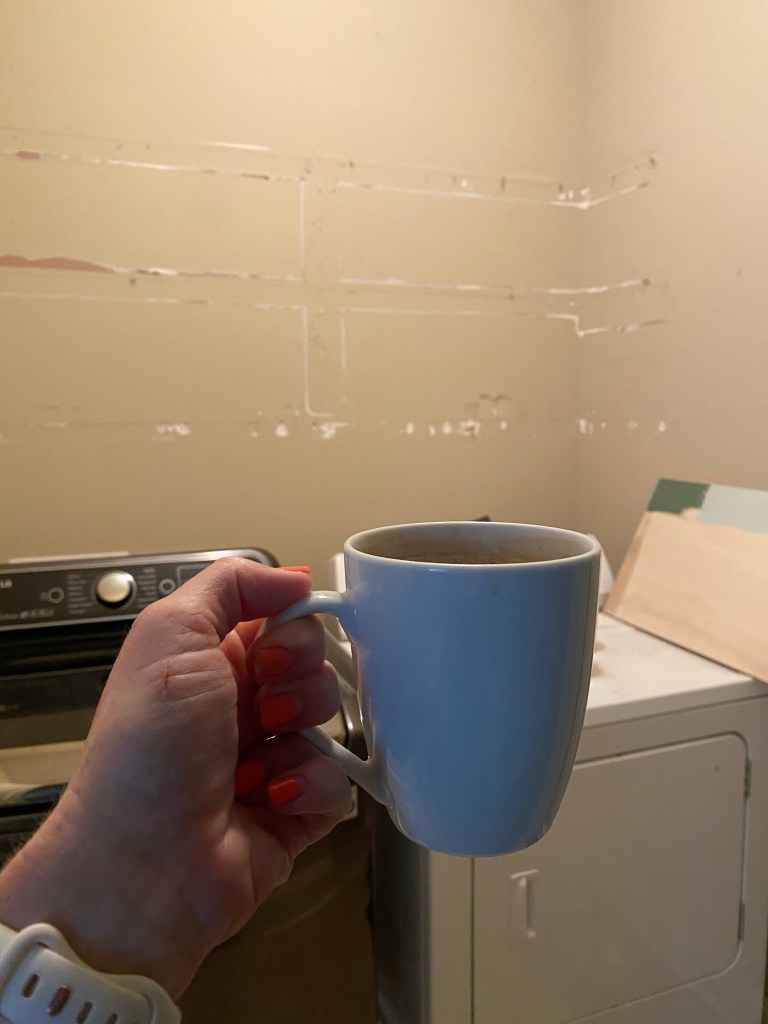
But first, demo and prep the walls for all the mentioned items above.
I kept the shelving boards to repurpose in one of the boy’s closets. I’ll share more on this in another post soon.
The sheetrock was damaged in areas but knowing cabinetry and wall treatments would hide the majority of it, I focused my attention on the remaining walls.
We decided to go with a dark green paint that we had on hand from a previous project, Dried Thyme.
One thing I’d like to note when you’re selecting paint colors and are tackling a project little by little, remember the big picture of the finished space. Think ahead to the final details you want, the flooring you will eventually add, ect. In this instance, I knew we had future plans to change out the flooring to a 12″ black hex tile.
I first painted the walls green, Dried Thyme, to the height I wanted to add beadboard and trim cap. For visual confirmation on the height I wanted for the trim, I painted a horizontal line of the green paint and measured to make sure that height worked well with the height we would be hanging the cabinets.
It was time to buy the cabinets. I recommend you search online before you visit the hardware store. I have found that not all stores carry the same products and in our case, the closest Home Depot doesn’t stock prefab cabinetry but the next town over does.
Prepping the cabinets is important.
Basic process included:
Remove all staples from packaging
Remove doors
Lightly sand the rough areas with 220 grit paper
Remove residue with tack clothe
Prime, prime, prime – Important if you don’t want to paint multiple coats of the main color
Allow to dry then paint
Allow to dry, lightly sand any rough spots and repeat prep and paint process
Allow paint to cure before putting the doors back on (I waited a nearly a week to be certain but mainly because life was also happening with 3 kids and my husband traveling with work)
I knew there was no way I was going to hang these cabinets by myself. Could it be done? Yes. Did I want to avoid getting injured or damaging the washer and dryers? 100% yes.
With the help of my husband, we added a temporary bracket for the cabinets to rest on while we anchored them into studs in the wall. This actually proved to be very difficult as the studs were not exactly located at the 4 corners of the cabinets on the walls.
We made it work and added extra screws for safe measure.
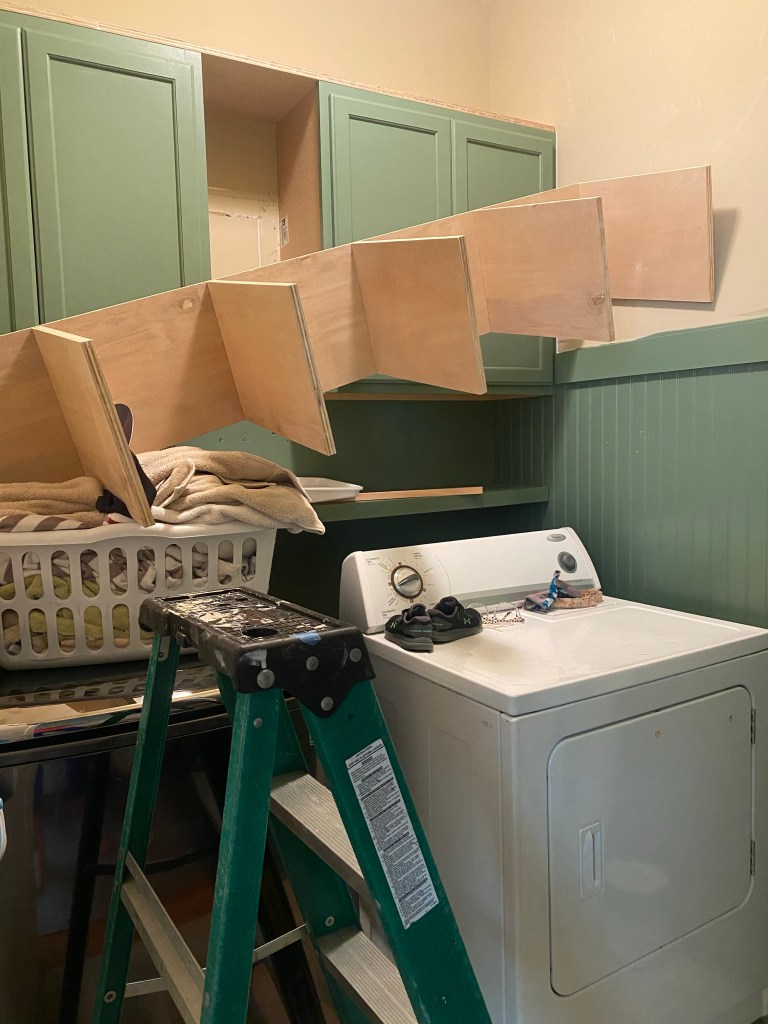
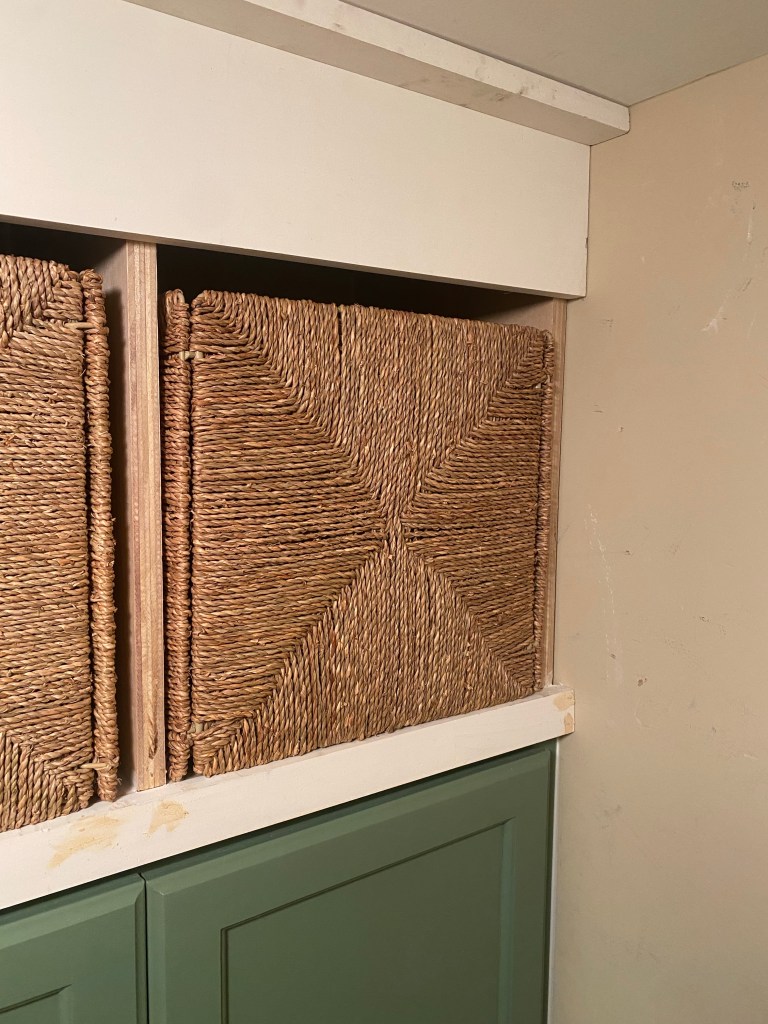
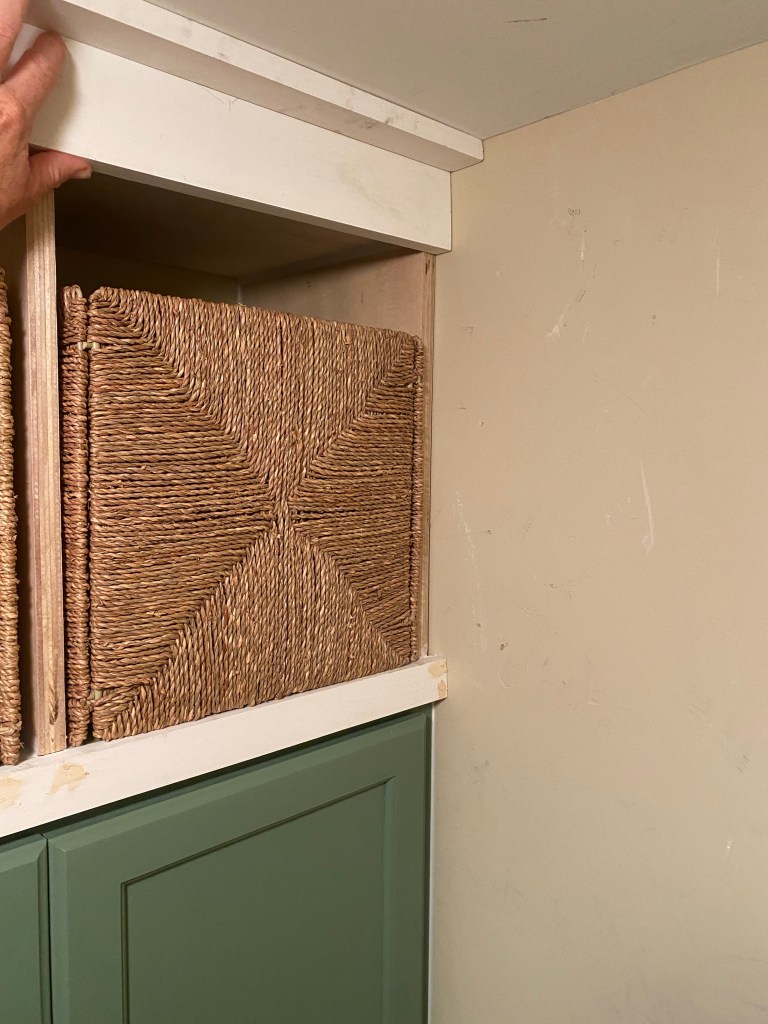
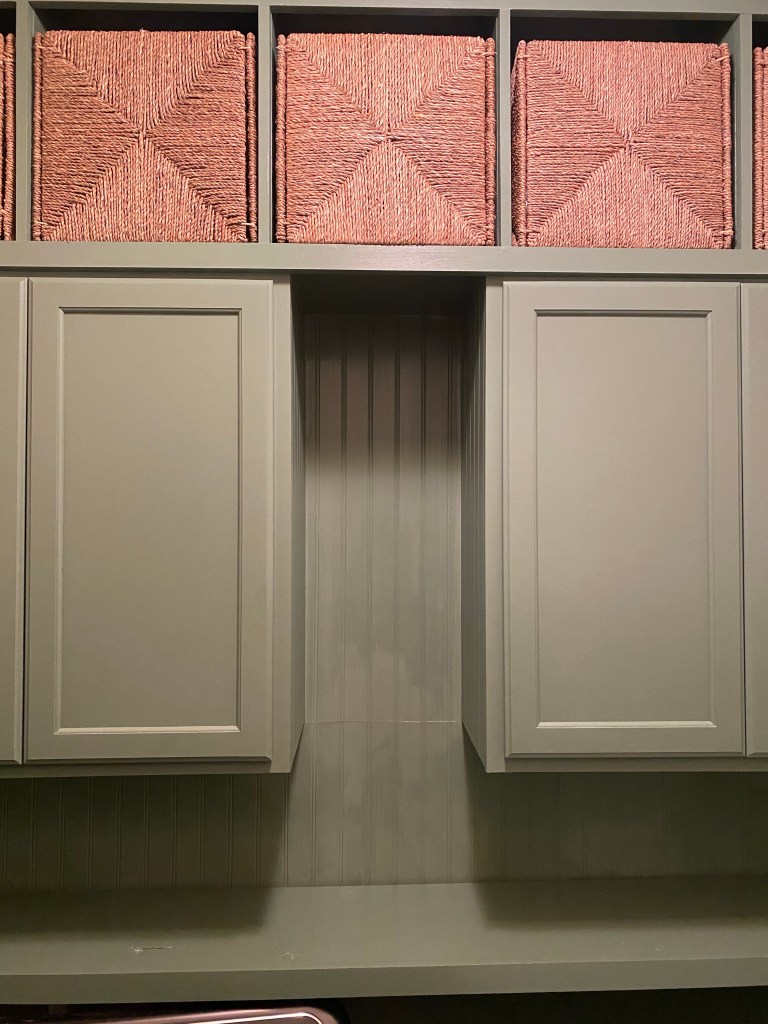
Next up, making the cubbies to fit above the cabinets. This is a smaller space and I knew I wanted it to feel larger than it is which I could accomplish by making the cubbies reach the ceiling height.
I measured A LOT and made my next trip back to Home Depot. I had them rip down the 3/4 plywood sheet into the depth of the boxes needed.
Let’s be honest, using a table saw is not something I’m comfortable doing alone and I was tackling this project on another week that my husband was traveling for work.
I loaded up the strips of plywood and beadboard for the remains walls and ventured back home where I would cut them down to length.
I am not going to provide a step by step tutorial of how I built these boxes for multiple reasons:
I had to deconstruct them to install then reassemble them in place
I didn’t add a backer board and instead, caulked the seams and painted the wall to give the illusion they have the backer board.
This unit was made to fit baskets I already had.
I do recommend having your baskets before determining the size cubbies you’re going to make. This will ensure it looks intentional and was made custom for the space.
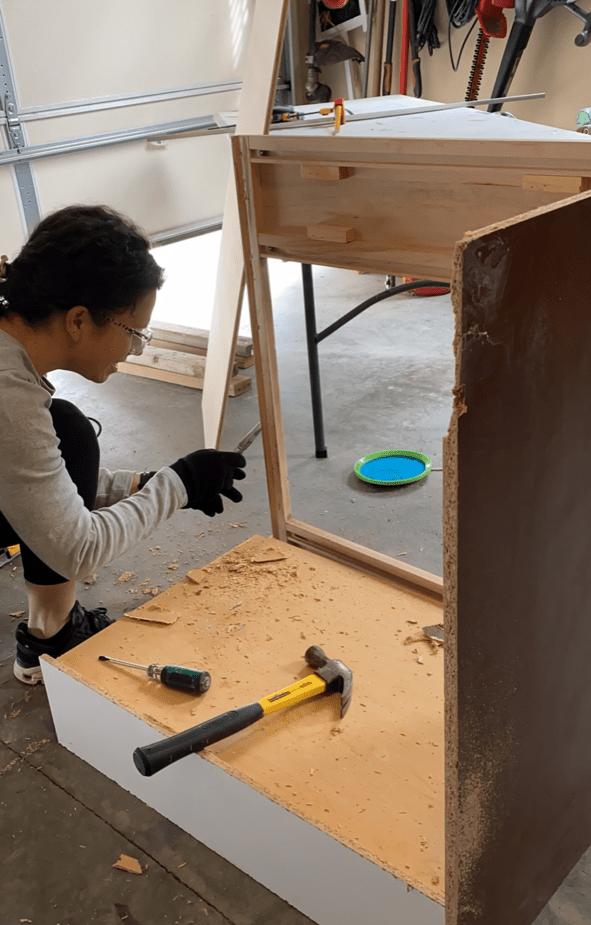
The walls in this space are not square and caused the issue of us not being able to install the build easily. While the measurements fit the intended space, it didn’t fit in the middle of the room where it needed to start for us to shimmy it into place.
It was a disaster. Our marriage survived the struggle but it was questionable for a moment. (I’m totally kidding but in full transparency, our patience was put to the test.)
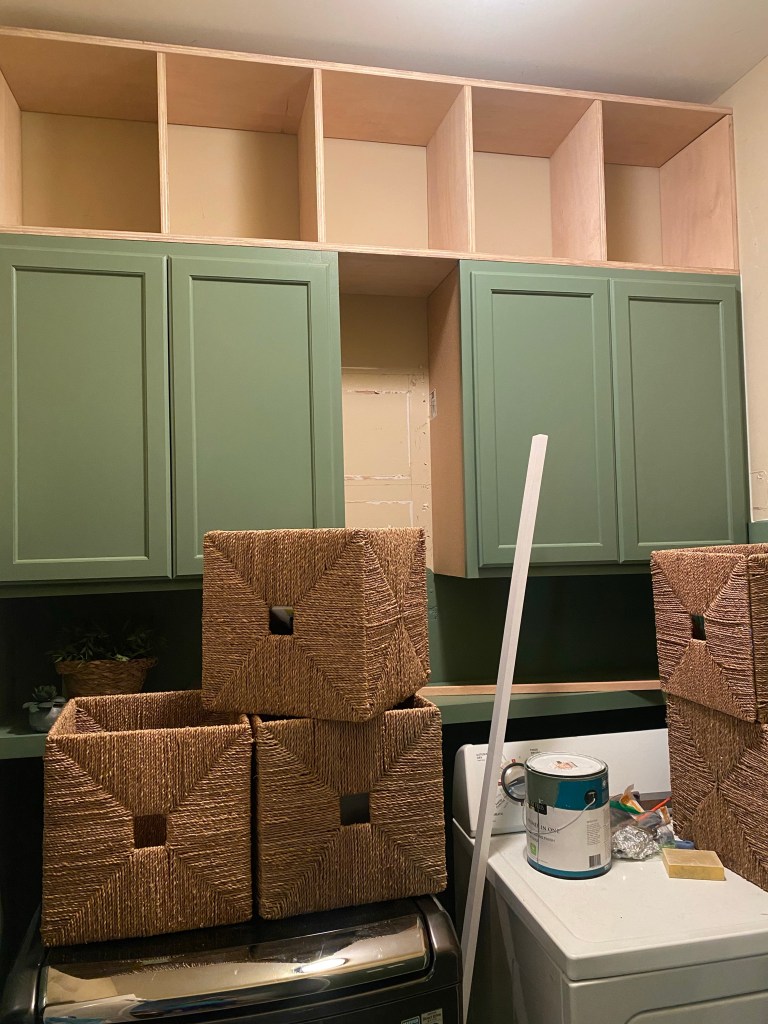
After disassembling the majority of the cubby and putting it back up, we anchored it in place and I got to work prepping for paint.
Next up, determining trim for the top of the cubby.
I ended up going with a height that was between the two options pictured above and am very happy with it.
After more caulk and paint, this unit was complete.
While this space is small, it was packed with so many steps to get to the finish line. There was also a long wait time between steps due to busy schedules, waiting for paint to dry, hardware to arrive, and more. I tried to multi-task when possible. When the paint was drying on the cubby boxes, I was outside cutting the beadboard and nailing it in place.
Continuing the beadboard was not part of the original plan. I had been given thin brick tile that I was planning to use as the backspace but with the height of the beadboard, the matching green shelf and cabinets, the best option for this space was to continue with the beadboard. It looks seamless and intentional.
The seam wasn’t an issue as I placed it where there would be one floating shelf.
After the final touchup of paint was done, I was nearing the finish line.
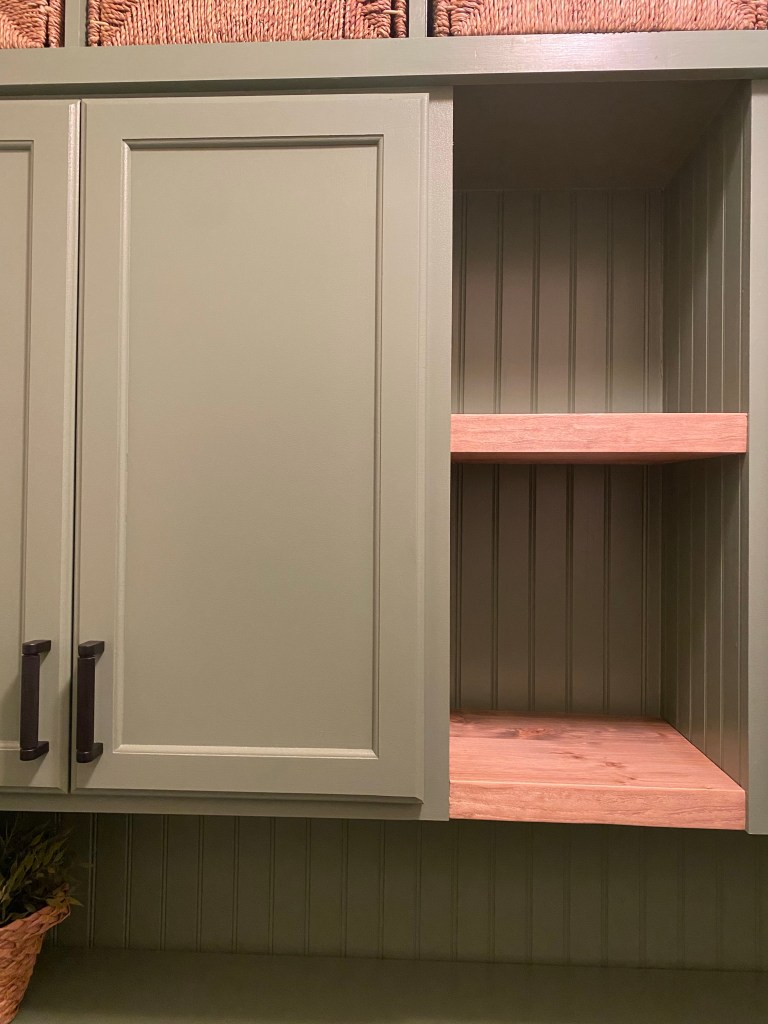
The finishing touch needed was to add floating shelving between the two cabinets.
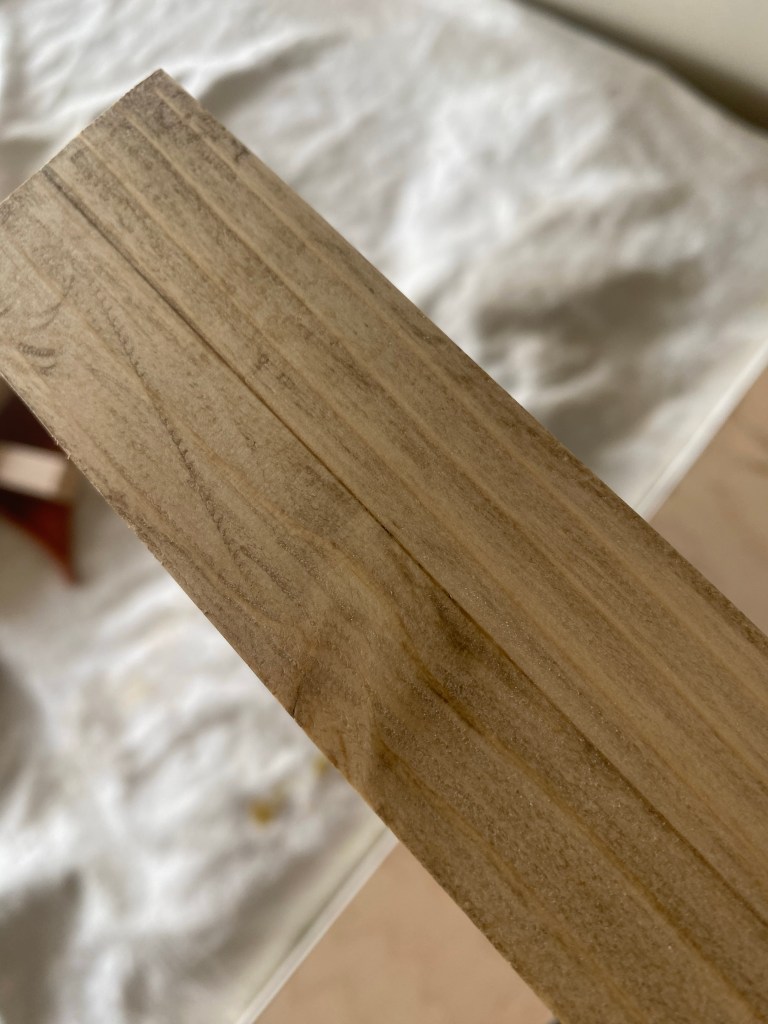
We took a family outing one weekend to find supplies and ended up having to DIY this to get the look I wanted. We purchased 2 project boards from Lowe’s. I glued and clamped them together while allowing it to cure more than the recommended time.
Next up, cut them down to size to fit. I then filled the seam with a mixture of sawdust and wood glue in an attempt to make this thicker board appear to be one. Unfortunately after sanding and staining them, it was visible which you can see from the first picture above.
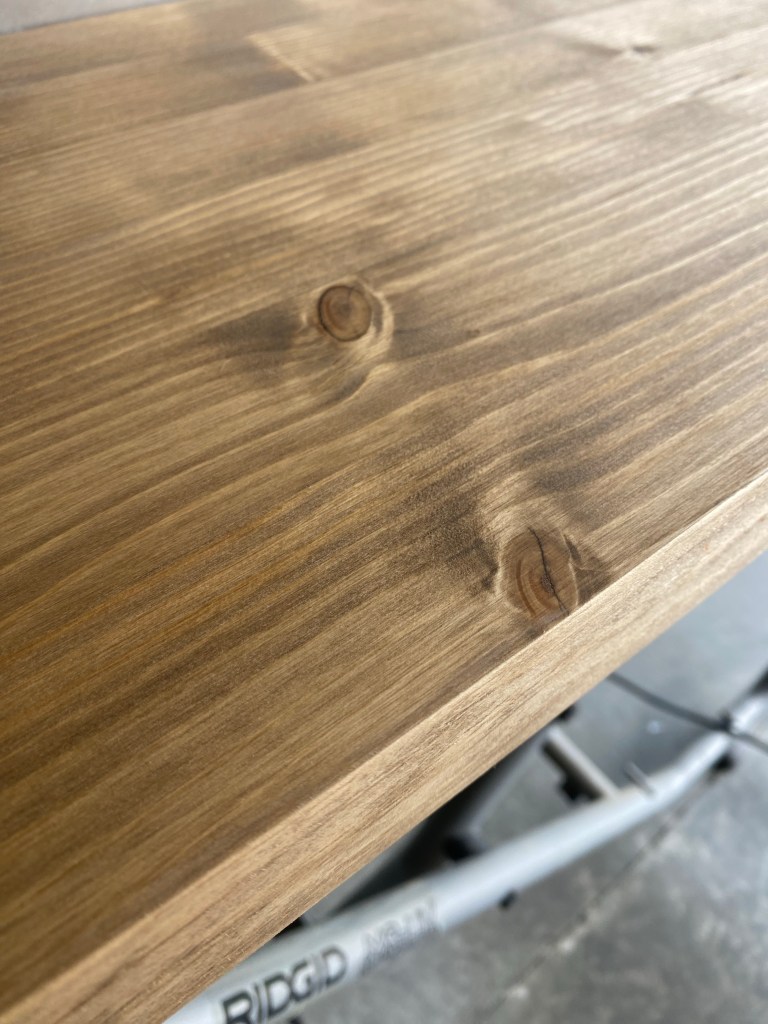
My backup plan was to add edge banding and stain it to match. This worked out perfectly!
If you’re in a season of feeling like you’re not making much progress on you home project list, let this be a note of encouragement for you to take a moment to look back at what you have accomplished. You may find you’ve come further along than you realize and are well on your way to creating your Haven and a home that works for you and your family.
If you want to see the behind the scene failures and successes, please follow along on Instagram @4havenssake.
Fun fact, my birthday is just 2 days after Valentine’s Day so I’ve always looked forward to the holiday and have always felt extra love surrounding February 14th and 16th.
With 3 young boys of our own and little Valentines being passed out by each to their classmates, I tend to think back on a personal memory of Valentine’s Day.
This year’s Valentines for the boy’s classmates are done and of course they include an allergy friendly option. Made Good granola bars are my go to. See below.
Do you remember the days of exchanging Valentines with your classmates in elementary school? One year in particular stands out for me and it’s because I was embarrassed and uncertain how to respond to a personalized Valentine in my bag.
The setting: 3rd grade, Mrs. Houston’s class. Oh how I loved her.
I remember the white paper bags that we decorated individually that were lined up under the chalkboard. A chalkboard. I just aged myself didn’t I? We had a week to fill all of our classmate’s Valentine bags with personalized goodies and notes.
I was in a unique situation at the school because my mother was a teacher there. I was at the school before and after “normal school hours” so I often assisted in the classrooms when help was needed by teachers.
I was a busy bee as a kid and almost always needed something to do. I loved helping others and still do. I helped Mrs. Houston in the classroom one day during Valentine week and it was on this occasion that I noticed a unique envelope sticking out of my Valentine bag. I peaked at the white legal sized envelope and read what was written on the outside:
To: Amanda
Love: Andy
When Friday came, it was time to take home our Valentine bags.
My mom recently reminded me that I was too nervous to open this letter and made her read it to me when we got home.
Inside was a hand written note, “Will you be my Valentine?” and check boxes, Yes or No. Of course there were check boxes.
Also included with the note was a small 1 inch picture of him. Do you remember those tiny pictures that came as a 8×10 sheet that we used to get with our school picture orders and we’d pass them out to our friends? If not, I have definitely aged myself.
I still recall my cheeks flushing when mom read the note.
Such an innocent request but one that made me nervous and uncertain what to do or how to respond. He was a classmate. What would my response mean?
I checked NO and returned the letter to him. <gasp>
When I told mom what I had done, I remember her saying, “AMANDA!” But it was said in a way of “Poor Andy”, knowing that I likely hurt his feelings. I can laugh about it now.
Looking back on this small life event, I now recognize 3rd grade was a time when I was beginning to worry about what others thought of me.
Fast forward to today, I LOVE Valentine’s Day & I no longer care what others think. Life is too short my friends.
I love the colors associated with Valentine’s Day. The bright pinks and reds tend to lift my spirits and evoke feelings of joy and anticipation for the upcoming season. Here in North Carolina, signs of Spring tend to show up shortly after Valentines which means longer days, vibrant blooms, and warmer days are near.
This Valentine’s Day, I hope you can celebrate love and connection. Use the day as an opportunity to express appreciation and gratitude for loved ones, friends and family.
Write the note. Send the text. Mail a card. Make the phone call.
Brighten someones day.
Do something for yourself.
Celebrate beautiful new beginnings.
Make that special treat. (If you need an idea for this, check out this post for two little Valentine treats.)
Below you will find a few printables which I created that you can use for writing a note or to include with a small gift for that special someone, friend, neighbor or family member.
Let’s spread love like confetti this Valentines and everyday—for Haven’s sake.
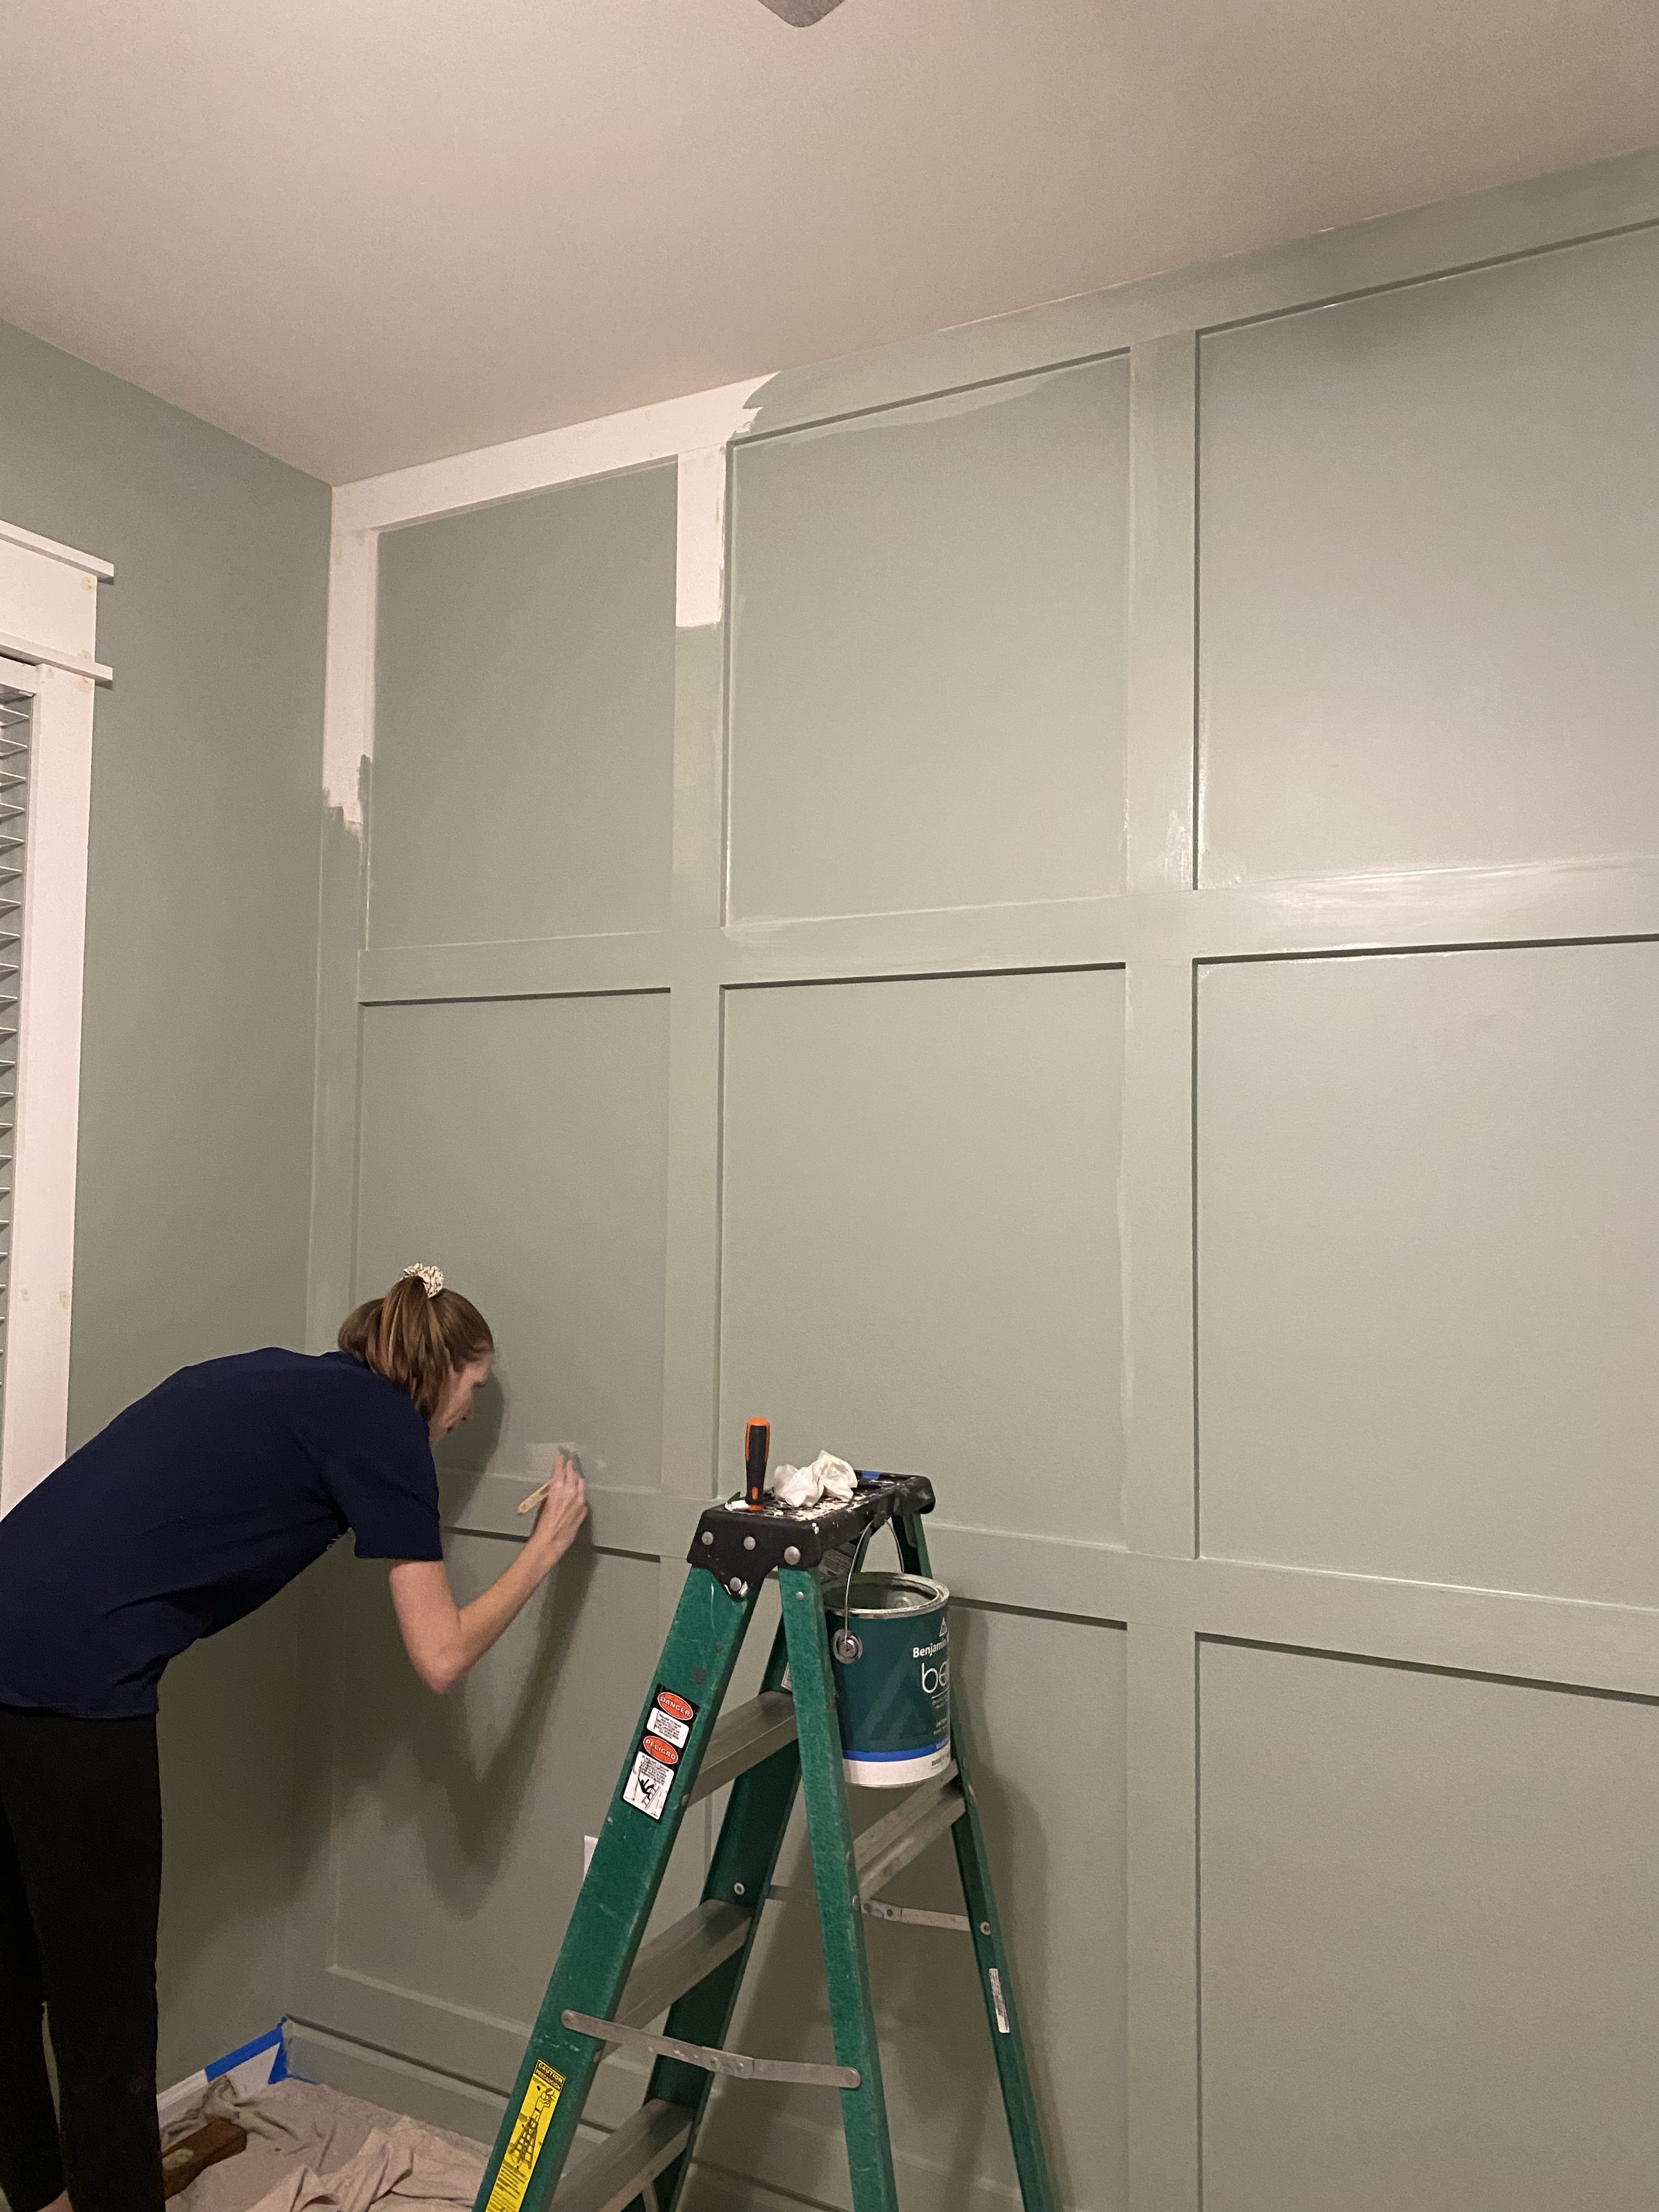
This past November my husband and I were asked if we could help with a feature wall in my brother and sister-in-laws home. They are expecting their first baby in April. Being a mom of 3 boys, I was elated when they are shared they are expecting a BOY. Queue the biased happy tears for the blessing of raising a son.
Back to the opportunity: Would you be able to help add an accent wall to the future nursury?
Yes. 1000 times yes. I couldn’t be more excited about the opportunity and spoiler alert, it turned out SO good.
A quick look at our calendars and throwing dates around, one thing after another fell into place and we were able to get over there within the week.
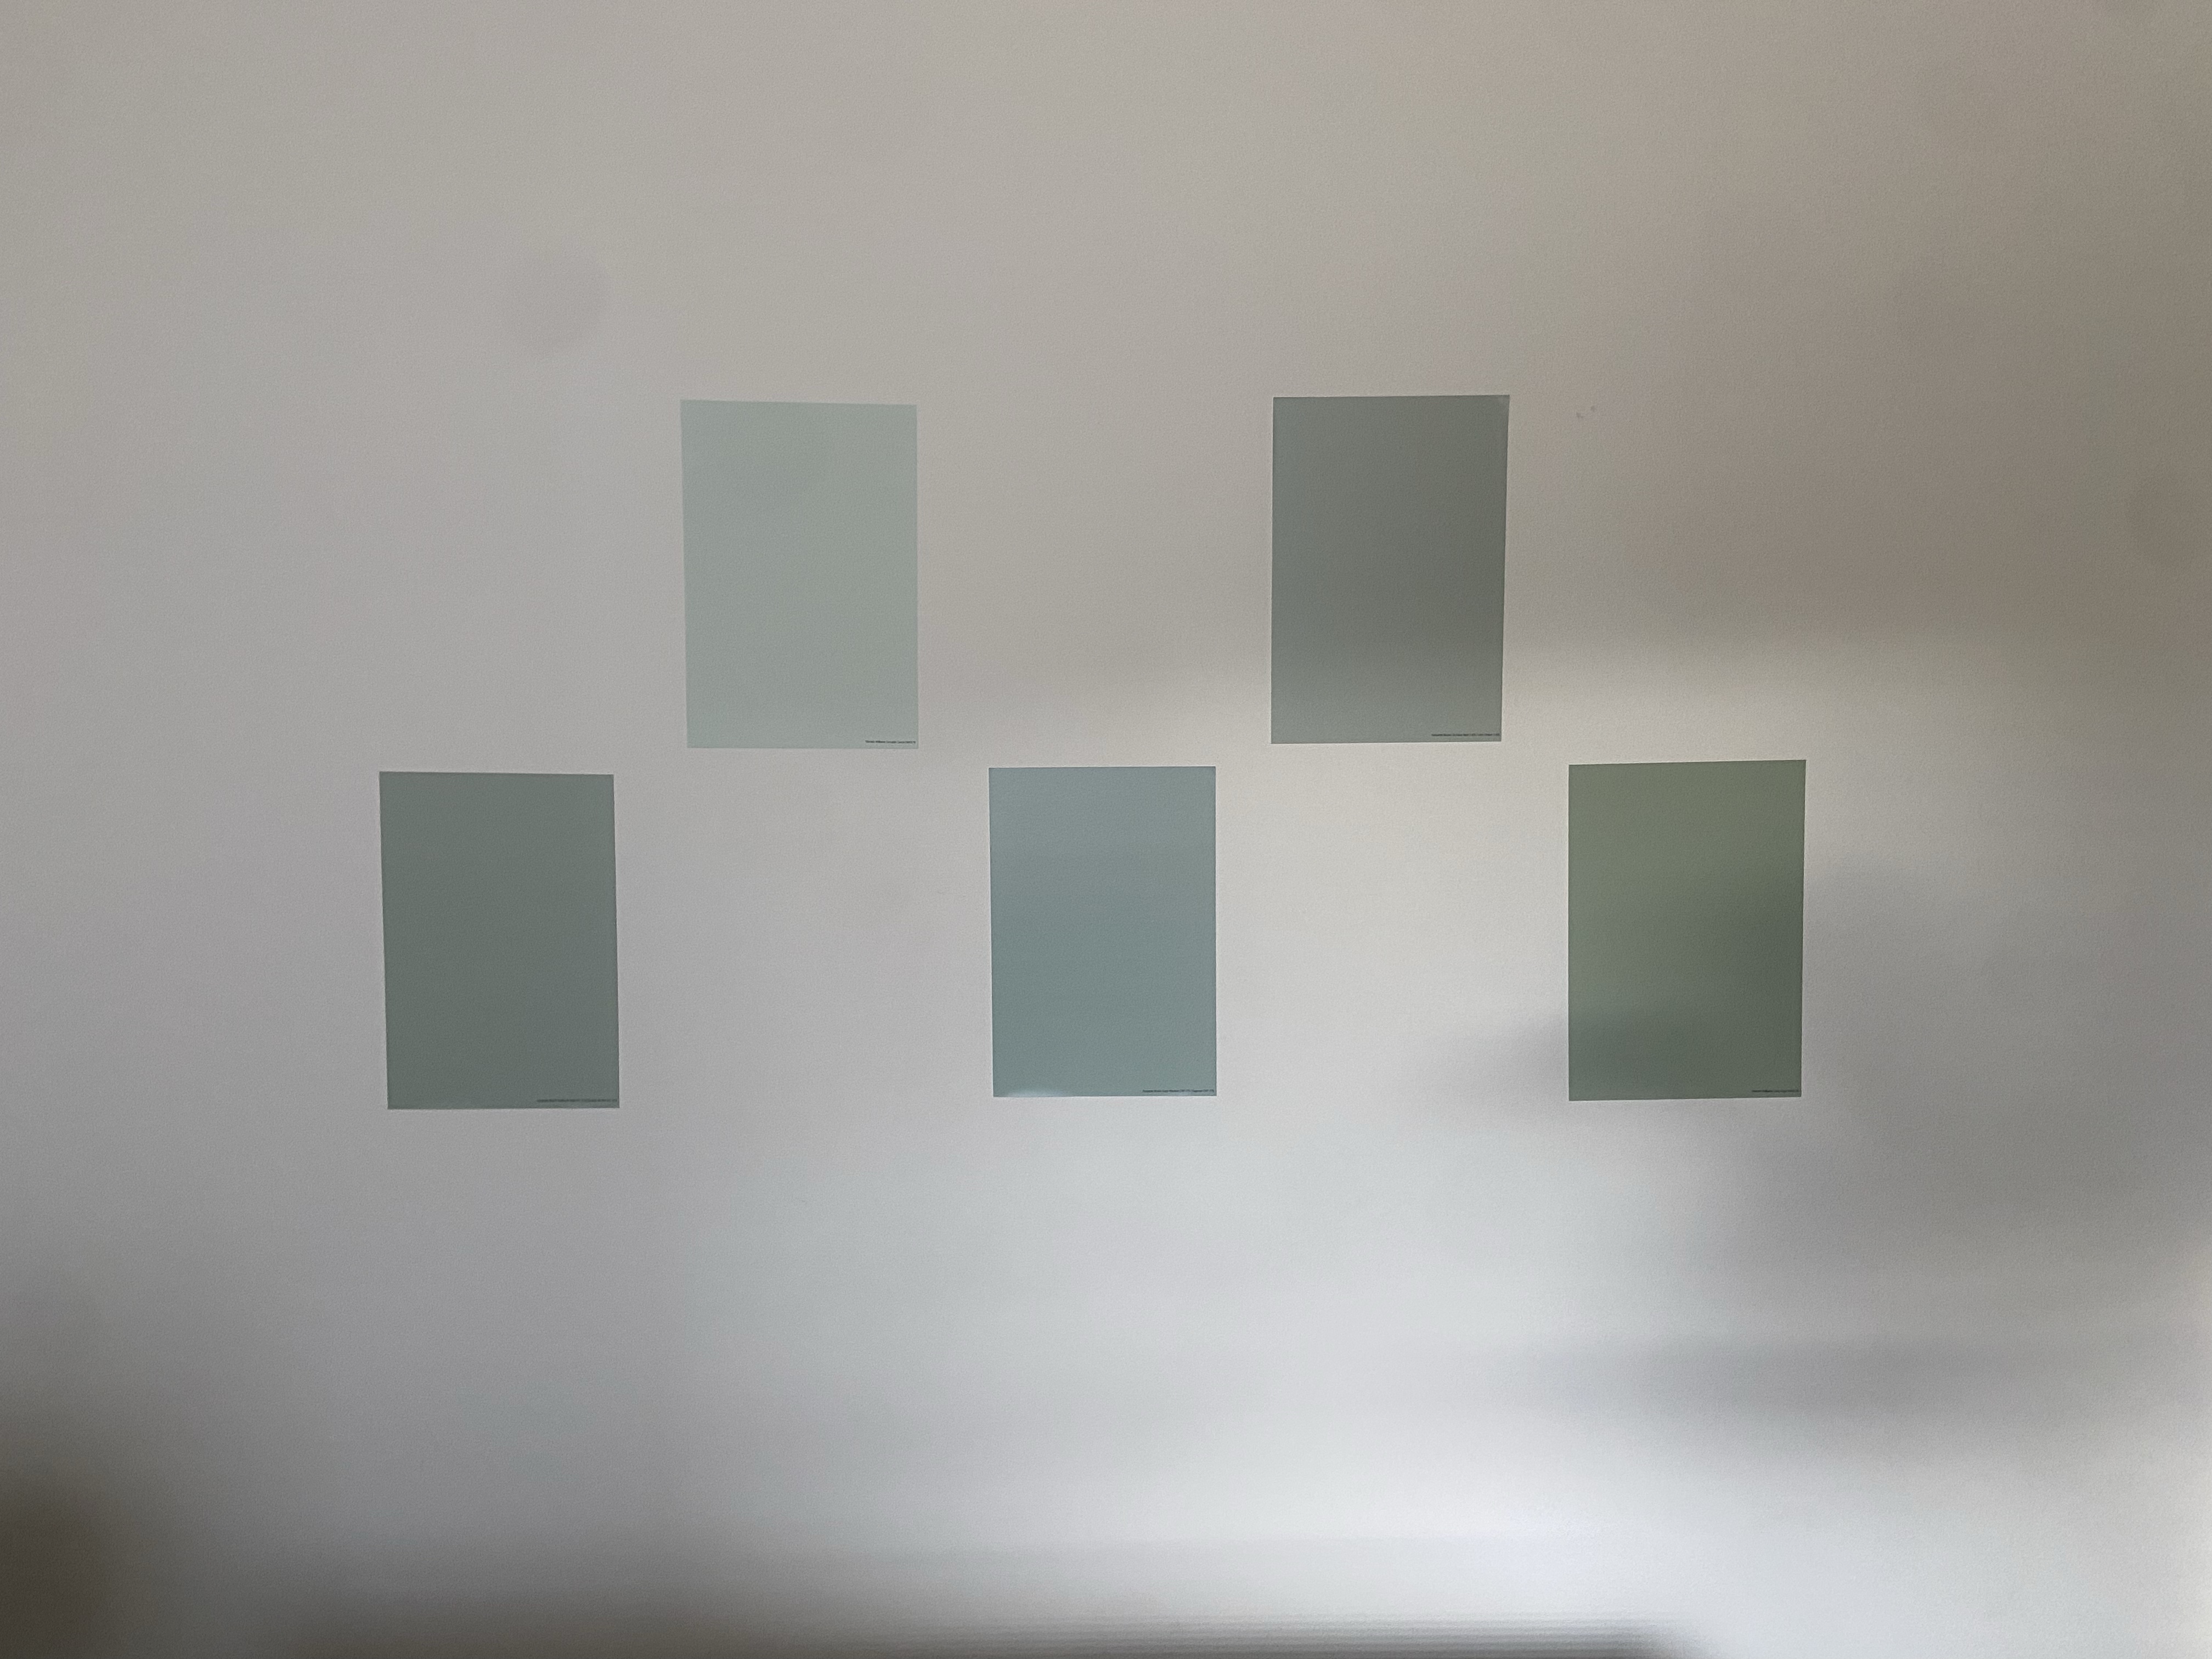
A dear friend who is an amazing designer, Amy Huber, told me about a company that will send you paint samples on sticker sheets that you can move around. Wait, you mean you don’t have to paint samples on different walls in the room to determine which paint looks best anymore? The company is Samplize. For less than $6/sample, you can select as many paint colors as needed and they ship them to you within 24 hours. No waiting at the paint store for colors to be mixed and no painting the walls with each and washing paint brushes. You simply stick and move the samples from wall to wall during different times of the day.
My sister-in-law and I were both sold on this. They ordered paint samples and sent me pictures of the walls as they started from all the colors they ordered to a smaller selection which they had narrowed down to as their favorites.
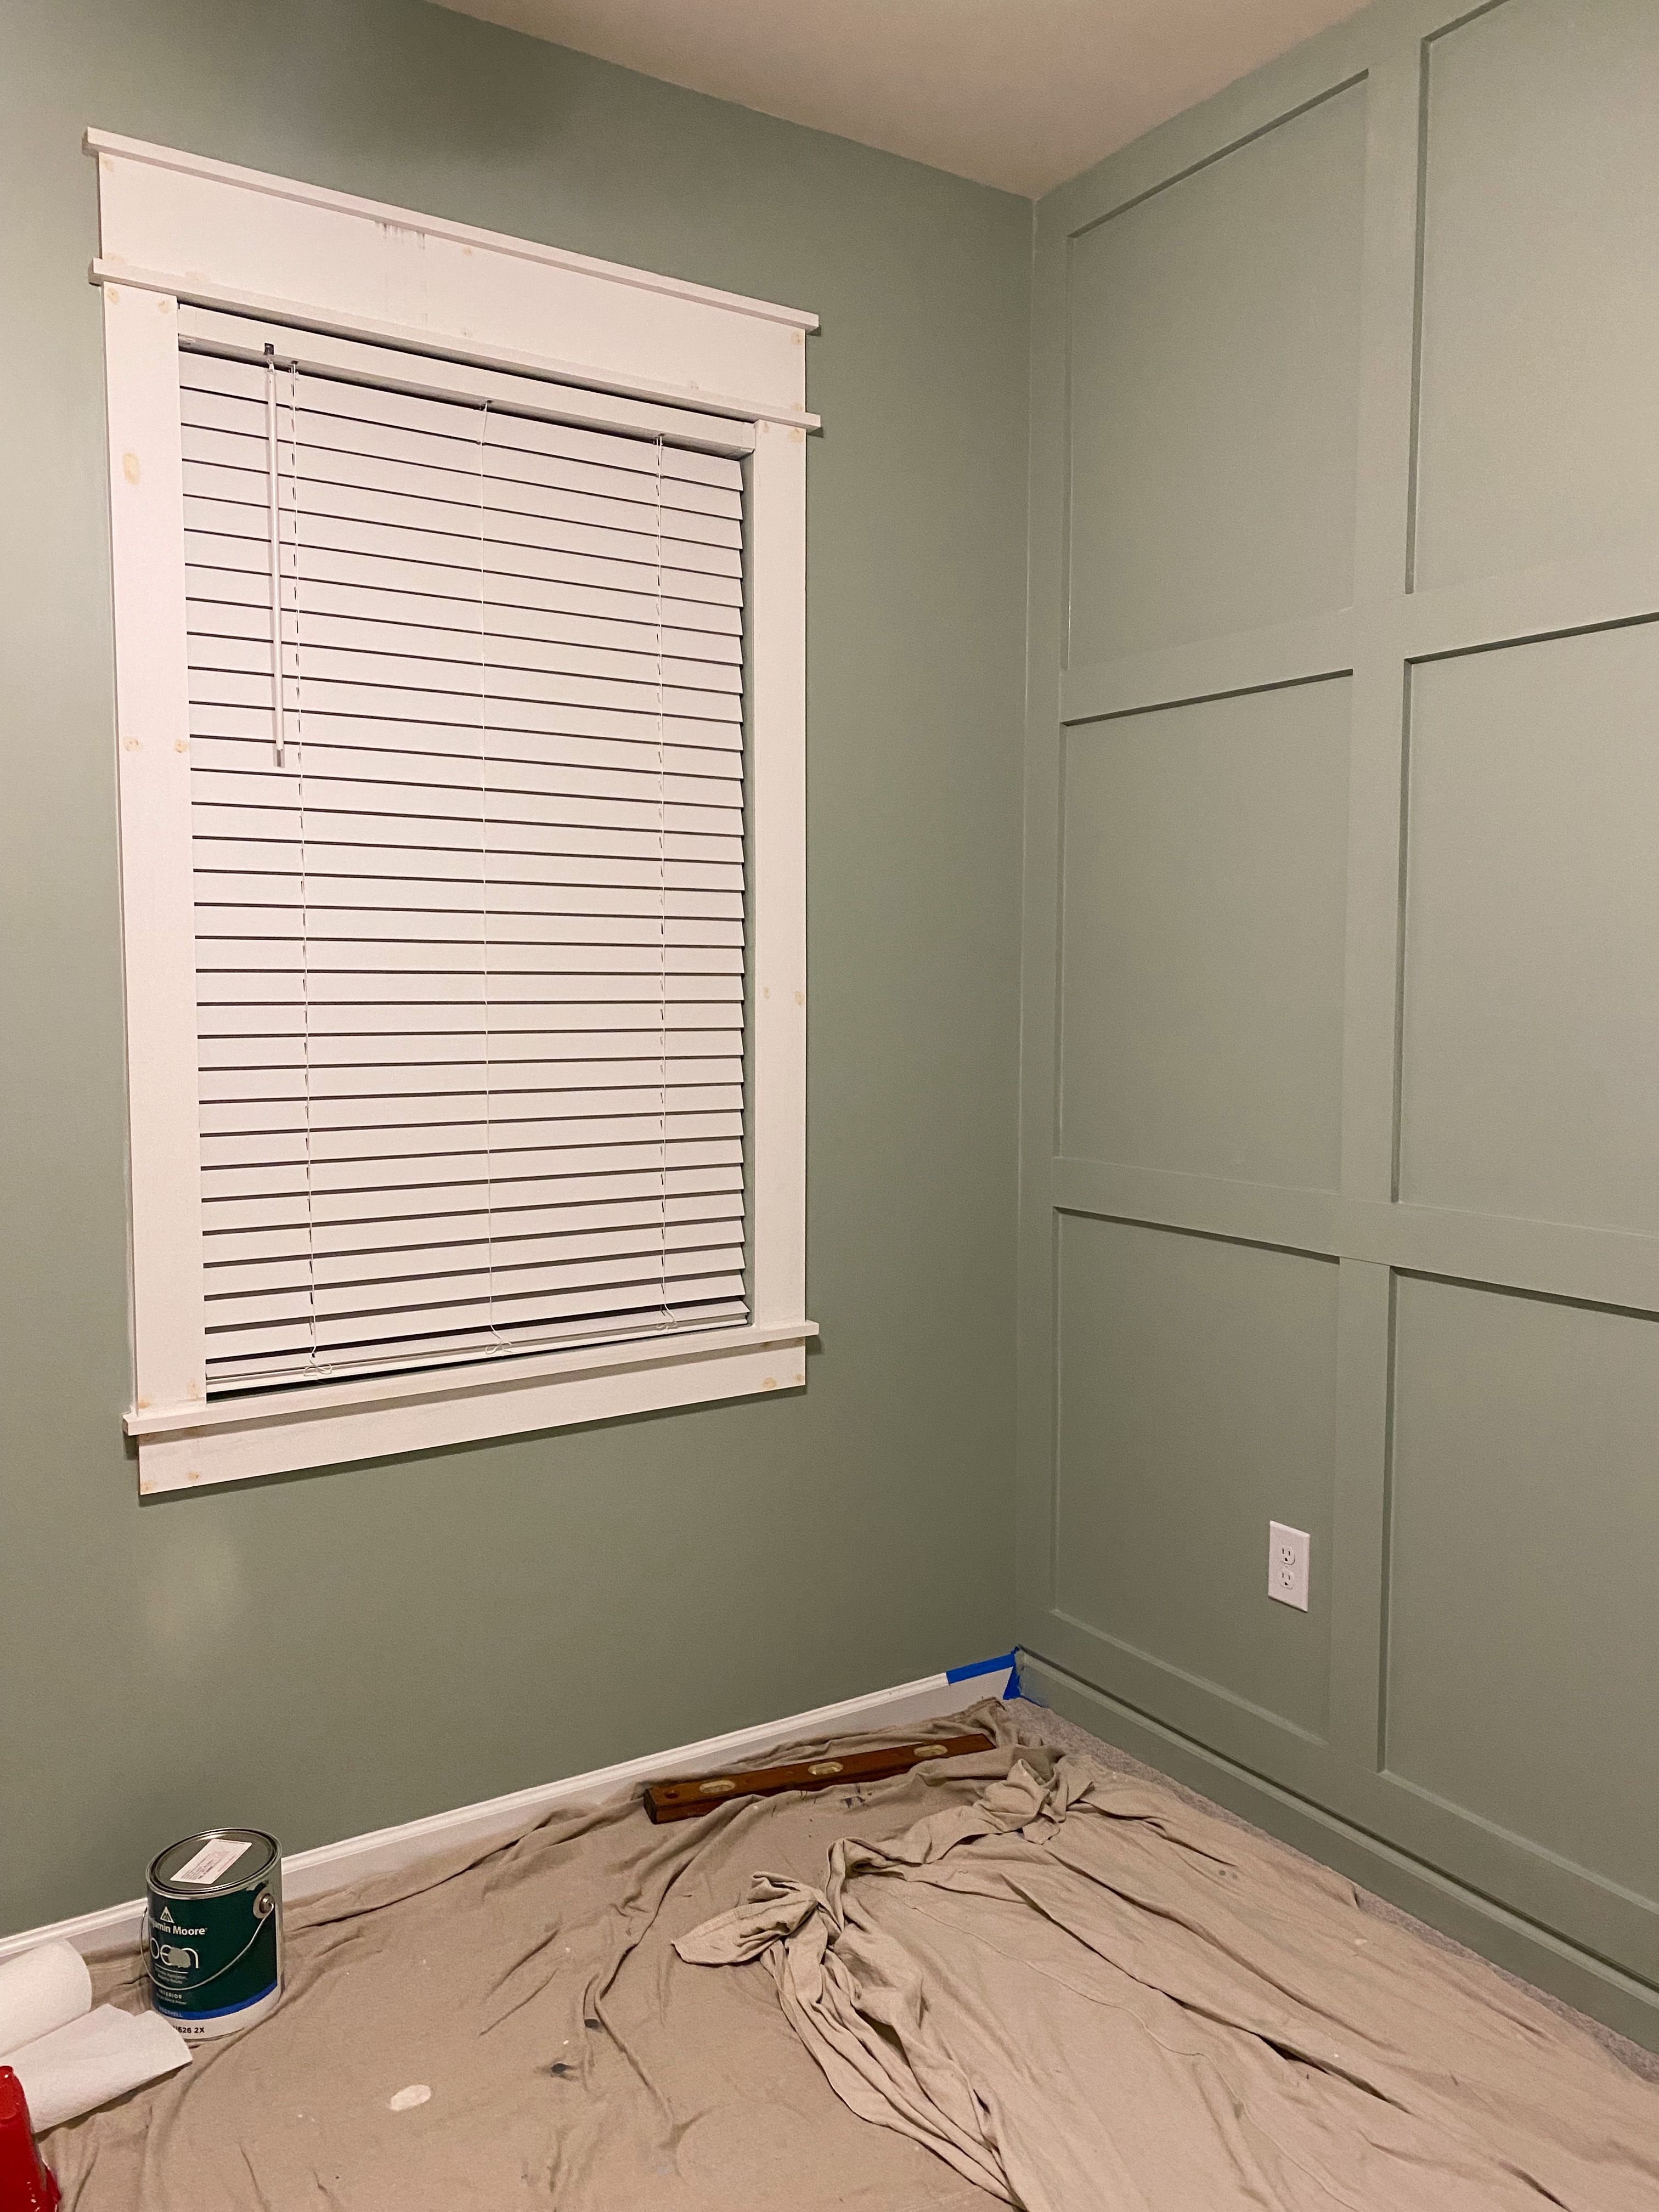
In preparation to go to their home with the tools needed for the wainscoting and framing out the window, we did have them send measurements of the room. Having the measurements helped us all plan out which wall would likely be best for the accent wall and to plan accordingly for supplies.
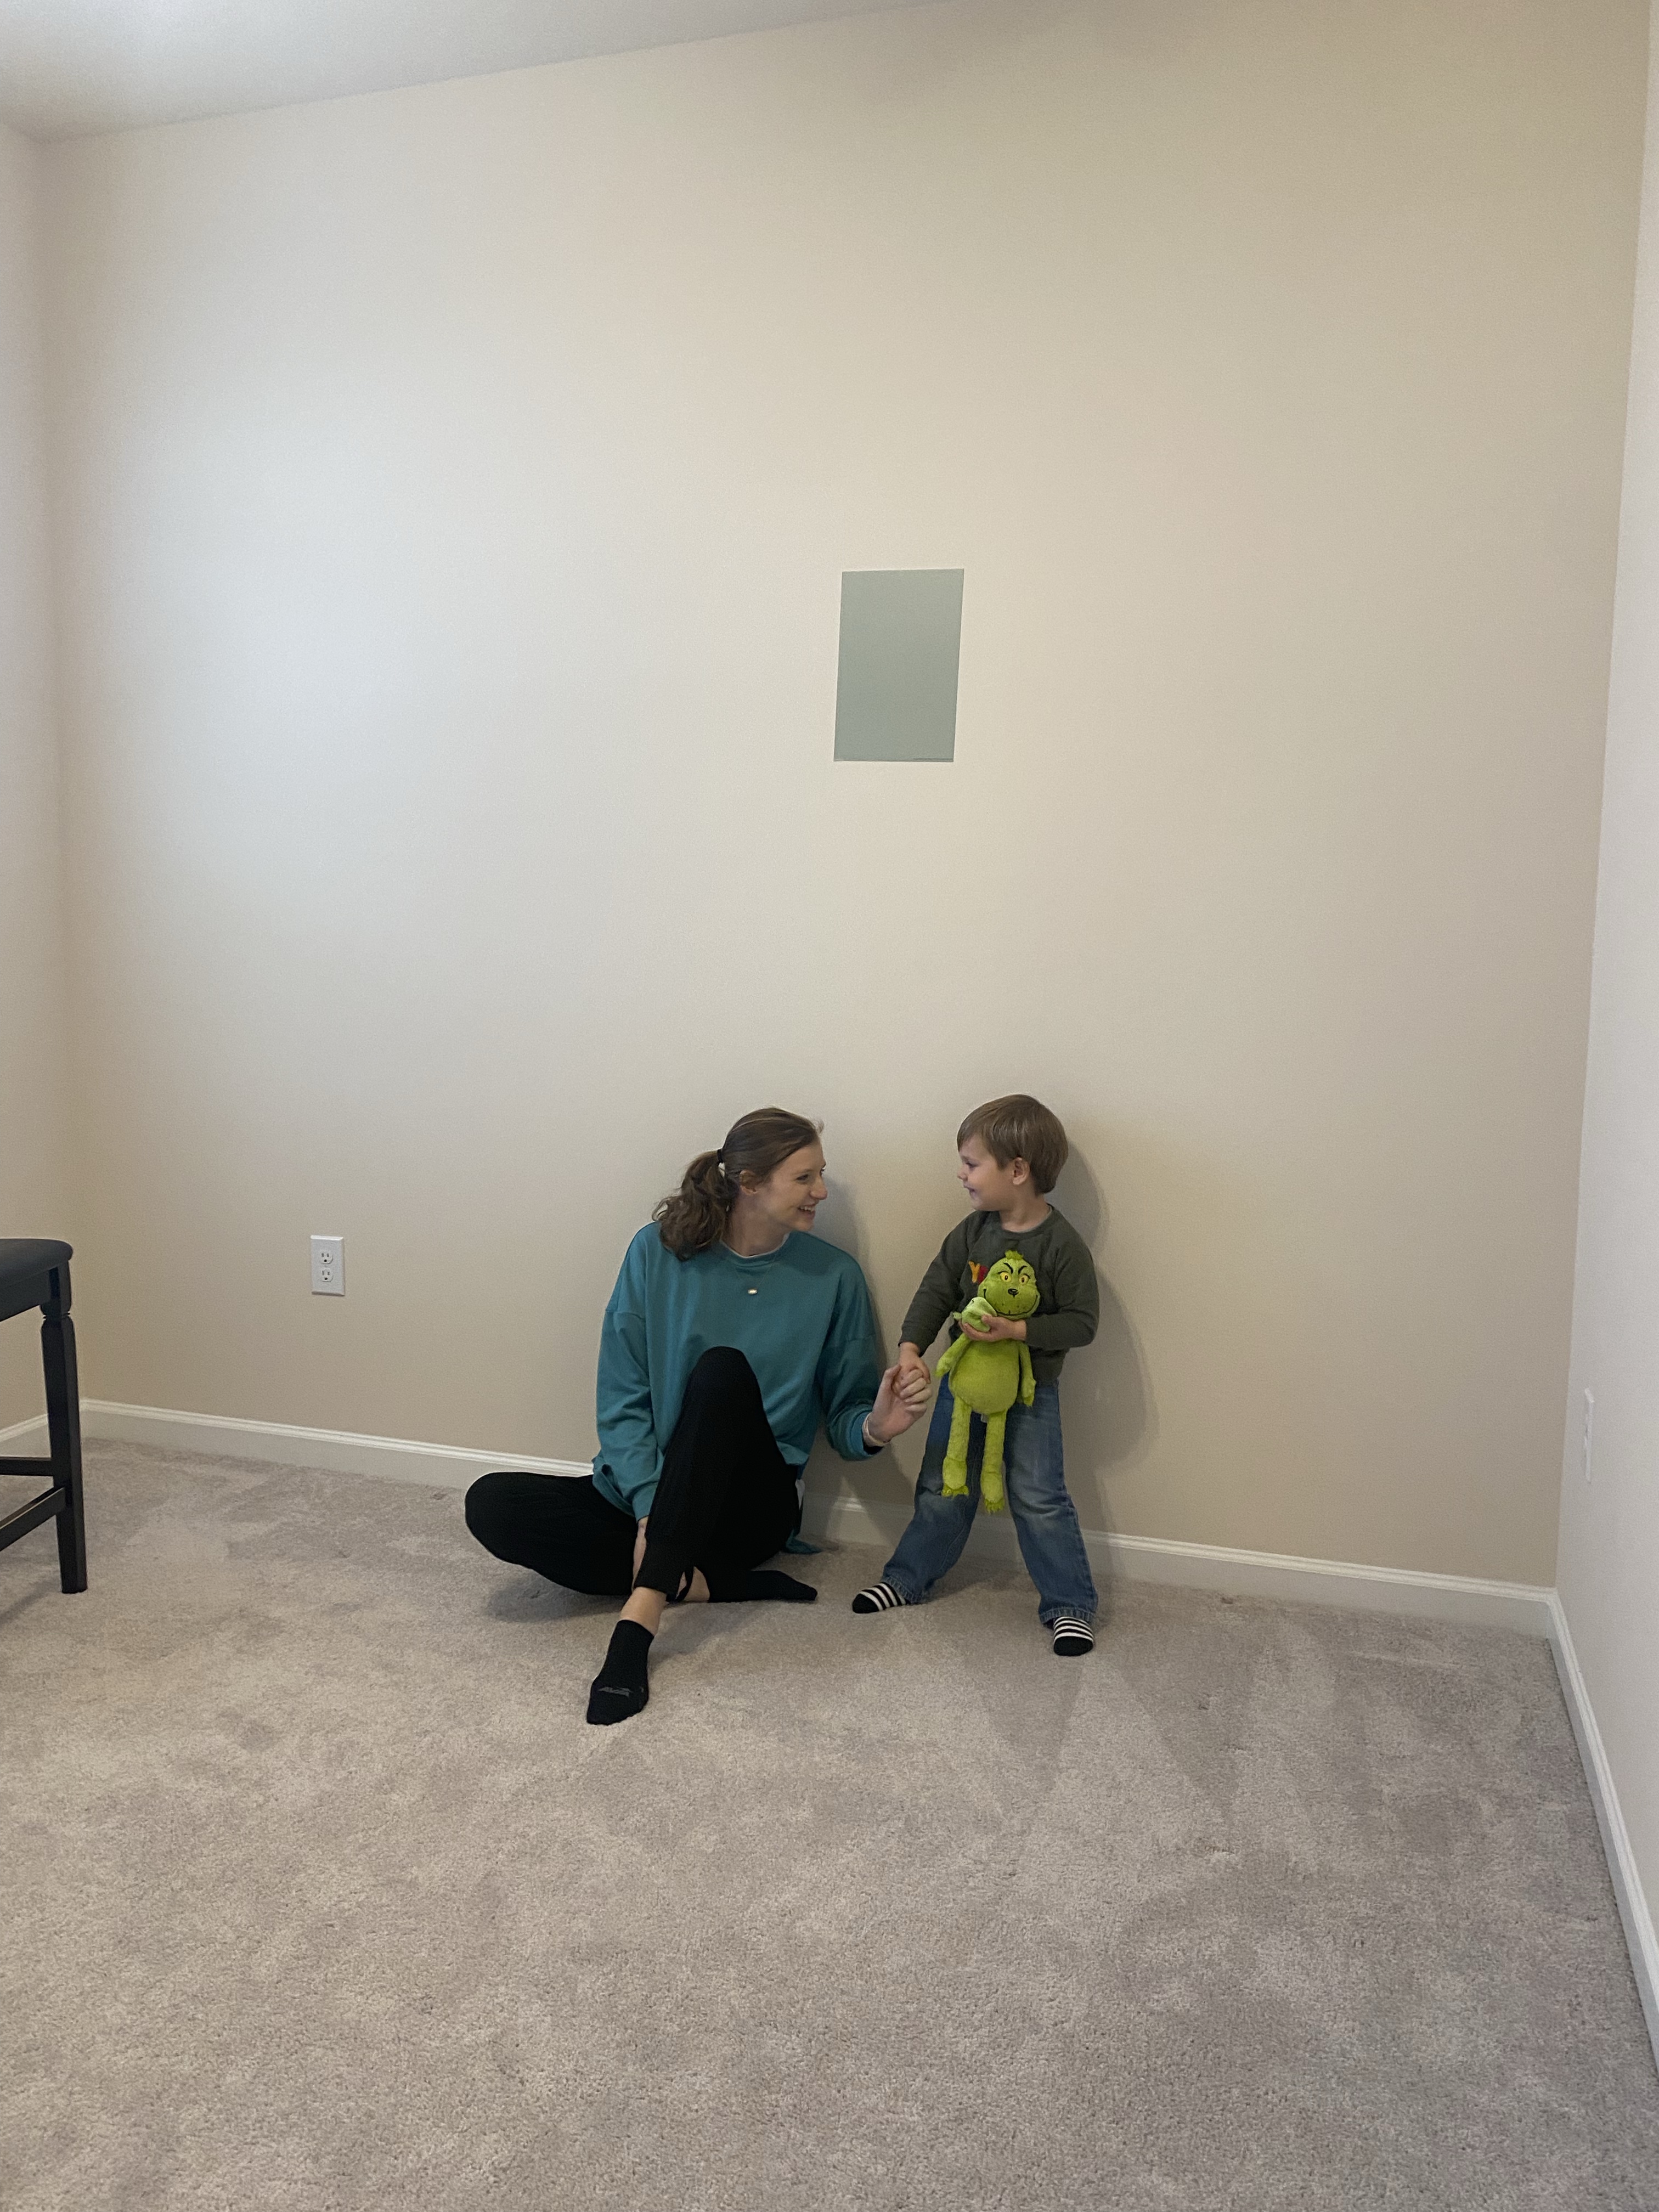
Check out the room before. A perfect canvas to transform with 3 simple updates: Paint, wainscoting, and quick trim for the window.
How precious is my sister-in-law?! Can you tell how much the boys adore her just from that last picture?
We did take all three of our boys with us for our project day but I was sure to pack plenty of snacks and food to appease their endless appetites. My brother in law, Michael, had set up the sweetest movie viewing pallet for the boys. He inflated a giant air mattress and loaded it with comfy pillows and blankets.
While the boys watched a movie, we got to work right away.
The men set off for Home Depot for the wood supplies while Rachel and I began painting right away. The men purchased primed boards which helped painting go smooth and required less coats.
We try to use primmed MDF on these types of accent walls as those boards have clean cuts when trimmed. This hardware store location didn’t have the product in stock that we usually buy for these projects so we made an easy swap with an alternative, primed pine, and it turned out perfect.
I had the best time chatting as we painted the entire room. It’s a day I won’t soon forget and can’t wait to share about the project day with baby when he is older. His mama worked so hard to make his room special.
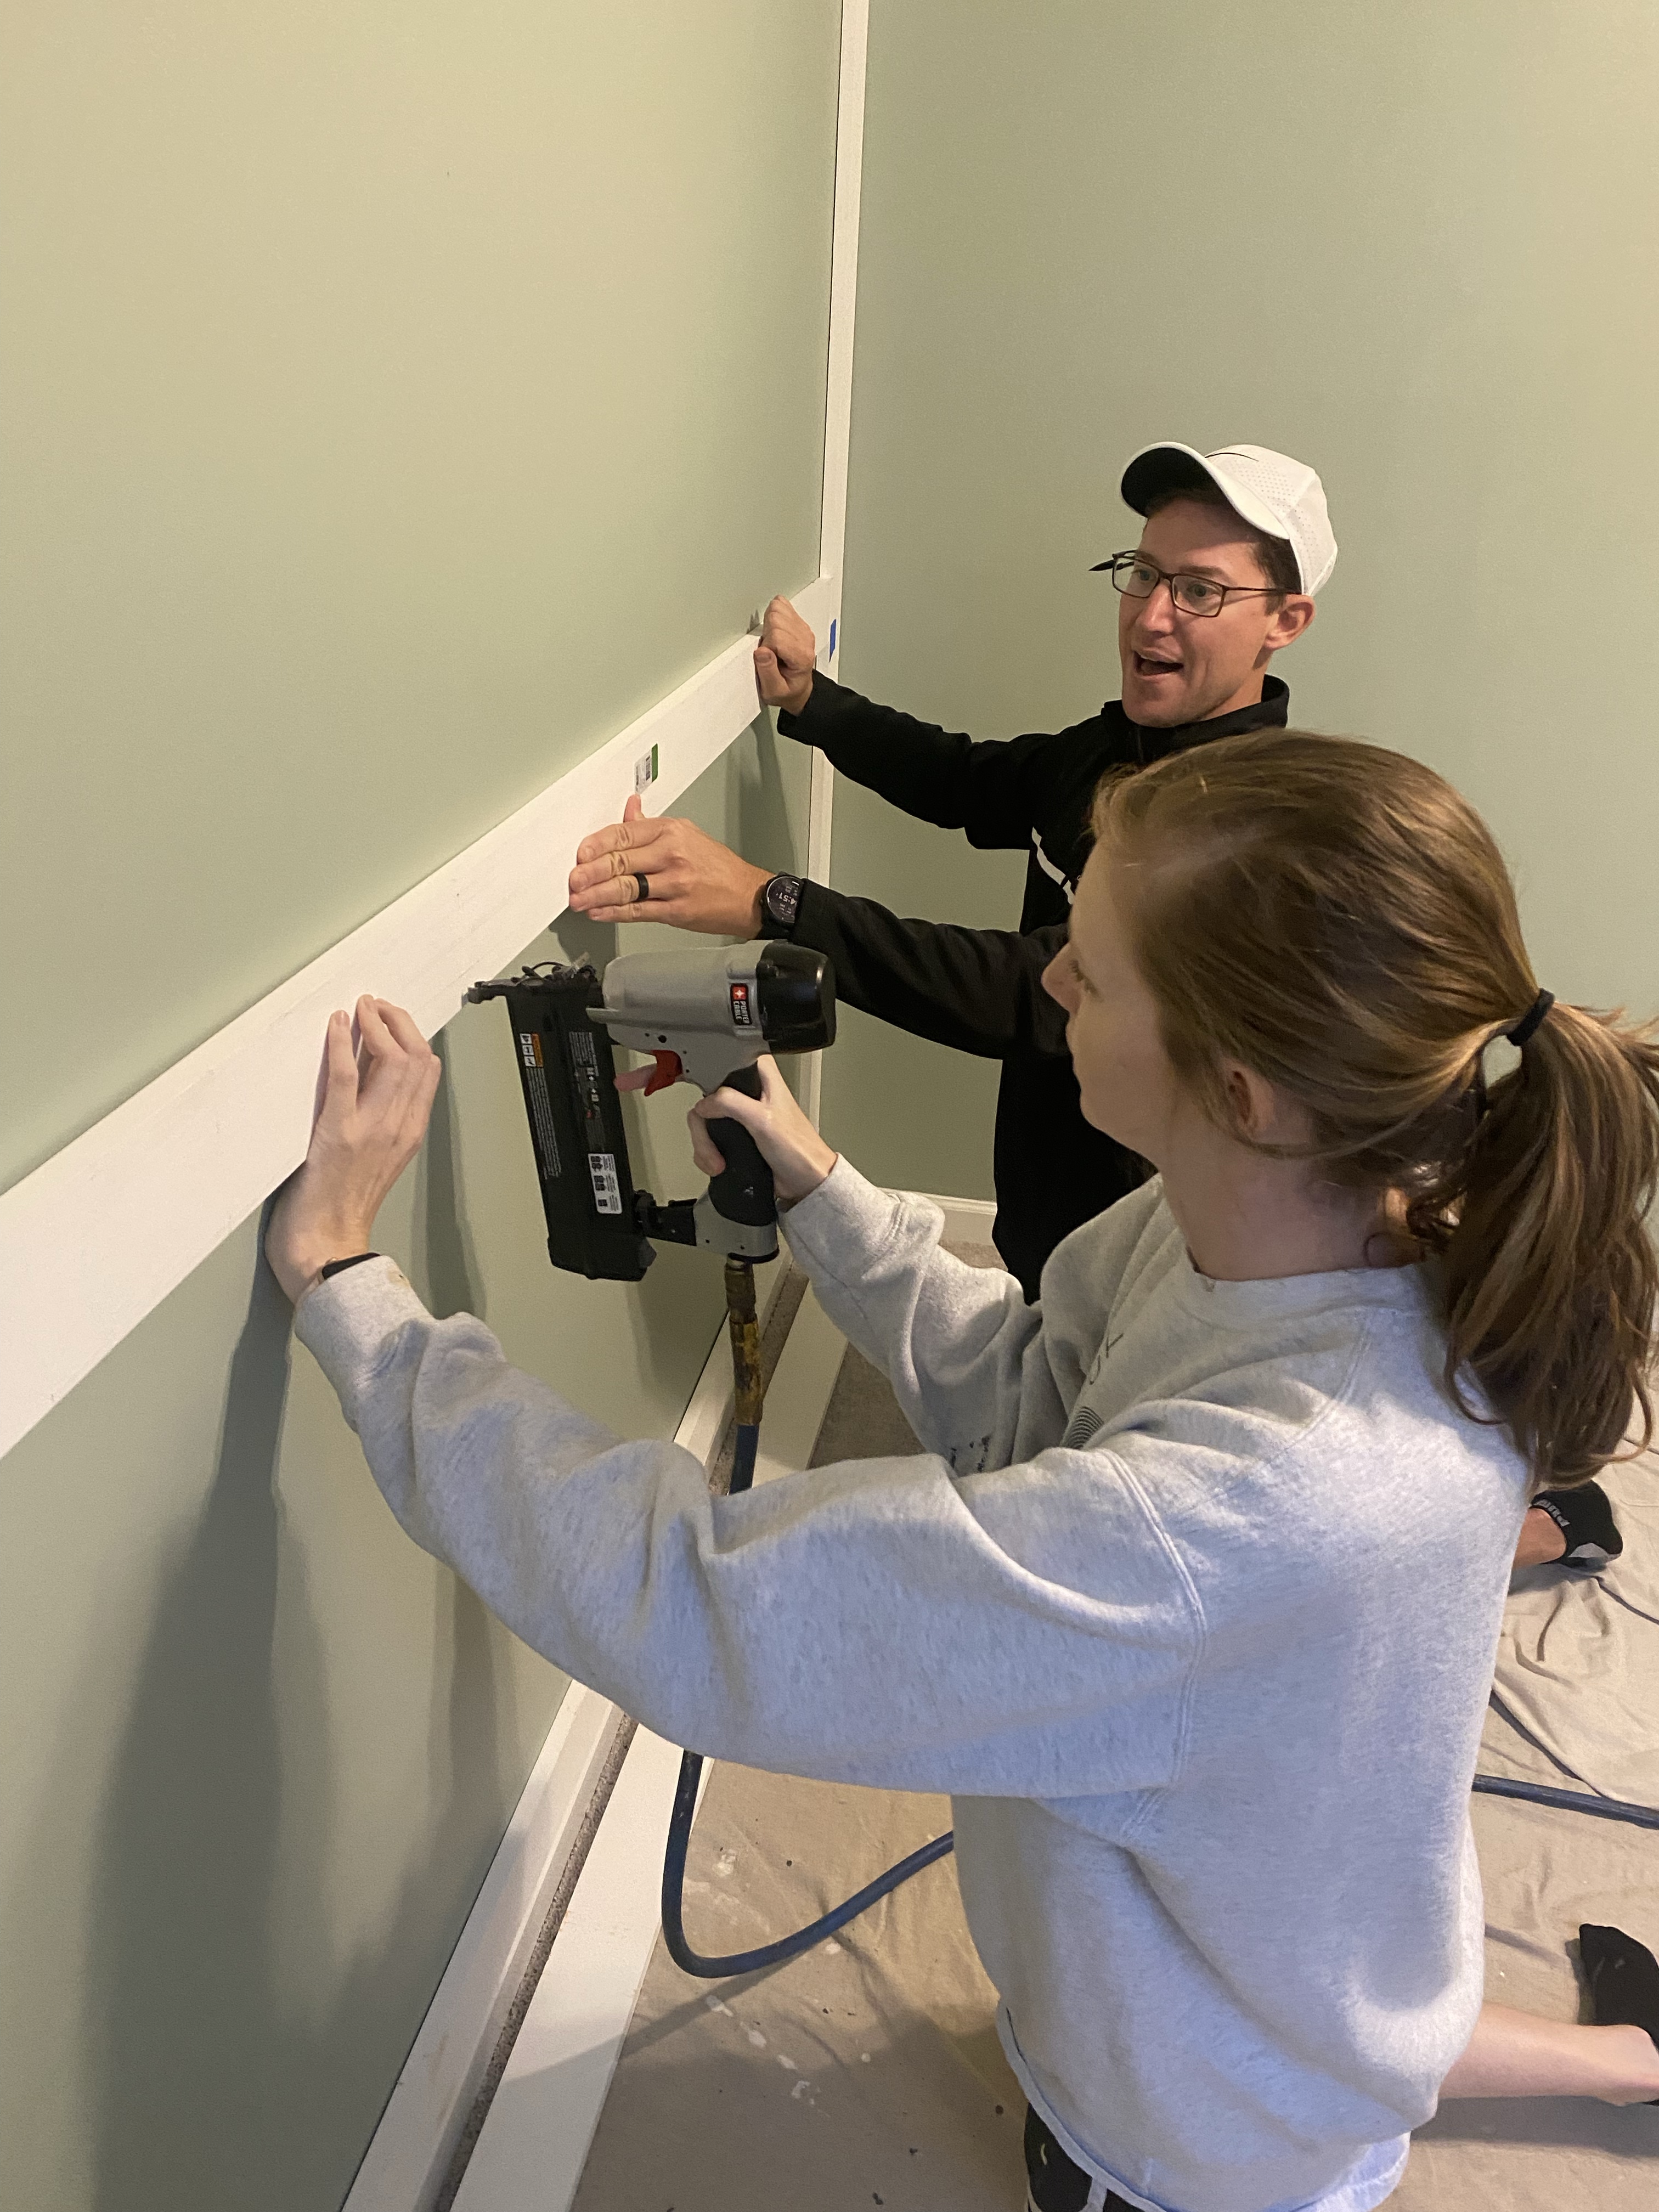
Adam took lead on measuring and cutting the wood for the accent wall. While it may look simple to plan out the spacing for the boxes, I can assure you the math is a little more challenging.
*We also purchased a piece of cove molding to add to the existing baseboard. When flipped upside down, you can rest it on the baseboard and it creates for the perfect flat surface for your board and batten pieces to run in flush with no overhang.
It was a long day of painting and had to be cut shorter for me so I could get the kids home and ready for bed. I left Adam to finish off the wall but showed Rachel how to finish caulking all the seams after the final boards were up and the process for filling nail holes.
We had a couple mishaps with placement of boards in the wrong place, having to remove them, remeasure and nail them back up in the correct spot but Allas, the wall was complete.
The window wasn’t completed until the following weekend. We had run out of time. I went back over the following weekend to finish up the wood working and did the window all by myself. I say this in a way to encourage you to tackle projects that seem daunting and just TRY it. Turns out, it was a simple update that, once complete, looked like it was always meant for the space.
My sister-in-law even said she wanted to add it to all the windows in the home now. It’s an update that can be made room by room and doesn’t have to be rushed.
I have never trimmed out a window before. I’ve watched numberous videos and how-tos but never had the opportunity prior to this project.
I used this as a guide and customized it to their space.
(Pic of window trim guide)
I have to admit, projects outside of our home are my favorite. Painting is therapeutic for me. Transforming a space is relatively budget friendly but brings a big impact. Adding texture to the walls in the form of wainscoting adds depth. Framing out the window added character and contributed to the overall aesthetic of the room that complimented the accent wall and helped create a finished look.
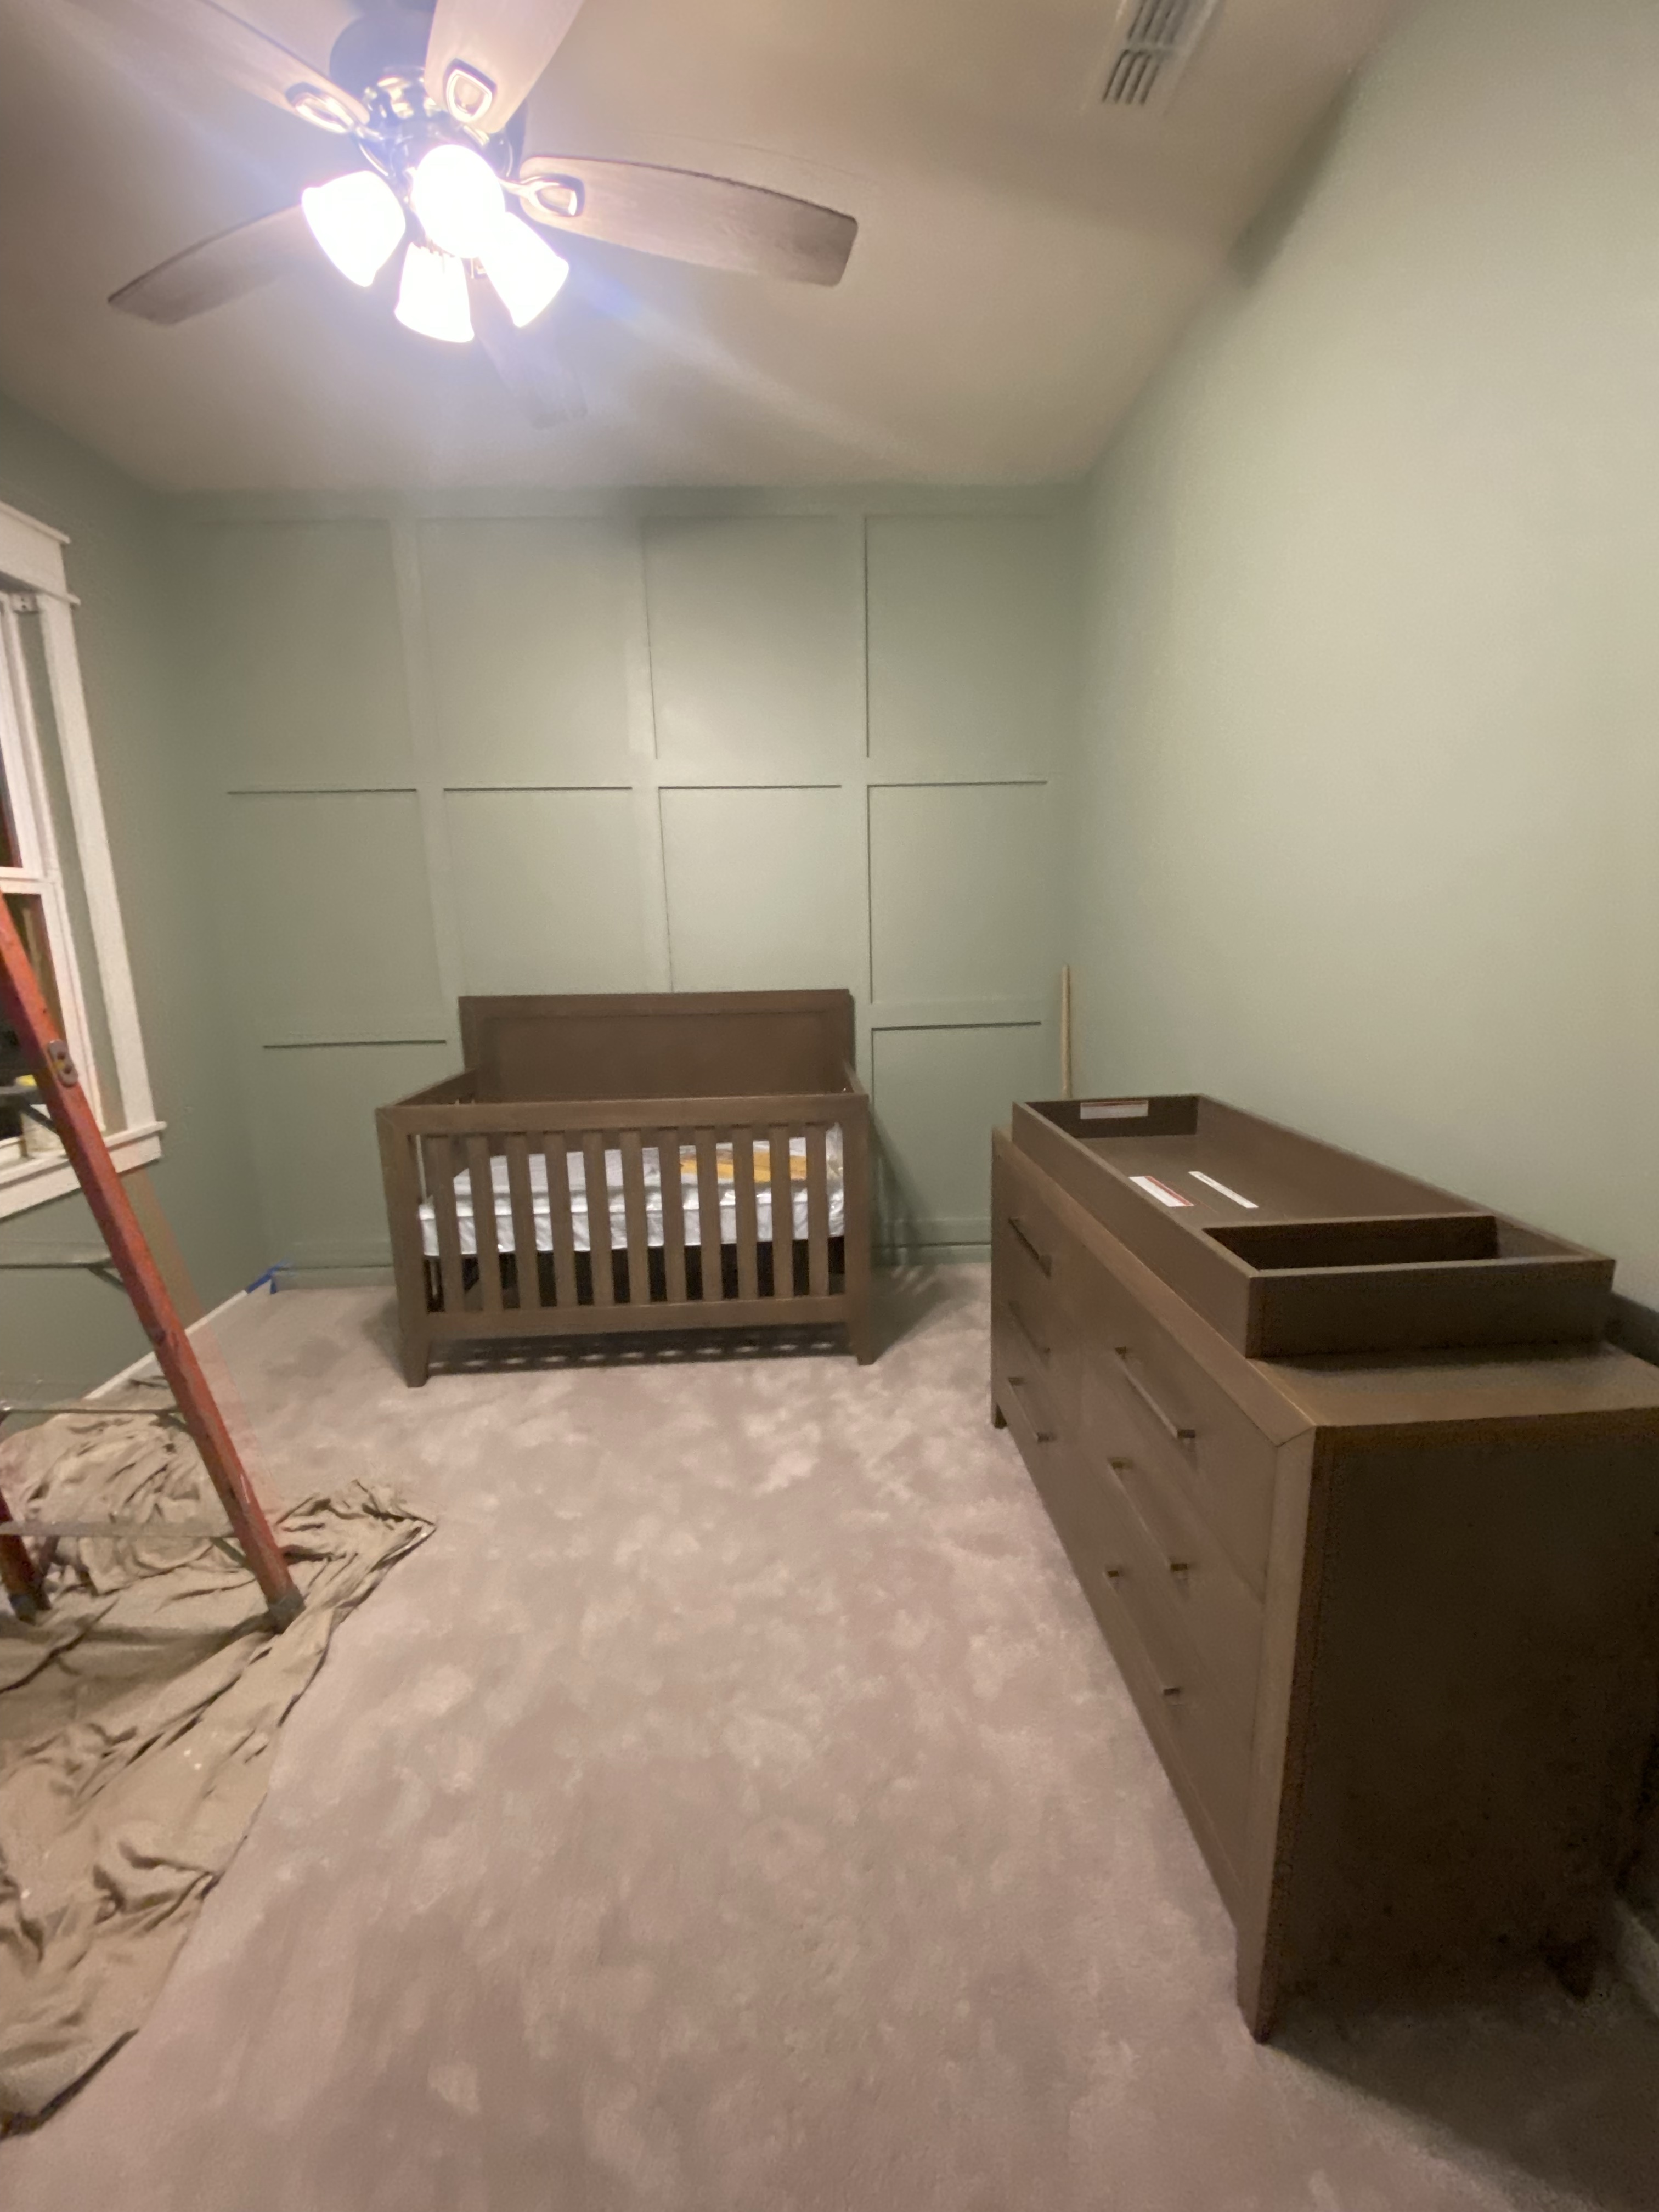
I’m excited to watch as they make all of the selections to finish out the room with furniture and decor in the theme they are going with.
Come on baby Chappell. We cannot wait to meet you.
Until then, my other sis-in-law are planning the SWEETEST baby shower which is coming up in February. Queue the happy tears anytime party details arrive in the mail.
This is your reminder to make a project list and TRY something new. Make it yours and create your Haven one room at a time.
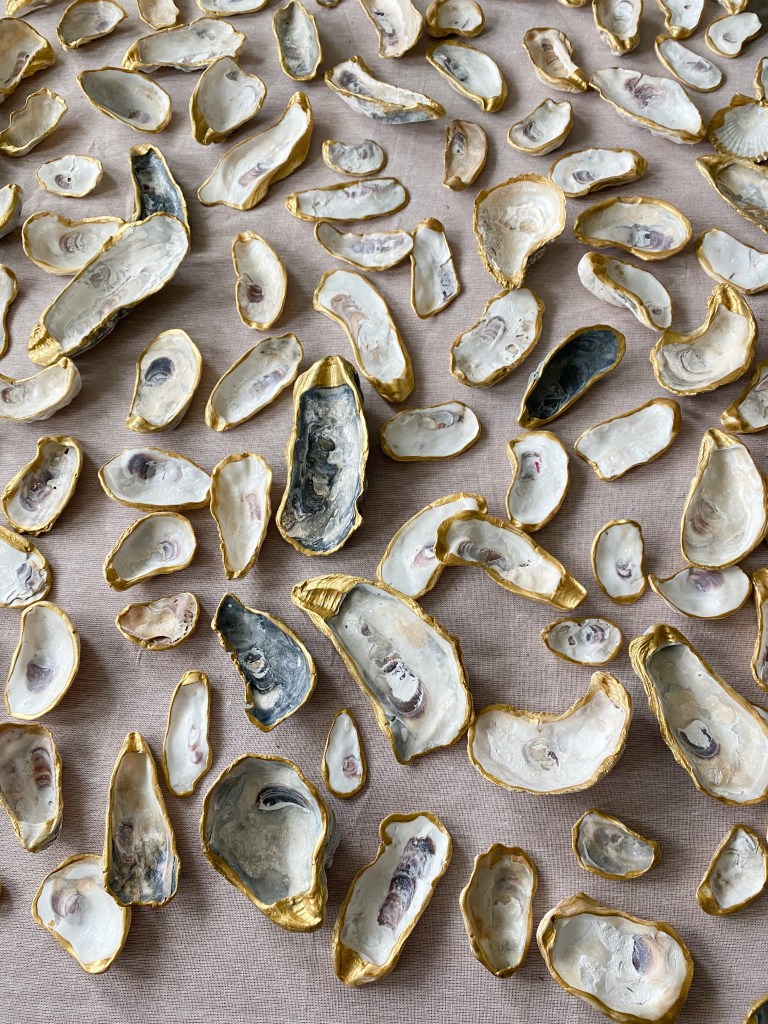
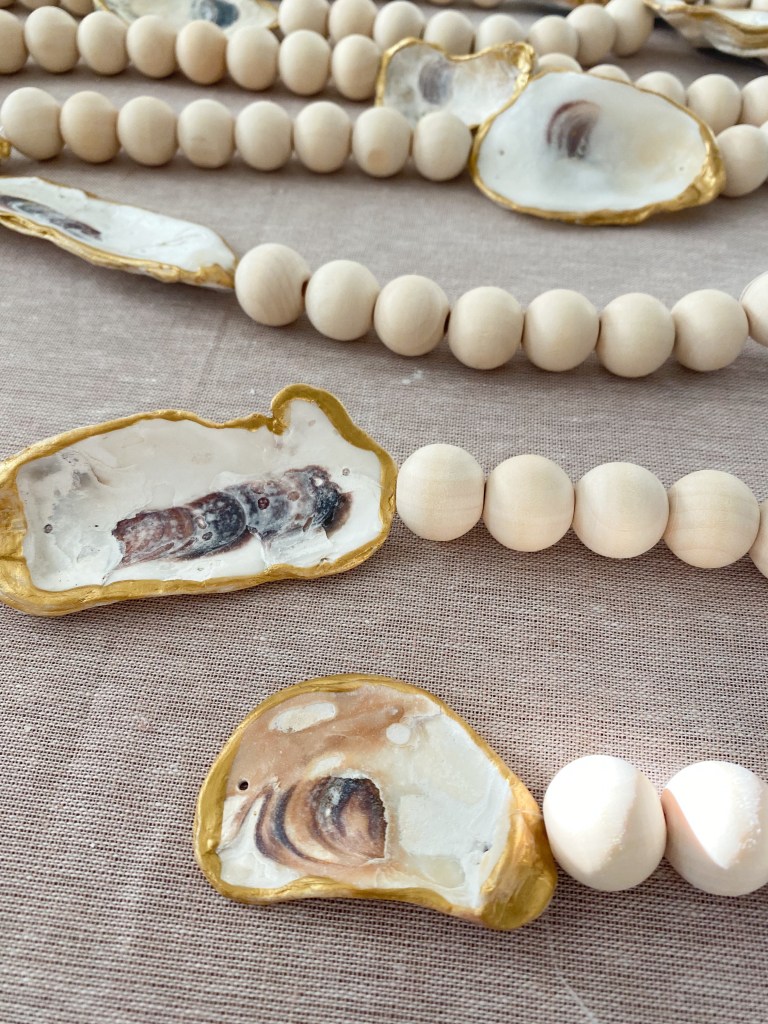
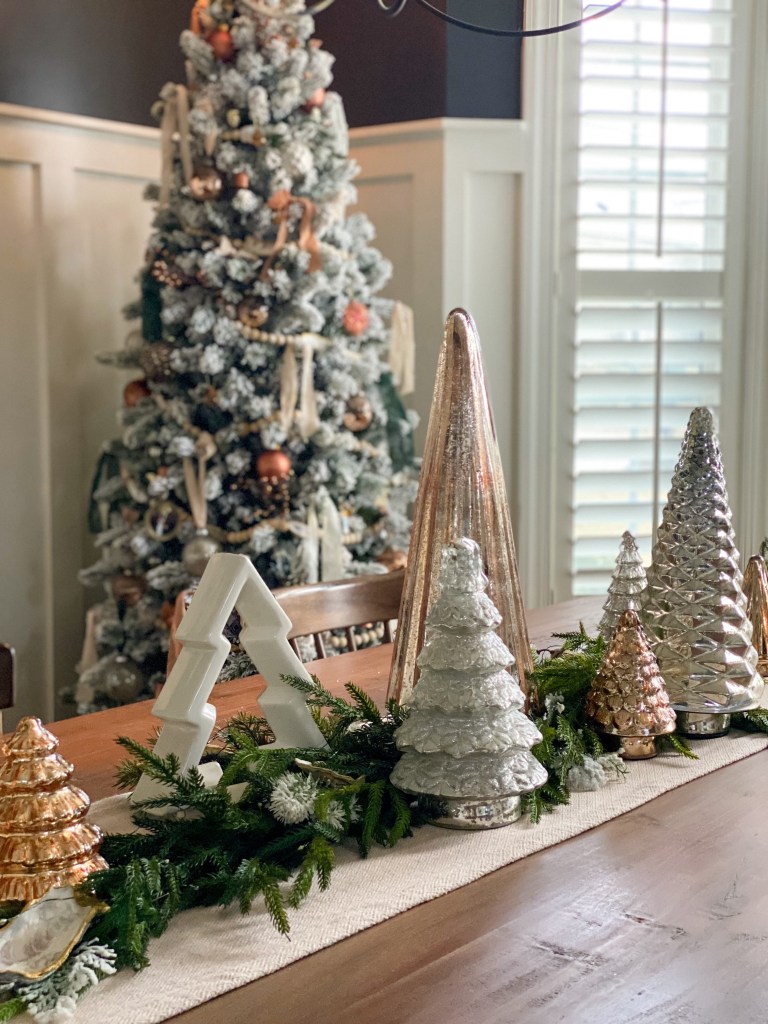
Over the years, we have always collected treasures from the beach whether it be unique shells, beach pebbles, sea glass, sharks teeth, or drift wood but more recently, I started finding myself drawn to oyster shells. Each one is so unique and almost like it’s own piece of art with the various colors and shapes.
Like most things, these oyster shell collections were stored away and forgotten about. That is until I came across the recycled strawberry bucket on a shelf of our laundry room FULL of them.
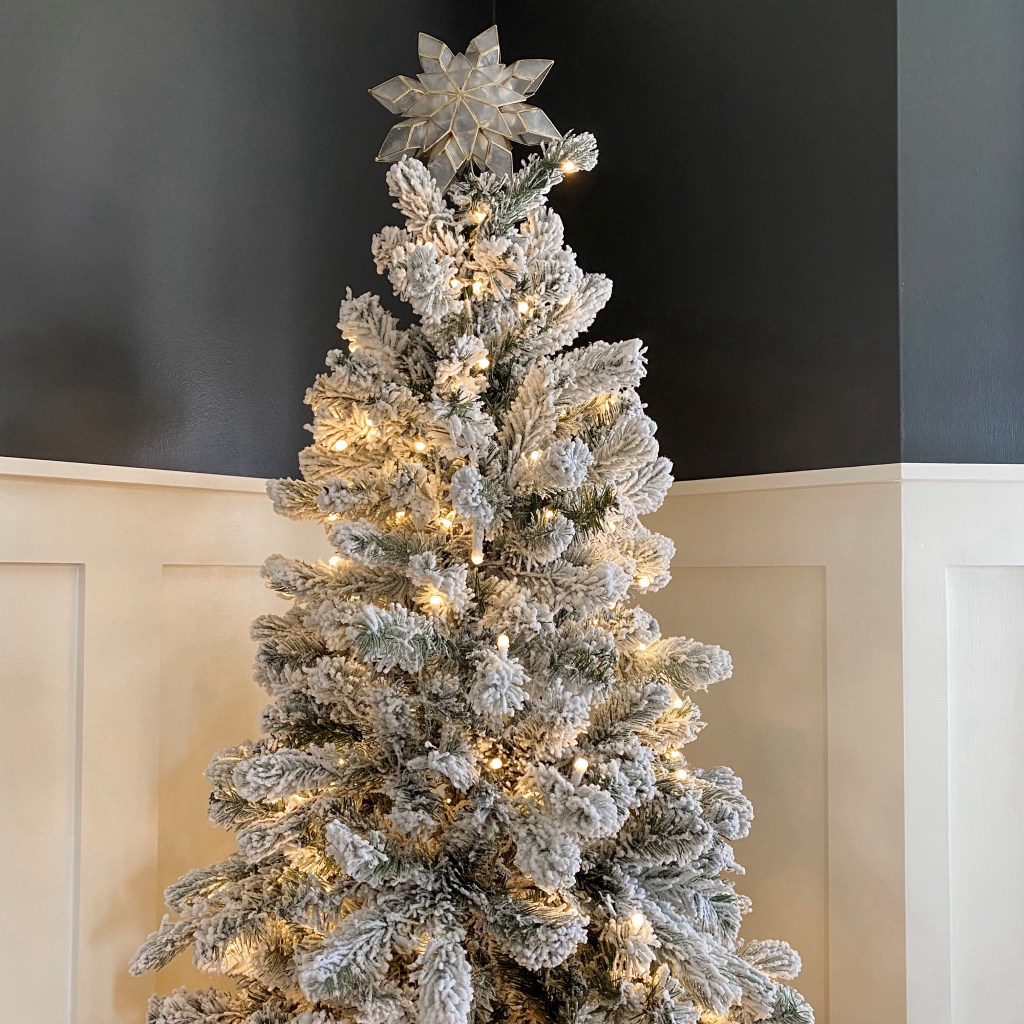
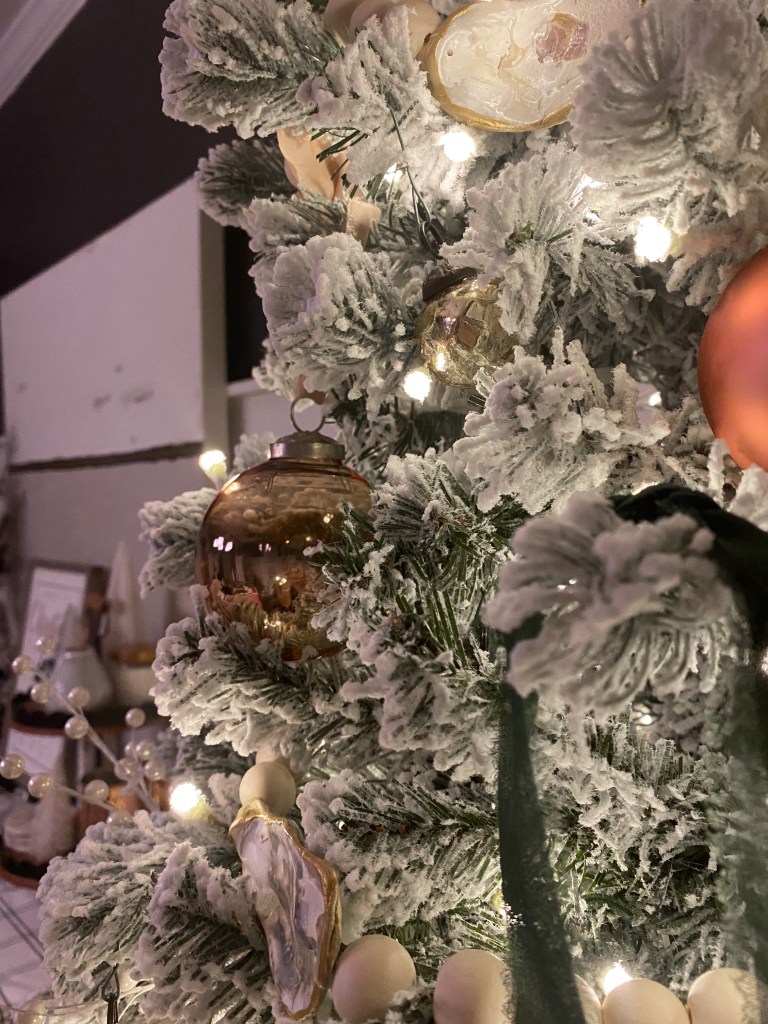
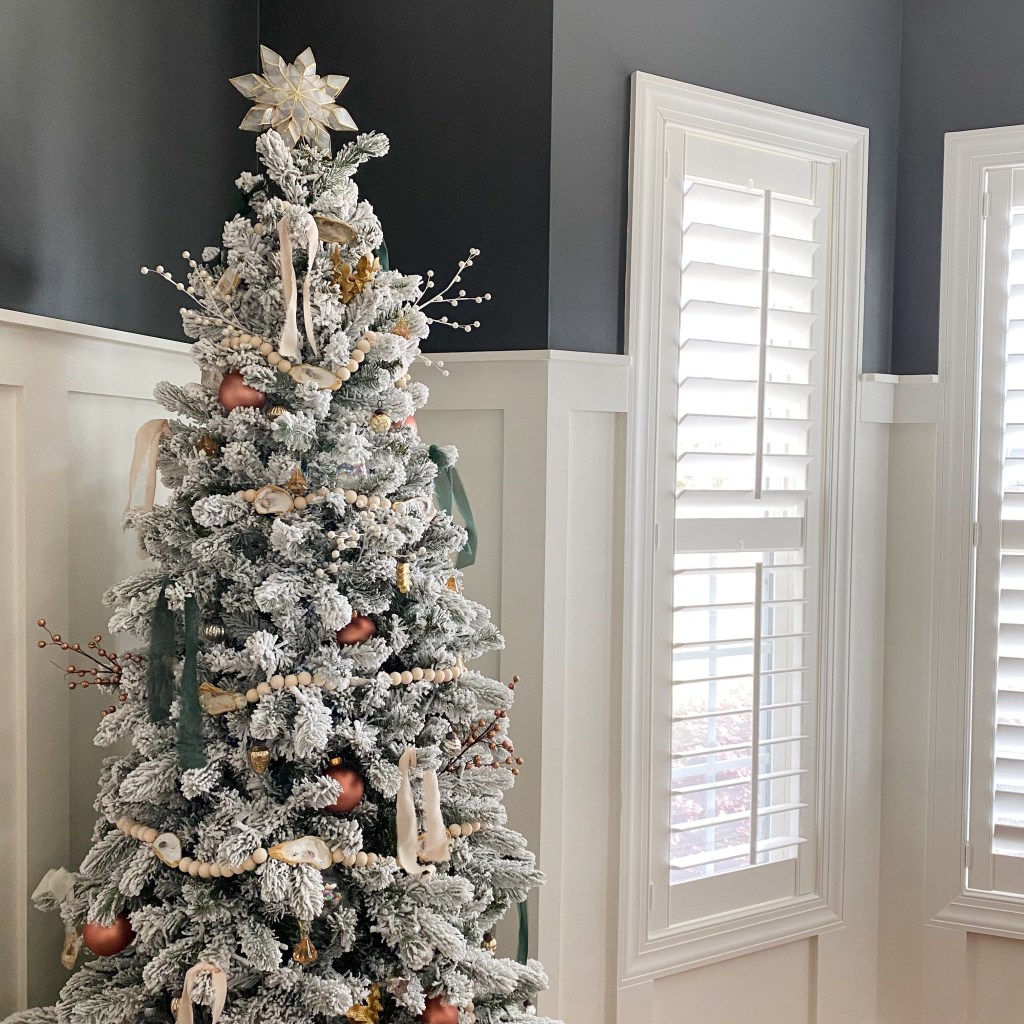
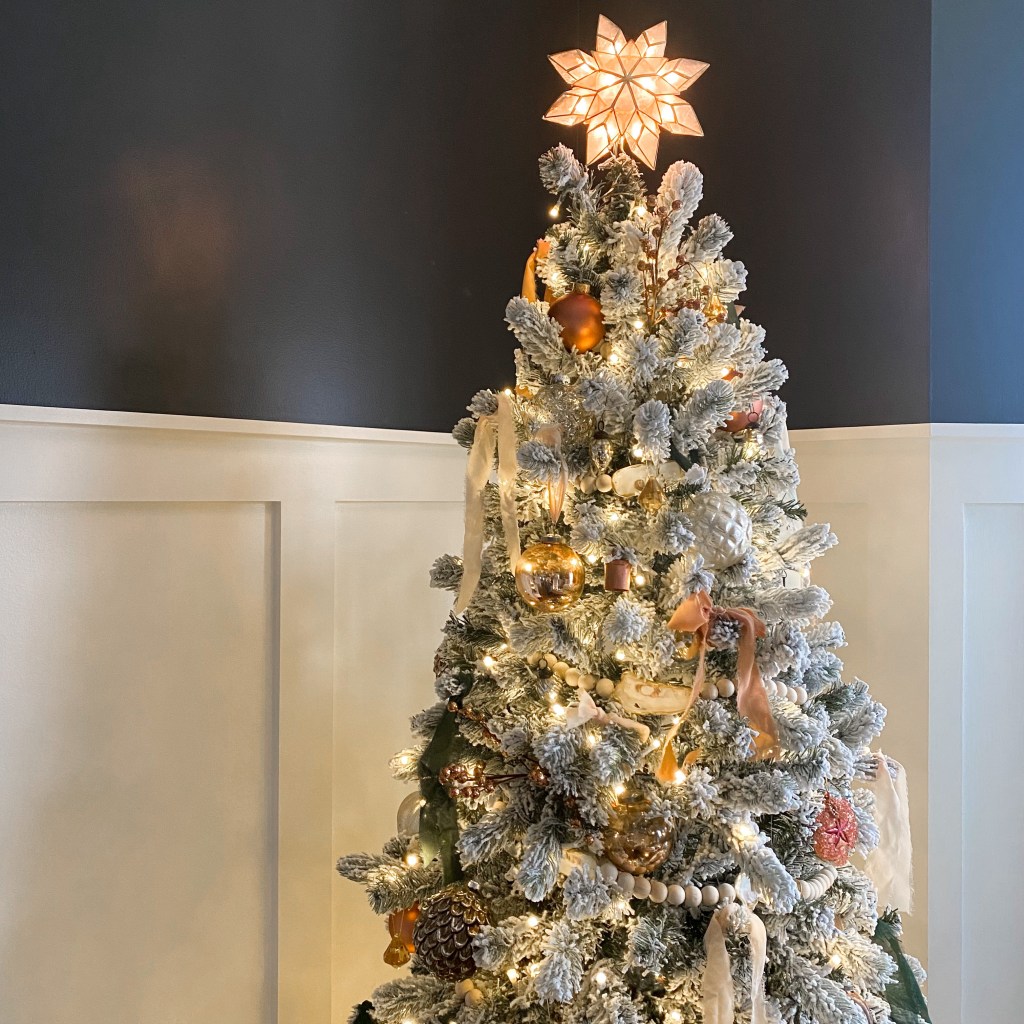
Last year I was asked to collaborate with King of Christmas Trees and was delighted at the opportunity. Christmas is a favorite in this household, my husband included. He was all in for adding another tree to our dining room.
I needed to come up with a theme.
Insert me finding the collection of shells and my brain started to run with an idea. I’d seen oyster shell ornaments, Christmas trees made from shells and other various ideas but never had I seen a Christmas tree adorned with a beaded and shell garland.
I took to the challenge, collected items I needed and got to work.
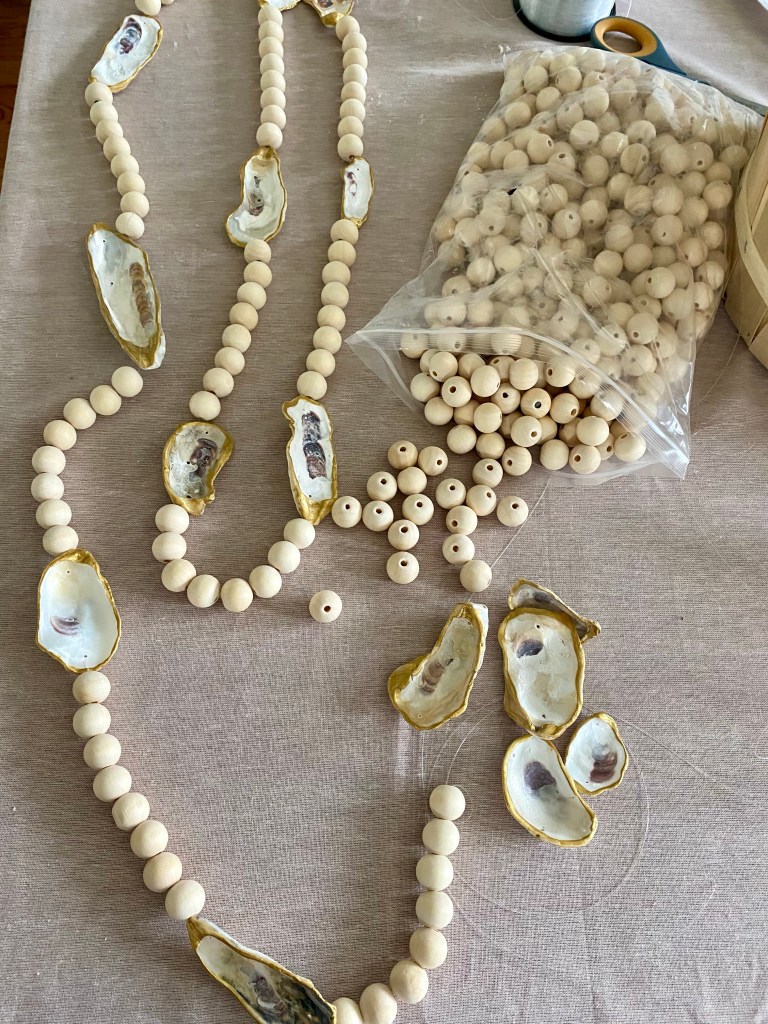
While I waited on my shipment of wooden beads, I prepped the shells for paint.
Thoroughly cleaned all shells with a solution of dawn, bleach and water
Allowed them to dry completely
Laid out my favorite shells on a protected surface
Painted edges of the shells with this perfect gold paint
Allowed to dry
Drilled tiny holes in each end of every shell to allow for fishing line
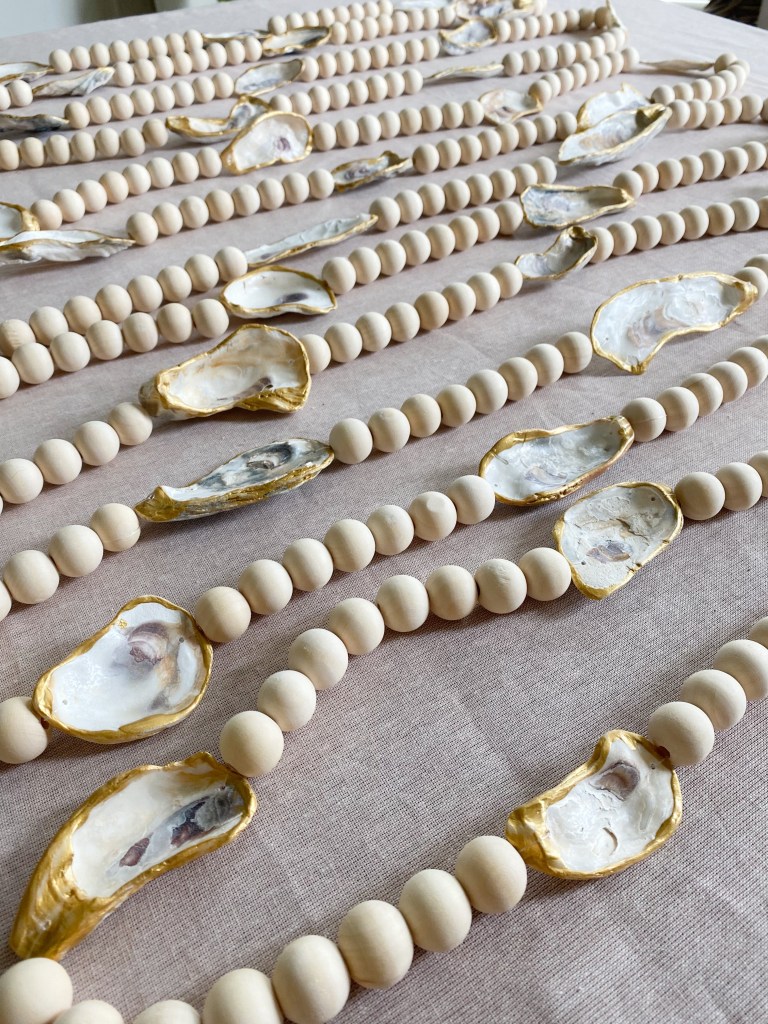
The beads arrived and I began to layout the pattern of beads:shells that I felt looked best. Using a heavy duty fishing line that I borrowed from our boys’ fishing gear, I began stringing beads and shells. The two holes I drilled in each shell allowed for one continuous strand. My initial strand was 5 yards in length. I ended up adding 3 additional yards to the strand which was perfect for our 6.5 foot tree.
You could easily make a short strand and add it as decor on a coffee table with books, and other items.
My favorite accent color in the home has always been copper and coral tones. When I saw some of the oyster shells had this coloring in them, I immediately knew which color theme I was going with. I dug out the matte copper ornaments that are usually on our main living room tree and only purchased one package of glass ornaments that had a hint of copper coloring to them and these mini mercury glass ornaments. All other ornaments were some I’d collected over the years and had on our main tree year over year.
For me, this tree represents our time living in Wilmington, NC and is a reminder of memories we have made at many beaches both as a couple and with our boys.
2022 Dining Room Christmas Tree2023 Christmas Tree and Tablescape
My hope is that each space in our home is a reflection of what brings us joy and fills our thoughts with moments of nostalgia.
I hope you find inspiration from this fun DIY. Don’t be afraid to create something outside of what is trending in popularity.
Make your home a HAVEN filled with meaningful spaces.
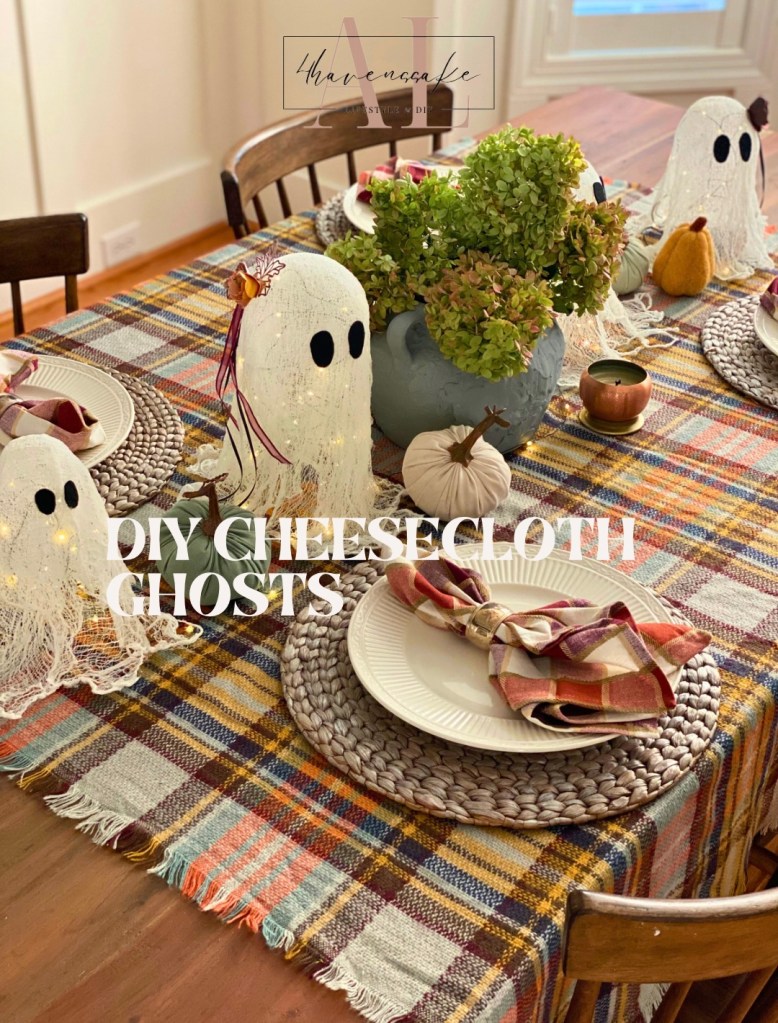
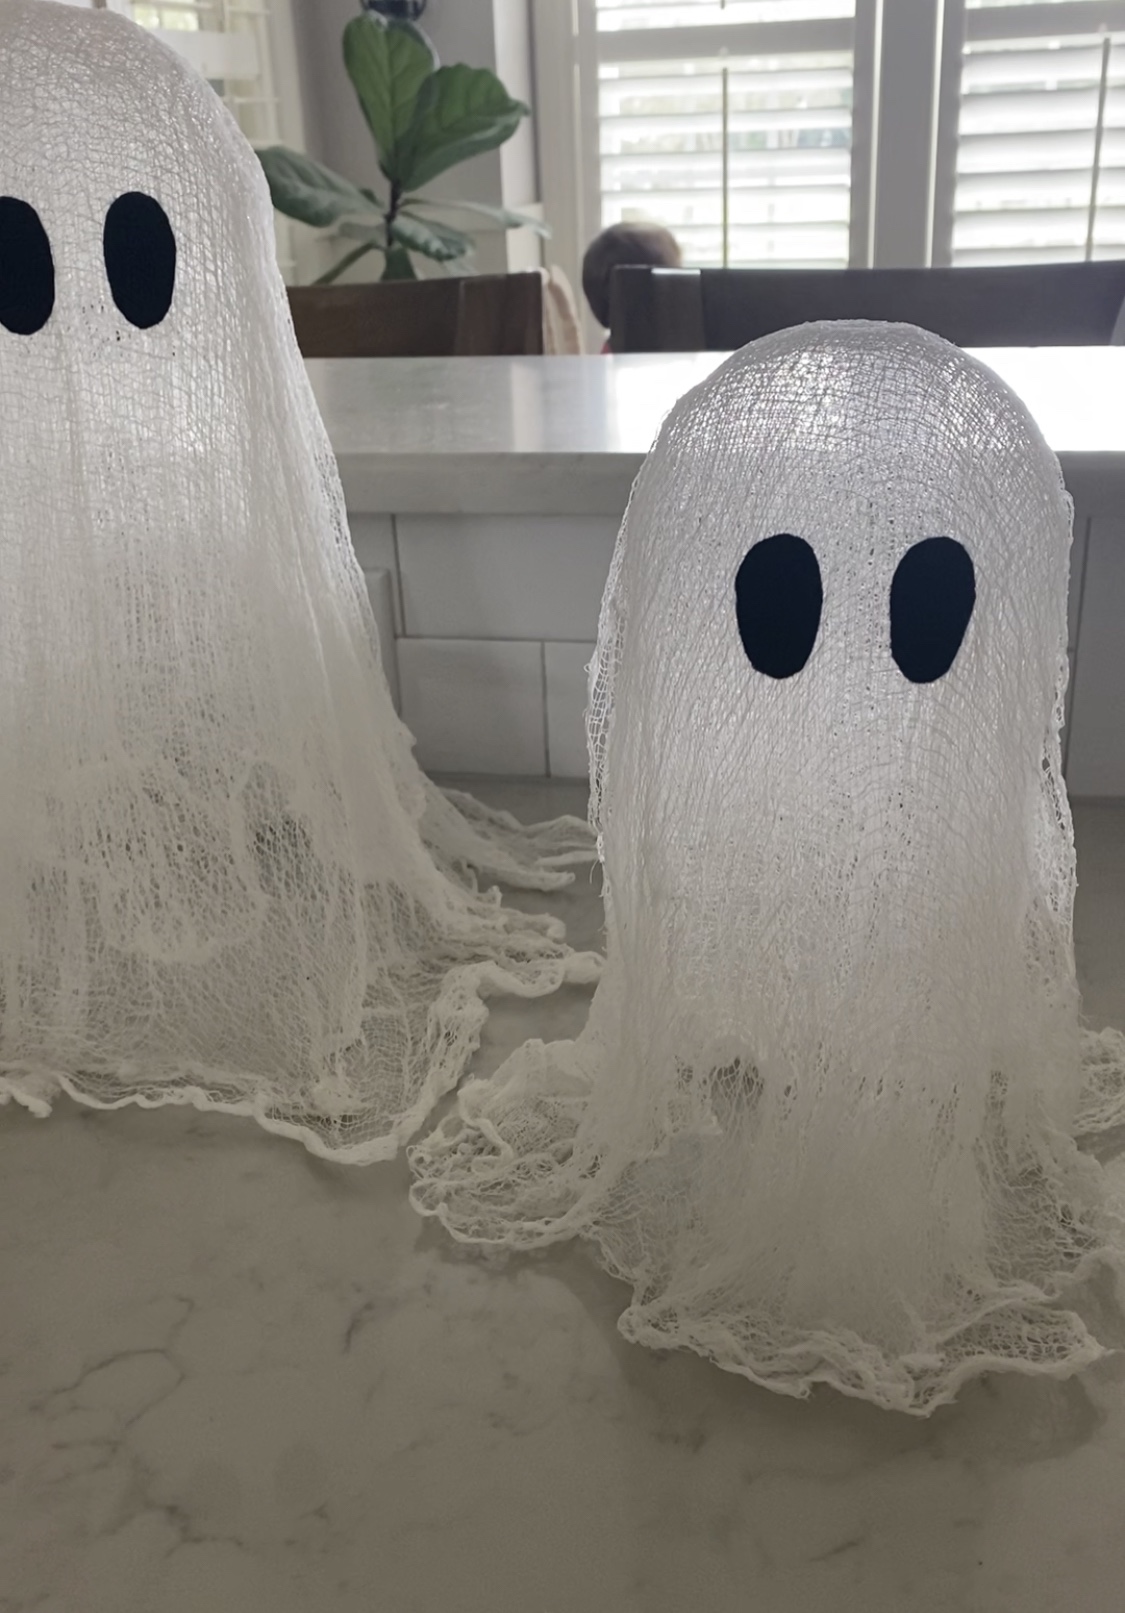
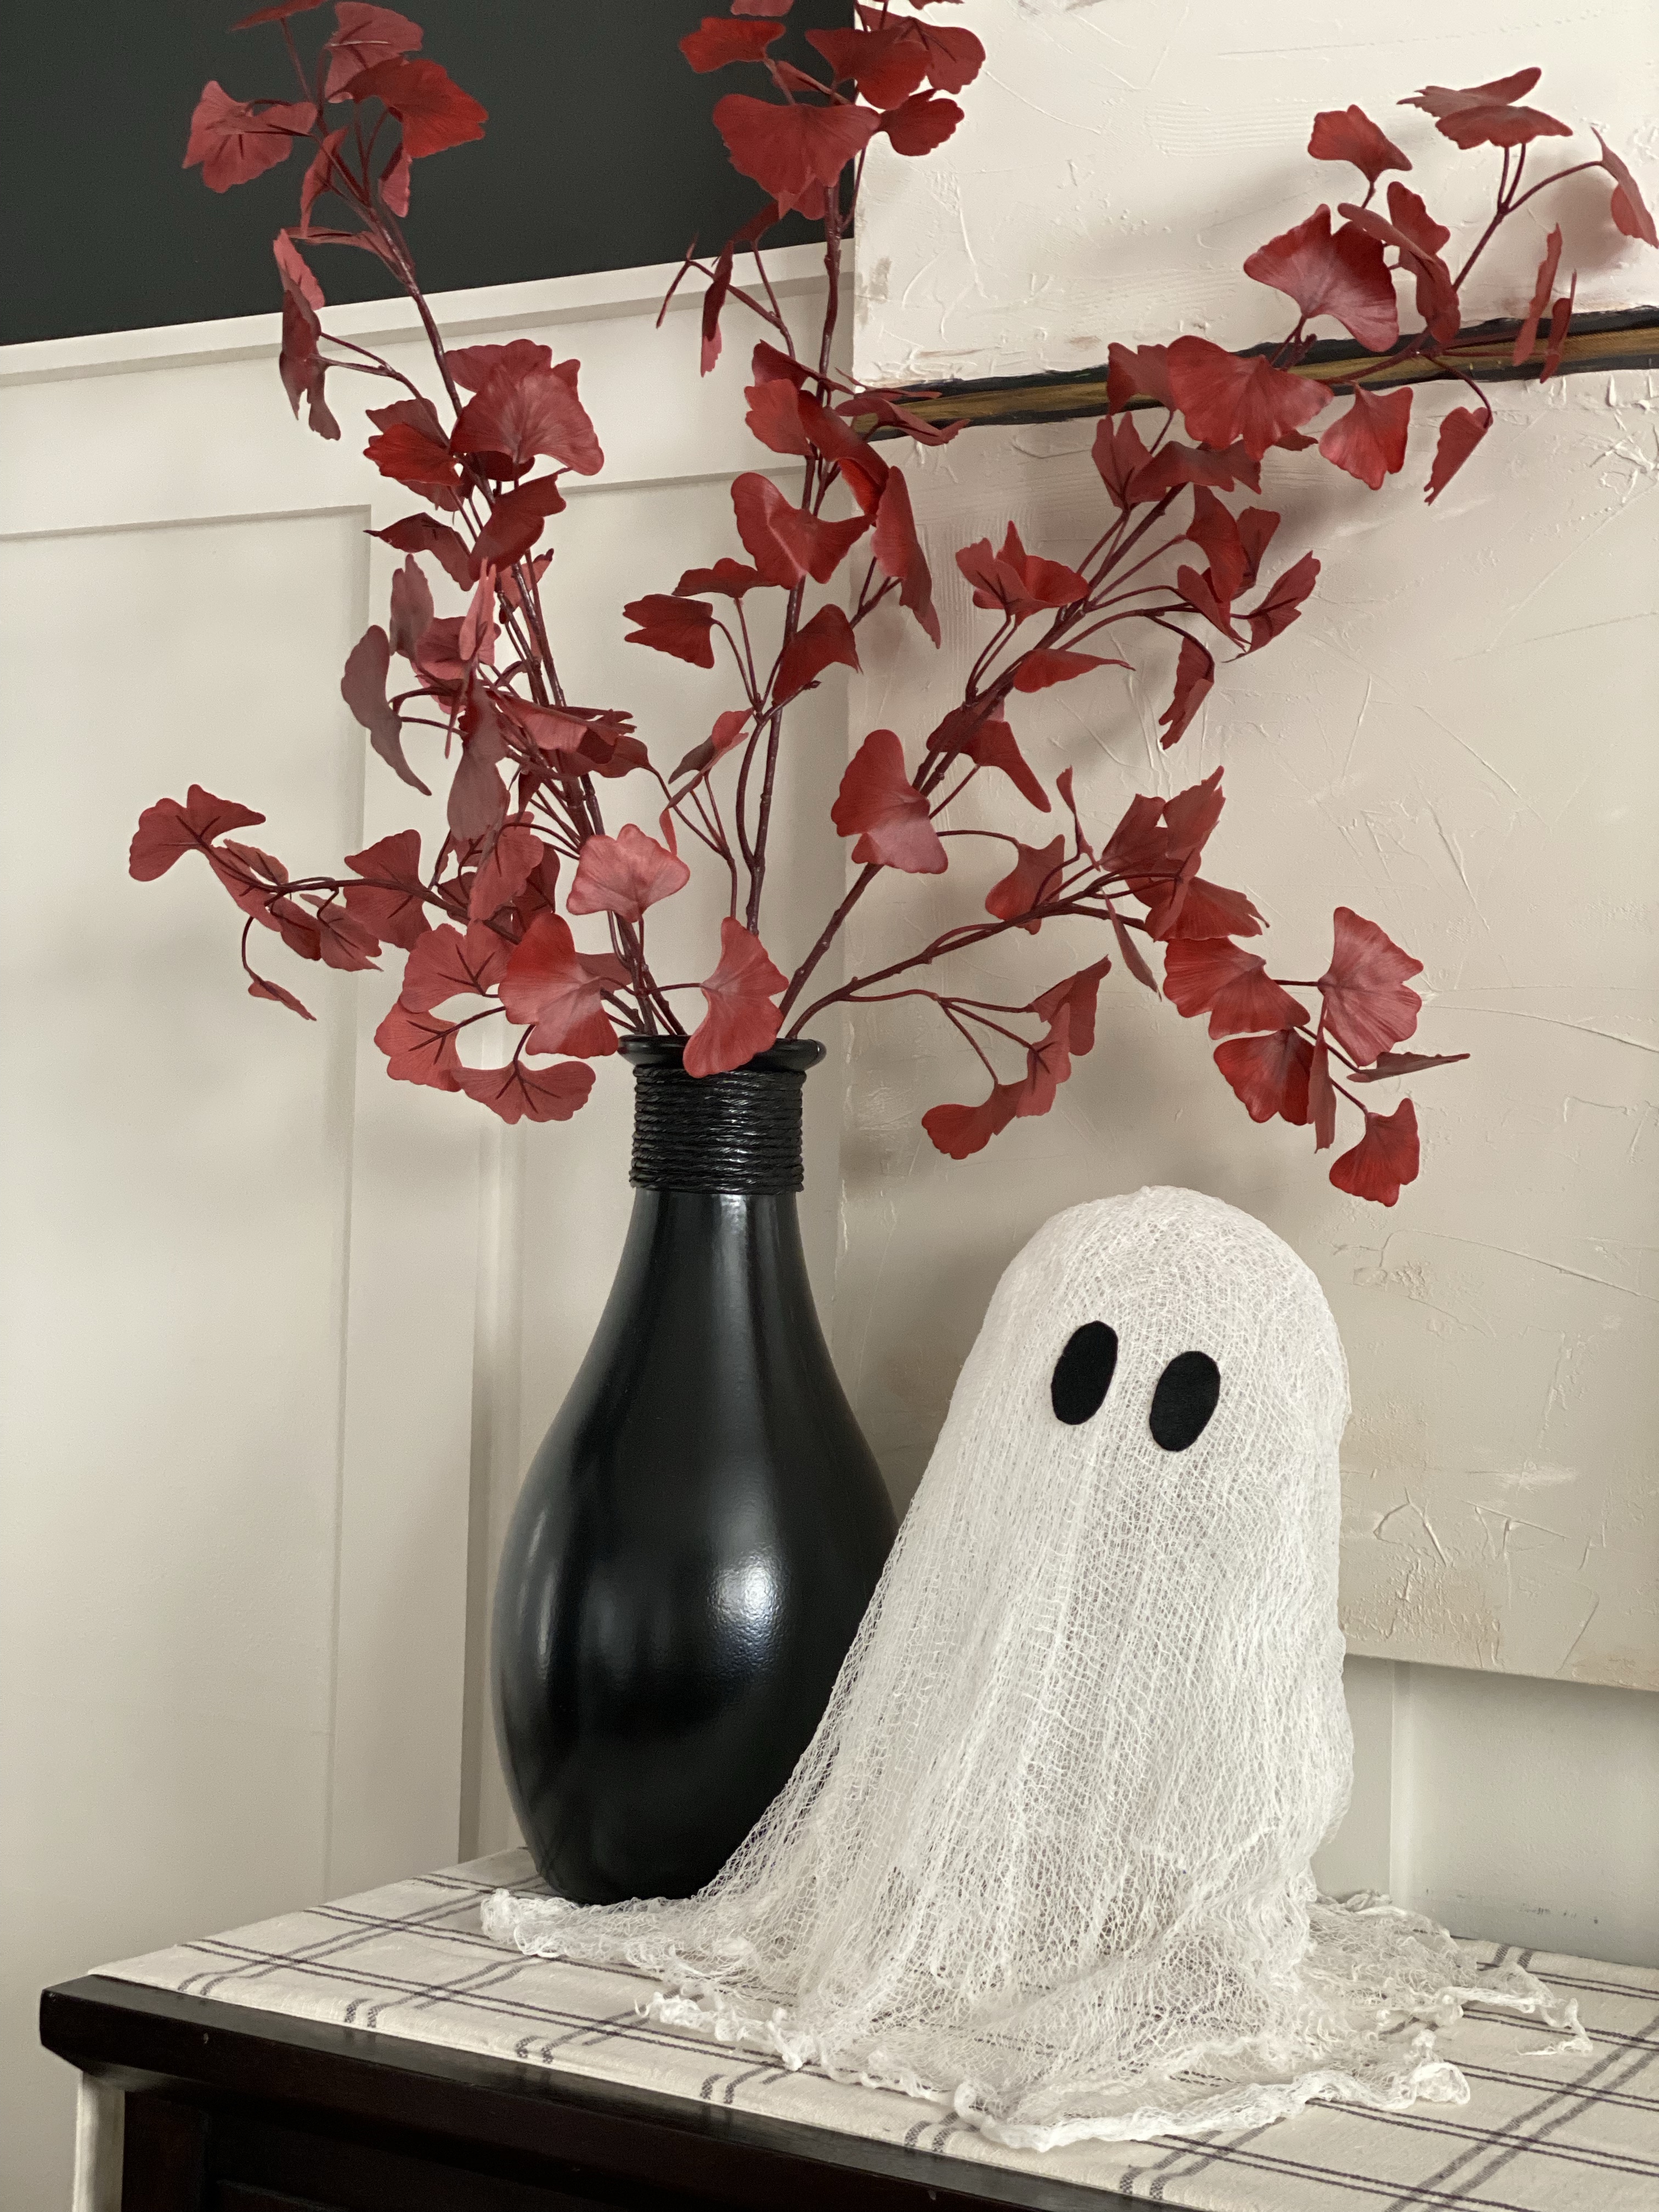
If you saw my post on Monday, you know already that I took on a cheesecloth ghost craft as a way to decompress. On occasion, I am reminded why I thrive when I create, paint a room or take on a DIY project in the home. It’s where I thrive and find Amanda, a moment of pause from mama and the joys and stimulation that role brings.
I am beyond grateful to be available for our boys, don’t get me wrong. There’s always reason to take time for yourself doing something that brings you joy. Filling that cup of joy will spill over when you step back into your role of mom.
This craft requires very few things:
Cheesecloth
Modge Podge
Balloons
Bowl for mixing
Drop cloth of some form
Supportive base to attach balloons
First, blow up the balloons at various sizes to add variation to your ghosts.
Next, drop the cheesecloth over each support and trim accordingly. Tip: Cut them slightly larger than needed so the cheesecloth can puddle nicely.
Mix the modge lodge with a little water to thin out the consistency. Soak each trimmed piece in the mixture, squeeze out the excess and slowly stretch it out to drop back over the base supports you made. I did two layers on each ghost.
Allow them to dry overnight.
Gently separate the balloons from the cheesecloth. Your ghosts may loose shape as you do this step but don’t worry, you can shape them back.
Next you will cut felt eyes or sew on black buttons. Hot glue them on to each ghost.
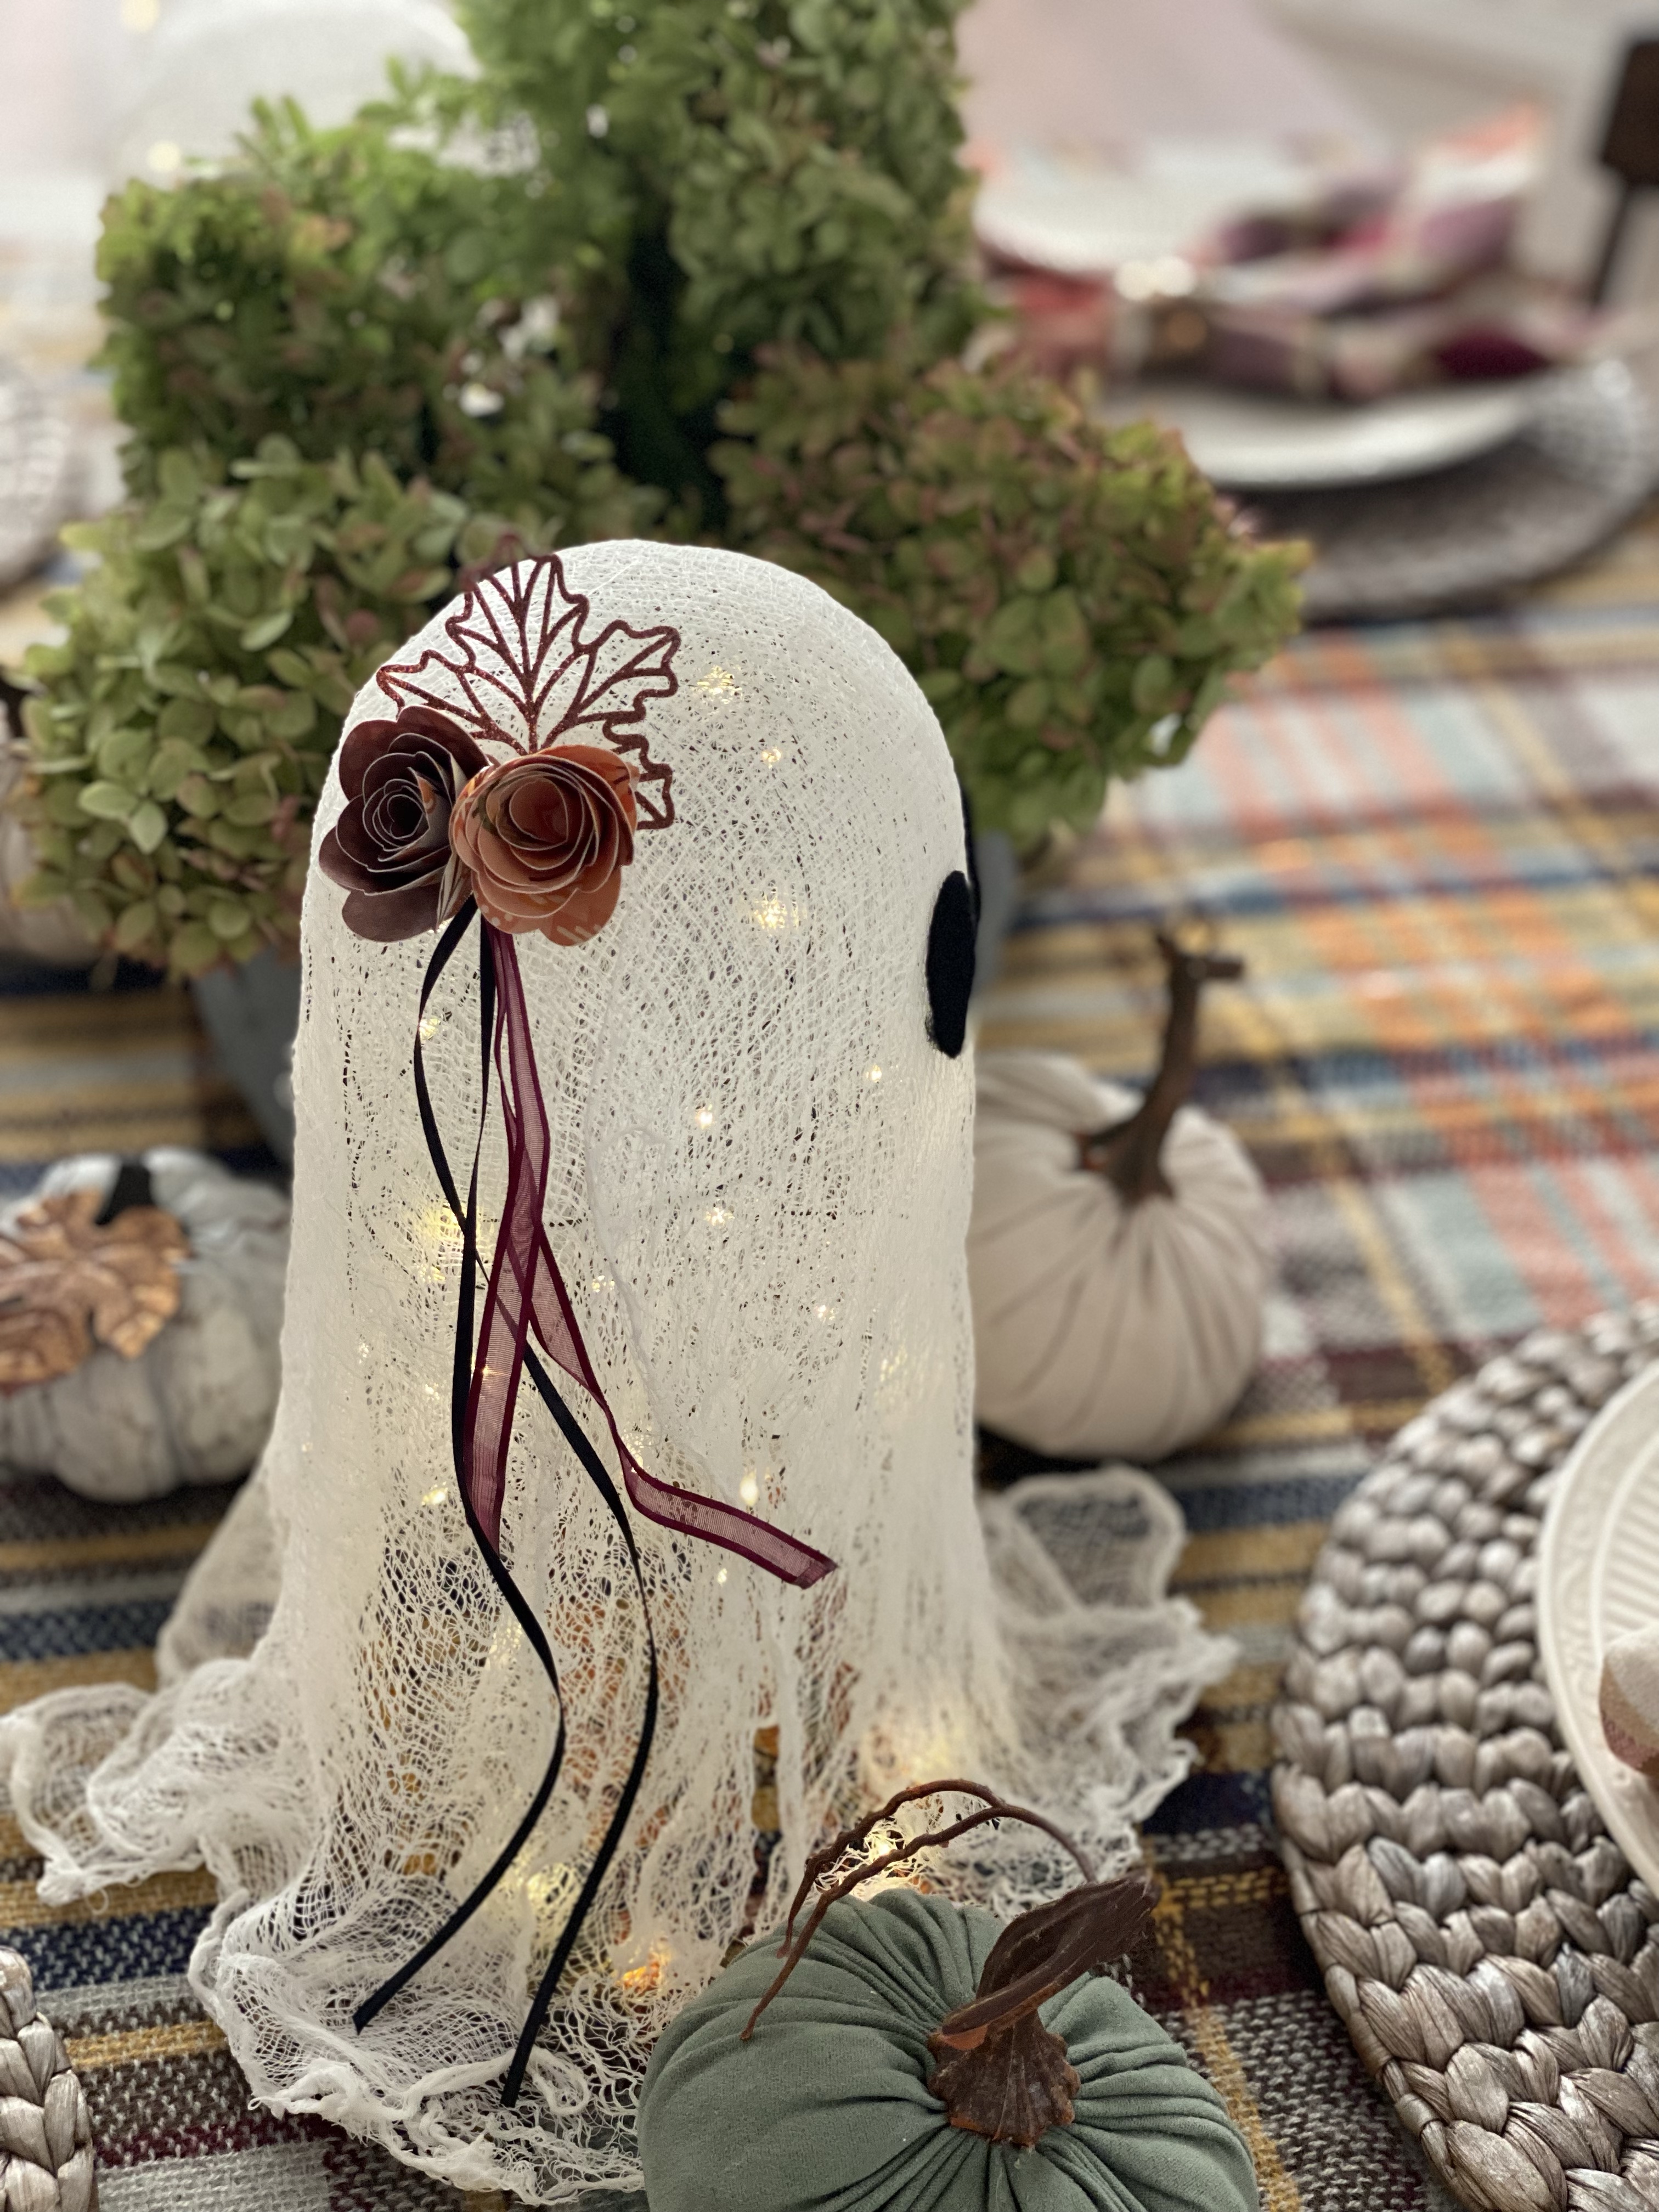
I decided to add paper flowers and ribbon to two of the ghosts to add a little extra flare, because I’m extra. Have fun with it and make them your own.
Fairy lights were the final touch I added to the ghosts. One long strand worked for all of them.
This tables cape will be a fun one to enjoy before a night out trick or treating. Our family has a tradition of filling up on a hearty bowl of my turkey chili with a side of cornbread before any candy is consumed. Be sure to save that recipe! It’s a crowd pleasure and simple to throw into the crockpot.
What was once an item listed on our project list, the powder room, it quickly became an active project when my husband walked into the garage and returned inside with a hammer and crowbar. He took to a corner in the bathroom and began an attempt at removing 1/4 round and baseboards. All I needed to get going on this particular project was him taking that first step and saying “let’s start checking off these projects.”
DIYs are fun but now with 3 kids, we have to be strategic in planning when we can tackle projects -between his work travel and kid schedules.
Goals for this project:
Try to be budget friendly, afterall, it is just a powder room
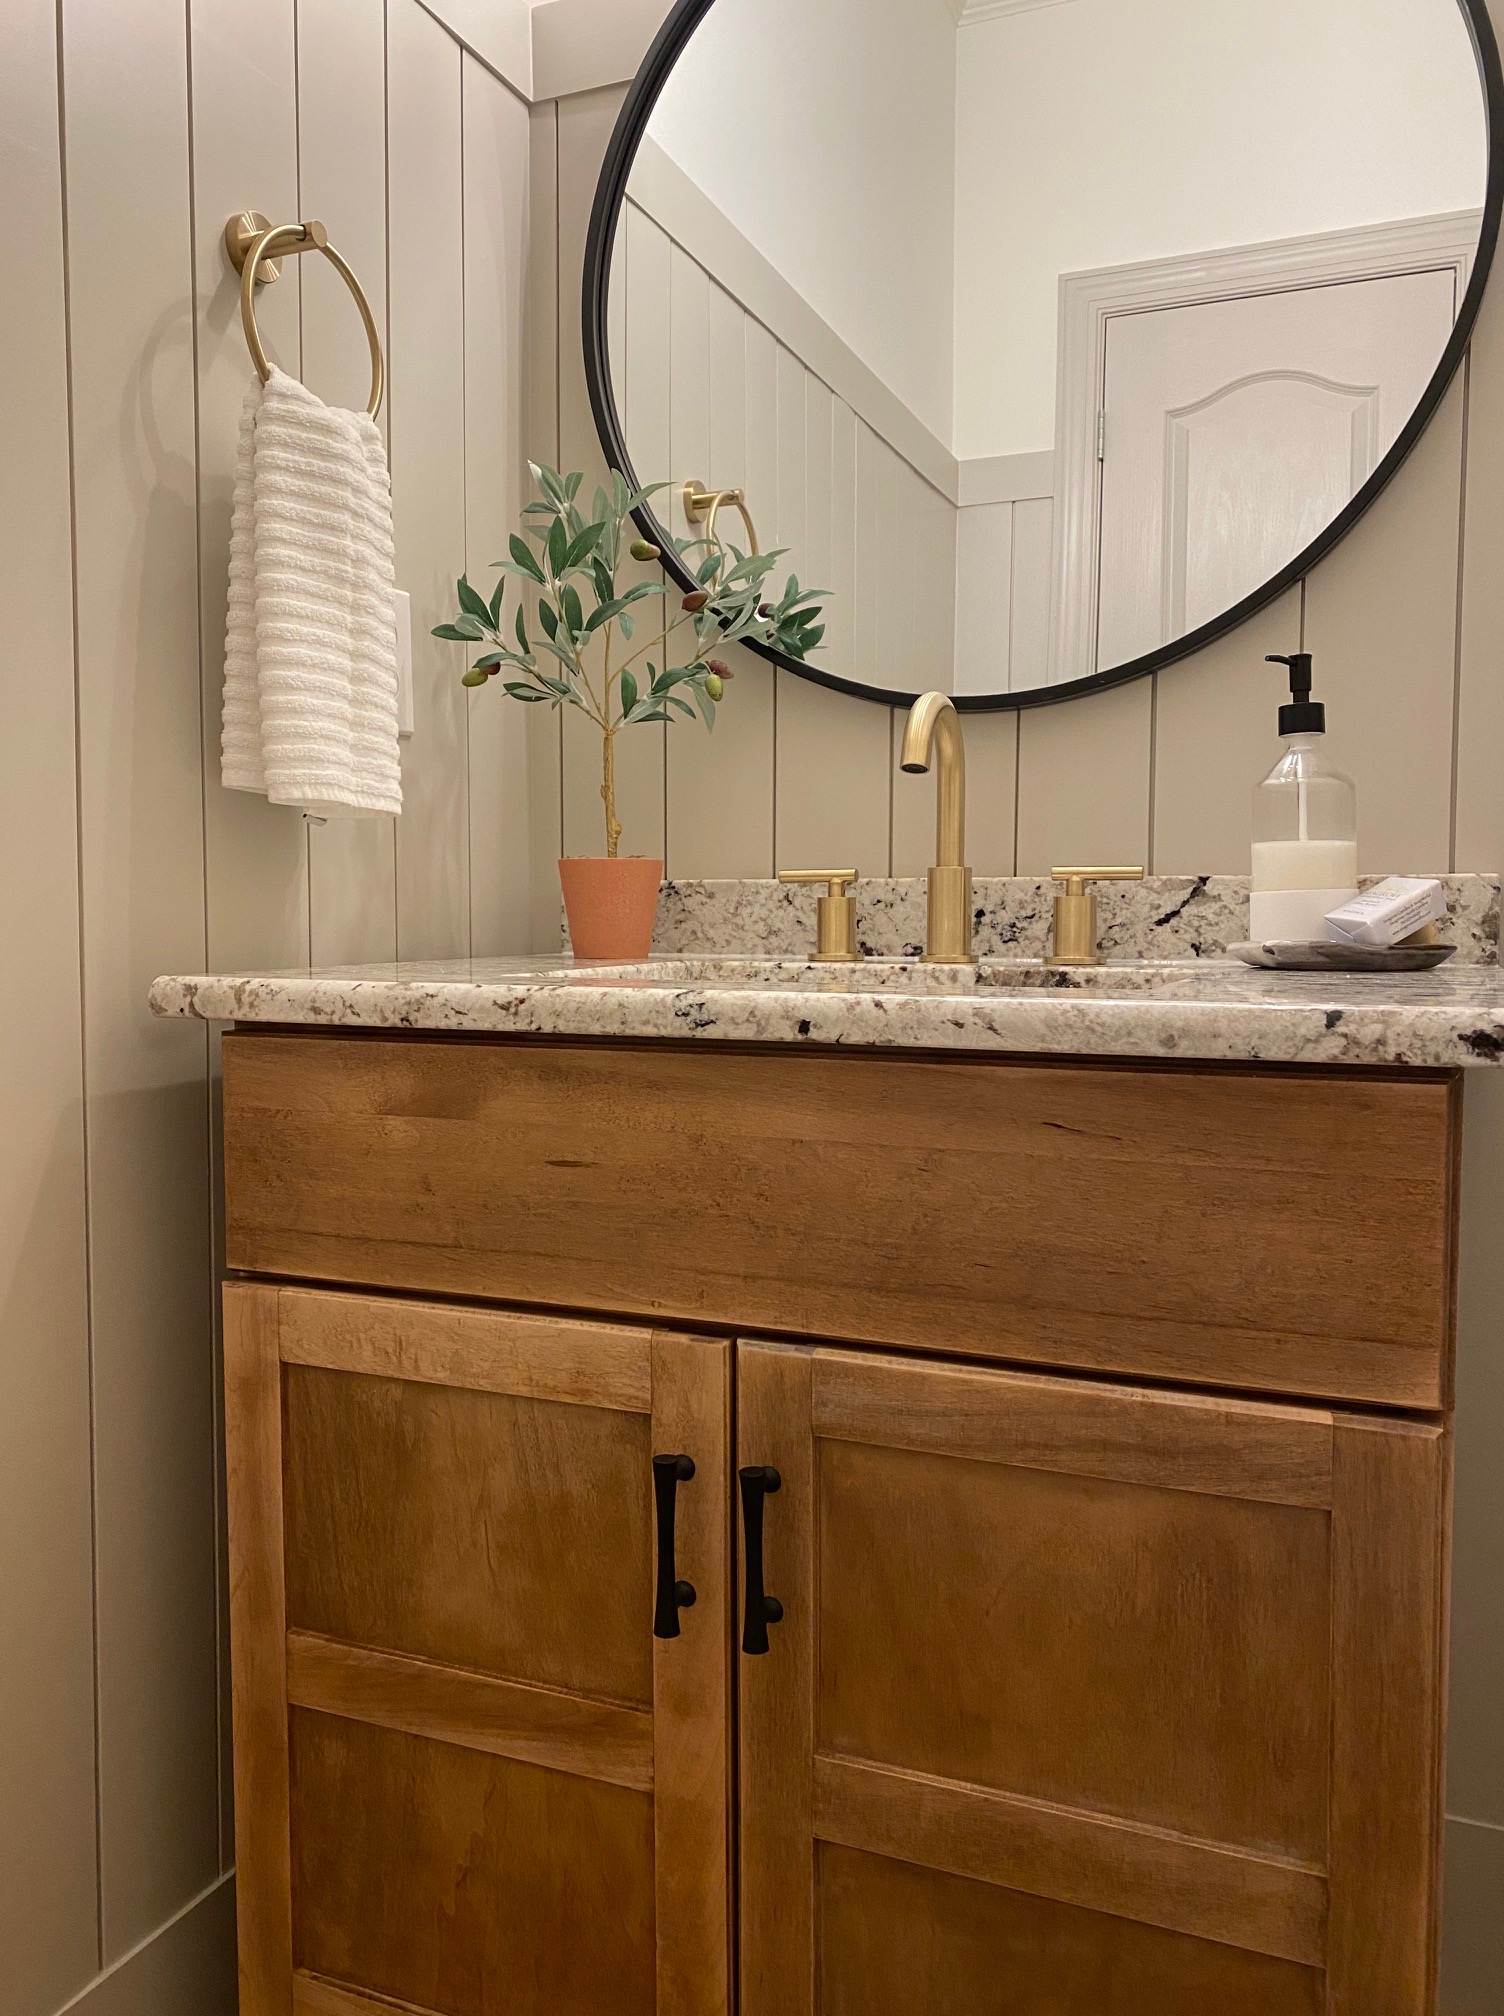
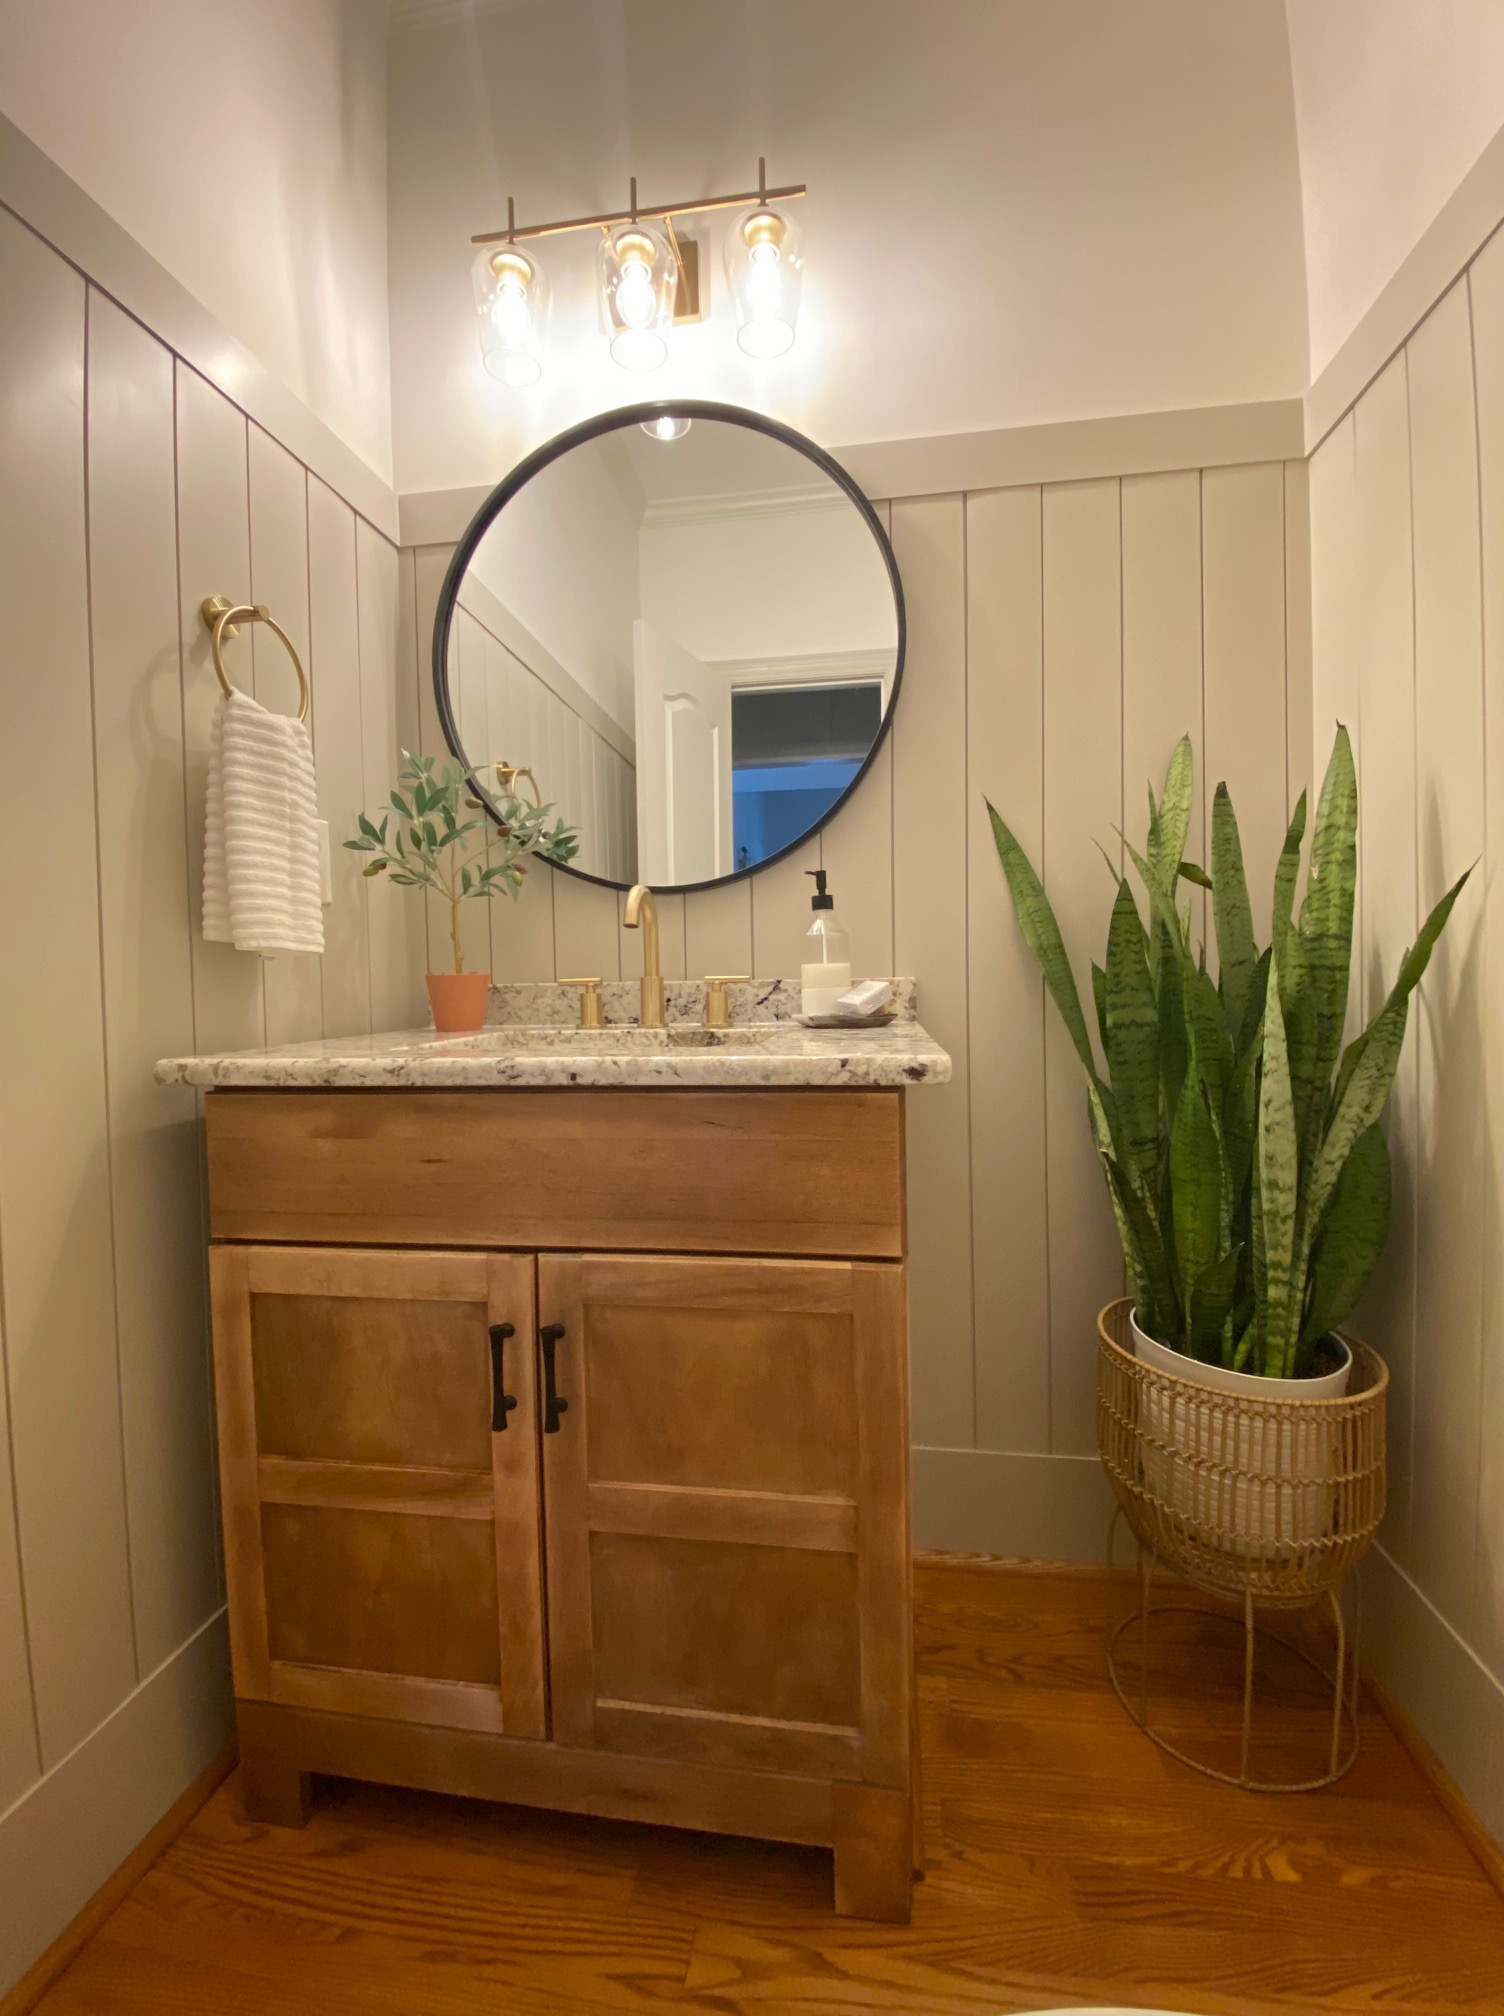
Source a local company to fabricate a new granite countertop for the existing vanity. This granite was going to the dump, and we scooped it up!
Find new faucet, lighting and accessories
Add vertical shiplap
Fresh coat of paint
Project Mood Board
You can find links to the lights, hardware, and faucet here, Product Links. The final faucet we went with can be found here. We have been very pleased with it. In fact, I installed it apart from connecting the drain to the p trap. I’m thankful for my dad who came over to connect them and teach me how they work.
First we demoed by taking out all 1/4 round, baseboards, disconnecting the water supply and removing the vanity.
We ended up having to purchase this set to help in removing the 1/4 round and baseboards. Even still, it proved to be challenging because the installers used 3 inch nails which is excessive in my opinion.
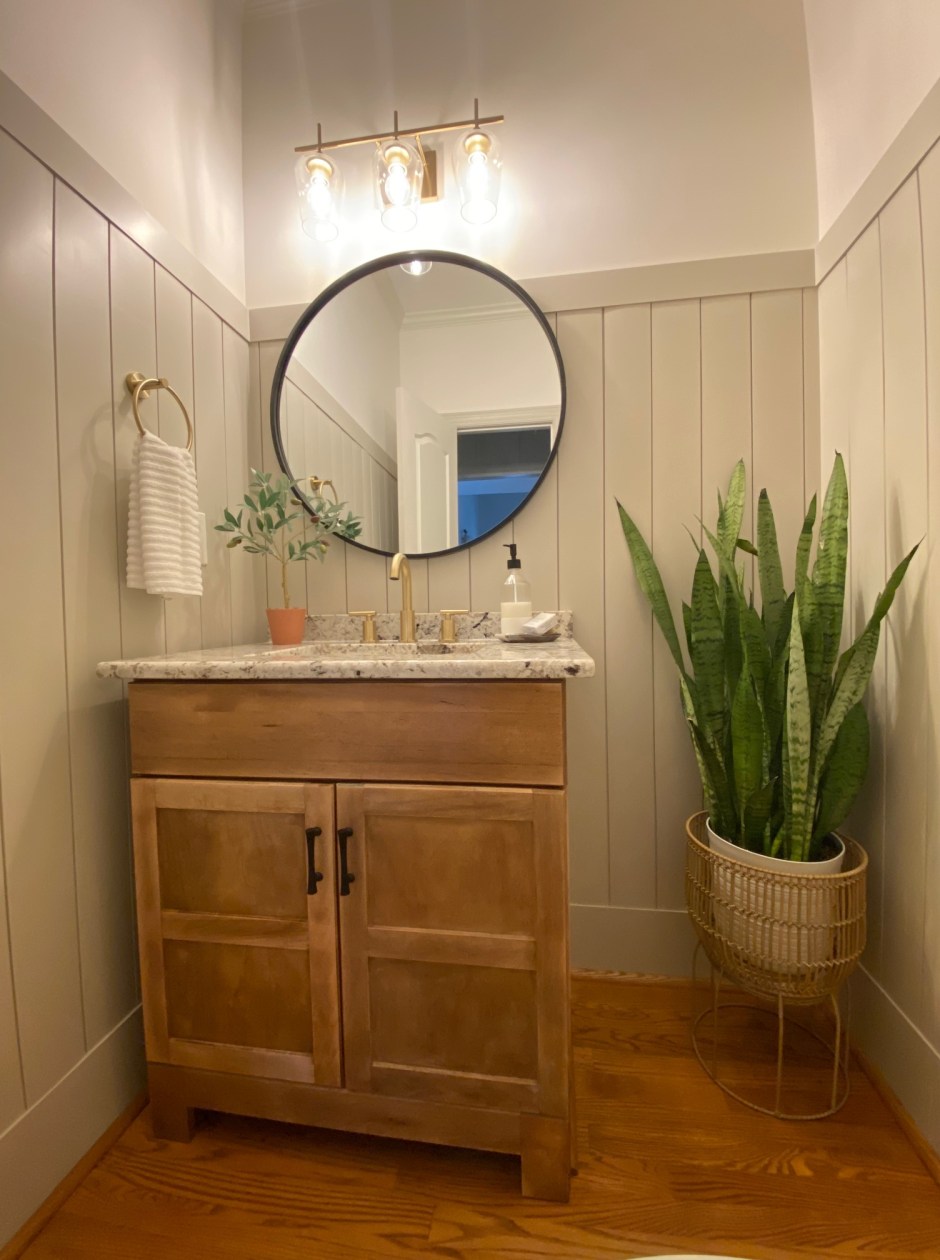
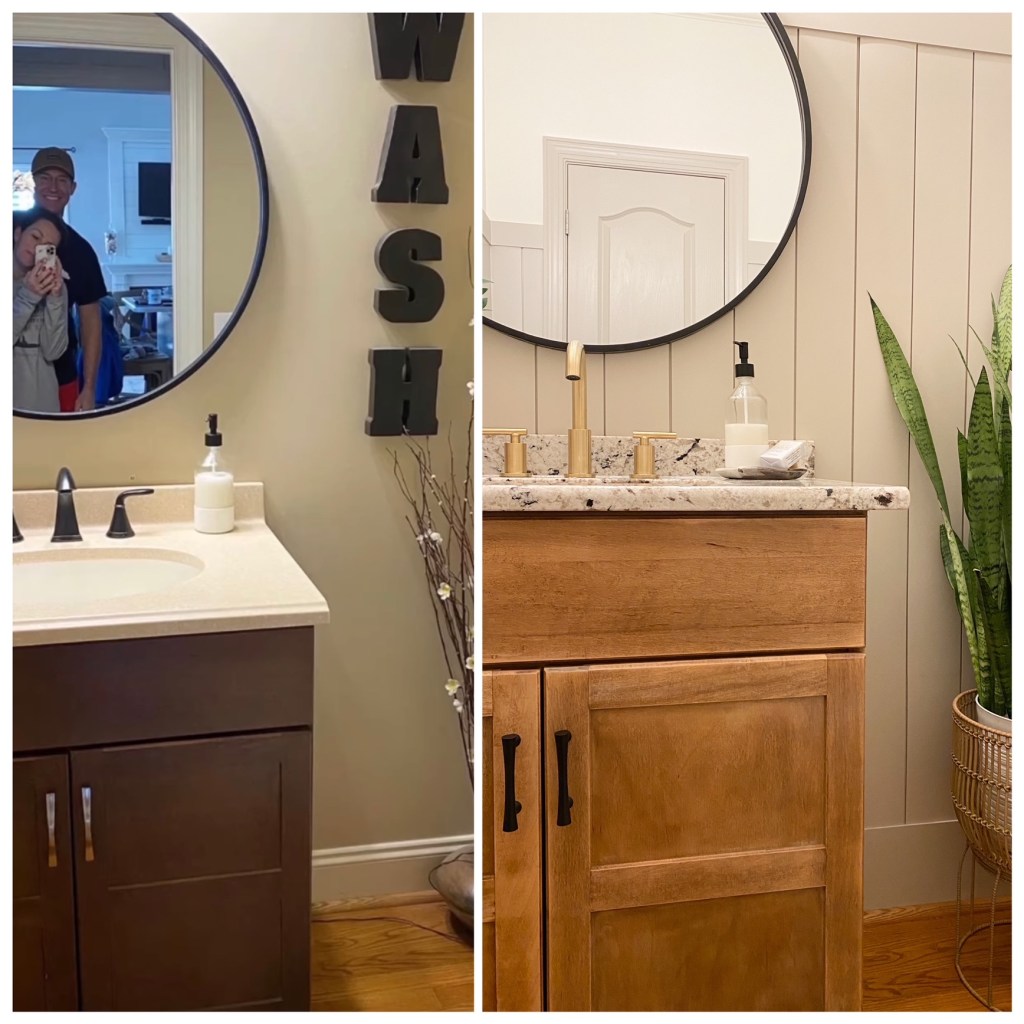
As you can see, the before was just “blah” and didn’t fit our style at all. As for the layout of the bathroom, we would have never designed it this way but we had to work with it.
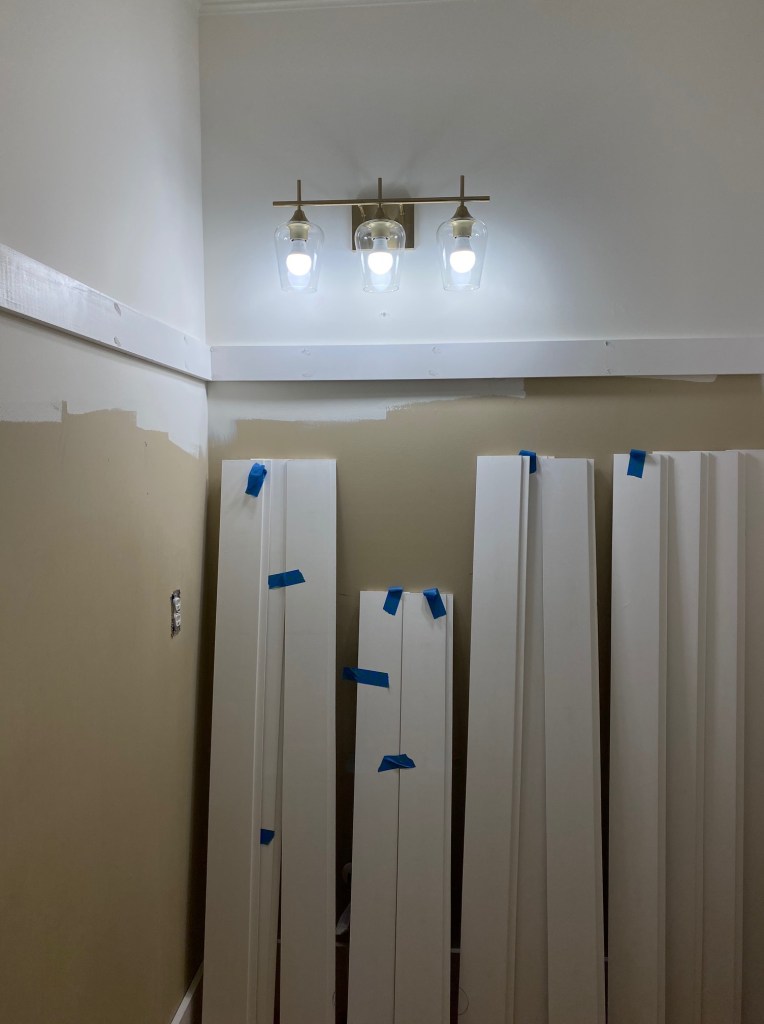
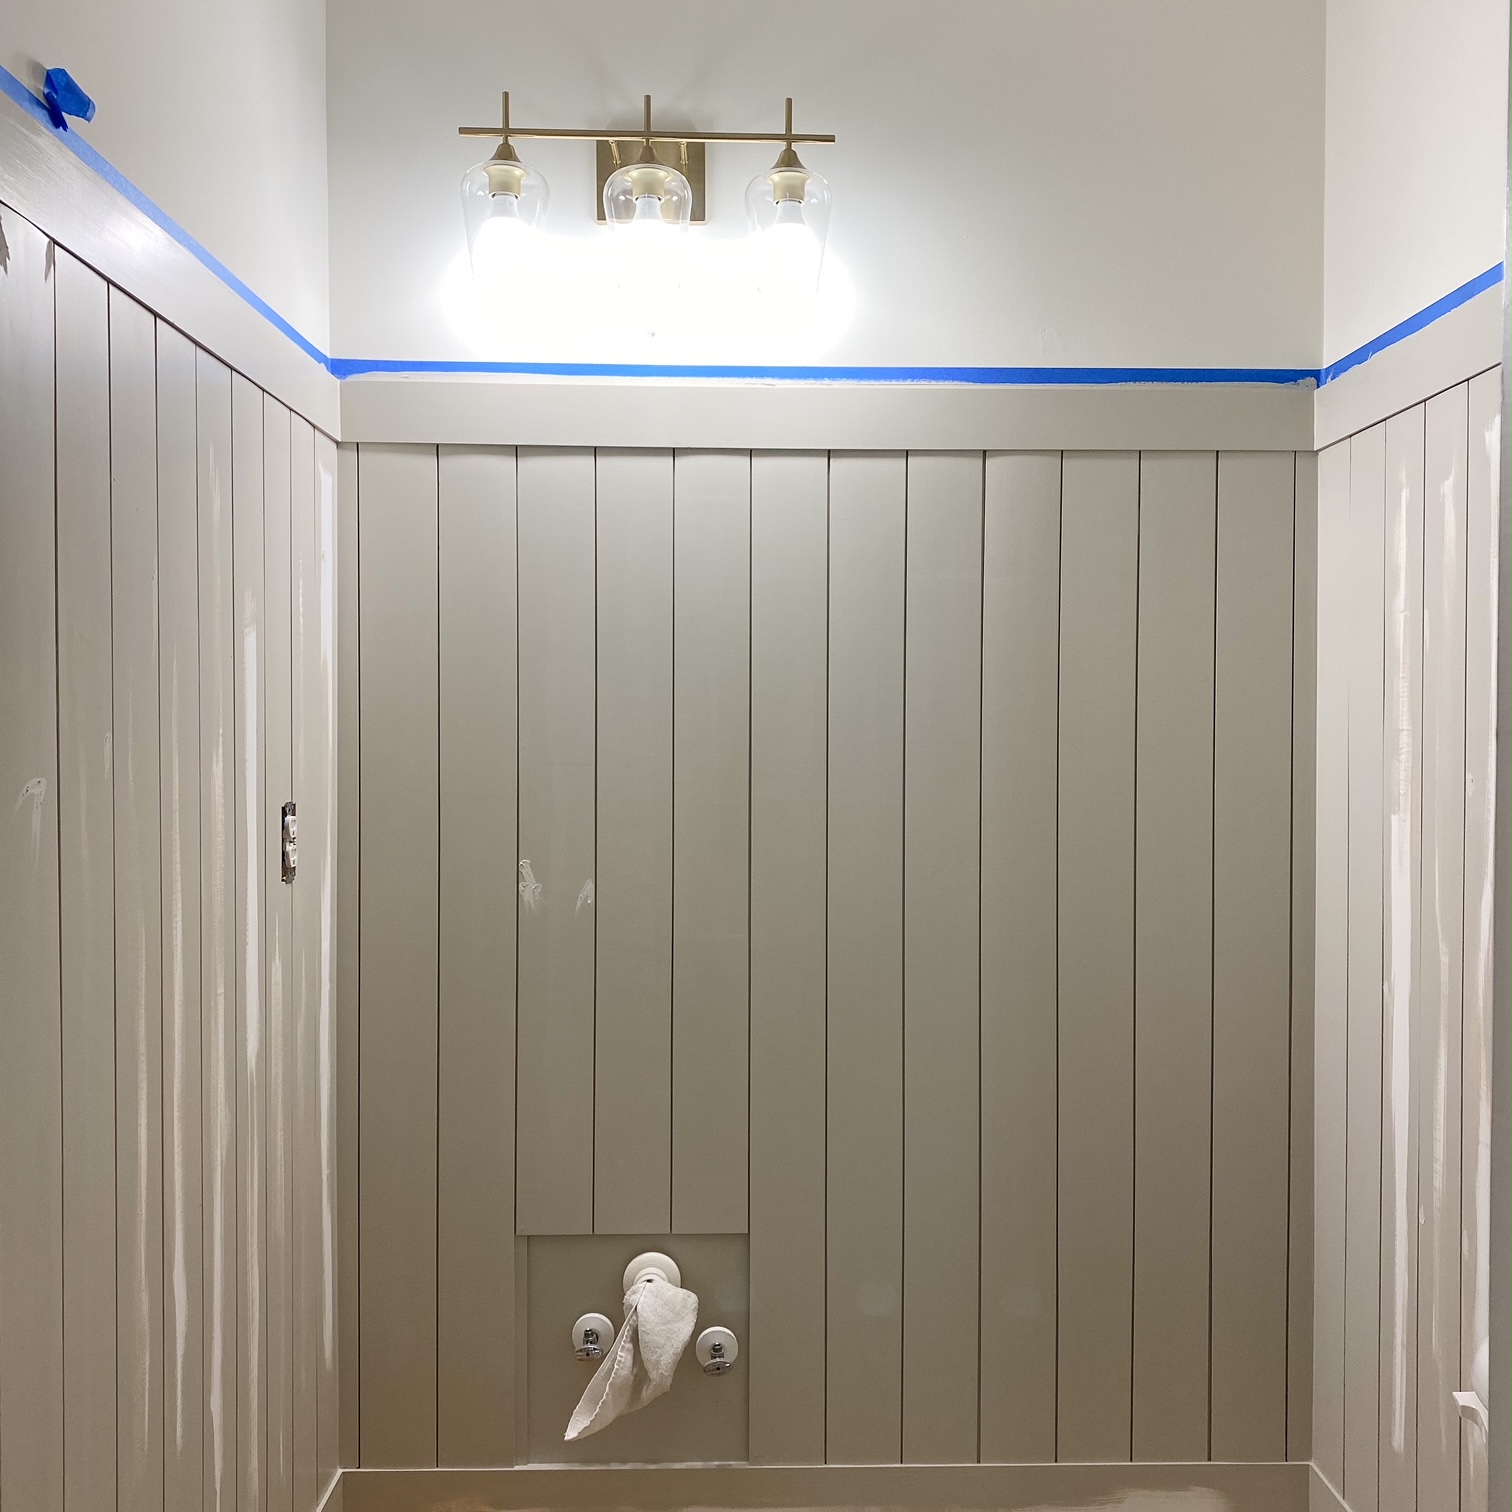
After the space was cleared out, I painted the top 1/4 section of the walls White Dove and the crown molding, and ceiling. Then we added in new baseboards, 1×8 primed pine as the MDF was limited for us.
After baseboards and paint, we added a 1×4 piece of trim that was our finishing cap and would act as the point where we measured for each vertical shiplap board.
At this point in the project, I had also switched out the light fixture but had not yet purchased new light bulbs that were a softer lume.
Once we both cut down our shiplap to size for our first wall, I painted the edges of each piece prior to nailing them to the wall. As I did this, my husband marked the studs on the walls.
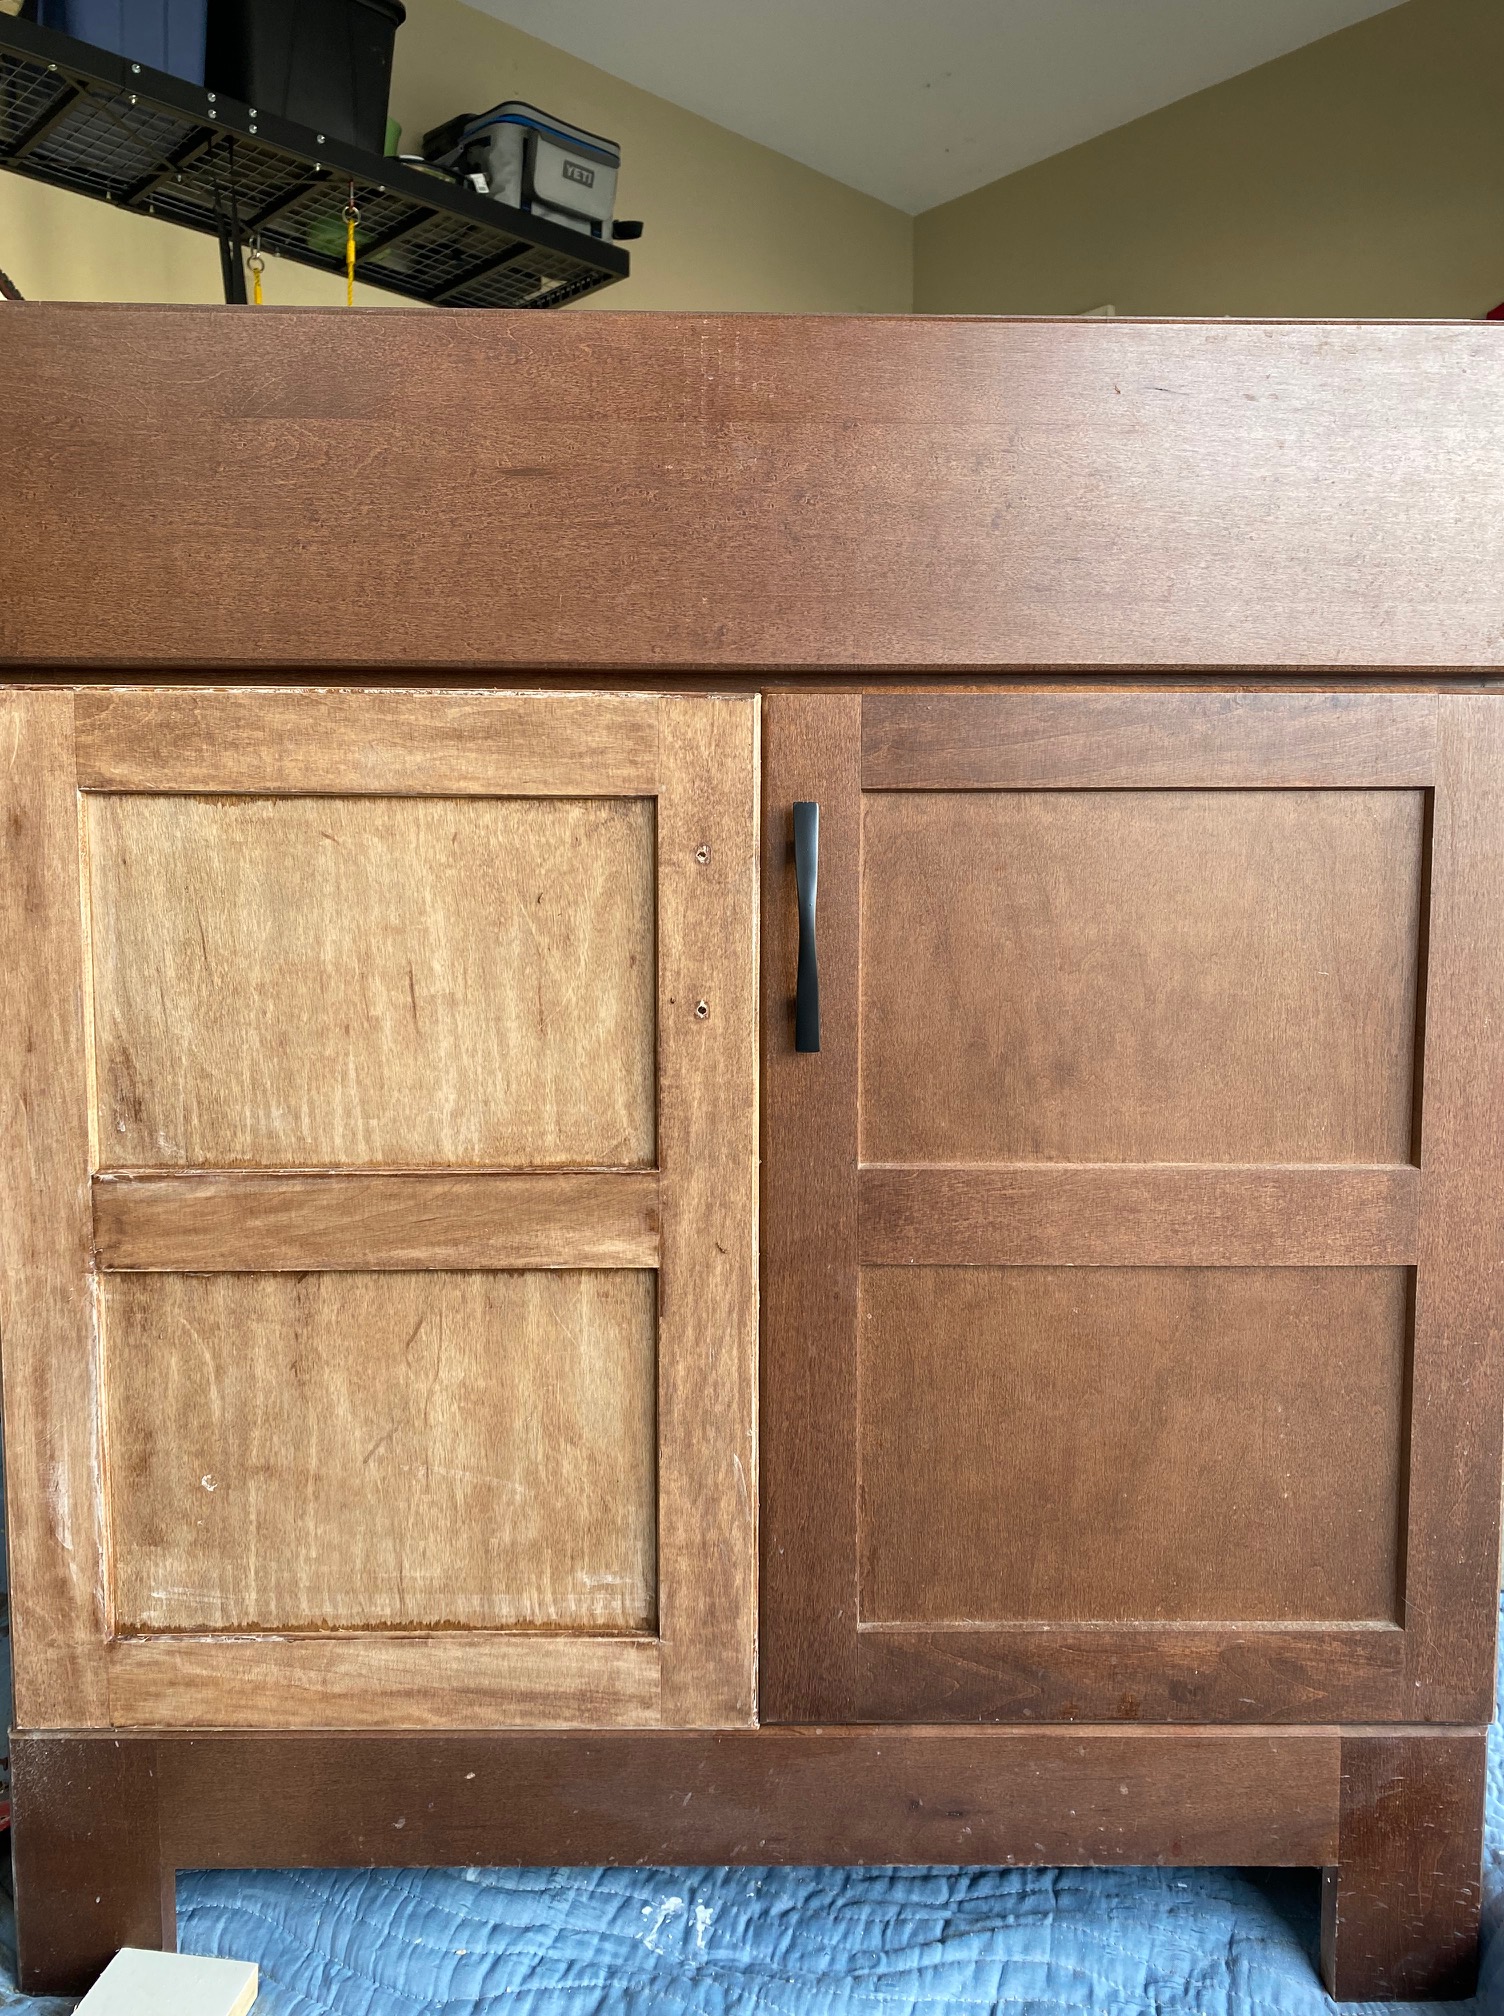
As paint was drying on the walls, I decided to update the existing vanity and strip the brown stain. I saw this inspirational photo which solidified my decision. Our granite was very similar in coloring.
I first tried a couple rounds of oven cleaner as stripper but I didn’t love the results. You can see the beginning process in the left photo. Next, I went the route of Citri Strip and it did much better. I also coated the doors with Citri Strip and wrapped them in plastic wrap to let them sit overnight before scraping off the product and stain. The result revealed a beautiful color that was very similar to what I was hoping for.
With a little grit, I cleaned up the corners to get it to match using steel wool and 220 grit sandpaper.
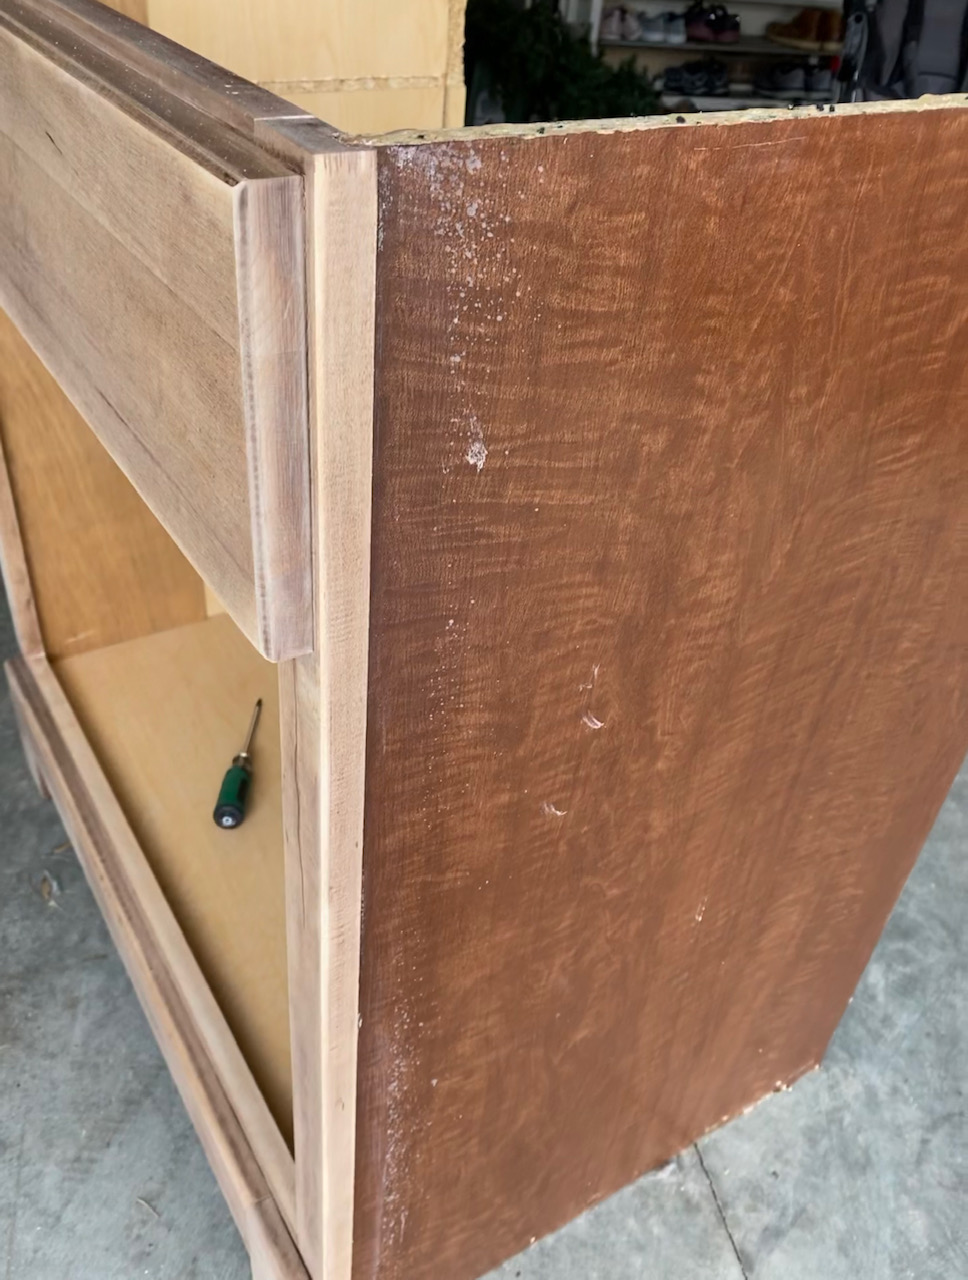
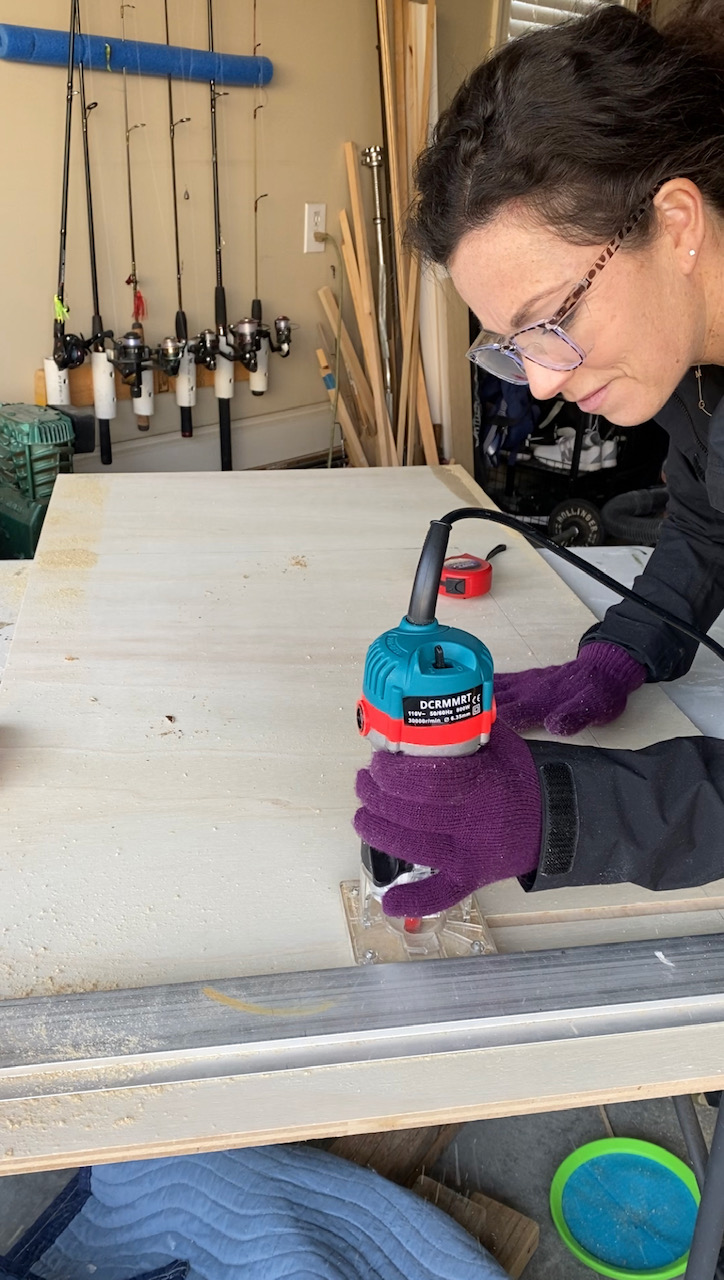
Where this vanity got tricky was the fact that I had to update the side panels. They were not made of real wood but had a veneer finish; therefore, stipping them of stain wasn’t an option. I had to replace the side panels with new 1/2 inch sheets of plywood. We were out of scrap wood that met the size requirements so I purchased 2×4 sheets from Home Depot and cut those down to size. Without using a table saw, I used a guide, clamps and my skill saw to trim it to size. I feel much more comfortable with this tool vs. a table saw.
This also allowed me to try out my new router tool to create a ledge for the cabinet shelf to rest in, just as it did on the original side panels. This was such a fun tool to use. I look forward to future projects when we can try out different bits that it came with.
After the new side panels were cut to size and the ledge routed, I had the task of matching the stain to the stripped down vanity color. I did this with a combination of Special Walnut, watered down white paint as a white wash, and Dark Walnut. I ended up doing 2 more additional coats of dark walnut to darken it up more and found the perfect match.
After stain, the side panel was attached with wood glue and 1 inch brad nails. I then finished it off with 1 coats of clear Matte Polycrylic. This is my favorite poly and is easy to work with. Tip: Between coats, you have to use 220 grit sandpaper to get the smoothest finish.
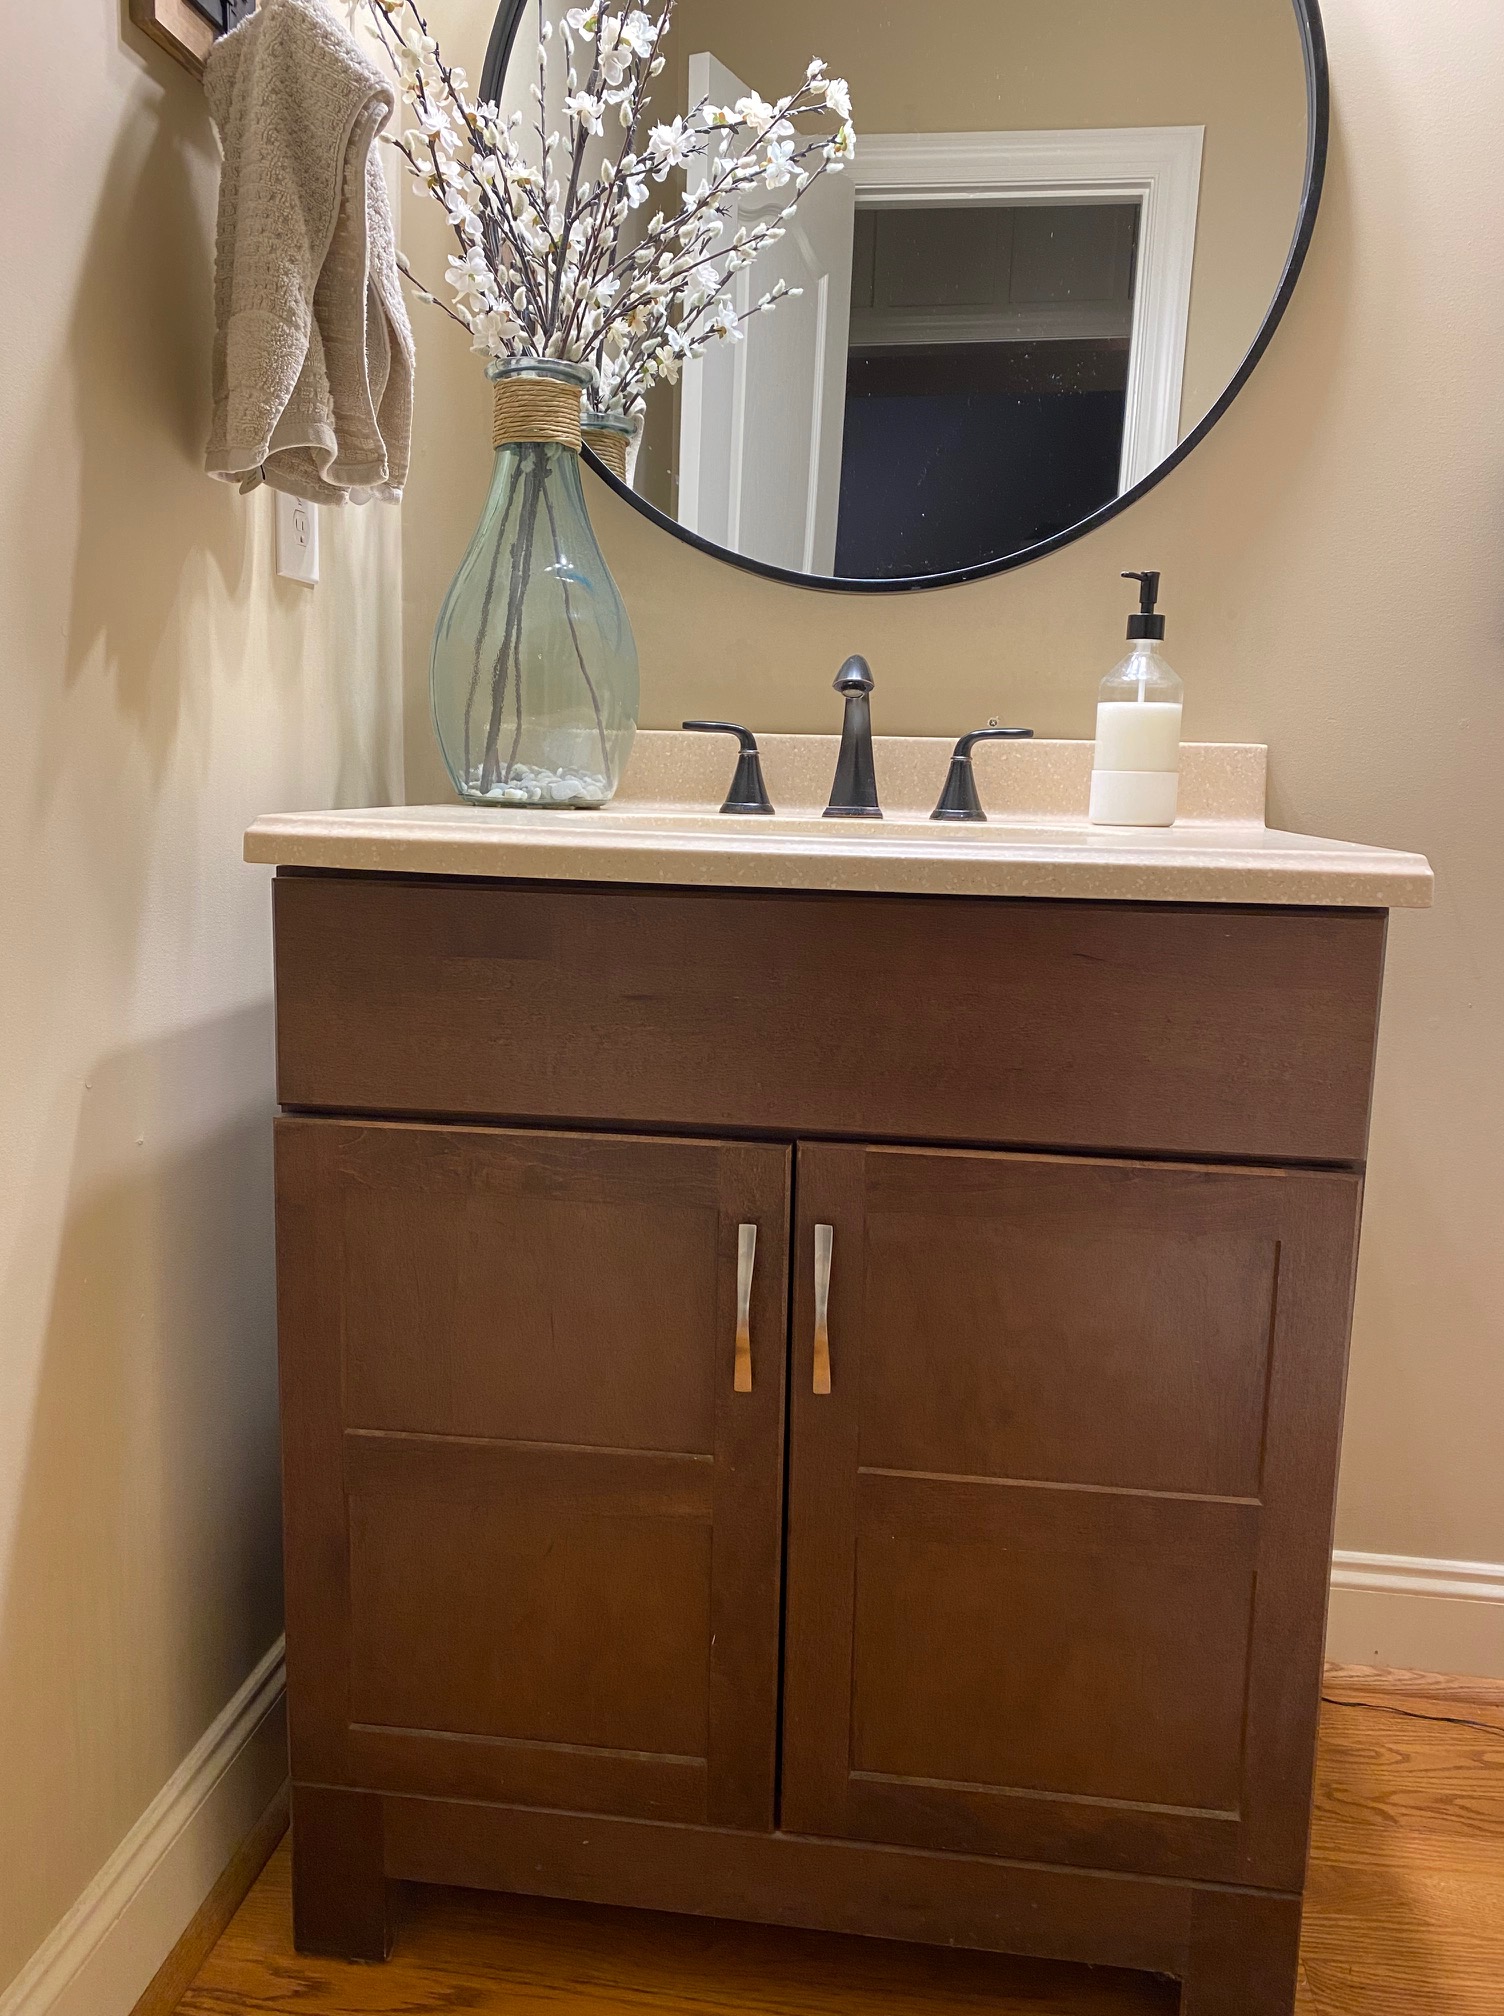
Check out the progression of adding the vanity back into the space, the counters, doors, faucet and new handle pulls.
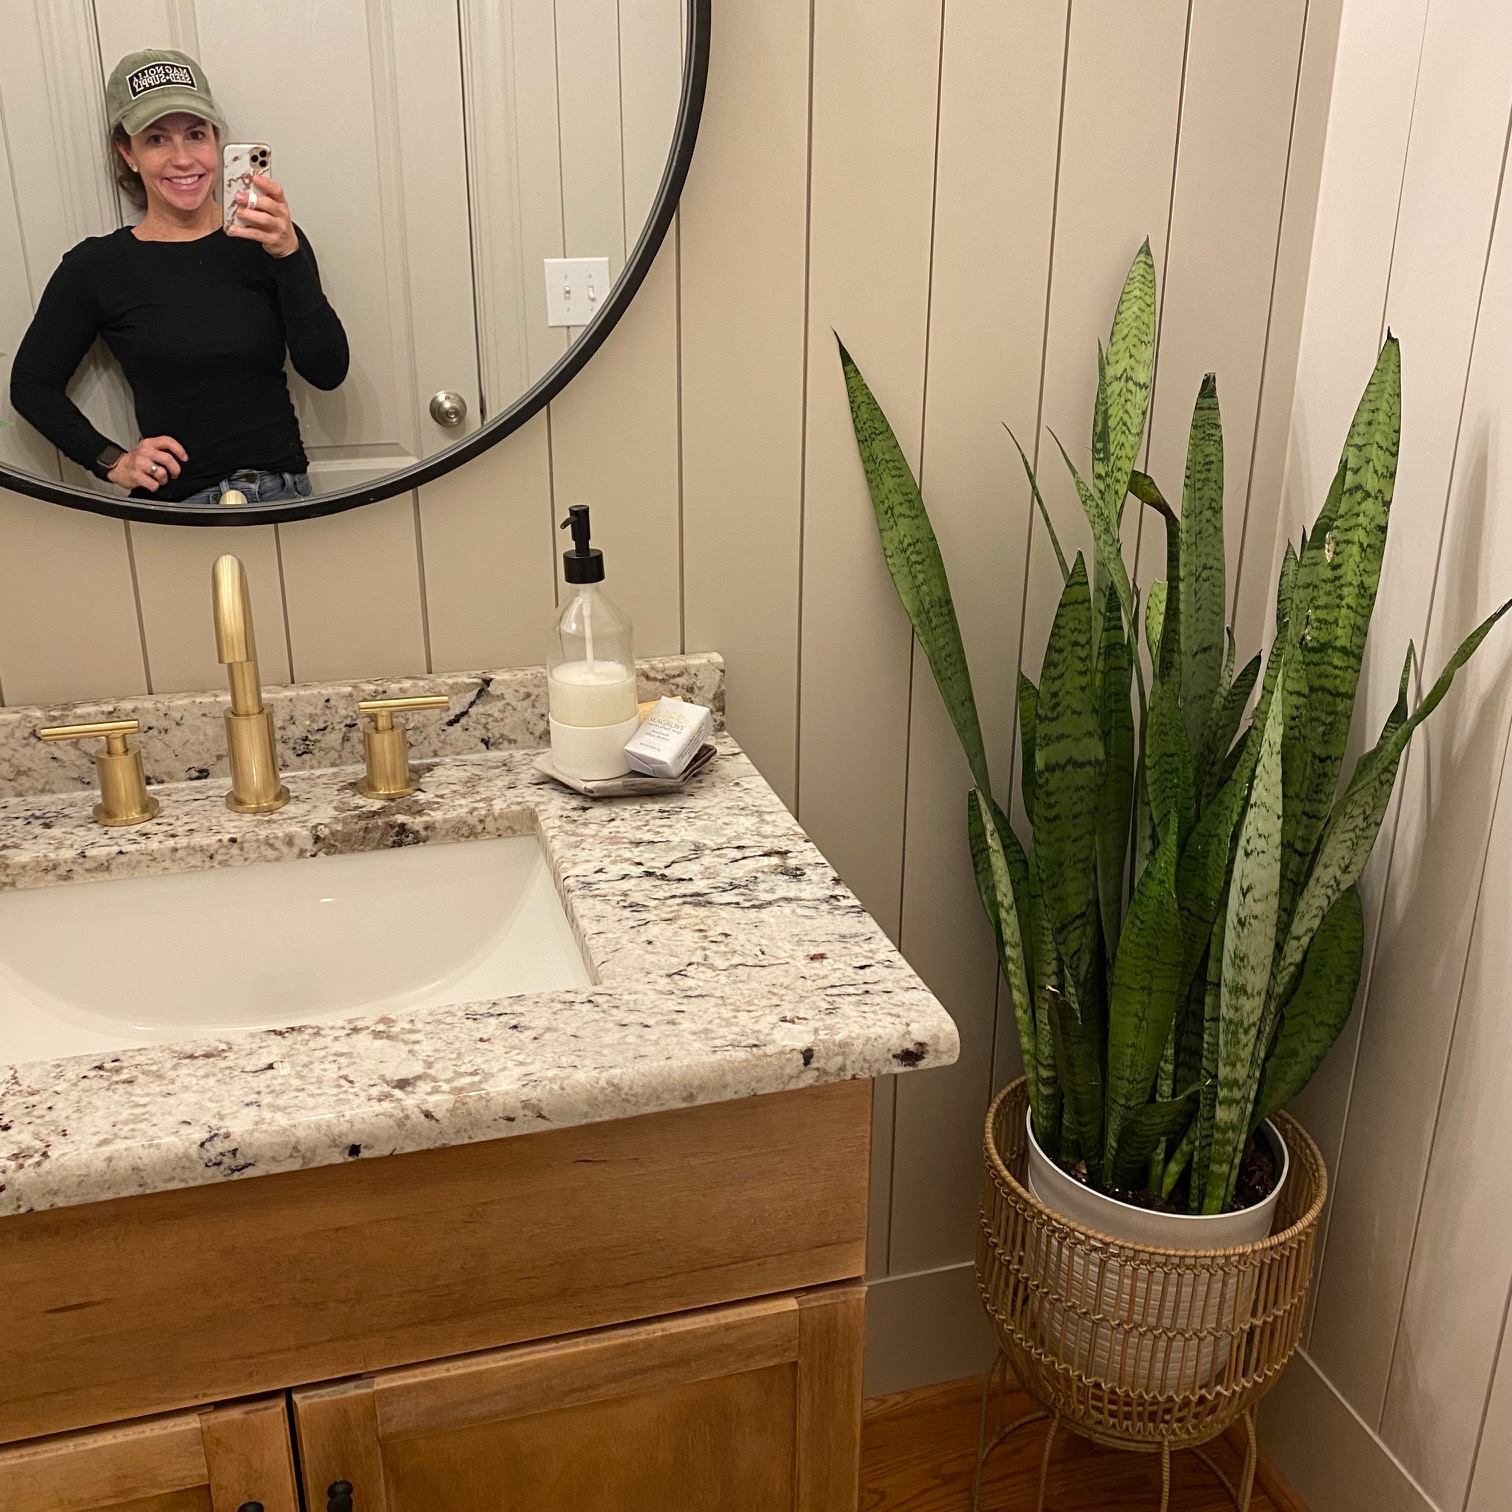
Adding in the finishing touches was one of my favorite parts. To fill the dead corner space, I found this giant snake plant at Home Depot for $22! The plant stand was an awesome find at Marshalls.
My favorite piece is the room is this watercolor lily. It was a gift to my grandparents by one of their church members. They had is framed by a local business who made a special pocket on the backside to hold the card that was handwritten and included with the art. The special note is a reminder of the impact they had on so many lives and that motivates me to live life to the fullest.
Before we look at the completed space in its entirety, let’s remember where we started again:
What do you think about the Powder Room transformation? Would you believe it was completed for less than $600? Most of that cost went to lumbar because we went with primed pine vs primed MDF.
I hope this inspires you to make the most of your space and transform it with a little paint and a little elbow grease. The before and after can be exactly like your mood board.
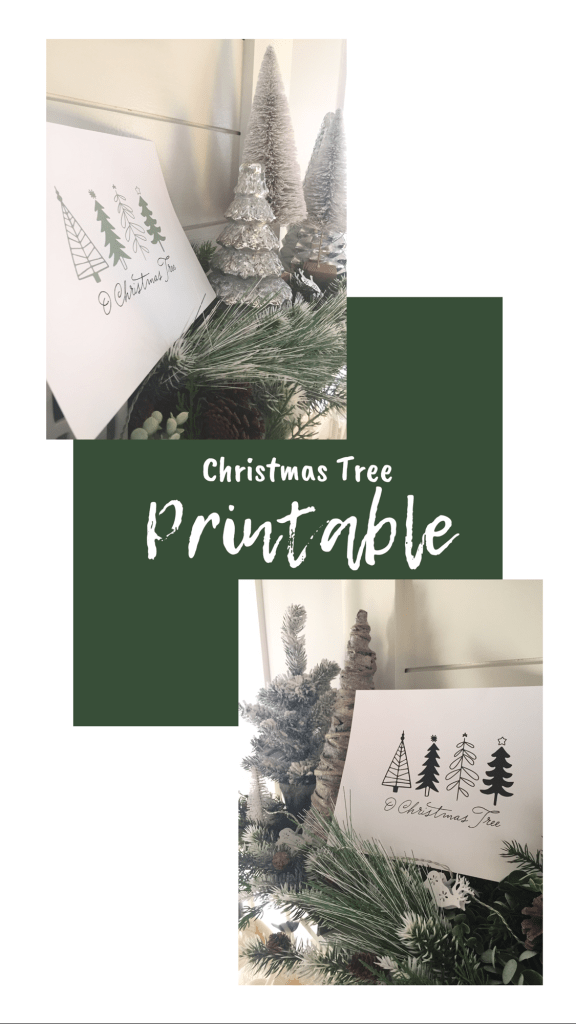
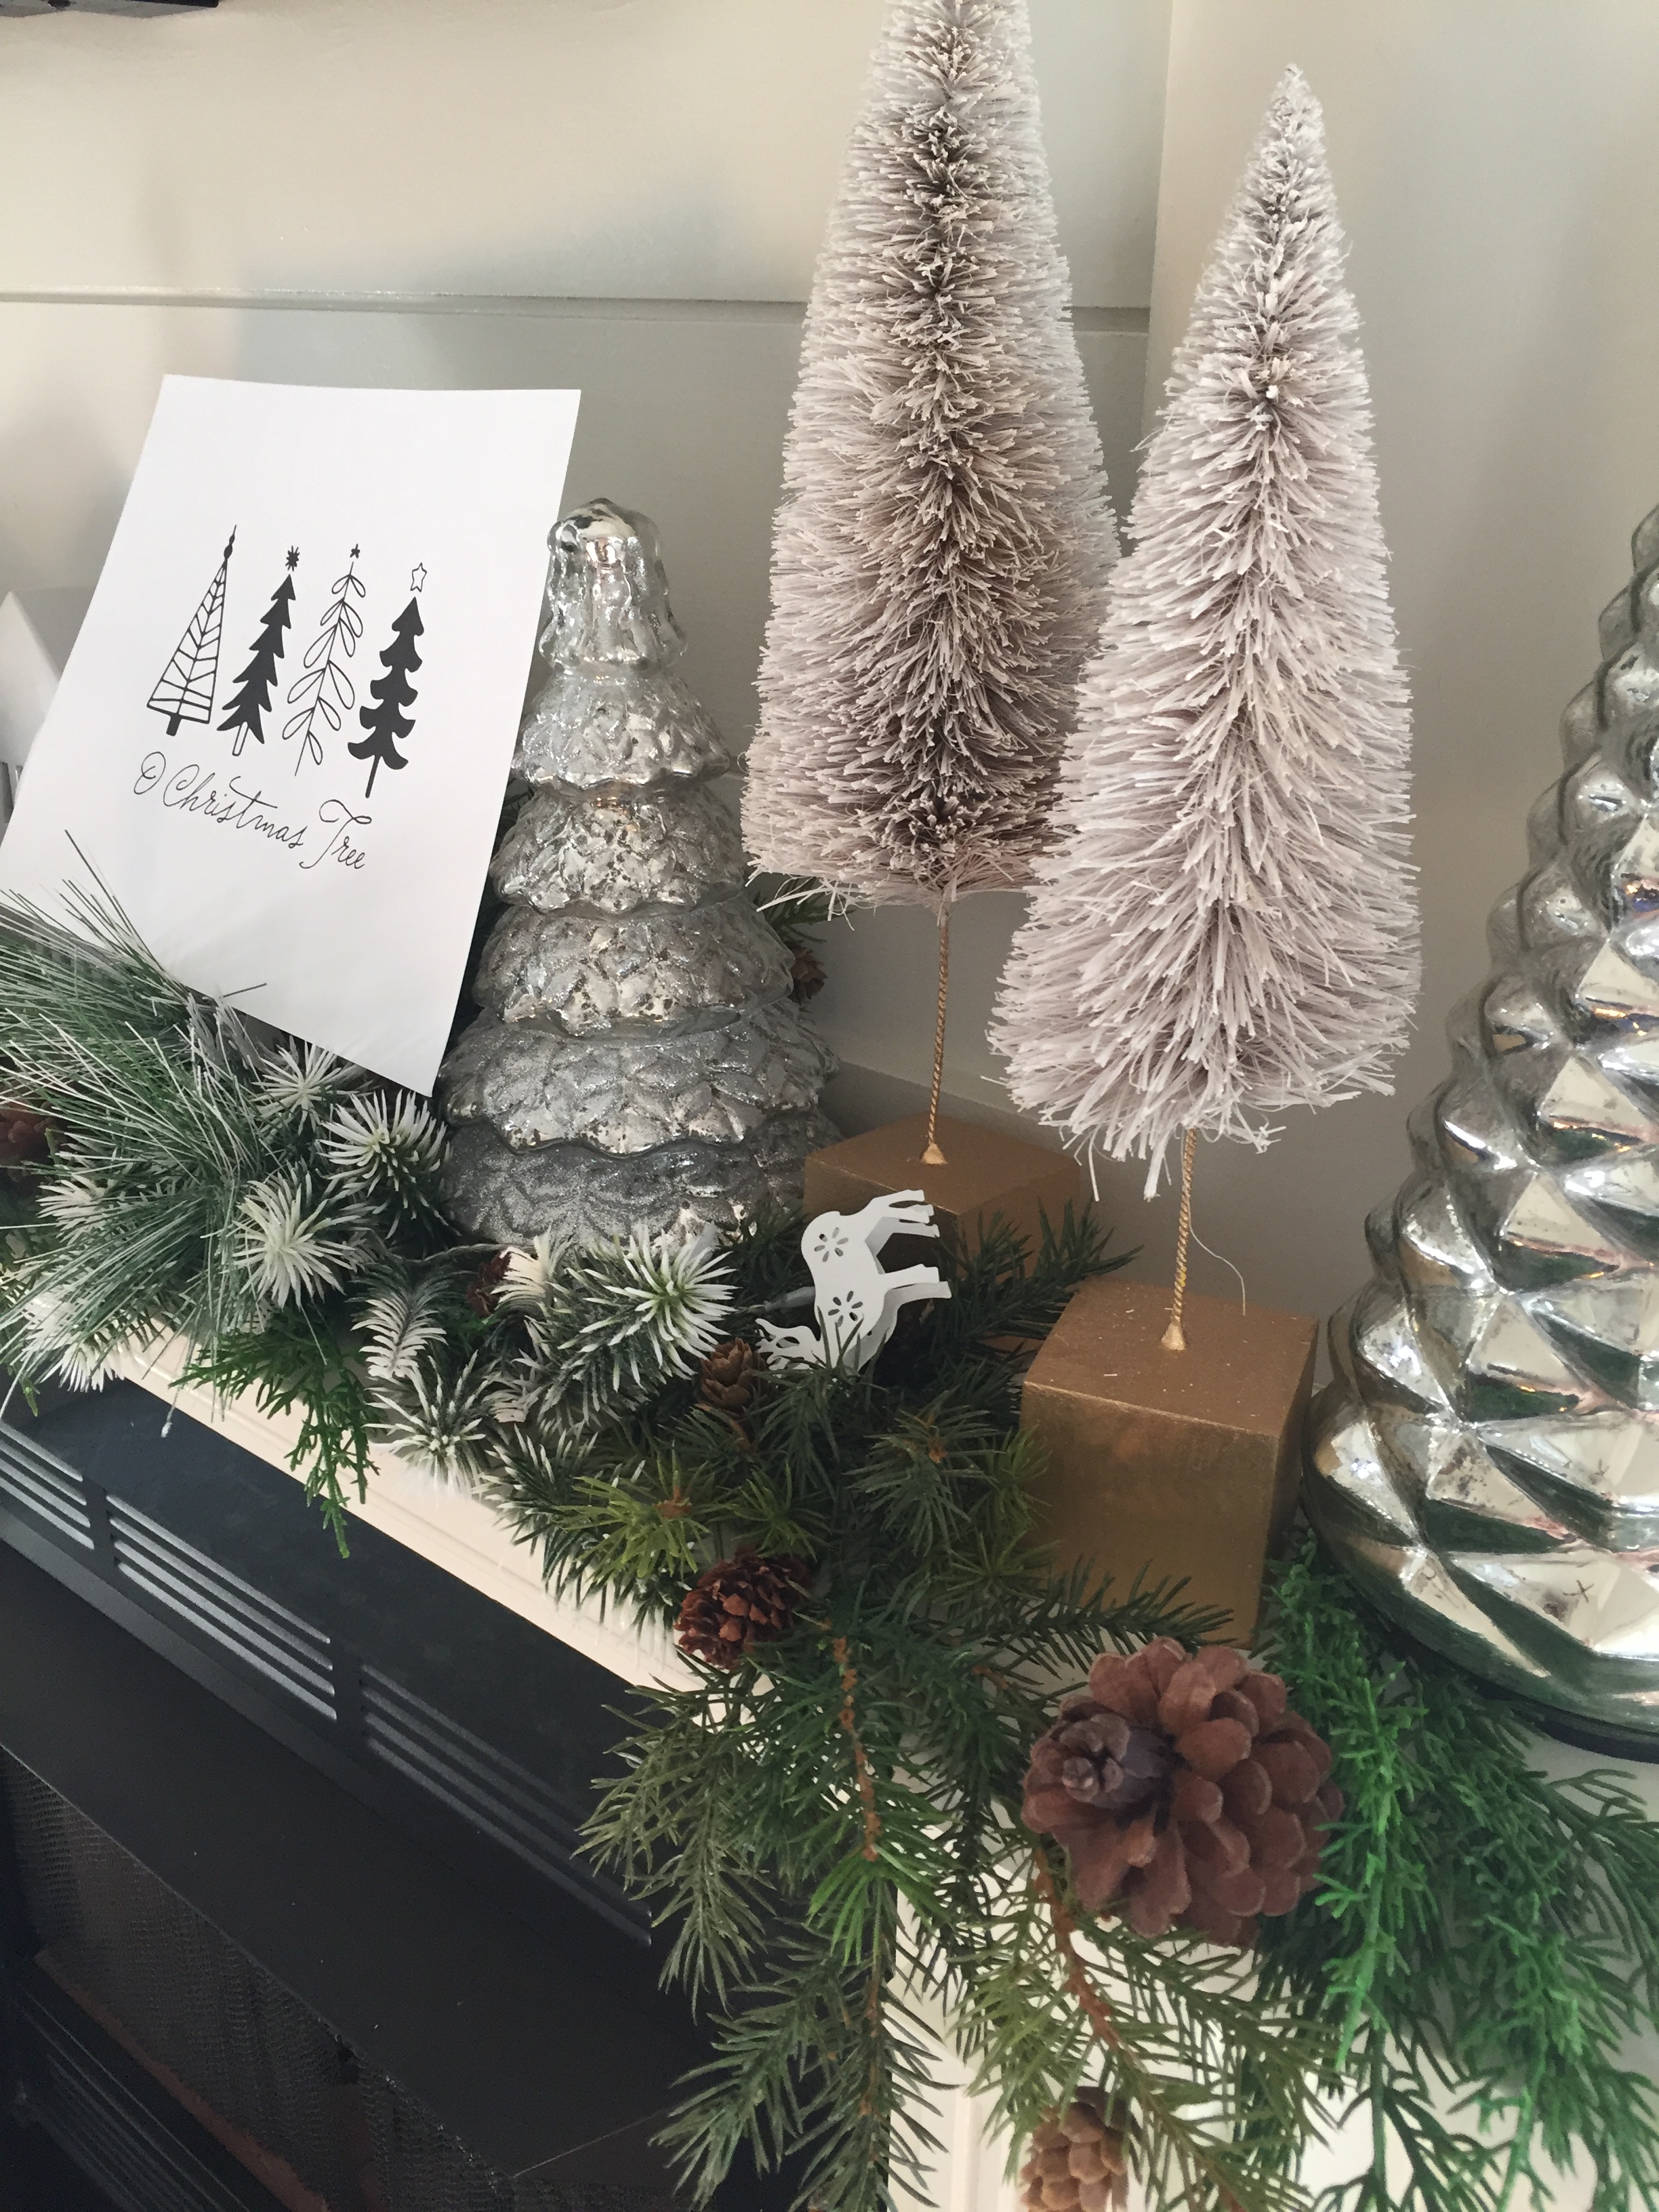
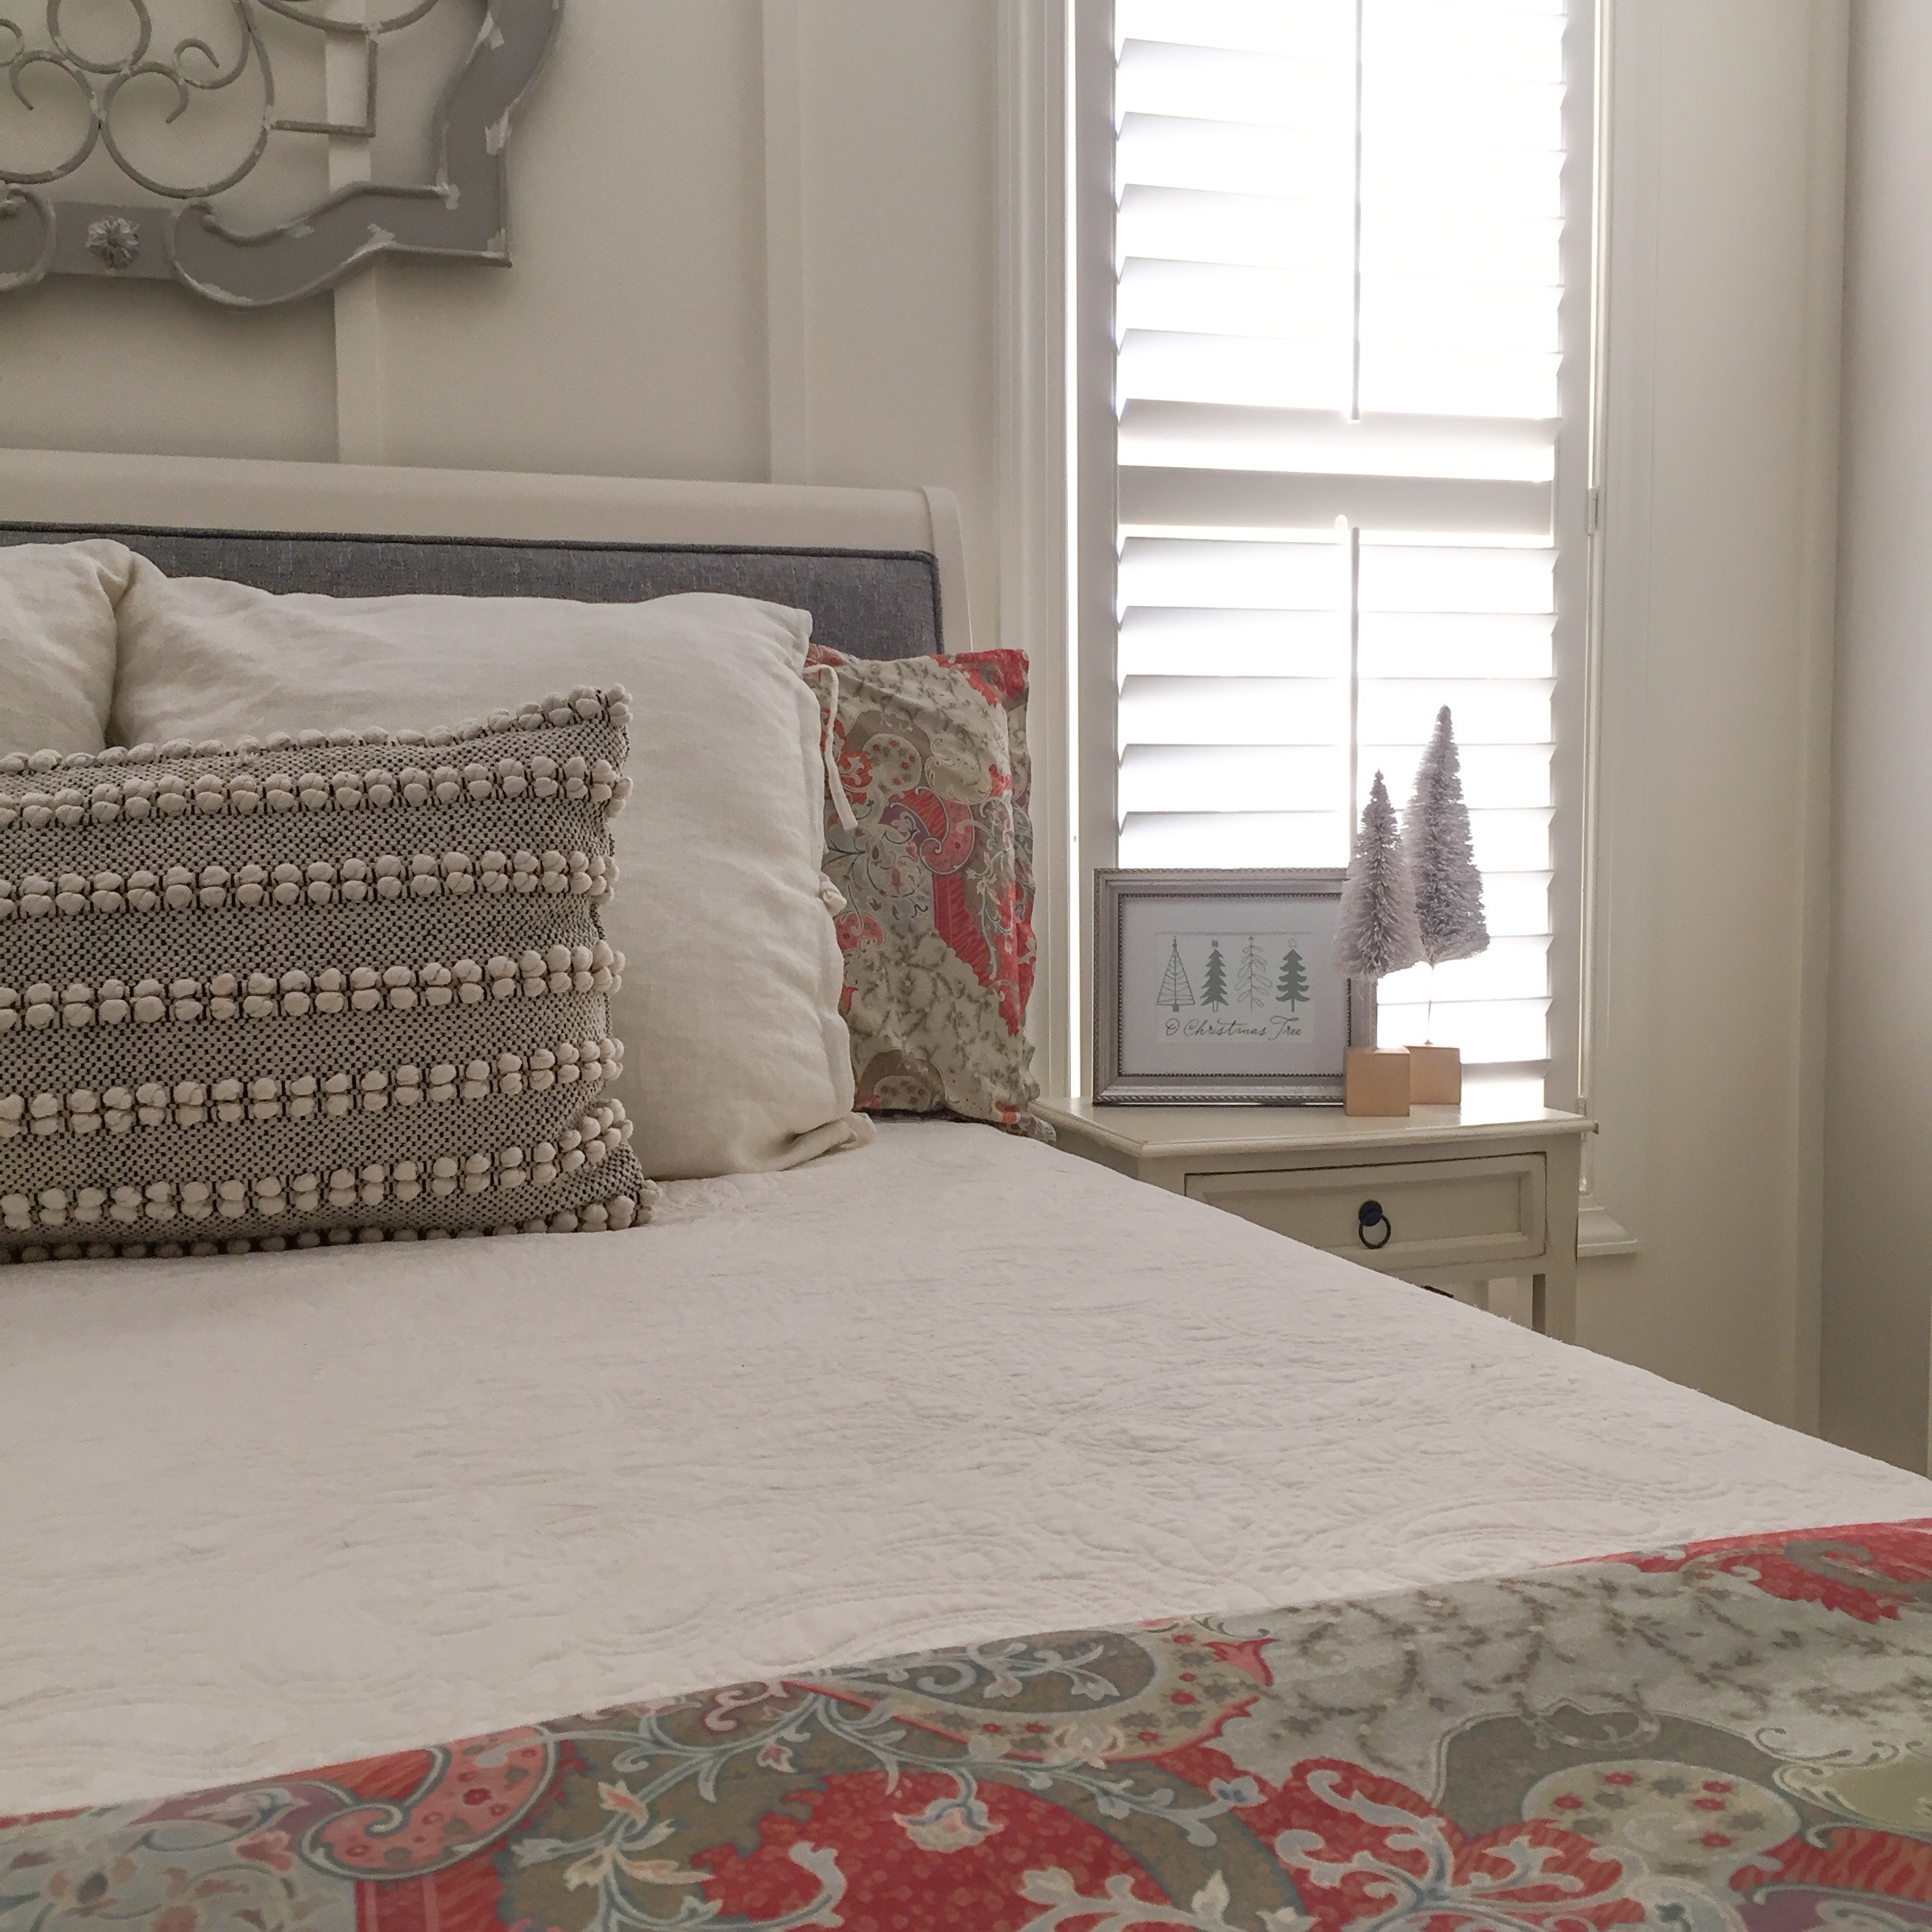
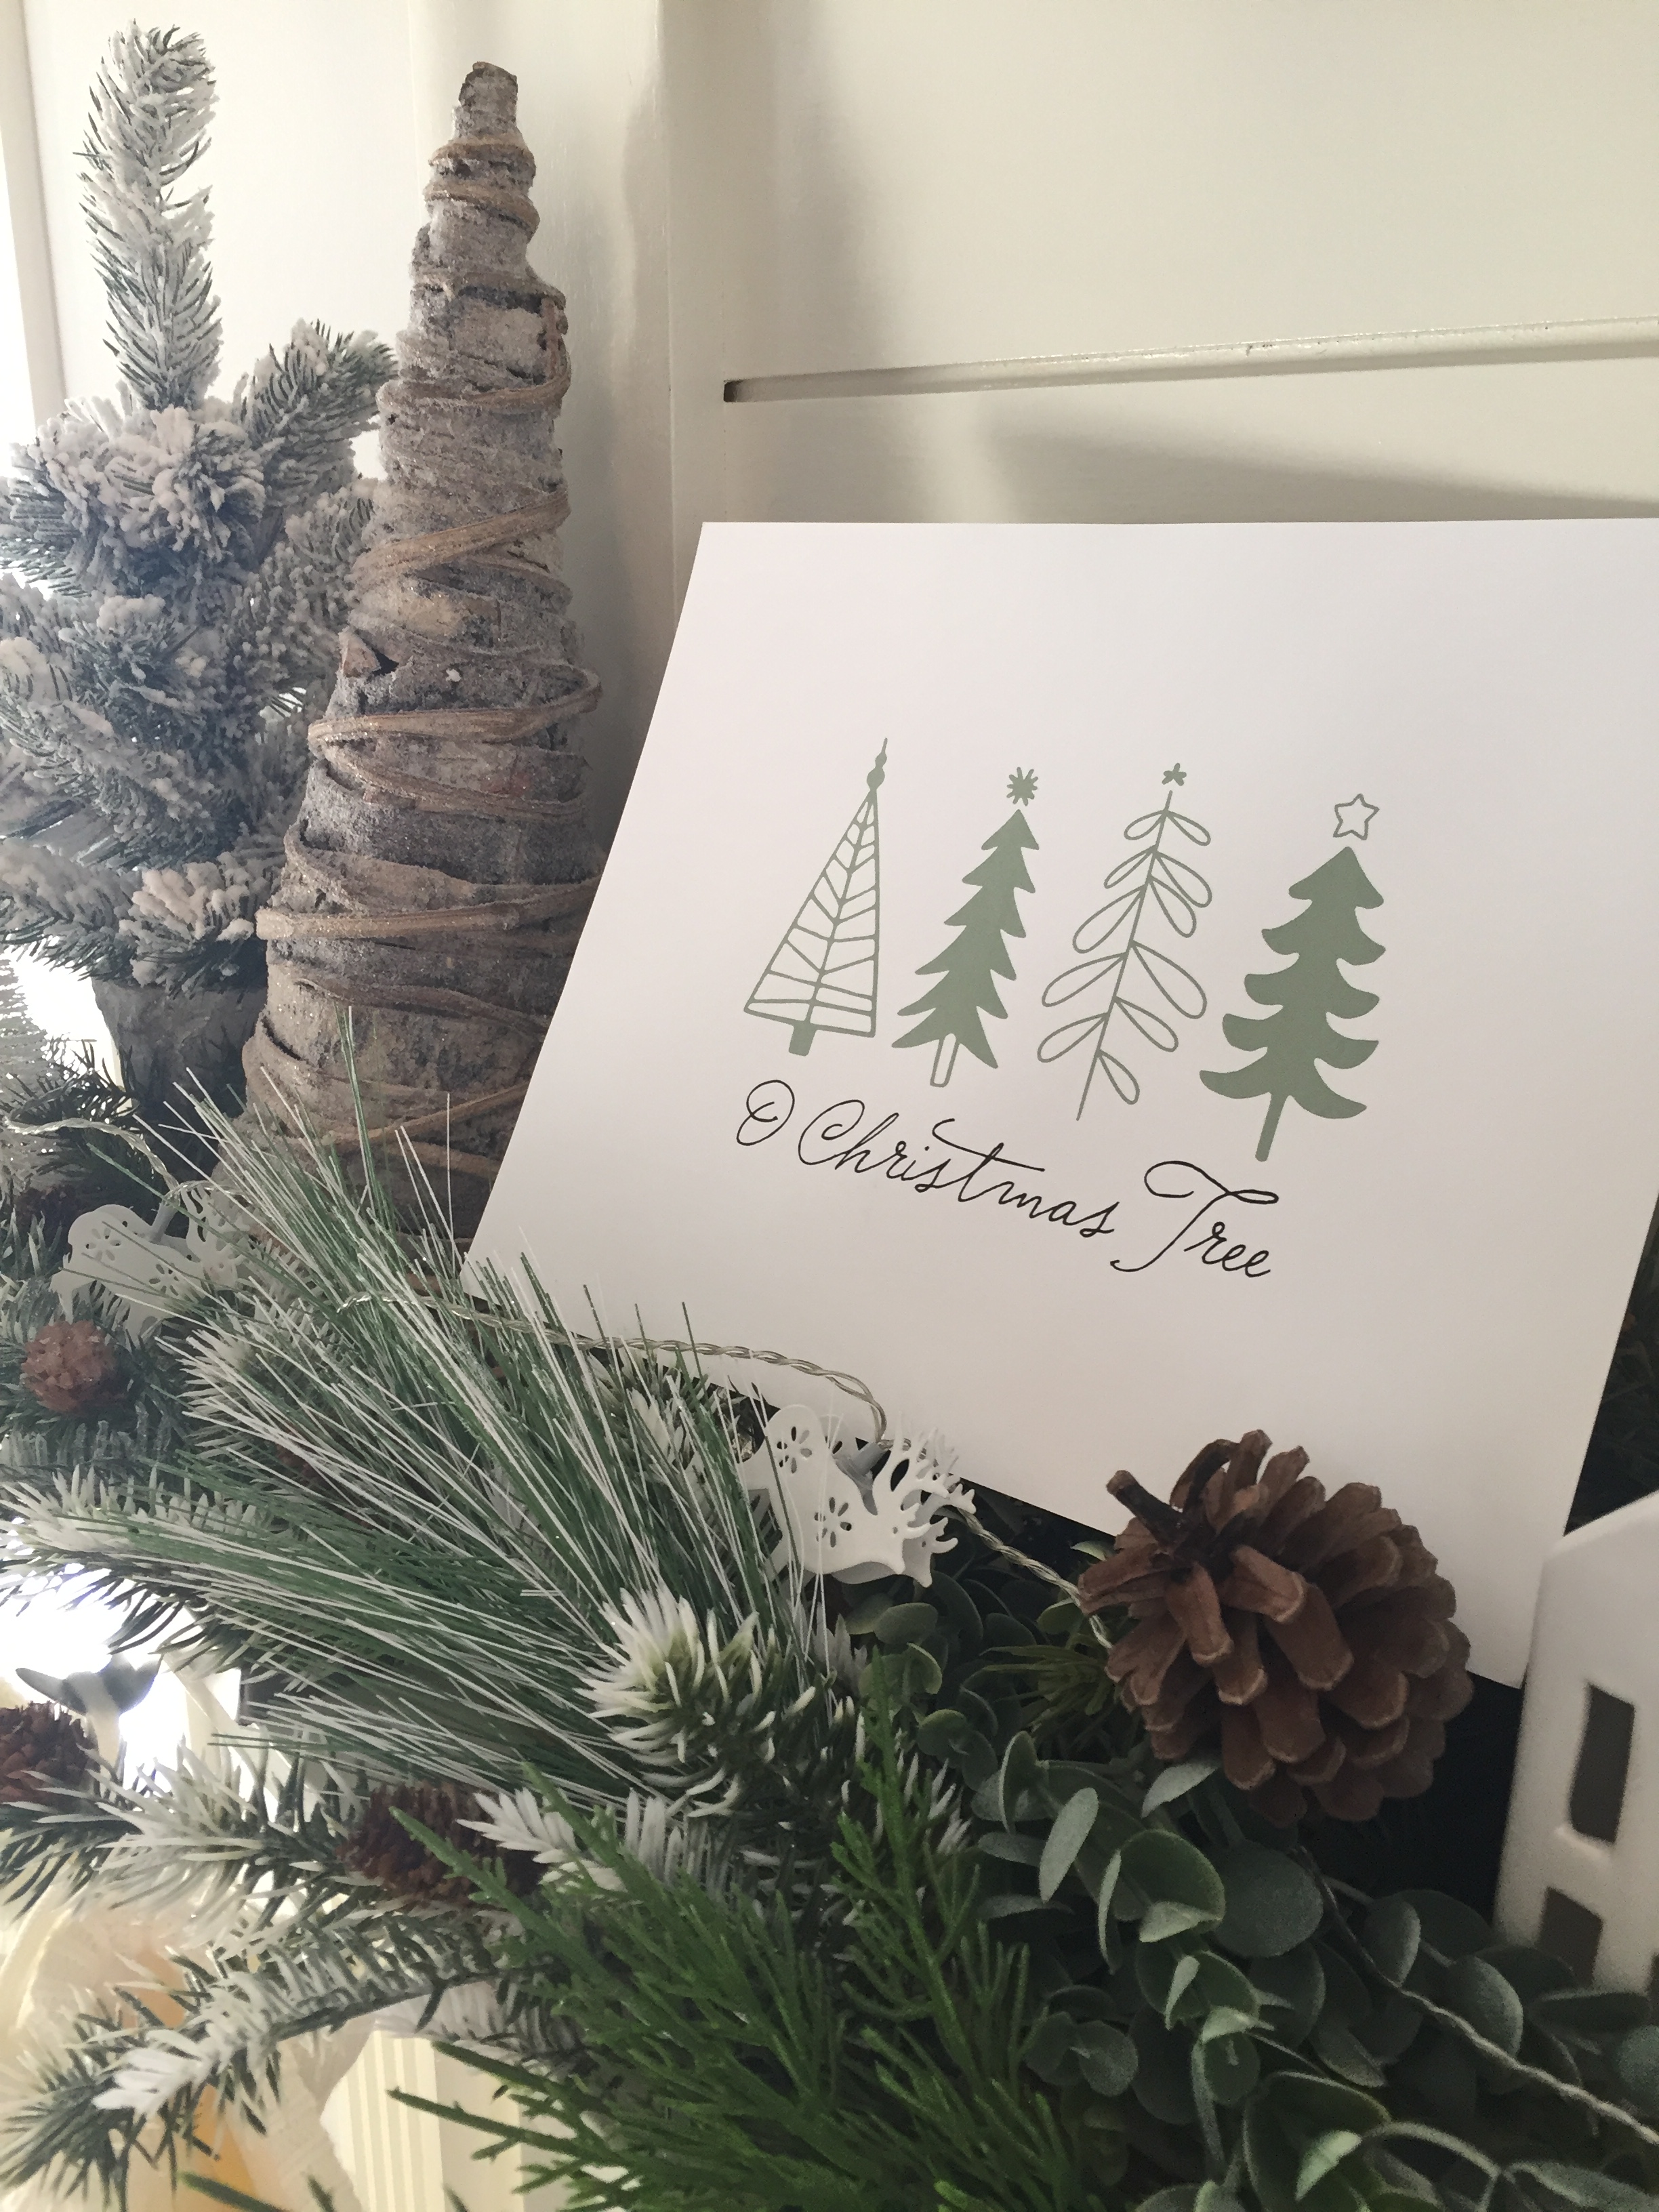
The Grinch made me do it. Who knew our traditional Friday family movie night would result in my favorite Christmas decor addition in our home? Contrary to the Grinch’s view of Christmas, the movie put me in the Christmas spirit early which I’m not complaining about. Whoville is so whimsical and unique which inspired me to doodle a few Christmas trees.
A few doodles later, I then turned them into a printable with a imple Christmas saying that I wanted to share with others. If you like to add simple holiday decor to your home, you can download the printables below.
These are made to fit an 8×10 frame and/or a 5×7 matte for an 8×10 frame if you wish to add a layered look to the frame.
I’d love to see how you style your printable. Be sure to comment on this post how you plan to use it and also tag @4havenssake on Instagram and Facebook!